Replacing the coolant on a Lada Granta VAZ 2190 car
To replace the coolant on a Lada Granta VAZ 2190 car you will need: a 13 mm spanner, a screwdriver, coolant, a clean wiping cloth. According to the manufacturer's recommendation, the coolant should be replaced for the first time after 75 thousand kilometers or 5 years of operation (whichever comes first).
WARNINGS Use ethylene glycol based coolants (antifreeze) that are free of silicates, amines, nitrates and borates and manufactured using long-life hybrid organic acid technology. Check with the dealer who sold the Lada Granta VAZ 2190 car about the brand of liquid poured into your car. Replace coolant only when the engine is cold. Coolant is toxic, so be careful when handling it. When starting the engine, the expansion tank cap must be closed. Close the expansion tank cap tightly. The cooling system is under pressure when the engine is running, so if the expansion tank plug is loosely closed, coolant may leak from under it.
1. Place the Lada Granta VAZ 2190 car on a flat horizontal platform. If the site is sloped, position the vehicle so that the front is higher than the rear. 2. Remove the engine protection from the car (see “Removing and installing the engine mudguard (protection) on a Lada Granta car”).
3. Remove the expansion tank cap.
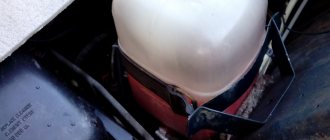
4. Place a container under the engine and remove the drain plug on the cylinder block. After draining the coolant, wipe any traces of it from the cylinder block.
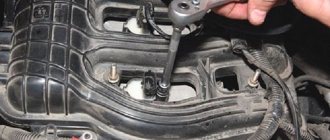
NOTE In order to gain access to the drain plug on the cylinder block of the VAZ 11183, VAZ 21116 and VAZ 11186 engines, remove the ignition coil along with the bracket (see “Removing and installing ignition coils”).
5. Place a container under the radiator, unscrew the drain plug on the radiator and wait until the coolant has completely drained from the system.
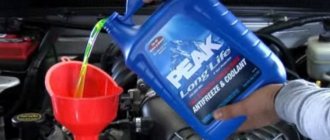
WARNING Antifreeze is deadly poisonous to all living things. In order not to pollute the environment, drain it from the radiator and engine through a funnel (for example, made from a plastic bottle).
NOTE The radiator drain plug is sealed with a rubber ring. Replace a heavily compressed, hardened or torn rubber ring.
6. Screw the plugs into the cylinder block and radiator. 7. Fill the engine cooling system by pouring coolant into the expansion tank until its level is 25-30 mm below the “MAX” mark on the wall of the expansion tank. Close the expansion tank cap. 8. Connect the wire to the negative terminal of the battery. 9. Start the Lada Granta engine and let it warm up to operating temperature (before turning on the radiator cooling fan). After this, turn off the engine and, if necessary, add coolant to the “MAX” mark on the wall of the expansion tank.
NOTE When the engine is running, watch the coolant overheat indicator light in the instrument cluster. If the light comes on but the radiator fan does not turn on, turn on the heater and check what air is passing through it. If the heater supplies heated air, the engine cooling fan is most likely faulty, and if it supplies cold air, it means that an air lock has formed in the engine cooling system. To remove it, turn off the engine of your Lada Granta car, let it cool and unscrew the expansion tank cap. Start the engine, let it run for 3-5 minutes and close the expansion tank cap.
USEFUL TIPS For better filling of the system without air locks, periodically squeeze the radiator hoses by hand. After a few days of using the Lada Granta after replacing the coolant, check its level. If necessary, top up the coolant level. If after a very short time the color of the fresh coolant turns brown, it means that you have poured a fake into the engine cooling system, to which you added corrosion inhibitors. In addition, one of the signs of counterfeit coolant is sudden complete discoloration of the liquid. This “antifreeze” needs to be replaced quickly.
useful tips for motorists
2279-4-9a-02d
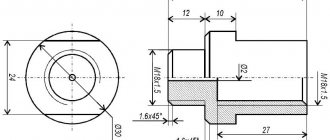
We tighten the drain plugs of the radiator and cylinder block. The connection between the plug and the cylinder block uses a conical thread that does not require additional sealing. Tighten the drain plug of the cylinder block to a torque of 25–30 Nm. Pour liquid into the engine cooling system through the expansion tank until it is full. Let's start the engine. With the engine running, vigorously compress all the hoses of the cooling system several times in turn - this will help the fluid fill the system and displace air from it. As the coolant level in the expansion tank drops, bring it to normal and screw on the tank cap. When the engine warms up, the outlet (lower) radiator hose should be cold for some time, and then quickly heat up, which will indicate the beginning of fluid circulation in a large circle. After waiting for the cooling system fan to turn on, stop the engine. After the engine has cooled, check the coolant level again and, if necessary, replenish the system.
Antifreeze - how to change
Changing antifreeze begins with draining the old one. This is not always easy, for example, look on the Internet for a video of the process on a Scania truck, where truckers are trying to fix problems on the spot.
On a cold engine, remove the tank or radiator cap, insert an unnecessary container, and unscrew the drain plug. The liquid should be completely drained and the system should be cleaned several times (fill with water, turn on the engine for 10 minutes). To obtain the desired effect, it is better to add 20% antifreeze (10% concentrate) or a special substance to the water.
The car is turned off and the cooled mixture is removed. The last time is washed with water, do not turn off the car for 15 minutes, let it cool and drain again. To remove air, turn on the heating and the engine itself for about 10 minutes. Then add the mixture to the normal level, checking the amount after a few days.
Engine oil
You should check the engine oil level at least once a month. To check, you will need a lint-free cloth.
IMPORTANT: The oil is checked ONLY on a cold, idle engine. The machine must stand on a horizontal surface. Check the oil level before starting the engine.
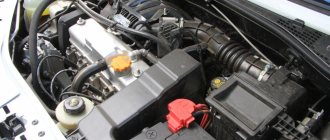
To check the engine oil level, you need to find the dipstick. It is located in front of the engine.
Remove the dipstick and wipe it with a cloth. Insert the clean dipstick back as far as it will go and remove it again. Look at the end of the dipstick. The oil level should be between the MAX and MIN marks on the dipstick. If the oil level is within the required limits, then everything is in order. Return the dipstick to its place until it stops and close the hood
If the oil level is at MIN or below, it must be topped up. It is dangerous to drive with this level of oil. This will lead to premature engine wear.
To add oil to the engine you need to open the oil filler cap. And add oil.
Oil must be added when the engine is cold. Do not open the cover when the engine is hot. You may get burned and fill the engine compartment with oil.
Oil must be added gradually, in small portions, to control its level in the engine. If the oil level was at a minimum, then about one liter of oil will be required. After you add oil, you will need to check its level again with the dipstick.
It is important not to exceed the maximum mark. This may cause damage to the catalytic converter. You need to add the same oil that is already in the engine. Take a photo or save the label from the canister so that you don’t have to remember which oil to buy every time.
Change the engine oil once a year or every 15,000 kilometers. Depends on which comes faster. Usually the oil is changed along with the annual maintenance.
Come to us for an oil change. Our technicians will flush the engine, change the oil and carry out maintenance in one visit.
How to remove air from the cooling system of a Lada Granta
There are several effective ways to bleed air from the system.
Purge using a pump
Method No. 1
- We move the stove heater lever to the “Maximum” position (car interior). Be sure to follow basic safety measures and place wheel chocks under the rear wheels.
- Unscrew the valve cover, having first removed the decorative trim.
- Using a screwdriver, loosen the clamp on the throttle body fitting and remove the rubber pipe..
- Unscrew the cap on the expansion tank
- Through a gauze bandage, blow air through your mouth in the direction of the expansion tank.
It is important not to overdo it, as you can start a new portion of air again
Method No. 2
- We warm up the car to 40 - 45°, turn off the engine.
- Unscrew the throttle clamp and remove the hose.
- If liquid leaks out of the hose, put it back on, otherwise wait until the air comes out.
- We assemble the structure in reverse order.
One time is not always enough to remove air. We repeat the procedure as necessary.
Method No. 3
- We drive the front wheels of the car onto a hill so that the highest point in the cooling system is the “plug”.
- We twist the cap on the expansion tank and the cap on the radiator.
- We start the engine, it runs at idle speed.
- We warm up the car to an operating temperature of 40 - 45°.
- As soon as the antifreeze level begins to decrease, we replenish the missing amount.
- We repeat the procedure until the maximum amount of plug comes out.
- Screw the lids on.
An air lock in the system can not only reduce the efficiency of the stove heater, but also negatively affect the operation of the engine as a whole. After the blockage is cleared, systematically inspect the equipment.
Reviews
| Prevention, replacement with new ones | ||
| Whistle from under the expansion tank cap | Inspection | Replacement |
| The motor takes a long time to reach operating temperature | Inspecting the antifreeze level | Adding fluid, replacing the thermostat with a new one |
| The temperature sensor systematically shows false data | Inspecting the electrical circuit, measuring the sensor resistance | Replacement with new one |
| No circulation in the main line | Inspection through the expansion tank with the engine running | Washing, removing air pockets |
| № | Positive |
| 1. | Vasily: I’ve been driving a car for a year and a half, no comments. I carry out technical inspections in a timely manner, fill up with high-quality fuel and oils, and have a moderate driving style. |
| 2. | Gennady: at 50,000 km the standard thermostat jammed, replaced it with a new one under warranty. There were no more breakdowns, the machine works like a watch. |
| 3. | Kirill: the rubber pipe burst once where it was fixed with a clamp, I think it was my mistake, I overtightened it. I'm happy with the build quality, no complaints. |
| 4. | Vladlen: I’ve heard negative reviews about Granta, saying that the system is often overstuffed. This happens, but extremely rarely, the defect is not widespread. |
| 5. | Ignat: in order for the machine to work properly and the parts to last longer, it is necessary to treat it with care, care for it, and maintain it. |
| 6. | Dmitry: Six months have passed since the purchase of the car, so far the work is perfect, no investments except for the purchase of consumables. |
| 7. | Valentin: I am satisfied with the build quality of domestic transport; breakdowns do occur, but they are insignificant and can be easily repaired. The engineers managed to combine good quality at an affordable price. |
| Negative | |
| 1. | Ivan: negative experience during operation of the car, already at 45,000 the thermostat jammed, then the bearing flew off. The model is still crude, there are many shortcomings, the manufacturer does not strive to quickly eliminate them. |
| 2. | Vladimir: the build quality is low, after two months of using the car, the rubber pipe cracked and antifreeze began to leak. |
| 3. | Vyacheslav: Lada Granta or Renault Logan - obviously the latter. The manufacturing quality of the French automobile industry is an order of magnitude higher than its domestic counterpart. |
Conclusion As practice shows, most calls to service stations are caused by a jammed thermostat on the Lada Grant. The reasons are different. The factor of manufacturing defects cannot be ruled out, but the fault also lies with the owner of the car.
Buy original spare parts, maintain your car in a timely manner - then the number of breakdowns will be reduced several times.
Cleaning the Cooling System
Experts recommend cleaning the system after each replacement. When you change antifreeze to antifreeze, or vice versa, switch from antifreeze to antifreeze, be sure to clean the system. What you may need for this:
- Plastic funnel and hose.
- A packet of regular citric acid.
- Distilled water (15 liters for Priora).
- A brush, sized to fit into the neck of a 5-liter bottle.
Please note that if the coolant is not cloudy, then you can only get by with distilled water. Otherwise, be sure to add citric acid
A good working fluid begins to lose color over time, that is, it becomes discolored, and a contaminated fluid always becomes cloudy.
Cleaning of the LADA Priora cooling system should be carried out after removing the air lock. Let water flow through the system through the open pipe. Using a brush, you can clean the expansion barrel separately. After this procedure, damage to the tank body is clearly visible. After cleaning the system is complete, you can add antifreeze.
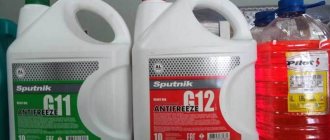
What color and how much antifreeze should I use?
One of the main questions of car owners is: how many liters of antifreeze should I fill? According to the official technical documentation for Russian-made Lada Priora cars, the required volume of antifreeze is 7.84 liters. For full operation of the power unit, you can fill 6 liters each; this option is suitable for the winter period. However, it is best not to deviate from the regulations and fill in the required amount of liquid so that no problems arise.
Each antifreeze is divided into classifications, and it can be distinguished even by color if there is no label, for example. So, in our country, red antifreeze is predominantly poured - the so-called carboxylate
Regardless of the type, it is important to know how many liters of antifreeze to fill and follow this rule
Windshield washer fluid
The simplest section of this article.
In summer you can fill with water, in winter you need to use non-freezing liquid.
Choose the anti-freeze temperature depending on your winter. If your temperature never drops below -15, then there is no point in using an anti-freeze agent at -30.
We just add this liquid. The reservoir is located under the hood and you can pour liquid there at any time. There are no restrictions on the volume - you can top it up to the neck.
How to replace antifreeze in Lada Granta
The factory recommends changing the coolant every 75,000 mileage, and my mileage is already approaching 100,000, so I decided to do this operation. I bought Sintec antifreeze (2 packs), water (2 packs), and flushing agent (Felix RUR 95).
Armed with a search, I started looking for any records and didn’t find a damn thing (((The problem with replacement was the following: unscrew the drain plug (it’s simply not realistic to get there from above). I tried to create a topic on this problem, but there were no sensible answers. In the end I gave up for everything and decided to ask the Bosch service how much this procedure will cost, I quote the verbatim dialogue: - Hello, how much does it cost to replace the coolant in a Grant 8kl with air conditioning? - Hello. The work to replace the coolant on a Lada Granta 8 valve - 552 RUR Telephone to make an appointment... We will be glad to see you at Bosch First - does this include flushing? - the cost of flushing work is 10,000 RUB - i.e. replacement is 552 RUB, and flushing is 10,000 RUB? - absolutely correct...
After this dialogue, I realized that I’m not going there anymore). I went to the “garage” service, all the work with washing cost 600 rubles (400+200). To drain the coolant from the cylinder block, we had to unscrew the starter (cable box), and to drain the coolant from the radiator, we removed the lower pipe from the radiator on the driver’s side (we didn’t even get to the drain plug from the bottom, the condenser is in the way).
Antifreeze
Many drivers believe that antifreeze is a separate type of coolant, different from traditional types of antifreeze, but this is not so. Antifreeze is a liquid developed by the domestic enterprise Organic Synthesis Technologies. Hence the name that the coolant received. TOS is an abbreviation for the developer, and the ending “OL” is an indication that it belongs to alcoholic liquids. During the Soviet period, there was no need for a patent on the name, so almost all car coolants produced in the USSR, and then in Russia, were called the same - “Tosol”, which, in fact, is a domestic antifreeze.
How often to change antifreeze is traditionally indicated on the packaging by the manufacturer. The frequency of replacement of domestic coolant, as a rule, does not exceed 2 years.
Recommendations for the selection of parts and components
The range is represented by domestic manufacturers, originals and high-quality analogues. The final choice is up to the owner of the technical device.
Service center technicians strongly recommend purchasing original parts. The service life and manufacturing quality of factory components are an order of magnitude higher than their analogues.
Before purchasing, carefully check the spare part catalog numbers with the actual data in the instruction manual. If necessary, get free consultations from service station specialists.
Lately it has become popular to order parts for subsequent installation directly in workshops. There are many advantages of this choice: prompt delivery, professional installation, quality guarantee.
How to change coolant
You will need: remove the crankcase protection (if necessary), a 13 mm spanner, a screwdriver, a clean wiping cloth, an empty container, and new antifreeze. Before draining the antifreeze from the Granta, you should first wait until the engine cools down, then:
- Remove the cap from the expansion tank.
- Place an empty container under the engine and remove the drain plug on the cylinder block.
- For VAZ-11183, VAZ-21116 and VAZ-11186 engines, to access the drain plug, you may have to remove the ignition coil along with the bracket.
- Wait until the antifreeze has completely drained.
- Place a container under the engine radiator and remove the drain plug on the radiator.
- Wait until the coolant has completely drained from the cooling system.
- Screw in the drain plug on the radiator, replacing the rubber O-ring if necessary.
- Tighten the plug on the cylinder block.
We pour new antifreeze into the Granta cooling system until its level reaches 25-30mm. below the “MAX” mark on the wall of the expansion tank. Then tighten the tank cap. Start the engine and let it warm up to operating temperature (before turning on the fan). Then turn off the engine and, if necessary, add fluid to the “MAX” mark. Check the fluid level after a few days. After replacing the antifreeze, monitor the coolant temperature in the instrument cluster.
If the overheating indicator lights up (No. 7) and the radiator fan does not turn on, turn on the heater (stove) and check what kind of air is coming from the air ducts. If the air is hot, there may be a malfunction in the fan operating system; if it is cold, it means that an air lock has formed in the cooling system.
Replacing antifreeze Kia Rio
We remove the left mudguard and find the tap in the radiator tank. We substitute the vessel and open the drain. To increase the intensity of the drain, unscrew the filler neck. Using a pear, we pump out the remains from the expansion tank, clean it, and fill in a new one.
Warm up the engine for two minutes, add liquid to the neck, and repeat warming up. If necessary, add antifreeze. The correct level is a few cm higher in the middle of the road. Vehicles are quite common. Waste refrigerant that is not replaced in a timely manner often becomes one of the main causes of vehicle malfunction.
Both antiphoriz and antifreeze significantly lose their performance properties after prolonged use, which means that after the recommended period, the composition will begin to harm rather than help. At this time, the load on the radiator increases significantly, while the engine failure time decreases.
It is better not to wait until replacing antifreeze becomes an urgent need, and replace the refrigerant in a timely manner.
Article number and cost of antifreeze for Priora
According to factory standards, coolant of different brands cannot be mixed in Lada Priora. The Lada-A40 brand is suitable for Priora, its catalog number is: 88888100005082. The cost of the liquid is approximately 550 RUR. rub. for 5kg. There is also a list of acceptable liquids:
- Antifreeze G-48;
- OZH-K Tosol-TS;
- Macra Cool Stream liquid Standard/Premium;
- 2 types OZh-40 Tosol-TS/OZh-65 Tosol-TS.
What types of car malfunctions can occur due to antifreeze?
When the coolant begins to drain, the owner of the Lada Priora should think about why this is happening. Antifreeze leaks often occur due to mechanical damage to the cooling system. In the worst case scenario, the engine overheats and the cylinder head gasket burns out.
The car owner noticed that antifreeze was constantly flowing, reasons:
- Leak between block and cylinder head. In this case, you can tighten the bolts better.
- When the radiator is damaged. You can try to replace it, but there are times when only repairs are required.
- The water pump has become unusable. The situation can be corrected by replacing the pump.
- The pipes are damaged. Initially, you need to tighten the clamps; if the problem does not go away, you can replace the hoses and pipes with new ones.
- The expansion tank of the automobile cooling system is damaged. There is only one option - replace the tank.
- Malfunctions can also be short-term in nature:
- There is scale on the cooling jacket; it can also be seen on the pipes and on the walls of the radiator. Flushing the system will help. Next, fill in new high-quality coolant.
- The existing antifreeze circulates poorly through the system. In certain cases, the pump, and in some cases the entire water pump, needs to be replaced.
- When the car owner first notices a low coolant level, he needs to top it up to the level. If the leak becomes regular, the system needs to be checked for leaks.
Why is a warning system needed?
Replacing the timing belt on Lada Largus 8/16 valves
A panel that flashes periodically or is constantly on, which depicts an engine outline, or has the inscription “Check Engine” can be translated as “check the engine.” Its appearance warns the driver about emerging problems in the power unit. Most of all, its appearance worries novice drivers, but there is no need to be afraid, you just need to diagnose the engine and then eliminate the identified faults. The first such blocks were connected to an on-board computer; its main purpose was to control the carburetor of the power unit.
Cars are constantly improving, and so are electronic control units. Now they control other systems, such as ignition, supply, formation of a combustible mixture, engine speed, and other parameters. As a result of this modernization, the reasons for the control unit to react have become many times greater, so it has become much more difficult to understand the reasons for the appearance of warning signals, and sometimes it is completely impossible to do without special equipment
How to remove an air lock on a Priora
On a car, malfunctions occur in the cooling system, and an air lock may form. To remove air from the system, you need to use its hoses. This is done in one of two ways. In each case, you need to wait until the power plant has completely cooled down, and only then begin to troubleshoot the problem.
I Option:
It is best to wear thick gloves before work to avoid burns. Warm up the engine a little and be sure to turn off the car. Remove the tube and clamp from the heating when antifreeze flows. Put everything back in its rightful place and tighten the clamp again. Air will escape under the resulting pressure.
II Option:
A device such as the throttle assembly clamp needs to be loosened, then the tube must be removed from the heating. Next, open the lid of the special expansion tank of the cooling system located in the engine compartment, cover the neck with a clean rag and blow through it properly. You will see air coming out. You need to tighten the cap when the coolant appears directly.
When to change coolant
For some coolants the service life is 3 years, for others 5, for others 10 years. There are a number of factors that change the numbers and the replacement will have to be accelerated. We'll tell you why to do this further.
You can check the condition of the coolant using test strips, which will change color when exposed to antifreeze. The scale will show whether it is possible to postpone the procedure.
The second method is visual. When the liquid has a red tint, becomes cloudy or transparent, it already contains corrosion products. Sediment and foam indicate that it needs to be checked at a service station. Unscheduled replacement occurs when components are repaired or premature loss of properties.
Recently, a new device has appeared: an automatic system replacement machine that only needs access to the radiator filler neck. Every motorist needs to know what to add in winter and how to change the coolant at home.
Clutch and brake sensors
Based on the signals from the clutch pedal position sensor and the brake light switch, the controller distinguishes between pressed and unpressed pedal positions. When the clutch pedal is pressed, the controller disables engine load regulation. Both sensors are located on the pedal assembly.
See "Replacing and Inspecting the Clutch Pedal Sensor" and "Replacing and Inspecting the Brake Pedal Sensor."
Some vehicle versions use an electronic throttle valve drive (E-gas). Let us remind you that in order to understand what errors are recorded in the ECU, you need to decipher them.
New Lada: Lada Granta sensors location
Keywords: Lada Granta sensors | Lada Kalina sensors | Lada Priora sensors | Lada Granta engine | Lada Kalina engine | Lada Priora engine | Lada Vesta sensors | Lada Largus sensors | 4x4 sensors | lada xray sensors | lada xray engine | Lada Vesta engine | Lada Largus engine | 4x4 engine | ECM Lada Vesta | ECM Lada XRAY | ECM Lada Largus | ECM Lada Granta | ECM Lada Kalina | ECM Lada Priora | ECM 4x4 | Niva sensors | Niva engine | esud niva | universal article
Share on social networks:
Found an error? Select it and press Ctrl Enter..
How to flush the cooling system on a Lada Grant
Violation of the deadlines for replacing the fluid, the purchase of cheap analogues contributes to the formation of sediment in the line and clouding of the antifreeze.
Due to the loss of chemical and physical properties, the water jacket of the power unit is subject to corrosion and peeling.
A constantly elevated operating temperature is the first sign of contamination, deposit formation, or thermostat malfunction. The manufacturer recommends cleaning the lines every 50,000 km. Replacement of antifreeze after 75,000 km.
The volume of the Lada Granta cooling system is 8.0 liters.
Cleaning methods
- external;
- internal.
In the first case, all dirt is removed from the outside using water pressure and adding detergent. In the second case, washing is carried out inside with special chemicals.
If the flushing does not give a positive result, then we replace the standard radiator with a new one, since an excess amount of fossils has accumulated at the bottom and the corrosion process has begun.
Distilled water
We use distilled water
There are several ways to get distilled water:
- buy at a pharmacy;
- melt clean snow;
- let tap water stand for six months.
The washing process is as follows:
- We place the car on the inspection channel, unscrew the fastenings of the oil pan protection.
- We twist the drain plug of the system and grind off the antifreeze. First, unscrew the cap from the expansion tank and relieve pressure.
- After the waste has been drained, tighten the plug and pour 8.0 liters of distilled water into the system.
- We start the engine, run it at medium speed for several minutes, and turn it off.
- We repeat steps 2 and 3. As soon as the water comes out with a pure color, the washing is complete.
- Refill with new antifreeze. Next replacement after 75,000 km.
Soda, acid and vinegar
Washing with improvised means
Mix the indicated ingredients in the percentage ratio: 25 / 50 / 25, add a liter of water. We drain a similar volume from the system, add the “potion”, leave the car motionless for 6 – 8 hours, preferably overnight.
In the morning we grind off the waste, rinse the system once, and fill in clean antifreeze.
Special means
The process is similar to the one described above. We carry out in compliance with basic safety rules. You can purchase additives at any specialized auto store or car market.
Checking the radiator for leaks
The diagnostic process is not at all complicated; we carry it out ourselves, and if you don’t have free time, visit a service station to have the work performed by professionals.
Checking the radiator from the engine compartment side
- We place the car within the perimeter of the repair area, on the inspection hole, and open the hood.
- From the engine compartment side, we inspect the surface of the radiator for drips and traces of antifreeze (antifreeze) leakage.
- We carry out similar actions from under the bottom of the car;
- We inspect the antifreeze supply/return lines, upper and lower circuits.
The most common places for depressurization: corners around the perimeter, joints, ties with clamps.
- The hood is open, the car engine has cooled down to a safe temperature so as not to damage the skin.
- We unscrew 6 screws from under the bottom and remove the oil pan protection.
- Unscrew the drain plug in the lower circuit of the radiator.
- At the same time, unscrew the drain plug on the wall of the cylinder block. We substitute the container.
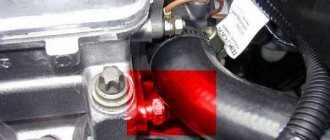
Unscrew the plastic drain plug of the radiator tank
Note to the driver!
In the Lada Granta 16-valve, we first dismantle the starter, since it prevents free access to the plug. If you do not remove the starter, antifreeze will flood the part, temporarily rendering it unusable.
- After the liquid is completely drained from the water jacket, screw in the drain plugs. Fill in new antifreeze in a volume of 7.5 liters to about or 8.0 liters to the recommended average level.
We change it to a 16-valve modification
As noted, to complete the procedure in full, you will need to dismantle the starter unit
If this important manipulation is neglected, spilled liquid may penetrate into the starter unit through the open hole, causing its breakdown.
- We turn off the power supply to the LADA Kalina starter by disconnecting the block with cables from the solenoid relay on the unit body.
- On the positive terminal of the unit, remove the protective cap, then use a “13” key to unscrew the fixing nut, remove the terminal with the wire and move it to the side.
- Now you can use the same key to unscrew the 3 bolts that hold the unit to the block. We take out the starter.
- Next we move on to unscrewing the plug and dumping the refrigerant into the container.
- Having completed this stage of the process, screw the plug into its original place. The torque should not exceed 30 Nm.
- Using the previously indicated method, we drain the liquid from the radiator assembly.
After installing the plugs, we proceed to filling the system with the indicated liquid. We perform this action through the neck of the expansion tank. After this, we install the starter, start the power plant and, by pressing on the pipes, help the fluid begin circulating in the circuit faster. At the same time, we check the level using the marks on the tank. It should be located between the “Min” and “Max” marks. The antifreeze replacement has been successfully completed.