The illumination of the Priora GRZ can be considered an insignificant element. VAZ-2170 cars have many light bulbs: they help you navigate inside the cabin or trunk in the dark. The license plate light must illuminate the license plate of the Priora car, otherwise the traffic police will have questions. If the lighting does not work, it would be more advisable to replace the light bulb in a timely manner; its price starts from 200 rubles. The process itself is quite simple. The Priora license plate lamp can be standard or LED. On hatchback, sedan and station wagon cars, the replacement procedure is identical.
The electric illumination of the Priora's license plate does not help the driver - it serves the traffic police officers to identify license plates on cars. But it will not be possible to refuse such assistance, because the need for the correct operation of small lamps over the gas protection zone is justified by legal requirements.
What lamps are used
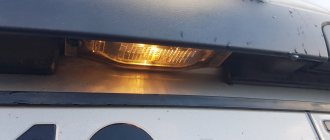
The Priora license plate is illuminated by two W5W (T10) lamps with a power of 5 W. They are located in a niche on the trunk lid (hatchback) or on its rear wall (sedan). The sign is illuminated from above, which makes the position of the devices more convenient. They become less dirty and do not experience mechanical stress. By default, incandescent lamps are installed, but many owners install LED analogues. They have noticeable advantages:
- consume less energy;
- have a long service life;
- give high brightness of light;
- are produced in a wide range.
The peculiarity of the license plate illumination on the Priora is the ability to replace only the burnt-out element. Unlike head lighting, there is no need to change a couple of devices at once. This simplifies the procedure and allows you to save a little.
Product delivery options
Note! Below are the shipping methods available specifically for this product. Payment options may vary depending on the delivery method.
Detailed information can be found on the “Delivery and Payment” page.
Parcel by Russian Post
Available payment methods:
Cash on delivery (payment upon receipt)
Using cards Sberbank, VTB, Post Bank, Tinkoff
Yandex.Money QIWI ROBOKASSA
Shipping throughout Russia. Delivery time is from 5 to 12 days.
Parcel by Russian Post 1st class
Available payment methods:
- Cash on delivery (payment upon receipt)
- Using cards Sberbank, VTB, Post Bank, Tinkoff
- Yandex money
- QIWI
- ROBOKASSA
Shipping throughout Russia. Delivery time is from 2 to 5 days. More expensive than regular delivery by Russian Post, approximately 50%. Parcel weight up to 2.5 kg
Express Parcel EMS
Available payment methods:
- Cash on delivery (payment upon receipt)
- Using cards Sberbank, VTB, Post Bank, Tinkoff
- Yandex money
- QIWI
- ROBOKASSA
Shipping throughout Russia. Delivery time is from 3 to 7 days. More expensive than regular delivery by Russian Post, approximately 100%.
Transport companies
Available payment methods:
- Using cards Sberbank, VTB, Post Bank, Tinkoff
- Yandex money
- QIWI
- ROBOKASSA
Delivery is possible to any locality where there is a representative office of the transport company. Delivery time is from 2 to 10 days. Sending large parcels is approximately 50% more profitable than by Russian Post.
Courier delivery in Togliatti
Available payment methods:
- Cash upon receipt
- Using cards Sberbank, VTB, Post Bank, Tinkoff
- Yandex money
- QIWI
- ROBOKASSA
Delivery time from 1 to 12 hours.
Pickup from our warehouse
Available payment methods:
- Cash upon receipt
- Credit, installments
- Using cards Sberbank, VTB, Post Bank, Tinkoff
- Yandex money
- QIWI
- ROBOKASSA
Pickup times must coincide with store opening hours.
Article rating:
Illuminated license plate VAZ 2110Link to main publication
Related publications
Bolt pattern Renault Megane 3
The best manufacturers
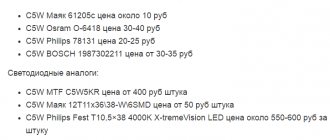
License plate lights for Priora W5W with T10 base are produced by almost all well-known lighting manufacturers. Among the most famous and reliable companies are:
- a German company whose products are considered a model of quality and durability;
- Bosh. A world-famous brand, which is also home to Germany. Today it is a powerful concern whose enterprises are located in many countries;
- Philips. A famous company from the Netherlands, whose history goes back almost 130 years of successful work;
- MTF. A transnational company with factories located in Taiwan. Produces a wide range of lighting products;
- Narva. Another German company, which is more than 70 years old. Demonstrates the country's traditional quality and care in the manufacture of automobile lamps;
- Neolux. A European brand that will soon celebrate its 100th anniversary. It originally appeared in Switzerland, but then changed its home country several times. Today Neolux is a subsidiary of OSRAM;
- Koito. Japanese manufacturer producing all types of automotive lamps. It is distinguished by the high quality of its products.
The above list cannot be called exhaustive. There are many manufacturers, they all produce high-quality lighting devices.
Lamps used in the VAZ 2110 recommended by the manufacturer
The VAZ 2110 car has long been known to Russian drivers. And this is not surprising, since its manufacturer is the Volzhsky Automobile Plant. It first appeared on the market in 1995, and production ended more than ten years ago. Despite this, the car is still often found on Russian roads today.
The VAZ 2110 is a reliable, comfortable, inexpensive to maintain and quite beautiful looking front-wheel drive sedan. If you compare the cost of consumables with foreign cars, you will notice a significant difference. The price of spare parts, fluids and other things for the VAZ 2110 is several times lower. It is also worth noting the efficiency in fuel consumption. A car with a 1.6 liter unit spends 8-10 liters of gasoline per 100 km. Quite playful and fast, acceleration takes 11 seconds.
Having become the owner of such a car, you need to know the type and power of light bulbs that the manufacturer has provided for it. Since periodically they burn out and require replacement.
How to replace it yourself
Replacing the Priora license plate light bulbs is done using a minimum number of tools and materials. The process is not very difficult. All you need is accuracy and caution, especially if the work is being done for the first time. You need to stock up on new lamps and you can get to work. Procedure:
Required Tools
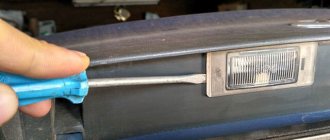
The easiest way to get to the license plate lights on a Priora is from the back of the trunk (or its door) by temporarily removing the trim. The only tool you need is a flathead screwdriver. It's better if it's long enough. This will allow you to remove the trim from the trunk door or rear compartment wall more cleanly and without damage.
Important! For a complete guarantee, you can prepare several spare pistons that secure the casing - sometimes they break, and it would be correct to immediately replace the defective elements.
Step-by-step instruction
First you need to turn off the car lights. Then they start replacing. Procedure:
- Carefully remove the trim from the inside of the compartment or trunk door;
- use a screwdriver to pick up the license plate light, move it to the side and remove it from the socket;
- disconnect the block with wires. You can skip this point, but it is more convenient to work with the backlight completely disconnected;
- remove the socket together with the lamp from the lampshade. To do this, you need to turn it counterclockwise;
- remove the burnt out element and install a new one;
- assemble everything in reverse order.
Before installing the casing, it is recommended to check the functionality of the backlight and eliminate errors if any are found. This will avoid repeated removal of the compartment upholstery and unnecessary waste of time.
Step-by-step replacement instructions
Having scoured the Internet, I found a bunch of “useful” recommendations for replacing the Priora license plate light bulbs. Some people rip the lights out of the rear trim, which almost always results in broken latches. Others pull out the lights, but before that they also remove the upholstery and this very rear trim (“saber”).
The result of such a replacement is a lot of work and again broken latches. There is no need to unscrew or tear out anything except the upholstery!
If you have purchased the license plate light bulbs and have a screwdriver at hand, then you can probably start. First of all, you need to remove the trim from the trunk lid (door), which is attached to regular clips. Open the lid, insert a screwdriver between it and the upholstery in any of the corners. Lightly press the upholstery, snapping off the corner piston.
We look for the next piston in the resulting gap and, driving a screwdriver into this place, tear it off too. Go ahead and completely remove the trim from the trunk lid.
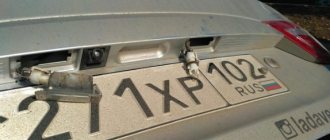
Final removal of the tailgate trim of Lada Priora
At the level of the rear trim we see two license plate illumination sockets.
Now you know how to quickly, safely and without unnecessary work replace the light bulbs in the sign lights in the Lada Priora Hatchback (Station wagon). I hope the information provided will be useful.
Source
Replacing the license plate lamp
Timely replacement of the license plate light bulb from a burnt-out one to a new working one will avoid a fine of 500 rubles. This is exactly the amount of administrative punishment that awaits a motorist for such a violation, according to Article 12.2 Part 1 of the Code of Administrative Offenses of the Russian Federation. There are certain rules about this type of lighting that must be followed.
Light control
All cars that come off the assembly line have light bulbs installed to help you see the license plate from the rear. Typically, a pair of instruments is located in the lower trunk saber. Traditionally, problems do not arise for the first few years, but over time the lamp may burn out, so it is necessary to periodically monitor the condition of the backlight on cars with high mileage.
It is important to know that the driver can receive punishment not only for the lack of lighting of the license plate, but also for improper installation of the lights.
Almost every motorist can cope with the replacement. You don't even need special equipment for this.
The license plate light bulb can be replaced in the following sequence:
- disconnect the battery from the on-board power supply to prevent possible contact shorting;
- Using a screwdriver with a thin tip, we disassemble the lamp shade;
- We show maximum care when unscrewing the lamp, since many people damage the socket due to carelessness;
- in place of the burnt out lamp we install a similar lighting device with LEDs or a classic incandescent lamp;
- The next step is to install the lampshade, but we recommend degreasing it first.
After all the manipulations, we check the functionality of the node. To do this, we connect the battery to the network. Each car model has its own procedure.
Hyundai Solaris
Minor repairs on one of the most popular car models in Russia are not difficult. Before you replace the license plate light bulb in this car, you need to know that there are two lights there. They are located on the trunk lid under the trim.
Examples of replacing light bulbs on certain car models
Lada Kalina"
If the license plate on the Kalina becomes poorly illuminated, this means that it is time to replace the lamps. This is not difficult to do. If you follow the algorithm below:
- To begin with, on the right side you will need to press on the flashlight itself, slightly moving it to the left. It should simply come out even with light pressure.
- Next, the lampshade is pulled out simultaneously with the power wires. It is this step that greatly simplifies the process of replacing power lamps on a Lada Kalina car.
- Then you need to slightly lift the plastic clamp up, and then remove the plug that provides power.
- The lamp housing must be unscrewed by rotating carefully. This way you can easily pull out the lamp base.
- The next step is to pull out the lamp, slightly pulling it to the side. Then the lampshade will be very easy to remove from the base.
- In place of the burnt out light bulb, another one is immediately put in place.
- Next you need to repeat all the steps in reverse order.
That's all, all that remains is to check whether the light is on after changing the bulb.
Hyundai "Solaris"
Changing the license plate lamp in a Hyundai Solaris is also easy if you do everything in the right order. In this model, 2 lights are installed for illumination, located under the trim on the trunk lid itself. These lights are closely related to each other. To change light bulbs in Solaris, you need to follow the algorithm below:
The first step is to remove the upholstery from the trunk lid. For this purpose, you need to use a reliable screwdriver to pry up the cover; it can be easily found in the trunk handle. Next, when using a Phillips screwdriver, remove the screws securing the handle, and then remove it. Using the same screwdriver, unscrew all the pistons that secure the trim to the trunk lid itself.
First, the pistons are removed, and then the upholstery is completely removed. The lamp socket is turned clockwise only until it stops, and after that it is important to press it and unscrew it together with the bulbs from the housing. You need to pull the socket exactly to the length at which it will be easier for you to change the lamp. The lamp is removed from the socket very easily
Simply pull it out by the flask.
Lada Priora"
How to replace a license plate light bulb on a modern Russian car? Replacing the license plate light bulb on a Lada Priora car has virtually no differences from the procedure for replacing this element in Kalina.
This is quite simple to do, it is important to follow the instructions
To change the light bulb, you will need special socket wrenches. With their help, you will need to remove the plastic elements secured with special fasteners. The rear chrome frame is removed by unscrewing all the nuts that hold it. The light bulbs are installed in a frame. It will take a little effort to get them out of the lampshades.
The problem is that they are quite difficult to understand. When the lampshade is disassembled, it is important to ensure that the rubber seals are not lost. Replacing the license plate light bulb on a Priora takes a minimum of time. Reassemble all parts only in reverse order
However, before reassembling it is worth checking whether the replaced bulbs work. If you do not do this right away, then if they are installed incorrectly, you will have to disassemble the entire structure again. The reassembly process is as follows: after changing the lamps, the shades are put in their places, and after them the frame. It must be securely fixed at all attachment points. Lastly, the plastic is installed in its place.
In this case, changing the room lighting bulbs on the Priora is complete.
How to change the license plate light bulb on a Renault Logan
In order to change the license plate light bulb on a car, you need to remember some of the rules. First of all, you can install it yourself only for the license plate light, which is located at the back.
To do this, it is recommended to use LEDs with lenses, as they illuminate the license plate better and, according to the law, make it possible to see the license plate more clearly.
Although lamps of a wide variety of colors are commercially available, the law does not allow many of them to be used in practice.
Independent work for drivers
Replacing license plate light bulbs is carried out in the following sequence:
- Using a thin screwdriver, you need to disassemble the lampshade in half, starting from the middle.
- Carefully unscrew the standard lamps, as the holder on the body can be damaged quite easily.
- The next step is to install LED or incandescent lamps.
- Before installing it in its place, the lampshade should be degreased.
- After installing the lamp, you should check the operation; if the replacement of the rear license plate light bulb was carried out accurately, the license plate will be brightly illuminated.
When replacing the backlight on different car models, there are small nuances that differ during installation. To ensure the job is done correctly, these differences must be taken into account.
Legal aspects
In accordance with the regulations of the Road Traffic Rules (SDR), each car must have a rear license plate light, activated when the side lights are turned on. This external light device must be turned on while the vehicle is moving at night. In this case, the brightness of the lamps must be sufficient for the inspector to be able to identify the state. car number from a distance of 20 meters. The absence of illumination or an unreadable car number for any reason is regarded as a violation and, in accordance with Article 12.2 Part 1 of the Code of Administrative Offenses of the Russian Federation, entails a warning or a fine of 500 rubles.
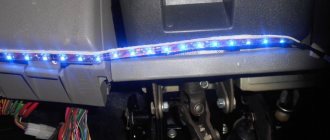
The situation can be corrected and thereby improve the illumination of the registration plate by upgrading the standard lights. The most common way is to install LED light sources: modules, rulers, strips. However, this innovation can be regarded as a change in the design of the car with all the ensuing consequences.
The Appendix to the Traffic Regulations of the Russian Federation states that it is prohibited to make changes to the design of a vehicle without permission from the State Traffic Safety Inspectorate of the Russian Federation (clause 7.18 - Other design elements). This point can be interpreted as follows. Firstly, if the car is not involved in road traffic (not in use), then the violation cannot be detected. Secondly, if the changes made have been certified by the traffic police and have documentary evidence, then the modernization was carried out according to the law.
GOST 8769-75 (updated on August 1, 2013) in paragraph 2.8.2 states that the rear registration plate of a car must be illuminated by a stream of white light. According to this clause, a ban is automatically established on illuminating the license plate with any other light, with the exception of shades of white. It turns out that the bright and rich colors of LEDs (blue, red, green) according to the law cannot be used in organizing rear license plate illumination. They can add ambiguity and confuse drivers of vehicles following behind.
Ceiling lamp
All illumination of the room is carried out by the lampshade into which the lamp is directly installed. It is the lampshade that scatters the light and fully illuminates the license plate of the car. It happens that when dismantling or in the process of replacing lamps, the lampshade may break. If this happens to you, then do not panic, lampshades are sold at any auto parts store.
Catalog number of the Priora lamp: 2170-03717010-00;
Its price is: from 100 to 200 rubles;
You should also not forget about the lampshade gasket; it is necessary to protect against moisture getting into the interior.
Gasket catalog number: 2170-03717012-00;
Cost of laying: from 20 rubles;
The lampshade is the same for all Lada Priora models.
Caution will not be superfluous
How to change a valve seat: photo and video instructions Very often, lampshades are produced in the usual way, and even without hardening. Due to such low-cost production, they can crack from exposure to high temperature or light impact. Therefore, do not forget about gloves, as they will save you from cuts if it breaks in your hands. Take your time, sometimes you can accidentally touch a lying lamp with your foot or step on it.
If you had an incandescent lamp before the breakdown, then you can then replace it with an LED lamp of the same power. This is due to the fact that LEDs last several times longer, they also provide more pleasant light, and the room will be better illuminated.
Try not to install more powerful lamps, because the wiring may not withstand the load and will simply melt.
Replacement work does not last very long - at most it can take no more than half an hour. We advise you to replace the seals in the lampshade, then during operation moisture will not get there and the new light bulb will not burn out.
Lamps
Lamps installed from the manufacturer's factory have a filament. After the first replacement, many install brighter LED lamps in place of the standard ones, which can illuminate the number much more efficiently and prettierly, giving the car a more beautiful look.
Standard lamps have the number W5W. The incandescent lamp has a power of 5W, which is quite enough to illuminate the room.
Cost of W5W lamp: from 20 rubles;
You can also install LED analogues instead of the standard lamp. LEDs consume less electricity and have a higher luminous flux.
It should be noted that according to the law on the safe operation of cars, the consecration of the license plate must allow one to see letters and numbers from a distance of at least 20 meters.
Lamp sockets on the Prior and their power...
Once upon a time I found this “List of Priora lamps”. Because The recording has become popular and is often used; I designed it beautifully in Photoshop so that it would be pleasant to look at. Well, I’ll leave it in text format for copying.
Lamp installation location - [Lamp type] (Power, W)
Headlight block:
Side light - [W5W] (5) Low beam - [H7] (55) High beam - [H1 / H15] (55) Turn signal - [PY21W] (21) Turn signal - [W5W] (5) PTF - [ H3/H11] (55)
Back light:
Signal brake/gab. light - [P21W / W5W] (21/5) Add. Brake Light - [P21W] (21) Turn Signal - [P21W] (21) Reverse - [P21W] (21) Fog Light - [P21W] (21) License Lamp - [C5W] (5)
Interior lighting:
Ceiling light interior — [C5W / T4W] (5/4) Ceiling light. thing drawer - [C5W] (5) Illumination of the cigarette lighter. — [AMN13-3-1] (3) Clock backlight — [W1,2W] (1,2) Lamp lighting. trunk — [C5W] (5) Instrument lighting — [W3W] (3) Center lighting. consoles - [W1,2W] (1,2) Engine compartment lamp - [R10W] (10) Indicator lamp - [W1,2W] (1,2) Push-button switches - [W1,2W] (1,2) Switch blocks - [LEDs] Advanced brake light - [LEDs]
What is needed for work and what kind of lamp is there?
Almost every Priora owner has everything needed to replace license plate light bulbs:
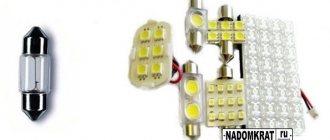
And, of course, you will need new light bulbs. Therefore, before we begin the replacement, let’s find out what the light sources are for the Priora license plate illumination. The manufacturer uses two W5W incandescent lamps with a power of 5 W each for these purposes.
Standard W5W light bulb for room lighting in Priora
If desired, the standard incandescent license plate lamps in the Priora can be replaced with LED ones. The easiest way to buy such lamps is because the industry produces W5W LED lamps, but craftsmen make them from ordinary super-bright LEDs. Since the light output of LEDs is approximately 6-8 times higher (depending on the design and manufacturer) than that of incandescent lamps, it is enough to take the 1 W option.
LED room lamp W5W
Tuning the ceiling
Such a pleasant and exciting thing for a car enthusiast as do-it-yourself tuning is also possible with a courtesy lamp. Instead of the usual one, a lampshade with a programmable LED lamp is installed. It has advanced features:
- selection of three brightness modes, this selection is made by switching the switch at intervals of one second, the last switching on is remembered;
- shutdown delay 6–8 seconds with smooth lamp extinguishing;
- automatic shutdown when the door is not closed or not tightly closed after 30 minutes.
The price for such a lamp is only about five hundred rubles, so the choice is obvious.
The procedure for installing and connecting a lamp with a programmable LED lamp:
- the plastic diffuser of the standard lamp is removed;
- the wires are disconnected from the contacts of this device;
- the four self-tapping screws holding the light housing on the body ceiling are turned out and the body of the old device is removed;
- the LED illuminator is released from the plastic transparent diffuser cover;
- the electrical wiring is connected to the plugs of the LED illuminator in accordance with the diagram;
- the body of the new lamp is attached to the ceiling of the body in a regular place with self-tapping screws;
- The plastic diffuser is fixed on the body.
It should be noted that such a lighting device produces brighter light, which in the dark is a good help for all people who are in the car.
Hello, today we will show you how to remove and replace the license plate lamps on a VAZ 2113, 2114. According to traffic rules, the license plate lamps must be in working order, so if you notice that one of the lamps has burned out, then it needs to be replaced.
Welcome! Illumination of the rear license plate - it is useful for cops and for cars driving behind, the license plate is hard to see in the dark, but if it is illuminated by a lamp, then it is visible as during the day and you can easily read it without driving close to the car, so this thing in some cases will even useful, for example, you are being chased by a car unknown to you, you report the number of your car to the duty station and there they will send an order to you, if the rear number is difficult to see and special service vehicles are approaching from behind, that is, the likelihood is that they will not immediately understand what this is the car that is being chased until you yourself look out of the window and signal the law enforcement agency about it with gestures.
Replacing license plate lamps
After six months of using the car, I noticed that one of the license plate lights began to shine poorly. Upon closer examination, it was discovered that water had entered it; the metal diffuser had rusted and stained the water.
The lampshade contains a regular 5 W incandescent lamp. When the backlight is used for a long time, the reflector and the lamp itself overheat greatly, which subsequently leads to melting of the lamp socket. To solve this issue, it was decided to replace incandescent lamps with LED lamps with a color temperature of 3200K. And since the lamp housing does not contain a reflector, it is advisable to use directional LED lamps.
Upon closer examination of the base of the standard lamp, it turned out that the arrangement of the contacts in the socket is not quite usual. Installing an LED lamp in such a lamp would only lead to a short circuit in the circuit and failure of fuse F14.
Later, lampshades manufactured by SEMZ were purchased - 1118-3717010-02, pictured with a black socket. The lampshades are more airtight than standard ones, which means they are more durable.
The main difference from the standard lamp is the location of the contacts in the socket.
With such a lampshade, there is no need to think about the location of the lamp base contacts.
This modification made it possible to increase the reliability of the backlight, increase the illumination of the license plate area and the opening of the 5th door while reducing energy consumption.
Table of circuits protected by fuses on the VAZ 2110
| Fuse number | Current strength, A | Circuits protected by a fuse |
| F1 | 5 | License plate lamps. Instrument lighting lamps. Side light indicator lamp. Trunk light. Left side marker lamps |
| F2 | 7,5 | Left headlight (low beam) |
| F3 | 10 | Left headlight (high beam) |
| F4 | 10 | Right fog lamp |
| F5 | 30 | Door window motors |
| F6 | 15 | portable lamp |
| F7 | 20 | Engine cooling fan electric motor. Sound signal |
| F8 | 20 | Rear window heating element. Relay (contacts) for turning on the heated rear window |
| F9 | 20 | Recirculation valve. Windshield and headlight cleaners and washers. Relay (coil) for turning on the rear window heating |
| F10 | 20 | Spare |
| F11 | 5 | Starboard side marker lamps |
| F12 | 7,5 | Right headlight (low beam) |
| F13 | 10 | Right headlight (high beam). Indicator lamp for turning on the high beam. |
| F14 | 10 | Left fog lamp |
| F15 | 20 | Electrically heated seats. Trunk lock lock |
| F16 | 10 | Relay-breaker for direction indicators and hazard warning lights (in hazard warning mode). Hazard warning lamp |
| F17 | 7,5 | Interior lighting lamp. Individual backlight lamp. Ignition switch illumination lamp. Brake light bulbs. Clock (or trip computer) |
| F18 | 25 | Glove box lighting lamp. Heater controller. Cigarette lighter |
| F19 | 10 | Locking door locks. Relay for monitoring the health of brake light lamps and side lights. Direction indicators with warning lamps. Reversing lamps. Generator excitation winding. On-board control system display unit. Instrument cluster. Clock (or trip computer) |
| F20 | 7,5 | Rear fog lamps |
Replacing rear license plate lamps
Hi all! The light bulb in the right rear license plate light stopped shining. Having bought some light bulbs, I started to make some. We remove the lining of the fifth door, for which we first pull it in the area of the corner, which is above the head, until the clip snaps off, and then we begin to carefully snap them all off along the width. Then the far side. Disconnect the connector from the lampshade and turn the lamp base 90 degrees. We change the lamp and put everything back in place. Please note that the lamp base has two protrusions of different widths, and there are two corresponding cutouts in the lampshade, so it can only be inserted in one position, and when you insert it into a lampshade installed on a car, this is not visible.
In my case, the rear saber was removed (unscrew the 4 nuts to check the absence of rust underneath. The lampshades were removed from the car. And this is where the release clamp often breaks, which is what happened to me.
I had to think about how to secure it. I took a washer with a rubber gasket from a roofing screw, a self-tapping screw about 1 cm long, and twisted it into the bottom of the lampshade. And this combination pressed the lampshade to the body very well, while the structure remained collapsible, which will allow you to change the light bulb if necessary.
There is a rubber gasket between the bottom of the lampshade and the body, which is pressed well, so I think that water will not get into the lampshade through the self-tapping screw with the gasket. We assemble in the reverse order, not forgetting to connect the connectors to the lampshades. Let's check. Everything is working.
The license plate lights do not light up: check the fuses
The license plate lights do not light up. How to find and eliminate the cause?
12/14/19 – reply | quote | #
Greetings! My name is Mikhail, sorry for being off topic, I want to express my gratitude to you and your site. Thanks to you, I was able to remove the scratches my wife caused in the parking lot on my own.
It all started when my wife passed her license and began to often take my car to get to the nearest shopping center. There were no signs of trouble, but one day she said with tears in her eyes that she had rubbed herself against a pole in the parking lot. I still don’t understand how it was necessary to manage to do this, but with women everything is possible, you understand)) The scratch was deep enough, but there was no money or time to bother with painting. That's why I simply ignored the scratch. A week ago I came across Artem Shevchenko’s blog, who in his article told how to get rid of scratches in 10 minutes. At first I didn’t believe it, but I decided to try it anyway and didn’t regret it at all. The method worked 100%, there was not a trace left of the scratch, and nothing was visible at all from any angle. In general, I’ll keep the intrigue, for those who want to quickly get rid of scratches, come and read the article on Theme’s blog, I guarantee you won’t regret it.
Good day. Answered here.
The light in the trunk stopped burning (I tried changing it), (can you tell me which fuse?)
Check the end switch. It is located in the lid lock. Should light up even when turned on. dimensions and when turned off. As for the fuse, I can’t say exactly which one in the block is responsible for the backlight, it makes sense to check everything, it doesn’t take long, especially if you have tweezers. If the car is old, then most likely the wires that go from the body to the trunk clapper are broken. Very often the problem is with old cars, sedans and not only Fords, but also Volkswagens and others, where the wires are twisted more than 90 degrees. This is not necessary in every case, but %70 it is. You definitely need to check to see if there is +12 volts at one end of the light bulb; if not, then crawl along the wiring to the pres and look for a breakdown of the pres, a short circuit, or a broken wire. If +12 comes, then look for where the ground went at the other end of the light bulb (i.e. -12 volts or body). Accordingly, you need to crawl from the lamp to the trunk lid, i.e. There is a limit switch attached to the lock; in the latched position there is no contact to the body, but in the open position there should be. A common cause is a broken wire at a permanent bend (visually everything is intact, but in fact the metal wire is broken, that is, there is no contact at all. This can be checked simply by ringing the wire.
Instructions: replacing the license plate light bulbs of a Priora car
The illumination of the Priora GRZ can be considered an insignificant element. VAZ-2170 cars have many light bulbs: they help you navigate inside the cabin or trunk in the dark. The license plate light must illuminate the license plate of the Priora car, otherwise the traffic police will have questions. If the lighting does not work, it would be more advisable to replace the light bulb in a timely manner; its price starts from 200 rubles. The process itself is quite simple. The Priora license plate lamp can be standard or LED. On hatchback, sedan and station wagon cars, the replacement procedure is identical.
The electric illumination of the Priora's license plate does not help the driver - it serves the traffic police officers to identify license plates on cars. But it will not be possible to refuse such assistance, because the need for the correct operation of small lamps over the gas protection zone is justified by legal requirements.
Reasons for turning off the dashboard on the VAZ 2114
Turning off the dashboard lights does not bode well for either the driver or the car. Because this malfunction is usually followed by others. Therefore, the backlight should be repaired immediately.
You should also understand that if the lights on the dashboard go out, then the problem must be looked for somewhere in the on-board electrical system. This means you can’t do without a multimeter, a soldering iron and electrical tape. Here are the main reasons for turning off the backlight:
- fuse burned out;
- the light bulbs have burned out (or LEDs - in later VAZ 2114 models the panel is illuminated by them);
- the wiring in the on-board electrical network is damaged;
- The common contact board of the instrument panel burned out.
Let's consider these points in more detail.
Burnt fuse
80% of cases when the backlight turns off is due to a blown fuse. It is located in a safety block installed under the steering column of the car. Usually the fuse indicated in the documentation as F10 is lit.
It is he who is responsible for the dashboard lighting, side lights and license plate lighting. On early VAZ 2114 models, fuse F10 was brown or red.
On later cars they started putting green ones. It is not difficult to understand that the fuse has blown. It's enough just to inspect it. The housing of a blown fuse may be slightly blackened or melted, and the conductor inside the housing may be severed. The faulty fuse is replaced with a new one. Typically this solves the problem.
Burnt out light bulbs
Dashboard lights operate under less than ideal conditions. They are regularly exposed to shaking, power surges in the car's electrical network and temperature changes. All this significantly reduces their service life. Especially if these are not LEDs, but ordinary incandescent lamps, which were equipped with the first VAZ 2114 models. There are a total of 19 lamps (but this number also varies depending on the year of manufacture of the car, and the number of lamps should be specified in the technical documentation for the car).
Another reason for light bulbs to burn out is their improper installation. This is most often observed on early VAZ 2114 models, where drivers decide to independently replace obsolete incandescent lamps with new LEDs, making some changes to the electrical circuit. Without proper qualifications, this operation is not so easy to perform. Here's what the sequence for replacing light bulbs looks like.
- The steering column is lowered to the bottom position until it stops. Above it is the dashboard cover with four mounting screws. They are unscrewed with a Phillips screwdriver.
Video: changing light bulbs in the dashboard of a VAZ 2114
Wiring damage
Problems with electrical wiring are the worst case. To figure this out on your own, the driver needs to have serious knowledge of electrical engineering. In particular, he must be able to read automotive electrical circuits well. Not all car enthusiasts can boast of such skills. It is for this reason that it is better to entrust the search for a damaged section of on-board electrical wiring to a qualified auto electrician.
His actions boil down to the following: he determines the key sections of the circuit and sequentially “rings” them using a multimeter until he finds a broken section of the wiring. Completing this work may take several minutes or several hours - it all depends on where exactly the circuit break occurred.
Panel contact board problems
If all of the above measures do not lead to anything, the last option remains: damage to the contact board in the dashboard. This part is a combination of several microcircuits. It is not possible to repair it in a garage without special diagnostic equipment. So the car owner has only one option - to replace the entire board. You can purchase it at any auto parts store. It costs about 400 rubles. Let us list the stages of its replacement.
- First, all the steps mentioned above in the paragraph on replacing light bulbs are performed.
- But instead of unscrewing the bulbs, you should unscrew the four bolts at the corners of the rear wall of the dashboard.
- The back wall is carefully removed along with the board, which is attached to the wall with plastic latches.
So, the owner of a VAZ 2114 can solve most problems with the dashboard lighting on his own. All that is required is the ability to use a screwdriver. The exception is the case of damaged wiring. It is strongly recommended that you contact an electrician to identify the damaged area. This will save a lot of time and nerves, which, as we know, are not restored.
Replacement process
- Open the trunk and use a slotted screwdriver to unclip the clips securing the plastic trim of the trunk lid. It is better to wrap the screwdriver with masking tape so as not to damage the paintwork on the trunk lid.
- After removing the plastic cover, unscrew the four nuts securing the saber. Eight nuts for the head, location in the photo below.
- Squeeze the clamps on the sides and disconnect the power connectors for the license plate light bulbs.
- We pull towards ourselves and take out the saber.
- We grab the lampshade and pull it towards ourselves. It's on the latch.
- We take the lamp socket and turn it 90 degrees. After turning, remove the lamp socket.
- We remove the burnt out lamp and install a new one. There are no tricks, I took it out and inserted a new one.
- We insert the socket with the lamp into the lampshade and turn it 90 degrees to fix it.
Next we reassemble:
- We install the lampshades in the saber.
- We install the saber and connect the power connectors.
- We secure the saber with four nuts.
- Snap on the decorative plastic trim.
Video lesson
In what ways can you achieve original license plate lighting?
Recently, there have been frequent cases when LEDs are inserted into the ceiling instead of conventional lamps. Such lighting is bright and attractive, making the car original and interesting.
It is important that the lighting has a color acceptable by GOST standards and that the numbers are readable
It can be installed on a VAZ 2114 car in two ways.
First way
Replace standard incandescent lamps with LED lamps (they have the same contacts as in factory products).
It is also important to choose the right light bulbs; too bright ones will quickly fail and take up too much energy. It’s also not worth installing very expensive products, because the backlight will become very noticeable, distracting drivers from the road process
Low quality light bulbs can have various defects and quickly fail. So we buy light bulbs from trusted representatives and use them economically.
Second way
Install LED strip. To do this, you will need resistors - 3 pieces and the same number of LED strips. Their colors are very diverse, but it is best to choose white or yellow tones.
If a motorist, in spite of everything, wants to replace the standard backlight with LED, the following steps must be followed:
- Solder a resistor to the positive end of the LED segments.
- Attach small wires to its end and the negative side.
- The result is a design with two contacts, which are powered by wires from the standard backlight.
Read more: Peugeot 308 oxygen sensor
To give the tape an original design, you need to take a piece of plexiglass and glue the strip onto it with silicone sealant. Next, we connect the wires of the tape to the contacts of the factory backlight lamps and make insulation.
At the next stage, we prepare the surface for installing the product:
- remove the lampshades;
- degrease the fastening side with solvent;
- after drying, apply sealant and glue the LED strip;
- We seal the tape along the edges and leave it until completely dry.
We check the operation of the design in action. If everything is functioning correctly, the job has been done effectively. In exactly the same way, you can illuminate the license plate around the edges, but this can lead to problems with the traffic police. Let's remember this!
LED lighting looks attractive both during the day and at night, making the car bright and original.
Original number plate lighting
According to traffic rules, the backlight must always be in working order, and therefore, if there are problems with the lighting of the license plate, they must be urgently eliminated, the light bulb must be replaced, or the cause must be found in the device unit itself. Create all the conditions for efficient and safe movement on the road! Take care of yourself and your car!
Main conclusions
Replacing the license plate light on a Lada Priora car is not difficult, but requires some preparation. Most of the time is spent dismantling and reinstalling the door trim or trunk compartment. The rest of the procedure is simple:
- removing the lampshade with the light bulb:
- disconnecting the burnt out element and installing a new one;
- reassembly and installation of the lampshade.
The procedure is performed with only one flat screwdriver; no special tools are required. Explain your methods for replacing the license plate illumination on a Priora in the comments.
Selecting lamps and backlight emitters to replace burned out ones
As already mentioned, you should not replace an LED emitter with an incandescent lamp and vice versa. It's easier if there is an incandescent lamp. Usually a standard light bulb with a power of no more than 5 watts is used. Such lamps can be purchased at any normal gas station.
The situation is more complicated for LED designs. If it is not so difficult to purchase emitters for common designs, then for unique car models it is more difficult to do, except perhaps during disassembly.
In this case, you can find ordinary radio amateurs who will change the LEDs element by element, that is, they will perform ordinary radio repairs. LEDs should be replaced as a set. Typically there are three diodes in series on the board. Therefore, even if one of the three is faulty, all three must be replaced.
It is better to choose a powerful LED (about 1 Watt), white, so that there are no complaints from inspectors and during technical inspection. Installation difficulties may arise. LEDs are often connected using spot welding instead of soldering. This will not cause any difficulties for an experienced radio amateur. Active acid fluxes can be used to facilitate soldering. In everyday life, flux is an excellent substitute for an aspirin tablet. Just don't inhale fumes when soldering. They are not dangerous, but extremely unpleasant.
If problems with the license plate illumination cause great difficulty when replacing lamps and emitters, as a last resort, you can purchase a license plate frame with built-in illumination. Difficulties may arise during the technical inspection, but they can be solved.
Tips for purchasing automotive diodes
W5W bulbs are used to illuminate license plates on most car models. But there are manufacturers who equip their brands of cars with C5W lamps, which differ in the type of base. Therefore, when purchasing, you need to know what type of spotlights are installed on a particular car.
There are LED analogues, the installation of which is permitted by law, but within certain limits
It is important that the lamp light is white and the license plate is clearly visible and readable from a distance of 20 meters. In this case, the lighting should illuminate only the sign, and not the entire road behind the vehicle.
When installing a new light bulb, you should pay attention to the power declared by the manufacturer and compatibility with the lampshade. Brighter diodes can cause melting of the contacts, overloading the car's electrical network and darkening the lampshade
We recommend products from the company specified in the instructions for the vehicle from the car dealer. There are many fakes on the market that are almost impossible to distinguish from a high-quality original.
When choosing a product, you should pay attention to the packaging itself, the inscriptions on it, markings and the quality of soldering of the light bulb
The process does not require trips to a car service and can be completed in 10–15 minutes in the garage. Tools needed to replace the license plate lamp:
- damp cloth;
- flat and Phillips screwdrivers;
- liquid key or WD-40;
- LEDs.
Before starting dismantling, you must remove the negative terminal of the battery, first turning off the ignition.
Each car model has its own nuances of the location of light sockets and fastening methods. The standard method is to clamp and install the lampshade onto bolts.
Installation Tips
- When buying new elements, it is worth paying attention to the fact that in addition to sizes 36 mm, which are suitable, there are also sizes 41 and 38 mm, which are not suitable.
- They have polarity, so before replacing elements on the Chevrolet Niva, you should turn on the backlight and only then carry out the installation.
- If, when examining the light bulb, the bulb turns black, but continues to shine, it should also be replaced as it will soon fail.
- Try to avoid moisture, as the device will quickly fail if water gets in.
How to do everything yourself
The backlight bulbs need to be changed in this order.
- To begin with, the lamp shade itself is disassembled, this is done starting from the middle, using a thin screwdriver.
- The standard lamps must be unscrewed very carefully, as it is quite easy to damage the place where the lamp is attached to the car body.
- The next step is to install a new LED or incandescent bulb.
- After the new lamp is screwed in, you can reinstall the lampshade. Before installation, it must be thoroughly degreased.
- When the installation process is completed, you need to check whether the license plate light is working. If everything is done correctly, then the license plate will have bright lighting.
Diagram of injection VAZ 2110 16 valves
CLICK HERE (TO SEE THE VAZ 2110 ELECTRICAL WIRING DIAGRAM IN HIGH RESOLUTION)
| 1 – block headlight | 2 – front brake pad wear sensor | 3 – fan motor activation sensor |
| 4 – electric motor of the engine cooling system fan | 5 – sound signal | 6 – generator |
| 7 – oil level sensor | 8 – carburetor solenoid valve control unit | 9 – heater controller |
| 10 – recirculation valve switch | 11 – backlight lamp for heater control levers | 12 – switch |
| 13 – carburetor limit switch | 14 – oil pressure warning lamp sensor | 15 – spark plugs |
| 16 – carburetor solenoid valve | 17 – coolant temperature indicator sensor | 18 – ignition distributor |
| 19 – ignition coil | 20 – starter | 21 – heater fan electric motor |
| 22 – additional resistor of the heater electric motor | 23 – speed sensor | 24 – reverse light switch |
| 25 – micromotor gearbox for heater damper drive | 26 – recirculation valve | 27 – brake fluid level sensor |
| 28 – blocks for connecting the rear window washer motor | 29 – battery | 30 – windshield washer motor |
| 31 – washer fluid level sensor | 32 – coolant level sensor | 33 – windshield wiper motor |
| 34 – mounting block | 35 – blocks for connecting the warning light harness | 36 – external lighting switch |
| 37 – instrument cluster | 38 – rear fog light switch | 39 – fog light indicator lamp |
| 40 – indicator lamp for heated rear window | 41 – hours | 42 – rear window heating switch |
| 43 – steering column switch | 44 – block for switching wires when installing headlights of another type | 45 – instrument lighting switch |
| 46 – ignition switch | 47 – blocks for connecting the wiring harness for headlight cleaners | 48 – socket for a portable lamp |
| 49 – directional lamp | 50 – brake light switch | 51 – interior lamp |
| 52 – on-board control system unit | 53 – fuel level indicator sensor | 54 – hazard warning switch |
| 55 – driver’s seat belt sensor | 56 – cigarette lighter | 57 – ashtray illumination lamp |
| 58 – glove compartment lamp switch | 59 – block for connecting the on-board computer | 60 – glove box lighting lamp |
| 61 – side turn signal | 62 – switch in the front door pillar | 63 – switch in the rear door pillar |
| 64 – parking brake warning lamp switch | 65 – trunk light | 66 – cabin air temperature sensor |
| 67 – external rear light | 68 – internal rear light | 69 – license plate light |
| 70 – block for connecting the rear window heating element | 71 – block for connecting an additional brake signal |
Important Features
According to traffic regulations, with the onset of darkness, and even under conditions of limited visibility, the license plate must be illuminated in white or yellowish colors.
This is necessary not only so that other road users can see the license plate number of the car, but also to determine the direction of movement of the car.
Why, in this case, is it prohibited to illuminate license plates in other colors? So, if blue and red lamps are used as lighting, this may well cause an emergency on the road. This happens due to the fact that in the dark the driver’s perception of colors changes.
Debugg
Of the possible malfunctions listed above, the average motorist cannot eliminate all of them. It is unlikely that in the middle of the road you can replace a rotten lampshade with something. Not everyone can repair a damaged wiring harness. Therefore, we will not consider such cases in this article.
Having discovered a malfunction of the backlight, let's start by removing the lampshade. It is fastened either with self-tapping screws, or with plastic latches, or with a “screw + latch” combination. All these methods have both pros and cons - plastic latches are easy to break, but a soured self-tapping screw with rolled-up slots is by no means a gift.
Important! Do not apply much force to the plastic shade in the cold, otherwise it will inevitably crack.
On a number of cars, you can unscrew the lamp socket from the lampshade from the inside of the trunk lid, for example, on a Priora. This is often preferable to trying to press the plastic clips of the backlight from the outside, although it is less convenient.
After removing the courtesy light or the backlight bulb socket, first inspect it. A dark bulb or visible damage to the lamp filament is a clear indication for replacement. As a rule, W5W (pictured below) or C5W lamps are used to illuminate the license plate. They do not take up much space in the car, and it is advisable to have them with you just in case.
You can often observe the following situation: a C5W type lamp (cylindrical with end contacts) is installed in the backlight. It may be absolutely fine, but the contacts themselves are oxidized. In this case, it is enough to clean the contacts and bend them slightly to fix the light bulb more securely - sometimes the license plate light does not light up simply because the lamp has jumped out of the spring contacts.
Do I need to contact specialists?
Not all car owners are in a hurry to change the license plate light bulbs if they malfunction. In some car models, the driver is simply unable to cope with the replacement on his own: the wires are too short, it is impossible to get the backlight bulb or disassemble the ceiling lamp. In such situations, it is advisable to seek help from specialists at the service station. They know the nuances of replacing license plate lights in most car brands, and therefore will solve this problem almost instantly.
How to make a replacement
This light is located above the license plate in a small recess in the rear bumper, and you can get to it without any difficulty.
- We take a Phillips screwdriver and use it to unscrew the two screws that hold the lampshade lighting in place. If they are corroded and difficult to unscrew, they can be sprayed with an anti-corrosion agent, for example, WD40
- After the rust has corroded, unscrew the screws located above the license plate, then remove the lampshade from the hole and disconnect the power wire from it.
- When we have the element in our hands, carefully press the latch on it and slowly remove the diffuser
- We take out the old lamp from there, if necessary, clean the diffuser with the shade, and install a new light bulb there. The main thing is that everything is sealed and dust and moisture do not get inside, so if necessary, we coat everything with silicone sealant.
The stage of replacing the light bulb can be considered completed
Why do you need license plate illumination on a Priora?
The legislation of the Russian Federation strictly regulates the rules that relate to the cleanliness and readability of state registration plate symbols on citizens' cars. You cannot operate a car with unreadable license plates, much less pollute them. At night, a similar rule applies so that the car can be recognized.
According to the Law, all symbols on license plates must be readable from twenty meters - this is checked by a traffic police inspector. At night, it will be physically impossible to see the numbers and letters even at a closer distance and with good lighting of the route. Therefore, the lighting must work at night as soon as the driver moves the switch behind the wheel.
If it does not work, the driver will be fined 500 rubles and it will be cheaper to replace the light bulb. It is understood that in this way a person is hiding from receiving fines from traffic cameras and can confuse police officers during a chase. The lights above the license plate are a safety measure that applies equally to all road users.
Fuse box
The fuse box in Grant is located to the left of the steering column, near the light switches. To remove the cover and access the fuses and relays, pull the top left side of the cover towards you. It’s made conveniently, everything is at hand and you don’t have to climb anywhere when getting up from the driver’s seat. Maybe this is a hint that they will often have to be changed, or maybe just convenience - the developers know better.
F1 (15 A) - engine control unit, injectors, ignition coil, cooling fan relay, short circuit 2x2.
If you have problems with electronics, and replacing this fuse does not help, in the worst case scenario, you will have to reflash the ECU or replace it. Also, if this fuse blows, the injectors and ignition coil stop working, which makes engine operation impossible. Therefore, if the Grant does not start, check this fuse first.
F2 (30 A) - electric windows.
If they do not work and replacing the fuse does not help, try unplugging it completely or removing the terminal from the battery for a couple of minutes, then connect it again. In this way, all temporary errors should be reset and if this is the case, the power windows will work again.
F3 (15 A) - alarm. If it doesn’t work, check this fuse, as well as the emergency light button, its contacts and the functionality of the lamps.
F4 (20 A) - windshield wiper, airbag. If the airbag warning light on the instrument panel comes on, check this fuse. The problem could be either in it, or in the electronic unit, or in the pillows themselves.
If the windshield wiper does not work and this fuse is intact, also check relay K6, the power handle, the reliability of the connectors connected to it, as well as the electric wiper drive itself.
F5 (7.5 A) - terminal 15 of the ignition switch. If you have problems turning on the ignition, check this fuse, as well as the reliability of the wire connections to the lock terminals.
F6 (7.5 A) - reverse lamp. If it does not work, but this fuse is intact, check the lamp itself, as well as the contacts connecting the connectors to the headlight.
F7 (7.5 A) - Mass air flow sensor, adsorber valve, oxygen sensor, speed sensor. If the engine runs erratically, does not idle, or stalls spontaneously, the problem may be this fuse or the corresponding sensor. We already had an article on how to check the mass air flow sensor.
F8 (30 A) - heated rear window. If it does not work, check this fuse, the terminals connecting the wires to the heater, and the integrity of its elements.
F9 (5 A) - right side lamps
F10 (5 A) - left side lamps. If the dimensions do not light up, the problem may be in these fuses or in the lamps themselves, as well as their connectors. It wouldn't hurt to check the headlight switch on the dashboard.