One of the owners of Lada Priora decided to do engine tuning by installing a receiver (intake module) from a 1.8-liter VAZ 21179 (from Lada XRAY or Lada Vesta, article number 21177-1008600-00) on the 1.6-liter VAZ 21126 engine. He determined the effectiveness of such modification in several ways.
Why was the receiver from VAZ 21179 chosen?
:
- it is as similar as possible to the VAZ 21126 receiver;
- it is plastic, which means it will not heat the intake air so much, which will have a positive effect on the filling as a whole;
- According to numerous tests, he showed the results of almost TOP receivers.
Reasons for replacing the Lada Priora receiver
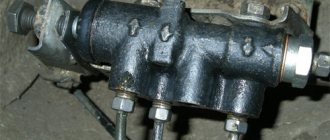
There are a considerable number of varieties of intake manifolds, for example, made from various types of metals or composite materials. However, the Priora receiver is made entirely of plastic. This material prevents excessive heating of the manifold due to a hot car engine.
Thus, the air flow characteristics are improved, which has a positive effect on the proportions and quality of the air-fuel mixture. However, plastic also has a main, negative side - fragility. As a result, numerous breakdowns occur both due to the fault of the car owner and due to low temperatures at which the plastic loses its strength coefficient.
The most common damage can be caused by: - road traffic accidents (even minor ones); — accidental impacts during any repair work in the engine compartment; — other reasons;
If the receiver on your car has through holes or any other leaks, then it must be repaired (if possible) or replaced. If a part is faulty, air loss will occur, resulting in improper engine operation.
Test No. 2
Acceleration was measured using a special Drag-On device. As a result of the races, a table of measurements was compiled on different configurations (the last measurement on the receiver was made on light forged wheels, all the rest on conventional stamping):
On the standard receiver, acceleration to 100 mph was 9.2 seconds, on the 21179 receiver - 9.1 seconds (different disks could affect the result). A noticeable difference is felt at a distance of 400 m. Receiver 21126 - 16.5 seconds, and on 21179 - 16.0 seconds.
Read also: Reversing lamp Chevrolet Cruze hatchback
How to remove the receiver on a Priora
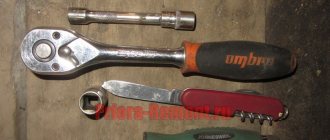
Tools that may come in handy: - 10mm socket; - key 13; - screwdriver.
To remove the intake manifold you will need:
- Due to the fact that in the next steps of the instructions there will be manipulations with electrical wiring, it is necessary to remove the negative terminal of the battery.
- The next step is to remove the plastic screen (cover) from the engine housing. This is done so that it does not interfere with your work.
- After which, it is necessary to remove power from the four ignition coils and dismantle them. To do this, pull out the contact chips. Take a 10mm socket (or a wrench of the same size) and unscrew one fastening bolt on each coil. Simply pull the coils upwards using the necessary force. Now they can be removed. There is no need to remove the spark plugs themselves; they will not interfere with removal. On the other hand, it is advisable to take advantage of the situation and check their condition (gap and spark quality).
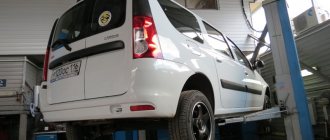
- Our next task is to dismantle the throttle assembly. The receiver cannot be removed without removing it. To remove the throttle and avoid excess antifreeze leaking out of the cooling system pipes, you need to prepare first (unscrew the cap of the expansion tank with coolant). To remove the throttle, it is necessary to disconnect all the pipes connected to it, including those responsible for the air supply (corrugation) and cooling. In order to remove the assembly itself, you need to unscrew the two fastening nuts with a wrench or a 13mm socket. Now the assembly together with the sealing strip can be removed, and at the same time inspected and, if necessary, cleaned.
- At this point, locate and remove the crankcase ventilation hose. To do this, loosen the tightened clamp using a flat-head screwdriver and pull it towards you.
- The next step is to dismantle the dipstick structure to check the oil level. It is attached to one screw, which must be unscrewed.
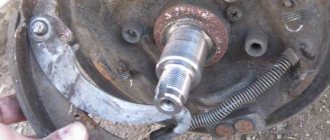
- Now the most important thing is to remove the Priora 16 valve receiver. Doing this is not as difficult as it seems. First of all, we need to unscrew the nuts from the three connecting bolts at the junction of the block and the manifold. It is most convenient to work from a repair pit or using a lift, having previously dismantled the underbody protection of the car. After that, you just have to unscrew two additional nuts.
- It's time to move into the engine compartment and unscrew the two special mounting bolts that are located on the right and left of the receiver housing.
- After which the receiver can be carefully removed.
- Depending on the type and configuration of components in your engine, you may need to unscrew, rotate or remove any component that prevents the receiver from being removed (for example, power steering or a generator).
Lada 2109 1992, 64 l. With. — tuning
Cars for sale
Lada 2109, 2001
Lada 2109, 1993
Lada 2109, 2002
Lada 2109, 1995
Comments 31
If you cook it from stainless steel)))
The 4th cylinder of ahahahahahahah is working on the vacuum, the blah = ddddd))))) and even I did not understand you now, it turned out not uniform ...
why not uniform?
Did you insert a pipe after the throttle to the middle of the receiver?
Why install the pipe all the way to the middle? It’s easier then to do nothing and use a stock receiver. I didn’t sculpt the res for boom.
Yes, yours is no better than the drain, if for that matter you didn’t increase the volume much, and the fact that the tube would go all the way to the middle is a necessary thing!
I don't agree with you. assemble the same one and you will understand everything yourself, and not like what they write a lot on the Internet. I don’t want to take pictures of records and look for links that guys who do autocross sent me. (and the difference in the length of the pipe plays either at the bottom or at the top), so it was chosen between. In short, I won’t make excuses here and prove that this is better or stock. The main thing is that I did what I needed and it works quite well. Now it's up to the shafts.
And did you make it to the top?
up to 3.500 it goes as usual, then it starts faster
The 4th cylinder of ahahahahahahah is working on the vacuum, the blah = ddddd))))) and even I did not understand you now, it turned out not uniform ...
on the throttles - not uniform. and here everything is quite normal. similar system on the 8kl engine engineer.
The 4th cylinder of ahahahahahahah is working on the vacuum, the blah = ddddd))))) and even I did not understand you now, it turned out not uniform ...
open the book and look
All that's left is to paint it)
I need to trim the plate under the throttle, maybe re-align it, most likely I’ll do that. it should be thicker) and then paint it with some color.
return ramp. Here is one fitting and brought it to the back cover.
oh yes, 3.6 liters with horns. the horns are a little long so that the engine can drive from below
I want to finish this for myself, I don’t have time
If you have time and desire, you will definitely finish it)))
Source
Installing a receiver on a Priora
As usual, installation is carried out in the same way as removal, however, during its production you must be extremely careful not to damage the receiver body. It is extremely important to insert the installed part with the holes into the connecting pins of the cylinder block, after which the manifold is directed to the mounting points on the engine.
Small but important points for installation:
- always clean or lubricate the rubber seals installed at the points of contact between the receiver and the cylinder block;
- Properly tighten the nuts at the joints of the elements.
Conclusion
- Receiver 21179 showed itself better than 21126, as a standard candidate - this is a good option.
- Receiver 21179 is not a sports receiver as it is presented in tests.
- The adequate cost of the 21179 receiver is 3,500 rubles (at the moment it is sold for 5,000 rubles).
- With receiver 21179 the response to pressing the accelerator pedal has become clearer. When you lightly press the accelerator pedal, the traction has become better (you can feel the acceleration, there is no need to press the pedal harder as before), the top has become brighter.
Let us remind you that we previously talked about cheap tuning of the VAZ 21179 engine, which allows you to increase power by 13%.
Found a mistake? Select it and press Ctrl+Enter..
Source: xn--80aal0a.xn--80asehdb
Which receiver is better for Priora?
There is no clear answer to this question. Each situation is individual. However, some comparisons can be made between receivers made of plastic and aluminum.
Advantages of aluminum products:
- higher strength and wear resistance;
- increased engine power due to design features and a larger volume of supplied air;
- Some models are easier to install and therefore easier to remove.
In addition, the shape of the collector itself plays an important role in ensuring increased power, which should not contain sharp corners and transitions. The most important difference between plastic and metal is the strength and durability of the latter. Therefore, we can recommend installing metal types of intake manifolds for Lada Priora cars.
The power of any internal combustion engine depends on the correct air/fuel ratio. In injection cars, gasoline is supplied to the combustion chambers through computer-controlled injectors. What about the air? And it passes through a special system, one of the most important parts of which is the receiver. What is it?
What is a receiver for?
In fuel-injected cars, the air travels a long way before entering the combustion chamber. The order of its movement looks like this:
3) Nozzle with mass air flow sensor (MAF).
5) Throttle assembly with damper.
The most important and expensive in this set is the mass air flow sensor. It determines the amount of air that has entered the engine. Based on its readings, the on-board computer regulates the opening time of the injectors, according to the configured setting. This creates an optimal air-fuel mixture. The throttle assembly opens and closes the air flow to increase and decrease rpm. A correctly installed receiver divides the total flow into sleeves, sending identical jets to each of the cylinders.
Air compressor made from auto parts
The air compressor has a fundamentally different design, which is assembled on the basis of a ZIL compressor and a separate engine. This is more powerful equipment that can also be used to connect pneumatic tools. Very noisy unit.
Layout drawing of the compressor unit: 1 - compressor from ZIL-130; 2 — frame from a corner; 3 - safety valve; 4 - standard pressure gauge; 5 — transfer case; 6 - three-phase electric motor (1 kW, 1380 rpm); 7 — start box (from the washing machine); 8 - capacitor bank (working capacity - 25–30 μF, starting capacity - 70–100 μF); 9 — receiver (from an oxygen cylinder or KrAZ muffler); 10 — V-belt transmission (reduction 1:3); 11 — “Stop” button; 12 — “Engine start” button; 13 - button for short-term activation of the starting capacitor battery; 14 — fitting of the flow (outlet) valve; 15 — aluminum tubes Ø 6 mm; 16 — exhaust valves; 17 — intake valves; 18 — wheels (4 pcs.); 19 — transverse stiffener; 20 — tie rod (M10 — 4 pcs.); 21 - drain hole with plug
Connecting a three-phase motor to a single-phase network: a - “triangle”; b - “star”
How to remove and install the receiver
This work is quite accessible to a novice car enthusiast. Read the instructions, prepare the tools and go ahead with the removal and installation. And you need to prepare the following set:
- Driver and extension for heads.
- Heads No. 13, 10.
- Screwdrivers.
- Pliers (just in case).
And you can start working. According to the established tradition of normal locksmiths, the first thing to do is disconnect the battery terminal. And only then start disassembling. The first step is to disconnect all sensors and ignition modules. And move the wire harnesses away from them so as not to damage them. Using a screwdriver, unscrew the clamps on the rubber adapter from the mass air flow sensor to the throttle and remove the adapter sleeve from the damper assembly. Unscrew the two nuts 13 securing the throttle assembly with the Priora receiver.
Using a 10 mm socket, unscrew the bolts securing the ignition modules. Remove them. Unscrew the 2 10mm nuts holding the Priora receiver to the head. Now let's move on to the front. You need to start with the oil dipstick connection. It is screwed with a self-tapping bolt to the receiver. After this, pull the dipstick cover up and put it away. It's time to unscrew the main mounting bolts of the device. There are 5 of them. More precisely, these are 2 13 nuts and 2 bolts. It's quite difficult to unscrew them. Especially if the car is equipped with air conditioning. You will have to use a cardan for the head. But when they are all unscrewed, all that remains is to push the receiver towards you and remove it.
Receiver installation
There's nothing complicated here. Just proceed in the reverse order when installing. The main thing is to check the condition of the rubber O-rings before installation. They are installed directly into the body of the part, around the outlet holes in the head. And on the connection for installing the throttle valve.