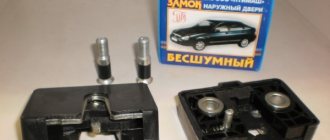
It is known that locks for VAZ-1118 car doors have an interesting property - you can replace their cylinder without removing the mechanism from the door itself. On previous models, dismantling is more difficult: you need to press the bracket holding the cylinder with a paper clip or an awl, getting into the hole on a mechanical drive. In the Kalina model, that is, VAZ-1118, this bracket is pressed out by pressing with a ruler or a screwdriver. Which, in turn, is done on the installed lock (there is no point in removing it). Next, the replacement operation is discussed in more detail.
Design of VAZ-2109 locks and disadvantages
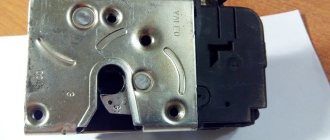
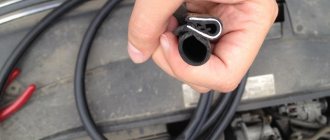
The lock cylinder is a cylinder that is equipped with a secret mechanism. In all locks with a flat key, the cylinder is replaceable. For example, on VAZ-2109 cars it is replaced like this.
The rotating part that is connected to the rod is called the “drive”. As we can see, this drive has a hole for removing the cylinder. By applying pressure with a thin axle or an awl, the larva is pulled out.
There is only one drawback - it is hardly possible to complete the steps indicated here without first removing the lock completely.
It should be noted that even when the mechanism is removed, it will not be easy to pull the larva out of it.
Therefore, before dismantling, be sure to insert a key into the cylinder and turn it left or right 90 degrees. The purpose of this action is to be able to dismantle the larva. This action is performed effortlessly, and the key is then simply pulled towards you.
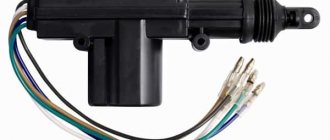
The driver's actuator toggle switch is damaged
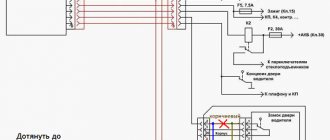
Operating any vehicle involves gradual wear and tear of components and systems. The budget domestic model Lada Kalina is also subject to this “law”. Among such systems is the on-board electrical circuit, which from time to time can fail due to the presence of a huge number of elements and their power circuits. If one of the network components fails, the owner needs to know several aspects: location, switching method, etc. A wiring diagram will quickly help with this.
The electrical diagram in the manual helps to find a pantograph that has become unusable. Without such documentation, it is impossible to repair or replace a part or section of the cable network. The Lada Kalina manual has an on-board electrical circuit; this wiring diagram is divided into separate blocks and collected in a special album. This was done for the sake of ease of reading the drawings.
Next, we will consider the basic principles of the functioning of electrical components in the Lada Kalina on-board equipment and how the electrical circuit is constructed.
Replacing the larva in Kalina
First of all, replacing the lock elements means that the door trim will be completely missing. Therefore, first we will figure out how to dismantle the trim on Lada Kalina cars. The second chapter is devoted to how to remove the larva and install a new one in its place. The last step will actually be the simplest.
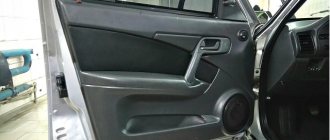
Removing the door trim yourself
The casing is attached not only to screws, but also to plastic pistons. The number of screws holding the part in question is four:
Numbers here indicate all fastening elements. But to get to them, you need to remove the screw cap “3”, as well as the inner door handle. The pawl handle also needs to be unscrewed.
If these actions are completed successfully, the casing begins to be dismantled, moving it away from the metal. Dismantling is carried out starting from any of the corners, but care must be taken: the pistons holding the plastic are fragile.
Restoring synchronization
Synchronization may be lost if there is a short-term (from 6 seconds) lack of power to the microcircuit in the key fob. In this case, desynchronization may actually occur, i.e. the connection between the remote control and the control unit of the central locking Lada Kalina is lost. According to the operating manual, if such situations arise, it is necessary to register the key fob again, entering data about it into the memory of the central locking system. You should immediately take into account that the procedure is far from the simplest and most understandable, and you also need a special training key. You can try to restore synchronization as follows:
- Turn the ignition switch with the key that requires synchronization.
- Wait 6 seconds.
- After the immobilizer lamp stops flashing, the ignition can be turned off.
After 10 seconds, the same key is used to start the car again. If the immobilizer warning light does not blink, it means that synchronization has been restored.
At first glance, nothing complicated, but this method does not help in all cases. If there is a training key, but there is no previously registered key, then the ignition is first turned on, then turned off. After the immobilizer warning lamp stops flashing, within six seconds the key is moved to the second position of the ignition switch (starter).
Recommendations from the magazine “Behind the Wheel”
Let’s turn again to the “Behind the Wheel” review, which discusses how to remove door locks in a VAZ-1118 Kalina. If the casing has been dismantled, this is not bad. Next, according to the recommendations, unscrew the screw securing the inner handle:
The lock mechanism is connected to two rods made in the form of rods. Both of them are dismantled by disconnecting the plastic clips:
To disengage the latch, press on the plastic tab with a screwdriver.
At the last step, as you might guess, all that remains is to unscrew the screws holding the mechanism motionless.
But first, you need to dismantle the external handle. To do this, unscrew two bolts equipped with an “8” hex head.
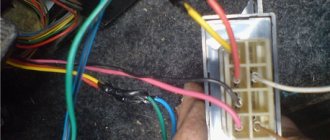
By the way, if the central locking connector is attached to the mechanism module, it is also disconnected.
Let the wiring harness for the central locking drive remain in the door.
Of course, all door locks must be unlocked with one key, which is supposed to be used in the future.
The work indicated here is carried out on each of the four doors. In addition, it is very desirable that the ignition key also unlocks the doors. However, replacing the cylinder on the steering column will not be so easy. Can you handle the total amount of work that needs to be done? Decide for yourself.
Electric drive: easy installation option
The technique is simple, the only thing you need is to make a rotating plate and a rod for it yourself. The wiring should be routed to the electric lock and connected to a special control unit. When disarming the car, the electric trunk lock will be activated after the fifth door opening button is unlocked.
The entire installation task is based on connecting the electric lock to two wires. You can purchase the part at any auto store. The trunk end must be additionally hidden to prevent water from getting into it. Otherwise, it will periodically short out during rain. An important attribute is the trunk hinges. Wires are often broken in this place, so their condition must be carefully monitored.
Before installing the electric drive, the trunk lid trim is removed. The main thing is not to damage it during this process. It is recommended to choose a lock that will not need to be modified during operation.
An important step in the installation process is wiring; you can use those wires that are standardly suitable for the fifth door of the car.
Power is taken from the cigarette lighter. An important point is the installation of a protective fuse. The wire is laid along the threshold; it will take approximately 3.5 meters. Then the installation takes place.
It is advisable to choose an option that does not require drilling additional holes. The procedure consists of connecting the wires according to the diagram. Important: you can use the wire that goes to the trunk light.
Installing an electric drive is not difficult, but for the first time it is a labor-intensive process. If difficulties arise, you can seek help from a service station.
In order to gain access to the rear door (trunk) lock, you first need to remove the inner plastic trim, which is attached to two bolts at the handle attachment points and latch pins, which are pryed off with a flat screwdriver and removed.
Changing the secret code yourself
Kalina rear handle repair
Remove the rear door .
Putting the handle on the shaft, set the glass to the upper position, and then remove the handle.
1. Remove the vibration damping element from shaft .
2. Fix the glass in the raised position by installing two wooden wedges between the glass and the inner door .
3. Using a 8-mm socket with an extension, unscrew the two bolts securing the glass holder to the guide slide of the window lift mechanism.
4. Repair of the rear door, two screws securing the front door handle of the Lada Kalina;. Using a socket or a size 8 wrench, unscrew the three nuts securing the window lift mechanism.
5. Using a socket or a 10mm wrench, unscrew the three nuts securing the guide of the window lift mechanism.
6. We remove the window lift mechanism through the lower technological hole in the inner door .
Troubleshooting methods
List of common malfunctions of the standard door lock of the Lada Kalina:
- difficulty opening;
- the key is not fully inserted into the cylinder;
- lock jamming;
- jamming of the locking mechanism;
- metallic knocking when driving on a bad road.
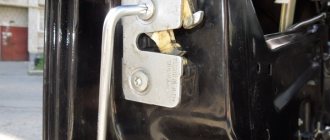
Difficulties when opening doors are associated with incorrect adjustment of the position of the locking bracket. This can be easily fixed by loosening the screws that secure it to the opening. Adjustments to the position of the bracket should be made in the direction of greatest wear. After this, you need to tighten the fastening screws.
Replacing the Kalina door lock cylinder is necessary if it is damaged. First you need to remove the left front door trim, then insert the key into the lock and turn it, if possible. Then you should press the cylinder mechanism lock with a knife blade or a thin plate and, pulling the key, pull out the cylinder from the outside. Replacement on the right follows a similar procedure. The difference is that the latch is located on top of the mechanism, in contrast to the driver's door, where it is located at the bottom.
A metallic knock that occurs when a car moves on an uneven road is caused by wear of the locking mechanism bracket and loss of elasticity by the seal. These defects can be easily eliminated by replacing the lock assembly and seal. Jamming or jamming of the locking mechanism can be eliminated by repairing the components. Applying lubricant is often sufficient.
Repair of door handle on Kalina VAZ-1119
A very simple way to quickly repair a door handle
, no need to open the
door
, everything is done from the outside.
3. To remove the door lock, disconnect the wire terminal from the “negative” terminal of the battery
Using a Phillips screwdriver, unscrew the screw securing the intermediate lever of the locking rod, and remove the lever together with the rods from the rectangular protrusion, removing the locking rod from the plastic holder (shown by the arrow).
4. Use a Phillips screwdriver to unscrew the screw securing the base of the inner door handle and remove it. together with traction from a hollow pin. Remove the decorative glass trim and take out the glass guide.
5. Removal, installation, replacement and repair of the outer front door handle of the Lada Kalina | Section 10. Using a Phillips screwdriver, unscrew the three screws securing the door .
We remove the electric lock through the technological hole in the inner door .
6. Squeezing the two clamps of the wiring harness , disconnect the block from the electric drive and remove the lock with rods.
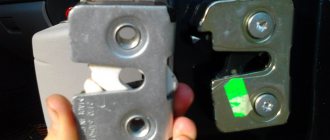
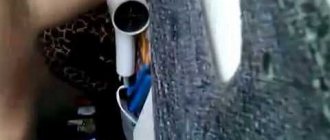
Rear door lock with electric drive and rod assembly
Install the rear door in reverse order .
Troubleshooting methods
When the Lada Kalina door lock behaves strangely: it jams, does not allow the key to be removed, or the unlocking device gets stuck in the mechanism, then there are several options for eliminating the problem. To identify the cause of the malfunction, you will need to disassemble the cylinder. Removal will not always solve the problem if the breakdown is caused by a poorly adjusted mechanism or door leaf. Algorithm of actions:
| Cause | Solution |
| The key moves poorly: it is difficult to turn and remove from the core. | Preventive actions: disassembling the cylinder, lubricating the pins. |
| Jamming, unauthorized blocking of the structure. | Adjusting the lock: modifying the latch, loosening the bolts with a screwdriver. Stopper insert with notches. Split teeth. |
| The lock does not close due to the fact that the door does not fit well to the body part. | Door adjustment: adjusting the plumb part or eliminating body movement. You can loosen or tighten two bolts at the end of the structure. |
Instructions for replacing the rear door lock on Kalina
- The first step is to perform a procedure such as removing the rear door trim.
- Also, for greater convenience, you can remove the door glass, although it is not necessary. But, again, I repeat, doing everything without glass is much more convenient.
- When the glass is removed, from the inside of the door you need to get to the block with the connector and, pressing the latch, disconnect it.
- Using a screwdriver, as well as light finger efforts, release the drive rods from the lock
- From the end of the door, unscrew the three screws securing the lock.
- From the inside we remove the lock from the door
- Install the lock in reverse order
In order not to show off everything and to convey everything as clearly as possible, I tried to make a video review of this repair.
How to install the activator
The only way for the viburnum to get into the trunk is to turn the key and press the button. Naturally, doing this is not always convenient. Weather, busy hands and other troubles contribute. At this stage, many car enthusiasts begin to think about the trunk activator. It is quite possible to do this, you just need to try a little.
The Kalina station wagon trunk lock activator is easy to install. It is enough to take a self-drilling screw and secure it on one side with it and on the other with a wire holder. To check the device, you need to connect it to the standard connector.
The only problem in all this work may be the back door being picked up at the wrong time. After the current stops supplying the activator, it closes with the first latch, but the trunk is not completely closed. In order to get into the so-called fifth door, you will have to use the key again.
A lock with a button is not difficult. But during work it is necessary to assemble the circuit and stretch the wires. In this case, one programmable alarm channel (additional) should be used. There are two main connection options. First: the button goes to +12 on the activator, bypassing the relay. The advantage of this connection is its simplicity and the absence of unnecessary elements, the disadvantage is the need to run additional wires.
Installing the activator using the second method is more labor-intensive. You will have to use additional elements, namely diodes. In addition, there is a need to search for “mass”. The main advantage is the use of a minimum number of wires.
Many experts prefer the first option due to its simplicity. The wire can be copper PV-3 with a square cross-section. It must be pulled along the left side and thresholds. The switching can be crimping and electrical tape on top.