How to increase on-board voltage
Where and how is a diode placed in the LV circuit on the generator in order to increase the voltage in the car network and better charge the battery?
Here I propose a simple solution, raising the on-board voltage, without going anywhere in the car and its circuits. I searched in my archives and did not find the material from which I read this decision. “Structurally, voltage regulators have an upper limit of 13.6V. This is due to the “old” connection diagram, from which the new one was copied and “successfully improved”. In it, the necessary voltage from the on-board network, supplied to the regulator for comparison, passed through a chain of wires. On them it dropped to normal. According to the new scheme, we have a chronic undercharge of the battery. Which, with the arrival of winter, makes starting the engine in the cold quite problematic. But if you install a pre-heater, starting the engine will be much easier.
It should also be noted that the battery begins to absorb energy (charge) only when its temperature is above zero. Therefore, in winter, if you make short runs and the battery does not have time to warm up under the hood to at least zero (plus charging time), it will be constantly discharged. And soon it will die... It is believed that after starting the engine, in order for the battery to recover, you need to drive for at least 20 minutes. Just go, and not stand in traffic jams! How to increase the voltage in the network?
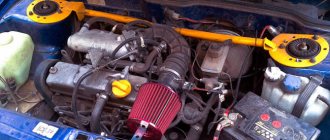
Very simple! It is necessary to make the regulator “think” that we have low voltage in the network. Thus, the generator will give us the missing volts. A diode will help us do this. In a generator with a built-in voltage regulator, you need to place a diode in the circuit, as shown in the figure.
Diode introduction
Observe polarity. There is no crime here, it’s just that if the polarity is not observed, charging will not happen. The diode must be designed for a current of at least 5 A. By the way, it will get very hot, so it is better to install it on a radiator. What should you consider when selecting the type of diode? Voltage drop on diodes: germanium - 0.3...0.7 V, silicon - 0.8...1.2 V. I.e. This is the voltage by which your on-board network will increase. Therefore, by selection we can achieve the “right” voltage in our network.”
On the generator
In the second picture you can see how the diode is installed, but with such a length of wiring it is not very convenient - everything is tight. It is better to make the length of the wire about 2 cm from the diode - this way, in my opinion, it will be easier to insert into the RN connector of the generator. As far as I remember, I have a K223 diode, i.e. it's silicon. Raises the voltage by about 1.3 V.
I’ll correct myself - I checked using reference data on the Internet what the K223 diode is - I must say that I was very mistaken in indicating exactly that name. In fact, there are diodes KD223 and D223, but their housings are completely different.
However, in the photos I provided, most likely diodes D214 or D242 are wrapped in electrical tape (there may be different letters after the numbers), here is the case (M6 thread):
Diode 242
I will briefly summarize the parameters here:
reverse voltage: from 50 to 100 V or higher forward current from 5 to 10A, with a voltage drop across the diode from 1 to 1.5 V.
Constant undercharging of the battery or its absolute discharge at the most inopportune moment is a headache for many car owners. One source of these problems may be the generator. But how to check it? Perhaps it's not his fault at all? Let's figure out together how much the generator must produce for the normal functioning of all car systems and maintaining the battery in a charged state.
How to check the operation of the generator
The battery in a car is an important element of the system, which is responsible for providing the car’s on-board network with electricity. The generator is used to charge the battery while it is active. Unstable operation of a device generating electricity causes a voltage drop in the network and failure to restore the capacity of the power source.
Normal generator performance means timely and complete replenishment of the battery charge level, which decreases under load. Checking the battery charge level from the generator is simple and can be done by the car owner himself.
Diagnostics of an automotive energy-generating device includes a visual inspection of the unit, its elements and related parts, as well as voltage and current measurements. At least twice a year, you should check the tension of the drive belt, excessive weakening of which leads to a decrease in the performance of the generator, and sometimes can lead to breakdown of the device. Once a year, you can check equipment elements - fasteners, diode bridge, voltage regulator and others. Timely maintenance of the battery will also guarantee the absence of problems - cleaning the terminals, adding distilled water.
Where to start checking
If the VAZ 2107 battery icon does not light up, the voltmeter gives normal readings, but the battery does not charge, which means there is no (or insufficient) contact at the terminals. Their severe oxidation can cause the voltage from the generator to the battery simply not to flow. Therefore, it is necessary to remove the terminals, thoroughly clean them, as well as the battery terminals, then reconnect the battery to the on-board network and check the functionality of the charging system.
What kind of charging should go to the battery from the generator?
It is traditionally believed that 13.5-14.5V should be supplied by the generator to the battery and this is absolutely enough to replenish the battery costs.
It is worth considering that using a battery with a higher power in a car than the manufacturer recommends also requires the installation of a more productive generating device.
It is necessary to take into account the load that the generator must withstand - it is calculated based on the maximum indicators of all electrical appliances and car systems.
Do not forget that the charging current from the energy-generating device will allow you to start the car in the cold season. In order to avoid problems with starting the car, we recommend purchasing generating equipment, the charge current of which will be approximately 10% of the capacity of the power source. That is, a battery of 100 A/h requires a generator that can produce 10A. Please note that for many cars, 100 amp equipment will operate at its maximum capacity, because the power consumption of the automotive system is in the region of 80 amps. Therefore, the choice of a source generating energy must take into account both the battery capacity and network consumption.
What to consider when choosing a new battery
According to the passport, the battery is designed for 3-5 years of active use (in reality it turns out to be less). Therefore, over time, it becomes necessary to buy and connect a VAZ 2107 battery instead of a failed one.
When purchasing a new battery, you should consider a number of parameters and characteristics. Battery type: serviced and maintenance-free. The first option allows you to check and replenish the electrolyte level. This makes it possible to use the battery longer.
The next question is: what power will the battery on the VAZ 2107 be most efficient. Batteries with a capacity of 50–60 Ah are suitable for this model. However, given that modern cars are equipped with energy-intensive equipment, it is better to opt for more capacious batteries. In addition, carburetor VAZ models require more powerful batteries - they consume more energy when starting. In terms of dimensions, the VAZ 2107 requires power supplies with dimensions of 242*175*190 mm. The vast majority of samples available on the market fit them.
When choosing a battery, you should also take into account the place of residence of the owner of the “Seven”. For those who live in the south, you can purchase a less powerful battery. Northerners are advised to prefer a battery with a higher capacity: in the cold, the car starts with high energy consumption.
How to check the alternator voltage on the battery
The potential difference can be diagnosed in two ways - directly at the generating equipment and through the battery. The generator is directly connected to the power source with a thick wire, therefore, to check the level of potential difference, you can measure the voltage at the power source. To do this, you will need special devices - a voltmeter, multimeter or load plug.
The wires of the first measuring instruments are connected to the battery in any sequence. The plug must be connected to the battery terminals with strict observance of polarity. It is generally accepted that the normal voltage in the network should not be lower than 12 volts. At idle speed without turning on all the electrical appliances of the car, this indicator should be at the level of 13.5-14V. A drop in voltage values to 13.3-13.8 volts is considered acceptable.
At the same time, using conventional testing equipment, you can check the resistance of the generator elements - rotor, stator and diode bridge. Diagnostics of rotary equipment is carried out by its winding. It is necessary to connect the probes of the device with slip rings. If the multimeter gives readings from 2, 3 to 5.1 ohms, then this element is working. The current consumption of the winding should be within 3-4.5 amperes.
Its normal resistance is 0.2 Ohm. The diode bridge is checked by the presence or absence of resistance, the indicators do not matter. The only thing worth considering is that there should not be a zero dimension. Measurements are carried out in pairs - positive output and all plates on this side or minus and all elements.
We remind you that for normal charging of a car battery, the voltage supplied by the generator must be from 13.5 to 14 volts.
How many amperes does a car alternator produce per battery?
The current strength required by the electrical system of each car is individual and depends on the number of electricity consumers and their values. And also the charge current must be sufficient to charge the power source.
It is worth noting that ampere readings appear only when there is a load in the vehicle’s electrical system and, accordingly, the battery is discharged. After starting the car engine, the charging current is about 6-10 amperes and drops over time, because the battery is charging, taking on the main energy consumption. If you turn on additional equipment - headlights, radio or heated mirrors, you can see an increase in the charging current values.
When purchasing a generator, pay attention to its technical characteristics, which the manufacturer indicates on the case - that’s where you will find information about the maximum current that will flow to the battery.
In the table below you can see the approximate current values that the generator shows at different loads.
Table 1. How many amperes the generator produces under load.
Signs of a generator malfunction
In modern cars, breakdowns of the electrical system are one of the most common. A large number of electronics requires particularly careful monitoring of the operation and condition of the generator and battery, because their failure can immobilize the car. The most common signs of a generator malfunction are:
- battery indicator light on the instrument panel;
- unstable operation of the battery (its boiling over or undercharging);
- different intensity of headlights;
- extraneous sounds from the generator.
If you notice incorrect operation of the car, then perhaps the battery charging current from the generator is insufficient.
All malfunctions of electrical equipment, which includes the vehicle’s energy-generating device, are mechanical (deformation or breakage of fasteners, housing, malfunction of bearings, pressure springs, drive belt, etc.) or electrical (winding breaks, diode bridge malfunctions, burnout or wear of brushes , short circuits between turns, breakdowns, etc.).
Don’t write off a non-working generator: find out if there are repair kits and spare parts. Replace them if possible. If you cannot carry out repair work yourself, then take the generator to a workshop. Many craftsmen will be able to restore the unit at no extra cost and in the shortest possible time.
What to do if there is no charge, weak charge (battery is discharged)?
If the battery of your VAZ 2107 is discharged, then one of three elements may be “to blame”: the generator, the voltage regulator, and the connections between them. Determining “who is to blame” can be very simple, even without additional devices. How this article will help.
We carry out testing using standard equipment
To monitor the operation of the generator on the “seven” there are two instruments: a voltmeter and a control light on the instrument panel. With their help, you can track the cause of your troubles.
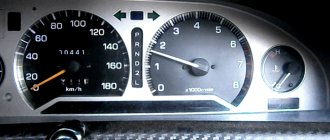
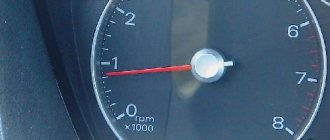
1) Turn on the ignition without turning on the starter and look at the warning lamp. It should shine at full intensity, as in the photo. The voltmeter needle, normally, stands on the white part of the scale (photo). Let's say everything is OK - go to point 2
The battery charge control lamp is on
Position of the voltmeter needle before starting the engine (ignition on)
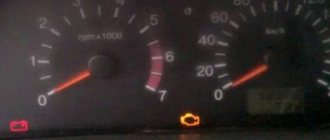
The lamp does not light, the voltmeter needle remains at zero when the ignition is turned on.
Check fuse No. 10 in the mounting block. 99% of the time it will be burnt out. In this case, all other lamps on the instrument panel will also be de-energized. Replace it with the same one and test again. If the fuse burns out again, you need to look for the cause, that is, a short circuit. We check whether the wires from the generator are disconnected, whether the insulation is frayed somewhere, etc. Diagram 3 at this link
Other causes of low voltage
A small potential difference in the system is not always associated with a breakdown of the generator or a bad battery. If the diagnosis of these elements does not reveal any problems, then you should pay attention to the following:
- condition of the battery terminals - connection density and oxidation;
- electrical wiring problems - oxidation, violation of its integrity;
- output contacts to electrical appliances;
- correctly selected energy consumers.
Each contact must be tightly adjacent and intact, that is, there must be no formations (for example, sulfation) that will disrupt the flow of current. Incorrect connection of contacts leads to accelerated battery discharge even when the car is not running.
To improve the connection of the elements of the car's electrical system, it is necessary to clean all contacts and restore the integrity of the wires by replacing them or connecting them and wrapping them with insulating tape.
In conclusion, I would like to repeat that stable operation of the car requires constant monitoring of all elements, and the generator should attract special attention. The battery is charged from it and provides electricity to the entire car system. Pay attention to all elements: generator brushes, slip rings, voltage regulator, equipment winding.
The most correct measurements should be carried out when the battery is fully charged and in various modes. Remember that the manufacturer links the characteristics of the generator to the number of engine revolutions - they help produce a certain current.
Detailed video on how to check the generator:
Do you have experience diagnosing an alternator and solving problems in a vehicle's electrical system? Please share your experience and opinion with our readers in the comments. If you have questions about the topics covered, we will be happy to answer them.
Many car owners are faced with a situation where, after starting the engine, the on-board computer or one of the devices begins to show that the battery is being recharged.
The consequences of this situation are very different and depend on how much the voltage in the on-board network exceeds the nominal one.
Slightly increased parameters will only negatively affect the battery (boiling of the electrolyte followed by its evaporation), but if the voltage coming from the generator greatly exceeds the norm, then electrical consumers may fail.
In any case, overcharging is a phenomenon that must be eliminated, otherwise it will not have the best effect on the service life of the battery and electrical appliances.
How to replace the charging relay?
- Important! First, as always, we turn off the ground, remove the negative wire from the battery terminal, then remove the yellow wire going from the generator to the relay, then use a Phillips screwdriver to unscrew it;
- Then we take it out together with the brushes:
- Now we need to carry out diagnostics. To do this, we test the voltage on the brushes with a voltmeter, and we power the relay itself from the battery, “simulating” the rectified current of the generator. At the same time, we apply (+) to terminal “B”, to the yellow wire, and connect (-) to the other terminal, “ground”. We are familiar with the signs of trouble. If you don’t have a tester, you can take a 1-3 W, 12 V light bulb.
- When installing a new relay, you need to press it firmly during installation, since new, unworn brushes provide more resistance.
If after taking these measures there is no effect, you need to look for the cause in the generator, we’ll talk about this next time. At the same time, remember that if you are removing a generator, then either you have decent knowledge in electrical engineering, or you have someone to give it to. There is no third option, especially if you have an injector.
In conclusion, let me tell you about several other reasons for the lack of charging or imitation, and also give advice:
- If you have a VAZ 2107 injector, then it is strictly not recommended to reset the battery terminal for various “checks” while the engine is running, and especially to allow strangers near the hood for this purpose. This is very harmful to electronic “brains”.
- It is advisable for those who like to “light up” to be able to say a firm “no” if you have a VAZ 2107 injector.
- On the instrument panel, the connectors are not soldered to the board, but riveted. Therefore, in some cars in the cold, while the interior is cold, there is no contact with the charging lamp. It lights up, simulating a lack of current from the generator. After the interior has warmed up, contact is restored and the lamp goes out.
- The next reason for those who like to go to the car wash in the cold. When water gets into the relay and brush assembly and freezes there, there is no charging. The solution is to heat it with any powerful hairdryer.
Battery charging circuit
For a general understanding of the reasons for overcharging, first consider the battery charging circuit diagram. And although it is structurally different on different cars, the general principle of construction is the same.
This circuit includes:
- Generator;
- Rectifier block (diode bridge);
- Relay regulator;
- Fuse box;
- Egnition lock;
- Charge indicator lamp;
- Battery
The recharging system works using the example of the VAZ 2106 and other cars from the VAZ classic series as follows: after starting the power plant, by means of a belt drive, the crankshaft begins to rotate the generator rotor, as a result of which this unit begins to generate electricity.
But since automobile generators use alternating current, the generated energy goes to the rectifier unit, where alternating current is converted into direct current.
After the rectifier unit, the electricity goes to the relay-regulator, whose task is to maintain the voltage in a given range.
After the regulator, the electrical energy passes through the circuit through the fuse box, the ignition switch and the charge indicator lamp, then returns to the output of the generator, and from there it is supplied to the battery.
The detailed diagram is shown below.
What else to check
- Voltage regulator;
- Generator rectifier unit;
- Diodes;
- Generator for broken windings;
- Generator brush assembly;
- Contacts on the terminals of the generator, mounting block.
A malfunction of any of these elements leads to the fact that the charging system is inoperative and the VAZ 2107 battery is not charged.
Let's continue... Diodes are checked with a test light or multimeter. If one of them is broken, the entire rectifier will have to be replaced.
To check the stator winding you need the same device. The resistance between the fasteners of the rectifier unit is measured. If there are no contacts between them, you need to replace either the winding or the entire generator.
The generator itself often fails due to wear on the brushes. To check them, you need to remove the brush assembly and measure the length of the elements. If it is 5 mm or less, the brushes must be replaced.
Almost all of the above system components are replaced when they fail, since they cannot be repaired. Only some of the generator problems can be repaired, but this can only be done by a qualified auto electrician.
The worst thing is if problems with recharging occur while on the road. Without recharging the battery, it will eventually run out completely. And even if you manage to find the cause of the breakdown and eliminate it, you will no longer be able to start the engine with the starter. It will be possible to start a VAZ-2017 with a dead battery only from a tug or pusher.
Features of the circuit
The above is a general diagram of the circuit, without details, but it is enough to understand how everything works. Now about the features of battery recharging.
The generator cannot independently regulate the parameters of the generated electricity, so the output voltage from it varies, and in a significant range, it depends on the crankshaft speed and the load in the on-board circuit. That is, the battery is essentially constantly being recharged while the generator is generating electricity.
In order for the battery to accept a charge, you need to apply a voltage to it slightly higher than the nominal value of the battery itself. The input voltage on the battery differs on different cars, but in general, this figure is in the range of 13.9-14.5 V.
It is at this voltage that the battery can “take” a charge. If the voltage is lower, the battery will be undercharged, and if the voltage is higher, it will be overcharged. Both situations have a negative impact on the battery.
The generator produces a voltage with a high value, and in order to maintain it in the circuit within the required limits, a relay regulator is included in the circuit.
On some models, this element is included in the design of the generator and is combined with a brush assembly (the most common design) or is a separate unit (found, for example, on the VAZ of the classic family).
Varieties of engine tuning options
To improve the traction characteristics of the “seven horse”, it is not at all necessary to take it to a car mechanic; many actions can be performed independently, without spending a lot of money, without causing a serious hole in the family budget.
Of course, every car enthusiast who decides to take such actions really wants to know what mechanisms will be affected and what tuning the VAZ-2107 engine will consist of. A carburetor, an injector, a cylinder block - this is only a small part of what can be done to increase traction.
Reasons for overcharging
A malfunction of the relay regulator is the most common cause of battery overcharging.
Due to a breakdown, this unit ceases to perform its functions and “passes” all the voltage generated by the generator into the on-board circuit, and it can reach 25 V. Naturally, not a single electrical appliance in a car is designed for such a voltage, so the elements of the on-board network begin to burn out .
Regulator failure can be partial or complete. In the first case, this element still performs its functions, but “passes” a voltage slightly higher than needed (for example, 15 V).
In this case, the overcharge of the battery can only be detected by readings from measuring instruments or the on-board computer. Electricity consumers practically do not “suffer” from such voltage, but even such an overcharge negatively affects the condition of the battery - with a constant process, the battery “boils out” and fails.
If the relay-regulator is completely malfunctioning, high readings (over 16 V) begin to damage consumers - light bulbs and fuses burn out first, then other devices. A significant excess of voltage can cause a fire in the electrical wiring.
Despite the fact that a partial breakdown of a relay does not pose a significant threat to the vehicle’s on-board network (with the exception of the battery), it should not be ignored, since at any moment it can develop into a complete failure of the element.
Since the relay-regulator is the only element that prevents the battery from overcharging, many car enthusiasts, when they detect increased voltage in the on-board network, immediately replace this unit.
But installing a new regulator does not always help; often the problem remains. Naturally, suspicion in this case falls on the generator. This unit can actually overcharge in the event of a breakdown of the diode bridge or a break in the windings, or a breakdown of the armature to the housing.
READ ON THE TOPIC: Car generator voltage, normal at idle and under load.
But if replacing the regulator relay does not help, you should not immediately change or send the generator for repair.
IMPORTANT: Often the reason for overcharging the battery lies in poor contact of the wiring of the battery charging system circuit (described above).
The reason is very simple: at the point where the contacts are oxidized, resistance arises, which the relay-regulator “perceives” as a load in the on-board network. For example, this can happen in the fuse box.
To compensate for it and prevent a drop in voltage, the regulator begins to “pass” large values, resulting in an increased voltage being supplied to the battery.
Therefore, in searching for the cause of battery overcharging, you should first check the relay-regulator, then the charging system circuit (all connections, as well as the fuse), and only after that remove and diagnose the generator.
Diagnostics of the relay regulator
Checking the relay regulator when recharging the battery is not a complicated procedure and you can do it yourself using a multimeter.
The test comes down to measuring the voltage at the battery terminals under different operating modes of the power plant. That is, we simply connect the multimeter probes to the terminals and measure the voltage first at XX, then at medium speeds, and then at high speeds.
At idle, the normal voltage is 13.2-14.0 V, at medium speeds - 13.6-14.2 V, at high speeds - up to 14.5 V.
If the values exceed the specified values, you should check and clean the contacts of the charging system circuit and repeat the procedure again.
If cleaning does not help, we check the relay separately (removed from the car), but for this you will need a power source with regulated voltage (you can use a battery charger), as well as a regular 12 V lamp.
The essence of the test is this: we connect the negative wire from the charger to the housing, and connect the positive wire to the regulator terminal. The lamp is connected to graphite brushes (polarity is not important).
When checking, we first set the voltage at the source to 12.7 V, at which the lamp should light up. We gradually increase the value to 14.5 V. When the specified value is reached, a working regulator should operate and the lamp will go out.
If it continues to light when exceeding 14.5 V, then the unit is faulty and requires replacement.
How to determine the charge level?
Primary control of the charge level on the VAZ 2107 is carried out by instruments on the panel: a control lamp and a voltmeter. If the charge is normal, the indicator arrow will be in the green area, and the control lamp should go out when the engine is running.
To more accurately check the voltage level, you need a voltmeter. As mentioned earlier, the correct charge is 13.6 - 14.1 volts.
You can purchase a special automotive electronic voltmeter or one combined with a watch. Installed both instead of the standard clock and on the dashboard.
Preparing to Troubleshoot
If a problem is detected, we begin diagnostics. First, let's prepare the tools.
- Multimeter (voltmeter);
- Emery cloth or needle file;
- Knife;
- Pliers;
- 12-volt indicator lamp (control).