Good afternoon, dear readers and subscribers of my blog! I have been thinking for a long time about replacing the standard pistons with plugless ones. Because I have already heard horror stories from Grant owners with 16-valve engines regarding timing belt breakage. This is fraught with the fact that the valves will simply be chased by a broken belt... So, I want to solve the problem right away, so as not to fly off to the engine capital in one fine moment. Dear Granta drivers, in this regard, I have a question: what plugless pistons do you recommend for a 16-valve Granta? Engine 21127. As usual, unsubscribe in the comments to the post)
Price issue
As for the cost of work, the spread here is very large. In the Moscow region, depending on the service, repairing such a VAZ engine will cost from 15,000 to 40,000 rubles.
To “bring to mind” the VAZ-21116 engine, you will have to spend time searching for spare parts and a decent amount of money. But if the plug-in engine has already failed - and this can happen to it anytime, anywhere - such a modification is guaranteed to save you from repeating a similar situation and all possible consequences.
Send all questions and suggestions regarding the “Technical Environment” series of issues to.
Other episodes of “Technical Environment” are available in our special project, as well as on our YouTube channel.
Source of the article: https://www.zr.ru/content/articles/917567-prevrashchaem-vtykovyj-vazovskij/
Flaws
Despite the improved characteristics of the 21127 engine, there are also weaknesses. And the main disadvantage is the vulnerability of the valves. If the timing belt breaks, they can easily be bent by the pistons. Another equally pronounced disadvantage is the high cost of engine repairs. Moreover, it does not matter where and who will do this: professional service station technicians or the vehicle owners themselves.
The high cost is mainly due to the fact that the timing belt, automatic tensioner and pulley included are very expensive. This is due to the fact that they are manufactured by the foreign manufacturer Gates. The same applies to ShPG parts, which are also produced by a foreign, but different company - Federal Mogul.
AVTOVAZ modified 1.6-liter engines to prevent valve bending, new details
On modern VAZ engines, when the timing belt breaks, the valves “meet” the piston, which causes critical damage and requires expensive repairs. In this regard, AVTOVAZ decided to modernize the line of engines by installing new pistons that will eliminate such damage, writes CARscope.ru, citing its sources.
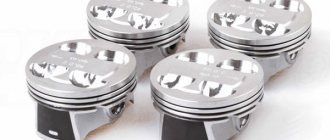
The plant's supplier, Federal Mogul, has mastered the production of pistons with recesses (holes, counterbores) in the bottom. Motors with such pistons are popularly called “plug-free”, that is, when the timing belt breaks, the valves do not “plug” into the pistons, the bottoms of which have special grooves for this case.
The new piston group is designed for a range of 1.6-liter engines that are installed on the Lada Granta, Kalina, Largus, Vesta, XRAY models:
- VAZ-11186 (8 cells, 87 hp)
- VAZ-21127 (16 cells, 106 hp)
- VAZ-21129 (16 cells, 106 hp)
VAZ-21126 (16 cells, 98 hp)
For the 1.8-liter engine with the VAZ-21179 index, a modified piston group is not provided.
Update 08/29/18
: The day before the opening of MIAS-2018, AVTOVAZ representatives presented the updated Lada Granta family to the media. Now, on all Granta engines - both 8-valve and 16-valve - they use “stickless” pistons, that is, with grooves where the valve “falls” if the timing belt breaks, and the piston pushed up by inertia will go to it towards. Nikita Gladky (product manager) told Kolesa.Ru about this.
Second feature
Another feature is the replacement of the MAF (mass air flow sensor) in favor of other devices - DBP and DTV. Thanks to the coordinated work of the duo of absolute pressure and air temperature sensors, floating speed in idle mode of the engine is not dangerous.
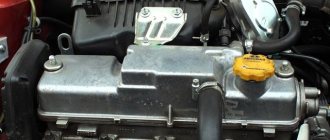
Otherwise, it is the same injection-type power unit with 16 valves (four for each cylinder). As for the base, the block has not undergone any changes since the VAZ-21083. The designers equipped the gas distribution mechanism drive of the Lada 21127 engine with an automatic tensioner.
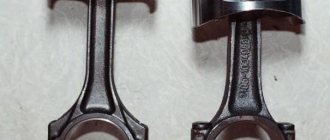
Installation of plugless grant pistons
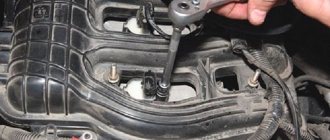
A Granta with low mileage was brought in for repairs. The client asked to replace the pistons with plugless ones. In earlier articles, the Granta engine with a lightweight ShPG was repeatedly considered, so we will not repeat it.
The work is quite simple. We dismantle the cylinder head assembly with the catalytic collector and receiver. When unscrewing the bolts securing the catalytic converter flange, the studs often break off - the repair is also simple, you need to cut out the broken studs and insert the bolts in their place. After dismantling the pan, you can unscrew the connecting rods and remove the connecting rod and piston group.
We use new pistons produced by STK, with valve plates. The ideology of the lightweight connecting rod and piston group is completely preserved - the connecting rods remain the same, from Prior. We replace the piston rings with new ones and install the connecting rod and piston group into the cylinder block. After installing the cylinder head, we check that there is no sticking by turning the camshaft with the pistons at TDC - all valves open freely.
The budget for this work is 10 thousand rubles (spare parts + labor).
Article written: July 24, 2016 Author of the article, photo-video materials: © Quasar Prohibited without the written permission of the author: reprinting the article in whole or in part, reprinting and use of photo-video materials, as well as their modification and editing for the purpose of further publication on third parties sites.
Source of the article: https://www.k-power.ru/1-K-POWER/Primer-21116-8valve-Granta-BEZVTYK.htm
Serious damage
According to the manufacturer Gates, the service life of the timing belt is 120 thousand kilometers. However, during the operation of the 21127 engine, this is not always confirmed. In most cases, the culprit is the idler pulley, which causes the belt to break. And this already leads to more serious consequences: the valves bend. The threat of a major overhaul can be avoided by replacing the standard pistons with plug-in counterparts.
Unfortunately, the quality of domestically produced thermostats remains unchanged over time. Therefore, their breakdown is still the most common cause of car overheating. It should be noted that such an engine also does not tolerate frosts well. In this connection, some prudent drivers have to cover the radiator with cardboard during winter operation of the car.
Piston rings and connecting rod bearings
Piston rings are replaced when repairing the connecting rod and piston group, if they are worn out or damaged. Also, rings are replaced during engine overhauls.
To complete the job, you will need a piston ring mandrel.
1. Remove the cylinder head.
2. Remove the engine oil pan
4. Turning the crankshaft by the bolt securing its pulley with a 17 mm wrench, set the piston of the first cylinder to the lower position.
5. Using a TORX E10 wrench, unscrew the two nuts securing the connecting rod cover of the first cylinder.
7. Place the hammer handle against the piston and push it up.
8. Remove the piston from the cylinder.
9. Remove the liners from the connecting rod and its cover.
10. Fix the piston by the connecting rod in a vice. Slightly spreading the ring lock, remove the upper compression ring. Similarly, remove the lower compression ring, oil scraper ring and its expander.
The rings are thin and to avoid breaking them, cut a strip from a plastic bottle slightly shorter than the circumference of the piston. Place the edge of this strip under the lock of the upper compression ring, and then in a circle under the entire ring.
Remove the strip along with the ring from the piston. Remove the second compression and oil ring in the same way.
The advisability of replacing the rings depends on the degree of wear of the cylinders. Small uniform wear of the cylinders (within 0.05 mm) can be compensated by installing a piston of a different class with a larger diameter (see “Piston and connecting rod replacement”)
1. Thoroughly clean the piston from carbon and deposits. We inspect the piston, connecting rod and pin. Cracks on them are unacceptable.
We select new rings in accordance with the piston diameter - nominal or repair size.
2. Before installing new rings, use a set of feeler gauges to measure the gap between the piston ring and the wall of the groove into which the ring will be installed.
Permissible clearances between groove walls and piston rings
| Ring | Gap, mm |
| Upper compression ring | 0,04-0,075 |
| Bottom compression ring | 0,03-0,065 |
| Oil scraper ring | 0,02-0,055 |
The permissible gaps between the groove walls and the piston rings are shown in table. 8.1.3. If the gap exceeds the maximum allowable, the piston must be replaced.
3. To select piston rings based on the thermal gap, install the rings one by one into the block cylinder to a depth of 20-30 mm and use a set of flat feeler gauges to determine the gap in the lock.
The maximum permissible thermal gap during wear (for used rings) is 1 mm, the gap for new rings is 0.25-0.45 mm. If the gap exceeds the maximum allowable, the ring must be replaced.
4. Place the rings on the piston. In this case, the oil scraper ring...
...and install the compression ring with the word “TOP” facing up.
We install new rings on the piston, starting with the oil ring expander.
Using a mandrel, we put on the oil scraper ring, and then the lower compression ring (we put the rings on the mandrel and carefully move them down until they are installed in the groove).
We put on the upper compression ring without a mandrel: having spread the ring lock (no more than is required to put the ring on the piston), we first place the lock on the piston, and then the back part of the ring.
5. Rotate their locks so that they are located at an angle of 120° relative to each other. The expander lock must be rotated 180° relative to the ring lock.
6. Lubricate the cylinder wall with clean engine oil...
...and the outer surface of the piston.
7. We put the mandrel on the piston and compress the rings with it, periodically lightly tapping the mandrel with the handle of a hammer to self-install the rings.
The connecting rod caps are not interchangeable. The engine is equipped with “chopped connecting rods”, the covers of which are made using a special method. The contact surfaces of the cap and the connecting rod are uneven, which ensures a perfect fit of the parts during assembly.
9. Lubricate the inner surface of the liners with clean engine oil.
10. Install the piston into the block cylinder.
The arrow on the piston crown should point towards the crankshaft pulley.
11. Pressing the mandrel against the block and tapping the piston bottom with the handle of a hammer, we recess the piston into the cylinder (at the same time we control the movement of the connecting rod to the crankshaft journal).
We assemble and install the other three pistons in the same way.
After installing all the pistons, we assemble the engine in the reverse order of disassembling it.
Stories from our readers
“Fucking basin. "
Hi all! My name is Mikhail, now I’ll tell you a story about how I managed to exchange my two-wheeler for a 2010 Camry. It all started with the fact that I began to be wildly irritated by the breakdowns of the two-wheeler, it seemed like nothing serious was broken, but damn it, there were so many little things that really started to irritate me. This is where the idea arose that it was time to change the car to a foreign car. The choice fell on the melting Camry of the tenth years.
Yes, I had matured morally, but financially I just couldn’t handle it. I’ll say right away that I am against loans and taking a car, especially not a new one, on credit is unreasonable. My salary is 24k a month, so collecting 600-700 thousand is almost impossible for me. I started looking for different ways to make money on the Internet. You can’t imagine how many scams there are, what I haven’t tried: sports betting, network marketing, and even the volcano casino, where I successfully lost about 10 thousand ((The only direction in which it seemed to me that I could make money was currency trading on the stock exchange, they call it Forex. But when I started delving into it, I realized that it was very difficult for me. I continued to dig further and came across binary options. The essence is the same as in Forex, but it’s much easier to understand. I started reading forums, studying trading strategies. I tried it on a demo account, then opened a real account. To be honest, I didn’t manage to start earning money right away, until I understood all the mechanics of options, I lost about 3,000 rubles, but as it turned out, it was a precious experience. Now I earn 5-7 thousand rubles a day. I managed to get the car buy after half a year, but in my opinion this is a good result, and it’s not about the car, my life has changed, I naturally quit my job, I have more free time for myself and my family. You’ll laugh, but I work directly on the phone)) If If you want to change your life like me, then here’s what I advise you to do right now: 1. Register on the site 2. Practice on a Demo account (it’s free). 3. As soon as you get something on the Demo account, top up your REAL ACCOUNT and go to REAL MONEY! I also advise you to download the application to your phone, it’s much more convenient to work from your phone. Download here.
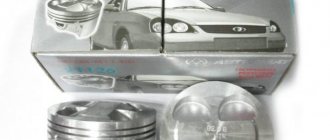
Plugless pistons for Lada Priora – which ones to choose
There are 3 varieties available on the Russian market. STI. Produced by hot pressing.
- Prior is not very well approved by its owners. Firstly, their compression ratio is rather low, and secondly, the combustion chamber area is too large. This affects the efficiency of the engine towards its reduction. In addition, the alloy from which they are made has a reduced silicon content (which makes the pistons less resistant to temperatures) and nickel (which reduces their service life). An additional disadvantage is that on cars with STI installed, breaks of the camshaft drive belt occur too often.
- “Avtramat” produced in Kharkov is made by casting. The pistons have a composition that exactly matches the Priorov ones. The compression has the calculated values, the efficiency, although reduced due to the increase in sampling areas, is insignificant - by 0.1 cm2.
- Samara. They have almost the same indicators as Avtramat. The Kharkov parts are inferior in weight: they are heavier (this is generally undesirable). But they win on price, since they cost a third less.
| -11194 (76,5) | 10:48, 12 |
| -11194 1 (77,0) | 10:48, 12 |
| 82,0, 2108-2115, 21213-2123, 2110-2112, 1117-1119, 2170, | 13:21, 22 ” … |
| 82,8, 2108-2115, 21213-2123, 2110-2112, 1117-1119, 2170, | 13:20, 22 ” … |
| 82,0, 2108-2115, 21213-2123, 2110-2112, 1117-1119, 2170 | 13:20, 22 ” … |
| 1118 77.0 Herzog | 07:32, “54” |
| (76.5) -1118 . 11194 16 .1,4 . (- 4 . ) . A LADA 11194100401557 | 06:14, |
| 1118 77.0 Herzog Herzog HKR0770 | 05:51, |
| 1118 77.0 Herzog | 23:27, ATZ54 |
| LADA Kalina 14i 16V 765 12x15x2 std 08 9280600 1404491 NE | 10:43, AZM24 -… |
| 1118 765 Herzog HLR0765 3175427 herzog | 10:14, AZM24 -… |
| 1 LADA Kalina 14i 16V 765 12x15x2 std 08 9280600 416033 NE | 09:55, AZM24 -… |
| LADA Kalina 14i 16V 765 12x15x2 std 08 9280600 2885971 NE | 06:09, AZM24 -… |
| 1118 770 Herzog HKR0770 1931753 herzog | 05:17, AZM24 -… |
| 1 LADA Kalina 14i 16V 765 12x15x2 std 08 9280600 3840947 NE | 03:55, AZM24 -… |
| 1 LADA Kalina 14i 16V 765 12x15x2 std 08 9280600 3238444 NE | 16:15, AZM24 -… |
| LADA Kalina 14i 16V 765 12x15x2 std 08 9280600 2251590 NE | 14:14, AZM24 -… |
| 1 LADA Kalina 14i 16V 765 12x15x2 std 08 9280600 313679 NE | 13:18, AZM24 -… |
| 1 LADA Kalina 14i 16V 765 12x15x2 std 08 9280600 3132304 NE | 16:56, 22 AZM24 -… |
| 1118 770 Herzog HKR0770 3479212 herzog | 10:51, 21 AZM24 -… |
| 1 LADA Kalina 14i 16V 765 12x15x2 std 08 9280600 3147109 NE | 05:36, 21 AZM24 -… |
| LADA Kalina 14i 16V 765 12x15x2 std 08 9280600 1014759 NE | 21:02, 19 AZM24 -… |
| 1 LADA Kalina 14i 16V 765 12x15x2 std 08 9280600 2614008 NE | 20:02, 19 AZM24 -… |
| 1 LADA Kalina 14i 16V 765 12x15x2 std 08 9280600 2382149 NE | 16:23, 19 AZM24 -… |
| 21083-1000100 BAZ2123, Chevrolet Niva, 2120 … | + |
| 11194 () 76,5 . | 11:20, 21 |
| 11194 () 77,0 . | 11:20, 21 |
| 11194 () 77,0 . | 11:20, 21 |
| 11194 () 76.5. A | 11:20, 21 |
| 1 04 LADA 110 8v 0826990600 1130720 Goetze | 06:52, AZM24 -… |
| 21081E12 3250923 lada | 16:28, AZM24 -… |
| d79x15x2x3947 06 4 Lada 1316 74 800013641060 1026002 800013641060 KS … . .- . D79X15X2X3947 | 04:55, AZM24 -… |
| 21080100010010 210801E13 3245772 lada | 11:11, AZM24 -… |
| 21083 820 210831E13 3205604 lada…. .- . 2108 2109 BAZ21083 BAZ2108 BAZ210 BAZ21 BAZ2 BAZ BA 21083… | 17:59, 22 AZM24 -… |
| 21083 820 210831E13 3321267 lada…. .- . 2108 2109 BAZ21083 BAZ2108 BAZ210 BAZ21 BAZ2 BAZ BA 21083… | 19:41, 22 AZM24 -… |
| 21083 820 210831E13 3311744 lada…. .- . 2108 2109 BAZ21083 BAZ2108 BAZ210 BAZ21 BAZ2 BAZ BA 21083… | 17:24, AZM24 -… |
| 820 210831E13 3272780 lada | 11:34, AZM24 -… |
| 798 210601E13 3290649 lada | 11:50, AZM24 -… |
| 820 210831E13 385690 lada…. .- . EL LADA | 06:50, 18 AZM24 -… |
| 764 2108 210801E13 3254964 lada…. .- . 2108 2108 210 21 | 11:19, AZM24 -… |
| d76x15x2x3947 STD 1 Lada 21010308 1115 70 9280200 3463688 9280200 ne … . .- . D76X15X2X3947 | 10:38, 21 AZM24 -… |
| d76x15x2x3947 06 1 Lada 21010308 1115 70 9280260 779787 9280260 NE … . .- . D76X15X2X3947 | 23:05, 22 AZM24 -… |
| d82x15x2x3947 06 1 Lada80460 636783 92804601 NE … . .- . 2108 2108 210 21 D82X15X2X3947 | 18:37, AZM24 -… |
| d79x15x2x3947 06 4 Lada 1316 74 800014E11 3497294 800013641060 ks … . .- . D79X15X2X3947 | 11:08, 21 AZM24 -… |
| d79x15x2x3947 06 4 Lada 1316 74 800014E11 3522718 800013641060 ks … . .- . D79X15X2X3947 | 11:31, 21 AZM24 -… |
| d82x15x2x394 STD 1 Lada881N0 403886 448 81 N0 Mahle … . .- . 2108 2108 210 21 D82X15X2X394 | 14:35, AZM24 -… |
| d82x15x2x394 04 1 Lada 2108 2111 2112 15 84 44881N1 619677 448 81 N1 Mahle … . .- . 2108 2111 211211 211 2112 D82X15X2X394 | 18:18, AZM24 -… |
| d82x15x2x394 04 1 Lada 2108 2111 2112 15 84 44881N1 3412437 448 81 N1 mahle … . .- . 2108 2111 211211 211 2112 D82X15X2X394 | 18:58, AZM24 -… |
| ! d76x1.5x2x3.947 +1.0 (4) Lada 2101/2103/2108 1.1-1.5 70>: KS 800013741100_* 800013741100 …, 10,000. 2108 2101 210301 2103 |
Maintenance
If you maintain your car on time, the chances that you will avoid major engine repairs are high. It is better to play it safe and avoid high costs, not only financial, but also time. A lot of nerves will also be spent.
- A timing belt can last 180 or 200 thousand kilometers, but it needs to be inspected much more often.
- The oxygen sensor has a slightly shorter service life - no more than 100 thousand km.
- The entire cooling system, like the liquid itself, will serve properly for 40 thousand kilometers.
- It is recommended to change spark plugs every 20 thousand kilometers.
- The oil filter along with the lubricant must be changed even more often - at least every 10,000 kilometers.
Replacing valve stem seals on a grant
We replace valve oil seals if blue smoke appears from the exhaust pipe when starting the engine and when the engine switches from operating mode under load to forced idling mode (engine braking), as well as in case of increased consumption of engine oil in the engine, when oil leaks are visible from the outside not detected. We install the crankshaft to the TDC position of the pistons of the 1st and 4th cylinders (see “Checking the condition and replacing the timing belt”). In this position of the shaft, we change the oil seals of the valves of the 1st and 4th cylinders. Remove the camshaft (see “Removing the camshaft”).
We remove the pusher with the adjusting washer from the cylinder head socket. We unscrew the spark plug of the 1st cylinder and through the spark plug hole insert a soft metal rod (about 8 mm in diameter) between the piston bottom and the valve plate, on which we change the cap. We install the valve strip on the cylinder head studs and fasten it with nuts to the outer studs. We install the valve depressurizer.
We rest the heel of the desiccant against the valve plate, and insert the hook lever into the groove located on the back side of the bar. Pressing the desiccant lever...
...and remove the crackers with tweezers.
We take out the plate with springs.
We carry out the operation of dismantling the oil seal carefully so as not to damage the fragile valve guide sleeve
Using special pliers (or a device for removing caps), remove the oil deflector cap from the valve guide...
...and remove the cap from the tongs. Apply a thin layer of engine oil to the working edge of the new cap...
...and install the cap on the valve stem.
Using a mandrel, press the cap onto the valve guide.
If you do not have a mandrel, you can use a tall twelve-sided tool head of a suitable size. We assemble the valve mechanism in the reverse order. Remove the rod from the spark plug hole.
After assembling the valve mechanism, we apply a light blow to the end of the valve with a hammer through a soft metal mandrel so that the crackers are securely fixed in the grooves of the valve stem. Apply engine oil to the valve pusher and adjusting washer and install it into the cylinder head socket. Then we repeat these operations for the other valve of the 1st cylinder and then for both valves of the 4th cylinder. Then, turning the crankshaft 180° (TDC of the pistons of the 2nd and 3rd cylinders), similarly change the oil seals of the valves of the 2nd and 3rd cylinders. We assemble the valve mechanism in the reverse order.
New teeth
Let's move on to the timing belt drive. We chose the Gates kit, which includes a Dolz pump with gasket, belt and pulley with semi-automatic tensioner. By the way, different devices are used for tension. We selected a crescent-shaped grip designed for the roller. The gripper is placed on the roller, a bolt is screwed to the head of the latter, and the belt is tensioned. We preferred a large set with a pump to be on the safe side: our car has 68 thousand km on it, and it is unknown how long the pump installed on it will last.
It was also decided to change the auxiliary drive belt - peeling appeared on the old one. We bought a Gates 6PK995 belt and a new INA pulley to replace the whistling old one.
Useful tips
Since the weak link in the cooling system is the thermostat, it is necessary to carefully monitor the antifreeze temperature, which should not exceed +95...+98 °C. Otherwise, premature wear of parts cannot be avoided.
When replacing the oil filter yourself, you need to pay attention to the valve cover seal. The presence of smudges indicates an unsatisfactory technical condition of the gasket. Because of this, motors often overheat.
Some car enthusiasts prefer to increase the power of their vehicles through chip tuning. True, as a result of flashing the control unit, no special increase in power is expected - only five horsepower.
The 21127 engine can be significantly benefited by installing Stolnikov 8.9 camshafts with a phase of 280. As a result, the car will accelerate to hundreds of kilometers per hour in less time - 9 seconds. Speed lovers will be pleased.
Everything's a head
Let's move on to the cylinder head. We replace all valves that are bent with new ones. To do this, we rub them in and check for leaks. Then we install the oil seals, and then the valves themselves. When removing the cylinder head, all gaskets are damaged and must also be replaced.
The gasket between the head and the block is especially important. It is two-layer, metal, with springy “zigs”, which ensure the tightness of the connection with a lower tightening torque. Thanks to this part, the volume of gases entering the engine crankcase is significantly reduced - this helps to stabilize its operation, and a lower tightening torque reduces deformation of the cylinder walls. Our motor uses M10 bolts, tightened in three steps: first with a torque of 20 Nm, then they are turned twice by 90°.
Let's pay attention to the camshaft. There are areas on its bearings that are necessary - without fanaticism! - Lubricate with sealant so that oil does not flow out along the end surfaces. After pulling the head, when installing the pushers, you need to check the clearances in the valves, since all our valves are new, but the washers are old. The latter will also have to be replaced if necessary. There is a marking on the washers; when installed, it should be inside the pusher. The washers are positioned so that they do not rub when in contact with the camshaft cam.