Covering a car with film is gaining popularity. Whether it is necessary to glue the film to the car is an individual decision for each owner. Everyone has their own vision on this issue and the pursuit of certain goals. If you have the desire and patience, it is possible to wrap your car yourself. To do this, you need to resort to studying some technological features.
Carbon film - what is it?
Carbon film is made on the basis of polyvinyl chloride (PVC) and visually and tactilely imitates carbon fiber, which is fashionable today. Because of its efficiency, it is very popular among motorists who are actively styling their iron horse.
Carbon film will make your car stand out on the road
Quality film is created through a process called calendering. It allows you to create a thin but durable material, with uniform thickness along the entire length. Thanks to this, there will be no seams on the car, which will bring its appearance even closer to the original carbon fiber. In addition to its prestigious appearance, the film has a number of other advantages.
- The coating combines both pleasant and useful properties. Carbon film will not only please your eyes, but will also protect your car from minor scratches, dust and stones flying from under the wheels.
- If the car already has minor damage, the film will hide them and smooth out the relief.
- The likelihood of corrosion will be significantly reduced, since the car is reliably protected from moisture.
- If you have purchased material of decent quality, it can easily survive both severe frosts and unbearable heat.
- The color of a high-quality film does not fade under the influence of direct sunlight and protects the original paintwork from fading.
When cleaning a car with film on your own from dirt, you should use soft sponges and special car shampoos for vinyl coverings.
The service life of the film with proper use can be from 5 to 10 years. But if carbon suddenly goes out of fashion during this time or your tastes change, you can remove the vinyl covering without any problems. To do this, you just need to heat it up. In this case, the paint layer will look exactly the same as before covering. This means that the wrapping process does not threaten the original appearance of your car.
About the choice of material
In short, you need to choose 3D carbon. The reasons are obvious:
- 2D films are not durable, and they are not at all similar to real carbon fiber;
- 4D, firstly, is very expensive, and secondly, finding it on sale is not so easy. Even today in many cities of our country it is very exotic;
- Another argument in favor of choosing 3D is the ability of its PVC base to greatly stretch when exposed to sunlight. Many cheap 2D ones (especially from Chinese manufacturers) do not have this ability, since their PVC base is very thin. Because of it, they quickly crack, especially if the car is used in sunny regions of the country;
- finally, almost all 3D films in the adhesive base have special channels for air removal, which cannot be said about 2D carbon. Thanks to these channels, the 3D is easily smoothed out and there are almost no air bubbles left underneath. But a driver who has chosen 2D carbon often has to resort to various tricks to eliminate the air bubbles remaining after smoothing (for example, they are removed by piercing the 2D with a thin hot needle).
Types and features of films
There are two types: vinyl, polyurethane. The protective properties of vinyl are due to their thickness, and that of polyurethane due to their abilities.
When purchasing vinyl material, pay attention to:
- adhesive composition on the surface of the back side of the vinyl;
- thickness in microns;
- width;
- strength, elasticity;
- possible service life.
The range of vinyl by type falls into several categories:
- Matte. The advantage is the adoption of fairly complex shapes. Service life up to 7 years.
- Glossy. Mainly used for reupholstering body parts.
- Mirrored. Prevents the formation of body rust. Available in two colors – gold, silver. Service life depends on the manufacturer.
- Carbon. Availability at different prices depends on the quality. Service life from 5 years.
- Textured. Used to imitate various materials: wood, metal. The material is dense, service life exceeds 10 years.
Durable polyurethane (up to 300 microns), protects the body from scratches and impacts
Capable of transmitting ultraviolet radiation, which is important when wrapping not the entire car (when the material is removed from a part of the body after a few years, the color of the entire car will be uniform). Price is more expensive than vinyl
What body parts do we cover?
Depending on your needs, we can cover the car with armor film completely or partially. Most often undergo protective treatment:
- Bumper.
- Hood.
- Doors.
- Trunk lid or tailgate.
- Ali.
- Headlights and fog lights.
- Rear view mirrors.
- Pens.
- Windshield struts.
- Thresholds.
- Part of the roof and other elements of the car.
Note that the cost of covering a car with armored film depends on the car model, film consumption and the amount of work. But one of the competitive advantages of the StyleGarage center is its affordable booking price, one of the most favorable on the Moscow market.
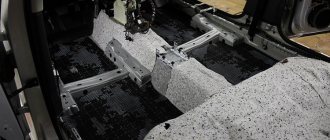
Preparing the machine surface before installation
Most models of windshields are produced together with an adhesive base designed to fix this device. Otherwise, you need to purchase specialized tape, which is preheated with a hair dryer.
In addition to a hair dryer, you will need a dry rag and a technical solvent to fix the plastic pads. After preparing the specified components, you will need to perform the following steps:
Wash the car body and windows, paying special attention to those areas where you need to stick plastic covers. Treat the body and windshields with a technical solvent, removing the fat layer. Carry out additional treatment of the body coated with wax polish or paraffin mastic.
If the car has old deflectors, then to dismantle the deteriorated linings you will need:
Open and lock the side door. Using a heat gun, warm up the junction of the deflector and the car body
This procedure must be carried out with extreme caution. Overheating will cause the paintwork to peel off from the surface of the body. Pry up one of the ends of the old lining and insert the fishing line. Run the fishing line along the entire deflector, thus detaching the trim from the body
During this procedure, you should also be careful to avoid contact with the surface of the body. After dismantling the old windshield, treat the surface with a solvent.
If the old windshield is plug-in, then dismantling is carried out in two stages. First you need to pry one edge of the deflector, and then pull the plate towards you. At the end of this procedure, it is also necessary to clean the surface of the body.
New deflectors can be installed provided that the ambient temperature is above +10 degrees. The procedure is prohibited in winter. In the cold, the adhesive composition does not set, which is why the deflectors will fall off a few hours after installation.
What is film used for?
It’s logical to start with the reasons why motorists are drawn to buy vinyl film and wrap it around their car. Not everyone fully understands why this is done and what such a procedure ultimately achieves.
It’s worth starting with the fact that covering a car with film is much easier and cheaper than repainting it.
The film has been available on the market for several years. At first, pasting was carried out only in car services. Then car enthusiasts realized that there was nothing complicated here. The material itself has been improved, the range has expanded, and the quality has improved.
Vinyl films are somewhat reminiscent of plastic in their texture and structure. When heated, the material becomes elastic, and after cooling it hardens.
Typically, when using vinyl, the following purposes are pursued:
- improving the appearance of the car;
- protection of body paint;
- masking existing defects on a car.
Unlike coloring, gluing technology is simpler and more accessible. Therefore, this option for improving, hiding flaws and protecting paintwork remains extremely popular and popular.
Pasting process
If you want to properly wrap your vehicle with vinyl film, you need to follow the following algorithm:
Wash and dry the vehicle thoroughly. This needs to be done even if you are going to paste over only individual parts of the body. Treat all surfaces on which you are going to glue vinyl using white spirit degreaser (or any other). You must make sure that there are no traces of dirt, dust, rust or sand left on the surface.
Car vinyl wrapping- Do a fitting. To do this, you need to attach the film to the place where, according to your plans, it should be pasted. In this case, under no circumstances should you tear off the backing or mounting layer! After you choose the most suitable location for the coating, it is advisable to mark the places where the edges will be located using masking tape. Fitting is a very important stage, and therefore it should not be done “in a hurry.”
- Cut a piece of vinyl flooring to the size you require. In this case, it is better to leave a small amount of space on all sides.
- Place the film on a horizontal surface, then peel off the white paper that serves as the backing. At the same time, this must be done while constantly monitoring to ensure that the film does not stick to itself. It is best to tear off the backing at an angle of 30-40 degrees.
- Apply a soap solution to the car part to be pasted - it is better not to spare it and cover the entire surface with an even thick layer. This will ensure that bubbles are eliminated and that the film can be moved after application.
- Apply the coating to the surface of the car. At the same time, it must be slightly pulled at all times and fixed at the extreme upper corners. From the middle to the edges, the coating must be rolled using a rubber squeegee and simultaneously dried with a hair dryer. You need to roll from the middle to ensure that all remaining soap solution and air bubbles are removed in time. If you notice that the formation of a fold is inevitable in some area, you can lift the coating and stick it again, heating it in parallel with a hairdryer.
- To fully activate the adhesive, you need to re-use a hairdryer over the entire surface of the coating after it has already been glued. At the same time, you need to roll it out with a felt squeegee.
Car wrapping with vinyl film
- Trim the edges of the coating with a margin of 5 millimeters and glue to the surface with ordinary glue with sealing properties. Due to the fact that vinyl peeling always starts from the edges, this step must be carried out with special care.
- Go over the entire surface of the vinyl with a rag. After this, the car should be left for about a day at the same temperature. After 24 hours, the vinyl will completely adhere to the surface. For 7-10 days after you have covered your car with vinyl film yourself, you cannot wash the car yourself. Also, of course, you should avoid visiting automatic car washes.
Results
Film development is at the highest level. So there is nothing to be afraid of. Rather, you should be glad that you can stick to it, try yourself in a new area and, if necessary, remove the film without leaving a trace. In 5 years of experience, I have never seen or heard anything. What kind of shitty film did you have to hold in your hands? But this is an invaluable experience that we pass on to you free of charge. My verdict is this: An old car with chips, you want to seal the car for half a year or a year - the best choice would be Oracle 641 or Hexis Ecotak. A new car and planning to drive for at least a couple of years - Arlon S5000 polymer is the best price/quality option, but only one color available in Russia. Well, or orcal 551, there is more than a range of yellow colors. PS As for the white film for the entire body, there are still the same recommendations, but regarding the choice of film for pasting stripes in accordance with GOST of the Moscow region, this is a completely different story...
How to apply anti-gravel film with your own hands
You can quickly glue the material to your car if you think through everything in advance and purchase the necessary equipment.
You will need:
- anti-gravel film;
- masking tape;
- roulette;
- solvent (white spirit);
- napkin;
- rubber squeegee;
- squeegee with Alcantara;
- stationery knife;
- bullet gun;
- construction hairdryer
- We measure the car part with a tape measure, make a margin of 10 cm for tightening, adjustment and tucking. Let's look at the example of a hood.
- We cut the film to fit the required part, approximately 135 cm by 110 cm, the width of the film in a roll is 152 cm, which means we cut it to 130 cm and leave the width.
- Before starting work, you need to wash the car well; if there are traces of bitumen or glue, you need to thoroughly wipe the entire part, including the edge at the bottom, for hemming.
- If there are uneven spots and rust, we sand, putty and polish.
- If we are applying film to a new car, it is enough to simply degrease it.
- Degrease with white spirit or other means (alcohol, solvent).
- Only on a perfectly flat, clean and grease-free surface of the body will the polyurethane protective film adhere firmly.
Key stages of work
Car wrapping, like any other work, requires serious preliminary preparation. Conventionally, all work can be divided into three main stages:
- preparation of material and tools;
- cleaning of surfaces to be pasted;
- covering the car with film.
The more thoroughly the surface of the body and other structural elements on which you plan to stick vinyl is prepared, the better the material will lie on it and it will be easier to cover them with high quality. Some people prefer to visit a car wash before starting work, but you can clean the vehicle yourself. Depending on the degree of contamination of the car, various solvents and soapy water may be needed. To make the surface perfect, you can use abrasive clay. It is necessary to clean not only the outer surfaces of the car, but also the structural areas of the body and interior where the edges of the vinyl film will be wrapped.
The process of wrapping a car with your own hands
If you don’t want to spend extra money on pasting in a special workshop, you can easily do it yourself. For insurance, you can call a couple of reliable friends: at some stages you may need more than two hands.
If you have ever used regular self-adhesive film, the process of covering a car should also not cause any particular difficulties. The material fits tightly to the surface of the parts, does not slip or crumple, and high adhesion will prevent the film from peeling off. You also don’t have to worry about the formation of bubbles: the structure of the material is such that it allows air to escape through special channels in the adhesive layer.
Before you start pasting, prepare all the necessary tools.
- Industrial or household hair dryer.
- Squeegee with felt or plastic pad.
- Scissors and a knife (preferably a stationery knife).
- Degreaser (such as White Spirit).
- Soapy water solution.
- Spray.
- Soft, lint-free cloth or rags.
- Primer or sealant to secure the edges.
There are two main methods of covering a car with carbon film:
- dry;
- wet.
What is their difference?
Wet method
If you have never covered cars before, or your film is not of the highest quality, you are better off choosing the wet wrapping method. It is much lighter and gives guaranteed results. To coat a car using this method, strictly follow the sequence of actions.
- Measure your car and cut the material to the size you need.
- Make sure there is no dried dirt left on the car. If necessary, wash and dry it first.
- Thoroughly degrease the surface to be pasted.
- Using a spray bottle, apply the soap solution to the car in an even layer.
- Remove the paper backing from the film.
- Apply the solution evenly to the film from the adhesive side.
- Cover the car with film. This is the most difficult stage, so you may need help.
- Using a squeegee, level the coatings. Your movements should go from the center to the edges of the car. In this case, the soap solution will gradually come out. Do not stretch the film under any circumstances! Be patient: the appearance of the car will depend on how well you complete this stage.
- After you have completely spread the film on the surface, dry it with a hairdryer.
- Smooth the coating again using a squeegee.
- If there is a lot of excess film left, carefully cut it off with a stationery knife, leaving 1.5–2 cm of margin.
- Tuck the edges inside the pieces and apply a thin layer of primer. This will help avoid peeling even the cheapest material.
- Leave the car to dry for a day.
For a week after pasting, do not use contactless car washes.
Dry method
The main difference between the dry method and the wet method is the use of a flow of warm air to activate the adhesive layer. It is much more complicated and requires some experience and skill. In addition, this method is not suitable for cars with serious damage: deep dents or corrosion. Pasting is best done in a warm and well-lit room.
The first steps are similar to the previous method: take all the necessary measurements, thoroughly clean and degrease the car. We don't need a soap solution. Apply the film to the surface and begin to smooth it using a squeegee and a stream of air from an industrial hair dryer.
Proceed with caution: air bubbles will be very difficult to remove. To do this, you will have to separate the material and smooth it again.
Repeating this action multiple times will damage the adhesive layer.
Monitor the temperature of the air flow: overheating negatively affects the condition of the film. Complete the process by re-leveling and applying primer.
Tools, materials
To work you will need:
- a squeegee, with which the film is smoothed and air bubbles are expelled;
- a stationery knife, which will be convenient for trimming the remaining film;
- sprayer, commonly used for gardening and vegetable gardening. We need it to spray soap solution;
- hairdryer At temperatures above +20ºС, in the absence of a powerful hair dryer, even a household hair dryer will do;
- degreaser;
- a primer that enhances the adhesion of the adhesive layer;
- paper napkins. These are used when painting a car to remove dirt and degrease. In order for the coating to serve for a long time, not to swell and not come off the edges, the surface must be perfectly clean. If the car vinyl is not glued to a car that has recently left the walls of a car dealership, then we recommend buying clay for car bodies. It will help remove stubborn tar deposits, clean dirt from micropores and cracks in the car's paintwork. This will improve adhesion and extend the service life of the film;
- dry rags to remove residual moisture.
Carbon-look film or any other texture can be glued using a soap solution (wet method) or dry. Dry wrapping of a car provides more reliable adhesion of the adhesive layer and better adhesion on bends, but is not very suitable for work without experience. A wet surface is more forgiving of mistakes, since the film is easier to move and lift to remove air.
Which films are easier to glue?
If you have no experience working with car vinyl, which is quite likely if you are reading this article, we do not recommend choosing the cheapest films for your car. Due to their poor quality, they are difficult to paste, as they have poor elasticity and are often subject to shrinkage and swelling. Understanding of many things will come to you only directly when pasting with your own hands. Therefore, in order not to spoil the expensive material, we highly recommend buying a small piece of the cheapest training film. You can cover, for example, the plastic in the interior with carbon fiber, and only then move on to pasting complex car parts and large areas.
For beginners, we recommend choosing a material with channels on the inner layer. It is much easier to remove air bubbles from under such vinyl. Also, you should not practice on carbon-look films, unless you are gluing it to an inconspicuous small interior part. The rectangular structure of the image does not allow stretching of the material, stylized as carbon, as distortions are immediately visually noticeable. In this regard, ordinary car vinyl is much more forgiving of mistakes, and therefore the first experience of car wrapping has a greater chance of success.
What you need to know for self-gluing
Many car enthusiasts prefer not to contact a service to apply vinyl coating to a car, preferring to stick it on themselves. This allows you to avoid unnecessary financial expenses. In addition, in this case you can be sure that the gluing was done correctly and conscientiously.
When you have decided on the color and type of material, you need to calculate the amount that will be required to complete the job. Just in case, take a small reserve - it will be a shame if there is not enough film.
The coating is applied in a well-ventilated room with a temperature of at least 20 C. If this condition is neglected, the film will soon begin to peel off due to temperature deformations.
Before gluing the vinyl film, you need to properly prepare the car. You will need to wash it thoroughly and dry it. No scratches, chips, or areas of corrosion are allowed on the surface of the car body - otherwise these places will cause premature peeling of the vinyl. In order to properly glue the vinyl, the surface must first be thoroughly degreased. White spirit is used for this.
After all these operations, the car is ready for vinyl stickers - we can start working.
Paintwork damage repair
Vinyl material not only does not hide defects in the car body, but can also make them more noticeable (especially if it is a matte finish or carbon film). When choosing auto vinyl over painting a car, you must understand that the preparation must be no less thorough.
Particular attention should be paid to areas of corrosion, since the corrosion process will continue under the film, which will very quickly lead to peeling or swelling of the car vinyl.
If the car body is in satisfactory condition, it is often enough to hide large chips and deep scratches. If the damage is not too severe, you can do without puttying and priming. Otherwise you need:
- degrease the damaged area, clean with P120 abrasive. Corrosion areas must be treated with a rust converter and then primed with epoxy primer;
- fill the defect with universal putty;
- sand the putty first with abrasive P120, and then with finishing abrasive P320;
- prime the putty areas with acrylic primer;
- clean the soil with abrasive P320 at the initial stage and P600-P800 at the finishing stage.
We did not describe each of the processes, since we have already devoted separate articles to filling and priming your car.
Air removal, correct twists, carbon
To avoid problems and poor-quality film application, it is recommended to wait until the material cools down after applying it to the surface. Having discovered air under the film, you need to carefully pierce the bubble with the tip of the blade along the surface and run your finger along the pasted material. The flaw will not be noticeable. Bubbles of small diameter resolve on their own after some time.
Proper folding must be done while the vinyl is heating up. With the help of a professional hairdryer, the material is heated, stretched at the point of the fold and placed on the corner. The film must be stretched so that it covers the corners well. After completing the work, you should warm up the surface, wait until it cools down and only then cut off the excess material.
The carbon film is glued to a clean, grease-free surface. The material is attached to the surface with masking tape or magnets, after which a blank of the required size is cut out. It is recommended to leave 3–5 cm of margin. When removing the protective coating, you must slowly and carefully glue the material, starting from the center and moving towards the edges. All work is performed using a squeegee. Warm air will help in the fight against bubbles and unevenness. The edges are folded under the bumper and fixed with heat-resistant glue.
We advise you to read our articles
Lada XRay will be equipped with a Jatco variator
The main problems of the VAZ 1.6 engine
A simple way to increase engine power and reduce consumption
How to get rid of scratches on car plastic?
Financial calculations
Start-up capital
It will take about 30,000 rubles to rent the premises for the first month, to this will be added 15,000 rubles for tools, 35,000 rubles for film, advertising costs of approximately 20,000 rubles (including the creation of the website), 20,000 rubles for finishing the premises and 30,000 rubles – to pay for the work of one master. The total starting capital is 150,000 rubles.
Monthly expenses
Every month you will have to spend 30,000 on paying for the work of a master, 30,000 on rent, 5,000 on advertising expenses, another 5,000 on purchasing consumables, and 3,000 on paying for electricity. In total, you will have to shell out approximately 73,000 rubles every month.
How much can you earn?
Full vinyl coverage of one car will cost a business owner from 30,000 rubles. If you place 10 orders a month, your revenue will be 300,000 rubles. From this amount we subtract monthly expenses in the amount of 73,000 rubles and the cost of the film 50,000 rubles. We get a net profit of 177,000 rubles.
Payback period
With a starting investment of 150,000 rubles and a monthly profit of 227,000, the business can pay for itself in the first month of its operation. However, depending on various factors, this picture may change, and the period may extend up to 3 months.
Adhesive vinyl film to car
Now let's take a step-by-step look at how to apply a vinyl sticker on a car yourself:
- First we do the fitting. Without removing the backing, we try the vinyl on the surface on which we plan to glue it. Using construction tape, we put all the necessary marks on the car. We take measurements of the material and carry out cutting. It should be remembered that uneven and difficult areas will require more material.
- Lay out the vinyl on a flat surface and carefully remove the backing. Care should be taken to ensure that no debris gets on the surface of the sticker and that wrinkles do not form there. It is best to resort to the services of an assistant - this will greatly simplify the work.
- If you are a beginner and are not entirely sure that the sticker will be done correctly the first time, you are better off using the “wet” method. Using a spray bottle, moisten the adhesive surface with a soap solution and apply it to the place of fixation. This method allows you to adjust the position of the film during operation. If you are sure that everything will work out right away, you can use the “dry” method - in this case, the surface of the sticker is not wetted.
- Place the vinyl on the surface to be glued and smooth it, pressing it with a rubber squeegee. At the same time, we warm up and dry the film with a hair dryer. An ordinary household hair dryer will not work - it will not provide the required temperature. Gluing is carried out from the center to the edges. We expel air bubbles and moisture if we are talking about the “wet” method. We make sure that the heating is carried out as evenly as possible.
- At bends and corners, the material will have to be stretched more strongly, so we pay special attention to the heating.
- After all the air has been removed from under the film, dry the surface with a hairdryer and leave for half an hour.
- Next we process it with a felt squeegee, removing small air bubbles and carefully smoothing it out. We heat the bends with a hairdryer, cut off the excess film with a construction knife and treat the edges and joints with sealant.
- We give it about 12 hours to dry and we can consider our task completed - the car is ready for use. It is not recommended to wash your car for 7 days.
Main manufacturers
The following product suppliers have a good reputation:
- KPMF is an English brand whose catalog includes products with high elasticity of various types, including “chameleons”;
- ORAFOL is a German manufacturer of vinyl films Oracal, ORAJET, ORAGUARD. The product has a minimum level of initial adhesion, which allows it to be adjusted during the application process;
- HEFIX is a French brand specializing in the production of carbon fiber and special effects coatings;
- 3M is an American company that produces high-tech products that even a novice craftsman can apply.
Oracal vinyl film, which combines quality and an affordable price, is in demand among professionals.
Methods of wrapping a car with vinyl film
For professionals, the dry gluing method is definitely suitable. The work is done on the first try and is done very quickly. The quality of the coating is high, and the material will last a long time.
Dry method of car wrapping
Technology of car wrapping with wet film
So, let's look at the procedure for wrapping a car using the wet method step by step:
- Prepare the surface. In order for the material to be applied easily and, as a result, to look the same color as the car, it is necessary to clean the surface of the car by thoroughly polishing it, removing irregularities and degreasing it. Next, the body is dried with a soft, dry cloth.
- Place the coating on the car body. It is recommended to start work with small areas that have the smallest bending radius of the surface. This is necessary so that the film stretches over the surface and does not shrink. At this stage, marks are made with tape, and the required film size is determined. Before pasting, the surface must be sprayed with a soap solution (detergent + water in a ratio of 1:10, respectively).
- Heat the vinyl. The heating temperature should not be more than 60 degrees, otherwise it may cause damage or complete deformation of the film.
- Start gluing the pieces. It is recommended to follow the principle of “one piece per body part”. If it is not possible to glue the film in one piece, it is better to slightly overlap one piece of material onto another in order to avoid the ingress of water and air in the future. You need to work with a squeegee from the middle to the edges, as when gluing wallpaper. The end of the hanging fabric should not stick together!
Technology of car wrapping with wet film
Air removal, correct twists, carbon
To avoid problems and poor-quality film application, it is recommended to wait until the material cools down after applying it to the surface. Having discovered air under the film, you need to carefully pierce the bubble with the tip of the blade along the surface and run your finger along the pasted material. The flaw will not be noticeable. Bubbles of small diameter resolve on their own after some time.
Proper folding must be done while the vinyl is heating up. With the help of a professional hairdryer, the material is heated, stretched at the point of the fold and placed on the corner. The film must be stretched so that it covers the corners well. After completing the work, you should warm up the surface, wait until it cools down and only then cut off the excess material.
The carbon film is glued to a clean, grease-free surface. The material is attached to the surface with masking tape or magnets, after which a blank of the required size is cut out. It is recommended to leave 3–5 cm of margin. When removing the protective coating, you must slowly and carefully glue the material, starting from the center and moving towards the edges. All work is performed using a squeegee. Warm air will help in the fight against bubbles and unevenness. The edges are folded under the bumper and fixed with heat-resistant glue.
Car wrapping with carbon film
How to remove vinyl film from a car
Like everything in our lives, vinyl film has an expiration date. To remove material from the surface of the car, you must follow these recommendations:
- The car can be left in the sun or indoors where the temperature exceeds 20 degrees. Next, using a hairdryer, heat the surface to 70–80 degrees.
- The coating is removed from the edge to the center at an acute angle.
- If after completion of the procedure there are still areas with film on the surface, they are removed with alcohol or solvent.
The film removal procedure is quite simple, but at the same time painstaking and time-consuming. The work must be carried out carefully and without haste.
Expert advice
In order to increase the service life of the film, it is recommended to leave 2–3 cm of material so that it can be tucked over the edge of the element. When treating large areas, it is best to work in a warm place and not use the machine for 24 hours after the procedure. In the first days after treatment, you should treat the car with care, as the material is more susceptible to various influences. To avoid damaging the surface with a squeegee, you can roll the air with your hands.
Car wrapping requires concentration, calm and self-confidence. Properly selected material will provide excellent coverage of the car and will last for a long time.
Calculating benefits
One order usually takes from two to three days of work. But in the cold season, the technology for gluing vinyl film stretches for another day. Usually two cars are processed at the same time - while one is being prepared for wrapping, cleaned of contaminants, a film is applied to the other. Then the pasted car is placed in a settling tank to secure the film, and work is carried out on the next car.
In a month of work, you can cover up to 15 cars, if no unforeseen situations arise. But not all clients order complete treatment of the machine; in most cases, only certain parts of it are covered. Most often, vinyl film is applied to the hood and doors. On average, you can count ten fully covered cars per month of work.
It takes about 25 square meters to completely cover the machine. meters of film material at a film cost of 1000 rubles per square meter. meter. Sometimes, at the request of the client, some kind of printing on vinyl film is required, this is carried out by a specialized company. If you add up the costs of materials, markups for selling them to clients and wages for employees, then the price of wrapping a car body with vinyl film is about 42 thousand rubles, half of which is the cost of materials. You can earn 21 thousand rubles on one car. For four weeks of work, income can be up to 315 thousand rubles.
If you subtract the rent for the garage, advertising costs and electricity fees from the monthly income figure, which in total will be about 30 thousand rubles, you will get a balance of 285 thousand rubles. In a few weeks, this profit will be clear, and you can think about investing in another profitable enterprise.
Do-it-yourself car wrapping
Let's start with the fact that the car owner can apply the film in two ways: on dry and wet surfaces. The choice is up to the driver, but it is better to rely on your own accuracy and speed.
To achieve a good result, you should work with an assistant. The pasting process involves following the following rules and recommendations:
- Smooth the material from flat surfaces, working towards the edge.
- In order for the film to fit perfectly on bends and indentations, it is made elastic by heating it to a certain temperature.
- Do not stretch the material too much.
- If air is detected under the film, you should try to smooth the material using a squeegee.
Do-it-yourself car wrapping
Tools and materials for wrapping a car with film
Pasting a car dry or wet cannot be done without special materials and tools. To work successfully, the master will need:
- car film;
- dry, soft, lint-free cloth;
- stationery knife and scissors;
- a professional hairdryer, but you can also use a regular hairdryer;
- plastic or felt squeegee;
- sprayer with soap solution (surface treatment using clean water is difficult);
- masking tape;
- degreaser (white spirit works great).
If the film is very large, it is better to work with an assistant.
Felt squeegee
Which films are easier to glue?
On the auto goods market, the car owner can purchase cast or calendered film. It is believed that the first type is most suitable for vehicles, as it is perfectly applied to recesses and bends.
In addition to the type of film, the quality and technology of gluing depends on the method of application - dry or wet. The first method is considered difficult and the work should be done very quickly, since the film instantly sticks to the surface of the car, and errors cannot be eliminated. Despite this, the coating is applied in one go and lasts for a long time.
Calculation of film for car wrapping and its cost
Car wrapping requires careful preparation. Before starting work, you should calculate the volume of material. This must be done taking into account a number of factors, including the car model, type of film, level of knowledge and qualifications of the technician.
Car wrapping with film
For small vehicles, it is recommended to purchase material whose width is at least 137 cm; for other cars, 152 cm will be enough. To cover the body of a sedan, the master will need about 17–19 m of film; for an SUV you will need at least 23–30 m; for station wagons and crossovers – 18–23 m.
Preparing a car for vinyl wrapping
For successful work, the surface of the car must be carefully prepared, namely: washed, cleaned and degreased. To wash the body, use a special shampoo or any detergent. Alcohol and solvent will help get rid of stains, insect marks and grains of sand stuck to the surface. A perfectly clean body can be obtained by polishing the car.
And finally, you can start marking the film. For the procedure you will need a stationery knife and scissors. Having applied the material to the surface, you need to mark the size line and make other necessary marks.
Preparing a car for vinyl wrapping
Primer, soap solution, cutting
To prepare a soap solution you will need detergent and water. Proportion 1:10. The detergent will ensure comfortable application of the material. Car wrapping with vinyl film in car dealerships is done using a primer. The need to use it arises in hard-to-reach places where the material needs to be tensioned; along the edges of the part where the film is wrapped and in case the adhesive layer has received fingerprints from the master, deteriorating its properties.
Cutting the film begins with the bumpers: front and rear. As a rule, bumpers are about three meters in length. A tape measure is ideal for accurately measuring the wings and “skirt”. You need to cut the film sparingly, using every centimeter. When cutting out the material for the arch, the remains can be folded or used on another surface, for example, a threshold or mirrors. When cutting doors, it is recommended to make a small margin.
Instructions for gluing
By following all the rules, you can quickly and efficiently cover your car with auto vinyl.
General principles and rules
If vinyl is chosen for covering, it is better to cover the body completely rather than partially. This is due to the fact that it does not allow sunlight to pass through, and the color of the car will not completely fade. This will be very noticeable after removing the film.
Before the coating itself, it is necessary to carefully prepare the surface of the car. If there is rust somewhere, this place needs to be treated and puttied to prevent the spread of metal corrosion.
Conditions for pasting
Initially, you need to choose the place where the work will take place. This could be a garage with good lighting; the room temperature should be at least 20 degrees.
Cleanliness is the key to quality coating. The smallest speck of dust or particle caught under the film coating will ruin the entire appearance. The work will have to start again. Therefore, before starting work, wet the floor surface to prevent dust from flying.
Preparing a car for wrapping
Before sizing a car, it must be carefully prepared. The preparation stages include:
- If the surface contains some suspicious places (where the paintwork may come off), it is better to clean it immediately, since the film may be adjusted several times during the work.
- For convenient gluing in hard-to-reach places, it is better to disassemble the body in as much detail as possible.
- Wash and dry the surface very well.
- Treat the surface with a degreaser solution.
- When gluing, apply a primer in bend areas for better adhesion to the surface.
Pasting process
After preparing the car, you need to move on to preparing the material for wrapping. Make patterns in accordance with the places where the gluing will take place:
- apply vinyl around the perimeter to the surface;
- secure with paper tape;
- make appropriate marks, taking into account the reserve;
- cut out.
When pasting wet on a prepared surface:
- a soap solution is applied;
- the protective layer is removed from the film;
- The material is glued in the center and then slowly move to the edges, smoothing with a squeegee;
- if bubbles have formed, carefully remove them from the place of formation with a squeegee along with a soap solution and the bubbles will disappear;
- in the bend areas, heat the material with a hairdryer, and apply a primer to the edges, from the side of the adhesive base;
- if irregularities appear on the bend, heat it up a little more;
- After applying the film, the entire surface is heated for better adhesion and getting rid of some imperfections.
When pasting using the dry method, the application process is repeated, the difference is that the material is applied to a dry surface of the body. After application, the carbon coating is heated. Pass over the surface with a felt squeegee and wipe with a dry cloth or rag.
When applying, carefully ensure that the material does not stretch too much and bubbles do not form. If this happens, it is recommended to press the unfinished area with a wet rag and treat it with a hot stream of air. The vinyl should shrink a little, the imperfections will be hidden.
We recommend watching this video before starting work: