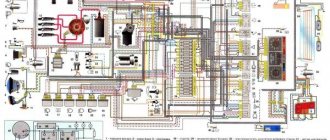
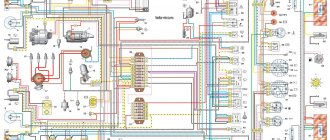
Electric window device (ESP) and connection diagram
The standard circuit consists of a control unit, drive and trigger mechanisms. The drive mechanism, or gearmotor, rotates the cable drum, directly raising or lowering the glass. The gearmotor is a solid block of an electric motor with a worm gear, which provides rotation in only one direction, from the worm to the wheel. This prevents the window from accidentally closing. The built-in thermobimetallic fuse protects against overloads.
Let's look at what the components in the electric lifting mechanism circuit are responsible for:
1. There is a mounting block located under the instrument panel on the driver's side. Devices are powered from it.
2. The power window relay reduces the current in the control circuit.
3. Buttons with LED backlight, on the right and left doors, activate the glass lifting mechanism.
4. Gear motors for the passenger and driver's doors create a force that raises and lowers the window.
5. The ignition switch supplies power to the relay.
How does the scheme work?
Turning the ignition key supplies power to the unit and the lift relay. The LED backlighting of the control buttons turns on. The glass movement mechanism starts only when you press any key.
The movement of current in the circuit: battery - fuse - relay - button - motor.
Welding work
The first step is to remove rusty metal and corrosion. It is advisable to carry out this work with a grinder. Hard-to-reach places are cleaned using a gas welding machine. Then the metal patches are cut out. This is done with special scissors. This way you can make correct, even workpieces without torn edges.
It will be easier for two people to weld a new floor, since you will have to fix the patch and weld it at the same time. Basic rules for welding the bottom:
- The patch is stuck at 3-4 points, and then completely scalded.
- Short sutures are used to correct small defects. Length – 3 cm.
- The patch is applied as tightly as possible. In gaps, corrosion quickly forms again.
- To increase the strength of the seams, they are hammered.
After repairs, be sure to check the work done in a well-lit room. If necessary, weld the seams on the Niva again. Only after this can the seam beads be cleaned.
Front door window regulator malfunctions
During the operation of the car, breakdowns of the window lifting mechanism occur. Most often, the causes of malfunctions are related to the electrical circuit of the lifts. Let's look at the main causes of malfunctions:
1.Both window regulators do not work: 1.1. The fuse has blown. 1.2. Unreliable connection of wires to ground 1.3. The connector is disconnected or there is a break in the electrical network. 1.4. The main power window switch is faulty.
2. The right one does not work: 2.1. Damage to the gearmotor or reverse current relay. 2.2. Electrical network interruption. 2.3. The power window switch is broken.
3. The glass goes down, but does not go up. The reason is that the button is stuck in the down position.
4. Slowing down or raising the glass. The reason for this is contamination of the drainage holes at the bottom of the door.
5. The cable in the drum may be worn out or broken.
6. Mechanical damage also occurs. They are identified by characteristic noises and knocks. Troubleshooting begins with checking the fuse; it supplies power to both window regulators. If the cause of the breakdown is not found, you will have to disassemble the door.
7" LED headlights
Nivas, like many other off-road vehicles, use 7″ headlights. By coincidence, exactly 7 inches or 178 mm. The initial factory light of the Niva is very sad. Experienced drivers and off-road enthusiasts replace standard light bulbs with halogens, but even this light is not enough when driving at night in bad weather.
For this reason, ready-made seven-inch headlights with integrated LED light have come into use. Kits, on average, cost from 7 thousand rubles. for 2 lights. Be sure to ask the sellers about the number of headlights included. Installation of such headlights requires the purchase of additional wiring kits with normal connectors (it’s better to do it well once and forget about the wires forever).
Car fuses and relay box
The vehicle's power supply and consumption system ensures the correct functioning of components and assemblies and comfortable driving. The car's current source is the battery. The consumers are connected in parallel and combined into separate blocks with fuses.
On the Chevrolet Niva, the fuse box is mounted in a unit and is located in the passenger compartment. Fuses protect almost all electrical power circuits. They do not have such protection for the generator circuit, engine starting and battery charging.
Installation of Forward Window Lifters on VAZ 2131 Niva mp3
Listen
Duration: 4 min and 31 sec
Bitrate: 192 Kbps
How to Install Window Lifters on a Niva Detailed Instructions
How to Paint Lada 4X4 At AvtoVAZ Lada Niva S Modern Paintshop Full Footage In Hd English Subs
Removing Windows on Niva 21213
Lada 4X4 Niva Installation of Threshold Protection
Installation of Forward Window Lifters on VAZ 2107
Hydraulic Engine Mounts On Niva
Test Drive Niva Lynx Autumn 2013 Autocomplex LLC
Installing Garnet Window Lifters on a Mercedes Vito 638
Replacing the Window Lifter on a VAZ 2104 2105 2107 Niva Zhiguli Classic
Niva V 3D Part 2 Bling
Installation of Window Lifters on a VAZ 2121 Niva With Windows
Installation of Forward Window Lifters on Daewoo Nexia
Seats for Niva From Foreign Cars Without Welding
Repair VAZ 21214 Niva Removing Cardan crosspieces
My Drive Installation of ESP on Classic VAZ
How to Install Electric Windows on a Niva Instructions Abridged Version
The formation of Niva is almost finished New things on Nivaha
How to Assemble Lada 4X4 How To Assemble The Lada Niva
Replacing the Window Lifter on a VAZ Classic
This Installation of Forward Window Lifters on VAZ 2109 2108 2113 2115
Now downloading
General Chat With Bts T I Died
Installation of Forward Window Lifters on VAZ 2131 Niva
Troubleshooting ESP
To prevent the front door window lift mechanism from breaking, it is enough to lubricate all its parts once a year. In case of breakdowns, remove the ESP and carry out repairs:
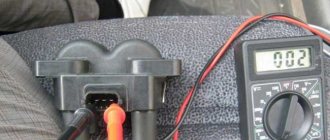
1. The fuse is checked in the standard way. Using the diagram or visually we find the required fuse. We inspect it for broken wires and burnt marks. You can check with a tester (multimeter) by resistance or voltage.
2. Check the relay for serviceability. To do this, either connect a new one, or close contacts 30 and 87 with each other. The relay cannot be repaired; it must be replaced.
3. Window lifter buttons are easier to remove and replace. The reason for their malfunction is oxidation of the contacts. You can quickly restore the operation of the buttons by treating them with WD-40 penetrating liquid.
4. The faulty motor must be replaced. Its repair is possible only if the contacts are oxidized. They need to be cleaned. If there is no voltage in the walk-behind tractor wires, you need to find the break and repair the damage.
All moving parts of the removed ESP mechanism are inspected for mechanical damage, dust, and dirt. Sometimes it is enough to clean the parts from rust and lubricate them for the lift to work properly.
Safety
According to the Autoreview magazine, the level of passive safety of the Niva VAZ-21213 turned out to be extremely low. According to the results of a crash test according to EuroNCAP rules (more precisely, only one of its parts, a frontal impact at a speed of 64 km/h), conducted by the magazine (a description of the crash test is given in No. 19, 2002), the Niva scored 0 points out of 16 possible for a frontal impact, becoming the second AVTOVAZ model after the VAZ-2107 to score zero points for safety.
This result is quite logical, since the car was developed more than thirty years ago and has a common aggregate base with the “classic” (VAZ 2101 - VAZ 2107) family. In practice, this means that the driver of a car involved in such an accident at a speed of 64 km/h will certainly be injured.
There is no possibility of improvement without radically reworking the car, including the power structure of the body.
One of the problems identified by crash tests was the problem of side member deformation. In the press in 2002-2003, notes appeared that AVTOVAZ was conducting experiments to solve this problem by filling the cavities of the side members with foam materials in order to improve the nature of body deformation (to comply with the VAZ-21213 car to the requirements of UNECE Rule R 94, that is , successfully passing the frontal crash test at a speed of 56 km/h). However, the results of crash tests were not provided anywhere, and there is no data on whether the restyled Lada 4×4 has become safer.
On June 20, 2011, a car with ABS went to the AvtoVAZ test site. The result of the tests was the launch of a version with ABS and BAS under the index 1. This version has been released since October 1, 2011.
Replacement of front SP
Remove the ESP mechanism from the front door to repair parts or completely replace it. The electric window lifter is also removed during other repair work, when the mechanism interferes with their implementation. A standard set of tools is required.
Sequence of work:
- Remove the plastic door trim. Using a thin screwdriver, carefully pull out the plastic plugs. We unscrew the cross-shaped screws on the frame near the opening handle, and the three at the bottom of the door on the bottom pocket and remove the parts. Remove the two large screws under the plug. We remove the main casing.
- Disconnect the wires from the buttons by pressing the latches. We remove the switches from the plastic case.
- We remove the speaker.
- We remove the front door glass. To do this, unscrew the bolts securing the glass plate to the bar and the bolt securing the door guide. We remove the guide, remove the glass seal, and remove the glass.
- We detach the ESP drive gearmotor from the block with the power wires.
- We unscrew the nuts securing the mechanism to the base of the door, the central and lower nuts.
- We take the mechanism out of the door hole. We inspect the mechanism for damage and replace parts. Next, we install the repaired power window in reverse order, or replace it with a new one.
Preparation for repair
It is quite possible to carry out repairs to the bottom of any Niva model yourself. Before welding a complete bottom or installing patches, dismantle the interior.
Step-by-step instruction:
- Remove the seats.
- Remove the carpet.
- Remove the old sound insulation.
- Move the electrical wiring to the side to avoid touching the wires during repairs.
Tools you will need:
- hammer;
- welding machine;
- screwdrivers;
- electric drill;
- Bulgarian.
After removing the sound insulation, the metal is thoroughly cleaned and wiped dry. Problem areas are cleaned with a grinder. It can be replaced with fine-grained sandpaper. Then the metal surface is degreased and treated with an anti-corrosion agent.
Connecting ESP without ignition
By default, the front door power windows on the Chevrolet Niva only work when the ignition is on. There are several ways to connect an ESP bypassing the central locking.
We will need a simple tool: a Phillips screwdriver, a thin screwdriver, wire cutters, and insulating tape. To replace the relay, we purchase a simple jumper, or we make it ourselves. Process: 1. We bridge the power legs of the relay, which supply power to the window regulator. To do this, remove the protective plastic cover. There are three to five relays under the fuse block.
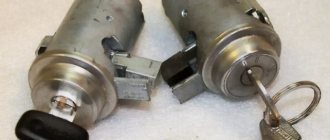
Location of the Niva Chevrolet immobilizer and instructions for disabling
page » Immobilizer » Location of the Niva Chevrolet immobilizer and instructions for disabling
An immobilizer is a device that blocks the engine when an attempt is made to steal a car. Used as a primary or additional anti-theft means, if present, the alarm can already be considered a security complex. In Chevrolet Niva cars, the immobilizer is installed as standard, but depending on the modification, it may be missing.
Blocker APS-6 APS-4
Chevrolet Nivas produced before 2004 were equipped with APS-4 immobilizers. Modern cars began to use APS-6 devices. In later versions of the car, it began to be installed on the steering column, and not in the tunnel.
Rear SMEs Niva Chevrolet
The rear doors of the Niva Chevrolet are equipped with mechanical windows.
They are not as convenient as electric ones, but are more reliable. The main element of the window lifter mechanism is the drive device. The drive consists of a simple set of elements: a pair of spur gears and a handle. The handle regulates the degree of opening of the window.
If the window regulator is broken, the window will not open when the handle is turned. There may be several reasons:
1. The handle slots are worn down. This is due to the soft plastic of the handle itself, at the junction with the gearbox shaft. The handle is replaced by choosing the option with a metal insert.
2. The gear teeth of the gearbox have ground down . The gearbox is a block of two gears in a housing, with space for a cable. The body is connected with rivets. To replace a worn-out gear, you need to drill out these fasteners and replace them with bolts after repair. It's easier to change the gearbox assembly.
3. The cable has broken . If this is the case, the handle rotates too easily. The cable is sold only assembled. You can find a suitable option, but it’s easier to change the entire window regulator.
4. The fastening of the cable to the base of the glass has become loose. This is the simplest failure. The cable slips into the mount and does not move the glass. It is necessary to remove the door trim and, by tightening the fastening bolts, adjust the position of the glass and the cable to each other.
Let's look at how to change the rear power windows:
- Remove the upholstery from the door.
- Unfasten the rods of the inner handle of the lock.
- Raise the glass all the way and fix it.
- We unscrew the center nuts securing the glass and window regulator.
- We unscrew the fastening nuts from the bottom and top and remove the window regulator assembly through the technological hole.
We looked at the main causes of power window failures on the front and rear doors and how to repair them. Use our tips for DIY repairs and save your family budget.
Sequencing
The process of removing and installing glass on a Chevrolet Niva consists of 3 stages:
- dismantling the old part,
- cleaning the frame, preparing for installation,
- installation and fastening.
Front glass replacement
The operation does not require special skills or much time. To replace the windshield on a Chevrolet Niva, you need the help of a friend and a couple of hours of time.
- It is better to remove the decorative upholstery and rear view mirror first, otherwise fragments will get inside. We also remove the wipers.
- When all the tools are ready, and your friend has agreed to help, we begin dismantling. We make a through hole in the seal. Whatever it is, it doesn't matter. We insert a fishing line or string. We draw one edge from the outside, the other from the inside, thereby cutting the rubber.
- You can use the second method: scrape off the seal with a spatula, gradually squeezing out the material. The damaged canvas will completely crumble.
- Work with fragments with gloves, observing safety precautions.
- We remove the fragments, clean the lower groove from dirt or dust. We remove the remaining rubber and rust with a sharp stationery knife.
- We try on a new part, marking the marks with a pencil or marker.
- We treat the new part and the car frame with acetone or alcohol. To replace it, we put on a new seal and insert a thick rope cord into it.
- Apply adhesive sealant to the inner edge of the glass. Place tape on the outside. To facilitate installation, apply lubricant to the seal and soap solution to the lower groove.
- We start inserting from the bottom. As you insert it, pull out the cord, pressing the shield tightly to the body.
- Align. We attach the tape to the body. Leave it overnight.
- After complete drying, cut off the excess sealant with a knife.