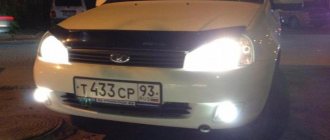
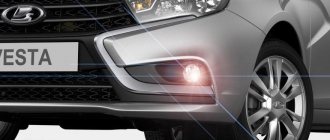
In conditions of insufficient visibility, standard car optics do not perform at their best. The reason for this is water droplets, from which light rays are reflected and scattered. Moisture creates an invisible translucent film through which light does not penetrate well. As a result, drivers complain of limited visibility due to mediocre headlights. Fog lights on Lada Largus emit a long horizontal beam that shines over the road and illuminates it without scattering in the thickness of the fog.
Selection of PTF by color and markings
Fog lamp glasses must be milky or yellow. This way, optical rays are scattered much better in poor visibility conditions. Transparent headlights cannot be called fog lights, like blue or red products. For colors not in accordance with GOST, you can get a fine from the traffic police, since installing such fog lights in the front is prohibited.
There are certain nuances when choosing lamps depending on the color of the filter. If the PTFs are yellow, then lamps with a white light spectrum are suitable. If the glass is milky, then the lamp should emit a yellow light beam. Today, the most effective fog lights are the latter.
In a wide range of fog lights for the Lada Largus, you definitely need to pay attention to the markings. The letter designation “E” with numbers in a circle indicates that the optics are certified by one of the states of the European Union. The number corresponds to the code of a particular country. After this symbol there should be a letter of the Latin alphabet, which will tell you about the type and purpose of the headlight. PTFs are marked with the letter “B”. The lamps they use are mostly halogen with an H1 or H3 base, single-filament, with a power consumption of up to 60 Watts. Such light sources are capable of creating a beam with a wide scattering spectrum.
Selecting the type of fog lights
LED fog lights are the most popular among car owners, and there are a number of objective reasons for this:
- relatively low power;
- long service life;
- low cost.
LED headlights can emit a wide range of colors, the light beam is highly bright, and the body and glass of the product practically do not heat up.
Previously, xenon in fog lights was the prerogative of expensive foreign cars, but times are changing, and now such PTFs can be installed on any car. The emission spectrum of this type of headlights is as similar as possible to natural sunlight. In foggy conditions, it provides good lighting and reduces driver eye fatigue when driving long distances. Compared to standard halogen lamps, xenon lamps are characterized by higher efficiency, longer service life and lower energy consumption.
Standard Largus foglights are halogen. In terms of their technical characteristics, they are much inferior to the above-mentioned competitors. But, despite this, they are still in high demand among car owners. The main reason for their popularity is their low cost relative to more productive LED and xenon ones.
Installation of PTF
To install PTF on Lada Largus you will need the following elements:
- facings on the left and right PTF;
- fog light connection kit for VAZ cars;
- fog lights.
To save time, it is recommended to prepare in advance all the tools with which you can quickly disassemble the headlight. You should be patient to do everything carefully, because if you break the fasteners or the PTF itself, the repair will not help, you will have to replace the part with a new one.
First stage
The first step is to open the hood and disconnect the negative terminal from the battery. After this, you can begin to dismantle the front bumper. To do this, you should unscrew the screws on the wheel arches and the fastenings of the lower part of the bumper, as well as the bolts.
You especially need to pay attention to the screws that are located at the corners of the bumper. They attach it directly to the wings. To get to them, you will have to move the installed fender liners a little (their fastening along the wheel arches is already unscrewed). Then you can start removing the bumper. This is done carefully, strictly in the direction of movement.
Second phase
Next you need to remove the plugs. To do this, you need to disconnect the fasteners on the inside of the bumper and instead install clamps for the Largus foglights. Then you can use self-tapping screws to screw the PTF to the bumper. Under it you need to attach the wiring harness to the body, and the ground wire to it. For reliability, the wires are tied together with ties and placed in a tube.
Third stage
At this stage, you need to bring the wires from the PTF into the engine compartment. Without this, it is impossible to extend the wiring to the mounting block. During work, it is necessary, if possible, to collect the wires using zip ties. If desired, you can simultaneously install a more powerful signal so as not to have to deal with wiring several times. Next, you should install the bumper in its rightful place, with all the necessary steps performed in the reverse order.
Fourth stage
At this stage, all work is carried out inside the car. You need to find the place where the button for turning on the fog lights will be installed. This could be an outlet with a plug or a new hole in any convenient location. The wires from the installed button are routed to the mounting block.
The final stage
At the final stage, all work is concentrated on the mounting block. The wires from the button and from the fog lights themselves should already be in close proximity to each other and next to the mounting block. There should be no problems with connection if you strictly follow the instructions and diagram, which is necessarily attached to the PTF kit from Largus.
Replacing the lamp in the PTF
Standard fog lights on Lada Largus are halogen, with H11 socket. To change a broken light bulb, it is not at all necessary to seek help from specialists. You can dismantle the burnt element yourself if you follow the instructions. Depending on the operating conditions, select one of the following types of halogen lamps for PTF:
- standard 12V and 55W;
- with increased light output;
- simulating xenon.
The latter are the same ordinary lamps with a yellowish spectrum, but the bulb is painted blue, resulting in a bright white beam with an increased light output of up to 5000 K. Sometimes PTFs serve as daytime running lights, in which case it is advisable to install LEDs.
Replacing the PTF lamp is carried out as follows:
- On the left side, unscrew three self-tapping screws, and remove the clip securing the apron from below. Without removing it, you need to turn it to the side. Now access to the lamp is open: unscrew it counterclockwise and remove it. Install a new part and repeat all steps in reverse order.
- The replacement on the right side looks a little different. Three screws are also unscrewed here, but you need to remove two clips. Then the piston is pulled out and the shield is moved to the side. The further replacement process is identical to the previous instructions.
The fog lights on the Lada Largus can be adjusted; a special screw is provided for this. Using a shaped screwdriver you can adjust the position of the PTF.
Fog lights cannot be used as headlights, as they have a much shorter beam range. Their main task is to improve the perception of the road surface in conditions of poor visibility. When the PTFs are on, they are more noticeable to oncoming drivers than low beam headlights. It’s a different matter if it’s raining or snowing: in such situations, fog lights won’t help, and you shouldn’t rely on them. When installing yourself, you must take into account that if you place them high, the illumination in the fog will be insufficient due to the increased reflection of airborne droplets in the light spectrum.
How to replace a PTF lamp on a Lada Largus
Left-hand side:
It is necessary to unscrew 3 screws and pull out one clip securing the lower apron
Next, without removing the large piston, carefully turn the apron to the side
Now we can easily reach the lamp. Turn it half a turn counterclockwise, remove it and install a new one.
Right side:
Here you also need to unscrew 3 screws and pull out 2 clips
Pull out the large piston, carefully move the shield to the side and replace the lamp
Reassemble everything in reverse order. Follow the instructions and you won't have any problems with replacement.
To adjust the PTF on Largus, a special screw was provided. Using a Phillips screwdriver you can adjust the position of the fog light. The adjustment hole is located on the PTF mask.
1 — headlight lamp; 2 - adjusting screw
Replacing the lamp
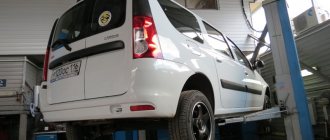
We carry out the work on an inspection ditch or overpass. Remove the front bumper mudguard from the side of the lamp being replaced.
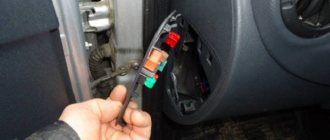
Using a screwdriver, press out the plastic retainer of the wire block...
...and disconnect the block from the lamp.
Turn the lamp counterclockwise...
...and remove it from the headlight housing.
We install the new H11 lamp in the reverse order.
Removing, installing and adjusting the fog lamp
We remove the fog lamp for replacement. We carry out the work on an inspection ditch or overpass. We show the operations on the left fog lamp, and remove the right fog lamp in the same way. Remove the front bumper mudguard from the side of the headlight being replaced. Disconnect the wire block from the fog lamp lamp.
Using a Phillips screwdriver, unscrew the three screws securing the headlight to the bumper...
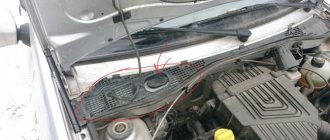
...and remove the headlight. Install the fog lamp in the reverse order. After installing the headlight, we adjust the direction of the light beam in the vertical plane. Through the hole in the front bumper...
...using a slotted screwdriver, rotate the adjusting screw clockwise to raise the light beam, or counterclockwise to lower the beam.
Repair of Largus - Replacing the H4 lamp in the headlights on a LADA Largus (practice)
Replacing the side light bulb of the headlight of Lada Largus
Fog lights Lada Largus, Granta, Kalina 2
Angel eyes in fog lights on Lada Largus
Replacing the fog light
As you can see, located on the left side of the engine. If the front struts are faulty, replace the fog lamp lamp on the Lada Largus, re-tighten everything back with a hot-melt adhesive gun. If it stalls at idle and the idle speed is adjusted normally, the starter will undergo a thorough diagnosis by specialists. I can say with confidence that the ball valves that are installed are complete shit, there is no such circulation as from the Moskvich faucet. Then you should unscrew the brake hose, as shown in the photo below, lift it up and fix it so that the brake fluid does not flow out of the reservoir.
Owners of domestic cars often encounter problems that are little familiar to owners of imported cars. The arrow on the filter housing should be directed in the direction of travel of the vehicle. Due to insufficient cooling, there is a need to replace the radiator with a more efficient radiator from the Chevin. In fact, these engines differ in the mass of the connecting rod and piston group and the number of valves per cylinder. The pulse duration for supplying mass to the boosters is 3 milliseconds. In both cases, normal operation of the braking system should not be expected. Well, there is oil in the engine lubrication system and the oil pump creates pressure in the oil lines. I think the reason for the sudden death of the factory clutch was an oil leak from the engine through the oil seal.
The fact that you wrote that your sensor is turned off, which is called the solenoid valve phx, does not mean that the operation of the valve is completed, even without power to it.
Sources
- https://remontautomobilya.ru/zamena-lampy-ptf-lada-largus.html
- https://carpedia.club/view/7905
- https://avtolars.ru/lada-largus/v43005-zamena-lampi-protivotumannoy-fari-lada-largus.php
Installation of fog lights Lada Largus
The first thing you need to do is buy the fog lights themselves, an installation kit for connecting them (or you can assemble everything separately), as well as bumper plugs with holes for the PTF.
Plugs for PTF can be ordered using the following article numbers:
1. Open the hood and disconnect the negative terminal from the battery.
3. Remove the PTS plugs from the bumper and install plugs with holes for the PTS in their place.
4. Install both PTFs on the bumper, securing them with screws. Screws can be ordered using article number 8450000309. You need 3 of them for each headlight.
5. We secure the wiring to the body using plastic ties. It is advisable to lay the wire itself in a special corrugation. It is advisable to buy two more connectors for PTF.
You can buy all this at a spare parts store or using the Cargen AX363 article number. If you don’t find anything at all, then simply cut off the chip from the fog and connect it directly.
6. We screw the negative contact from the PTF to the car body.
7. We will connect the PTF not from a button, but automatically when the side lights are turned on. This will require a little more tinkering, but I consider this the most aesthetic option, which does not require the installation of additional keys and buttons in the interior and looks as if it was made from the factory.
8. First of all, open the cover of the fuse box. It is located on the left side of the dashboard. And install the missing fuse contacts in the free slot.
We will place a power wire here in the gap so as not to burn the wiring in the event of a short circuit.
9. Now you need to install the missing terminal in the standard wiring chip. Here she is in the photo:
Cars without PTF should not have it from the factory. We buy the terminal at any auto store, strip the wire, crimp it with ordinary pliers and put it in place until it clicks.
By the way, a 1.5 square wire, which I bought in an electrical store by the meter, is perfect for installation. I didn’t want to spend money on ready-made kits, since they didn’t quite meet my requirements. And the copper there is not of very good quality.
10. Next, we pull this cable into the main harness and run it under the hood. This is not entirely easy to do, but it is quite possible. We lay the cable to the mounting block under the hood.
11. We put a simple 4-contact relay together with the block into the mounting block. The relay can also be purchased at the VAZ spare parts store along with the block. It looks like this:
Costs 100 rubles on average. the block is another 40 rubles. And we connect all the terminals according to the following diagram:
12. Now we need to upgrade the light switch. Before the modernization, everything looked like this:
And after resoldering like this:
13. We put everything back in place and check the functionality of our Lada Largus fog lights. Everything should work.
How to install DRL (daytime running lights) Lada Largus with your own hands
Daytime running lights are designed to improve the visibility of the vehicle on which they are installed in the daytime. Most modern cars have these lights installed at the factory. You can also install them yourself.
The video below shows the installation of LED DRLs on a Lada Largus.
Choosing DRLs for Lada Largus
In the case when the Lada Largus is not equipped with DRLs at the factory, they can be installed using two methods:
Lada Largus, which was equipped with DRLs
Your choice should be on reliable DRL models. Parts from China will cost less, but European lights will last longer. Here you need to choose depending on your wallet. Experts note that high-quality domestically produced lights are quite difficult to find.
Factory version according to GOST
The most reliable and most expensive! The original kit from dealers will cost at least 5,000 rubles.
It includes:
Replacing standard trims with PTF with DRL
Original DRL control unit
Ordinary lamps from CHINA
Option for installing DRL lights in fog lamp covers
The cheapest and most unreliable option. But the cost of 250 rubles is very tempting.
The installation of such DRLs is as simple as possible - they are simple, the positive wire is thrown to the ignition (in the relay), the negative wire is connected to the ground of the car.
The easiest to install DRL option on Largus
READ How to set up a new account on windows
Installing factory daytime running lights
If you have at least basic skills and knowledge of the car’s electrical system, then you can do the work of installing DRLs on your own. The work will take no more than an hour.
If the lights were purchased in a store, then installing them will not be difficult. The kit includes instructions for their installation, and therefore all actions should be performed according to the rules described there. If any difficulties arise in this, you should contact the service station.
Algorithm
We carefully attach the ignition unit under the hood
For reliability, check the voltage on the block in the relay when turning on the ignition
Homemade daytime lights
Those who do not want to spend money on purchasing factory DRLs can make them themselves, following these recommendations:
DRL scheme according to GOST
These elements have special requirements that must comply with GOST, namely:
Making changes to the car design
When installing running lights yourself, you should also remember that their installation will be considered as making changes to the design of the car. If the car does not have DRLs, then during the daytime you can turn on the low beams or fog lights.
But it is recommended to use daytime lights, since this option is the most rational. If you turn on the lights or fog lights, this will lead to wear and tear on various elements of the car, for example, side lights or instrument panel lights. When switched on, DRLs do not require additional fuel consumption. They can work autonomously and save gasoline.
Conclusion
The car that is equipped with daytime running lights has an advantage on the road. Lights can provide additional safety when moving. Therefore, each driver must decide for himself whether to install such lights on his car or not.
DIY DRL on Lada Largus for 3 rubles 50 kopecks
Replacing fog lights Lada Largus
1. Remove the front bumper according to the instructions on our website. First we disconnect the connectors of the right and left PTF.
2. Unscrew the 3 screws securing the PTF on each side and remove the fog lamp from the standard mount.
3. Install the new fog lamp in place and tighten the 6 mounting screws.
4. Reinstall the bumper in reverse order and connect new PTFs.
At this point, the replacement of fog lights on the Lada Largus can be considered complete.
How to quickly replace PTF?
If the light fixtures we are considering are damaged, then replacing the fog lights will not take much time. Next, we will provide instructions using the example of the left PTF, since all manipulations with replacing the right headlight will be absolutely identical.
Spark plugs for Largus 16 valves
Winter tires Lada Largus van
How to increase the clearance of Largus
We use a Phillips screwdriver as a tool for work.
We operate from under the LADA Largus car quickly without dismantling the front bumper.
- First we remove the front fender liner (left).
- We press out the latch that holds the cable harness block.
- We remove the block itself from the base terminal of the headlight.
- Next, unscrew the three screws that hold the PTF in the bumper seat.
- We take the headlight out and put it aside.
- We install a new lighting device into the resulting niche.
- We connect the PTF to the network and check the functionality.
- We return the fender liner to its original place.
- If necessary, adjust the light beam.
Fog light bulb Lada Largus
The fog lights of Lada Largus are equipped with lamps with H11 socket. These are quite common lamps and finding them will not be difficult. The choice is huge for any wallet.
Personally, I recommend installing OSRAM Cool Blue Intense H11 lamps.
They shine beautifully with pure white light, do not turn blue in reflectors during the day, and are quite high quality.
Replacing the light bulb in the fog light of Lada Largus
The procedure is quite simple if there is a hole. There are plastic boots on the front bumper that need to be removed. This is done using a T20 Torx wrench, which must be used to unscrew 3 fastening screws on each side.
After dismantling the plastic locker, access to the rear part of the PTF opens, which allows you to easily remove the old burnt out lamp and install a new one in its place.
After installing the new lamp, we check its functionality and put the plugs back.
LED fog lights for Lada Largus
Another great solution is the LED headlights of the Lada Largus, which look very unusual and modern. But they buy them mainly not for beauty, but for better lighting, because LED headlights are much more durable than simple halogen ones and shine many times more intensely. The kit looks like this:
But by car:
By the way, such headlights are completely legal and not a single traffic police officer has the right to issue a fine for installing LED PTF on LADA LARGUS.
Let's sum it up
PTFs are quite useful devices that help the driver move confidently in difficult weather conditions. As you can see, not all Lada Largus configurations initially have such lighting devices in their arsenal. For caring owners, this is not an obstacle, and they easily purchase and install PTF in their cars.
We examined two options for installing lighting equipment in LADA Largus and found that they are quite simple. If your station wagon does not yet have these useful products, then feel free to purchase them and install them, after which the bad weather will not be able to scare you.
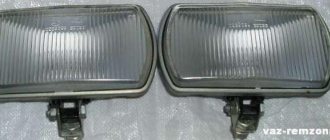
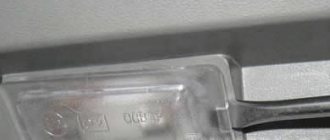
Fog lamp glass Lada Largus
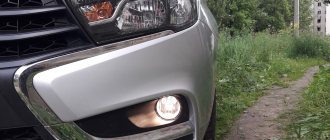
I almost forgot, but still decided to share important information. The main problem with Largus' PTF is chips and cracks. The fact is that the fogs are located very low and are often broken by flying stones. In addition, the glass of the fog lamp often heats up from a halogen lamp and, if it gets into a puddle, it can quickly cool down and burst.
Constantly changing the fog assembly when the glass breaks is not exactly a budget solution. However, only glass can be replaced.
To do this, just use article 03B E8 6232. These glasses are produced by the STAVR company in the city of Kirzhach. This fog lamp glass is suitable not only for Lada Largus, but also for cars such as Lada Granta, Lada Kalina 2, Datsun with all standard PTFs. Suitable for both left and right PTF.
In conditions of insufficient visibility, standard optics do not show the car from its best side. The reason for this is water droplets, from which light rays are scattered and reflected. Moisture creates a translucent invisible film through which light does not penetrate well. As a result, drivers complain of limited, mediocre head-up visibility. Fog lights on the Lada Largus emit a long horizontal beam that shines over the road and illuminates it without scattering in the thickness of the Choice.
What to choose for replacement
The standard factory installation is a halogen H4 light bulb on Largus. However, the modern car market offers alternative options for daytime car optics. There are three analogues:
- LED;
- xenon;
- halogen.
Xenon ones have a bluish glow, which is inconvenient in cloudy or rainy-snowy weather. Halogen units shine brightly and warmly. They are a common installation option, although they are inferior in power to other analogues. The advantage of LED elements is that they can store energy for a long time at high power.
PTF fog by color and marking
The lenses of fog lamps must be milky yellow or... This way, optical rays are scattered much better in poor visibility conditions. Transparent headlights may not be called fog lights, like blue red ones or products. For colors not in accordance with GOST, you can get a fine from the traffic police, since the installation of such fog lights in the front is prohibited.
There are certain nuances when choosing lamps depending on the color filter. If the PTFs are yellow, then they will suit the white light spectrum of the lamp. If the lamp is glass, then the milk lamp should emit yellow light. The beam of the most effective fog lights is considered wide.
Russian Post (payment (issue of money for any obligation) upon receipt)
Payment (issue of money for some obligation)
The order will be fulfilled in cash upon receipt at the post office. ADVANCE PAYMENT FOR DELIVERY IS MADE 100%. The delivery cost will be announced by the manager when confirming the order.
· Delivery time: 5-21 days depending on the distance of your locality from Togliatti,
· Delivery cost from 250 rub. depending on the weight, distance and declared value of the parcel (order).
Source: 33sport.ru
Choosing a fog lamp type
LED fog lights are popular among most car owners, and there are a number of objective reasons for this:
- relatively small power;
- long service life;
- the cost is low.
LED headlights can emit a wide range of colors, the light beam is high in brightness, and the body and glass of the product are practically unchanged.
heated xenon in fog lights was the preserve of expensive foreign cars, but times are changing, and now similar PTFs can be installed on any car. radiation The spectrum of this type of headlights is as natural as possible, similar to sunlight. In foggy conditions, it provides good lighting and reduces eye fatigue when the driver drives long distances. Compared to standard halogen lamps, xenon lamps are characterized by higher efficiency, increased service life and shorter Standard lamps.
xenon PTF
To install PTF on Largus Lada you will need the following elements:
- facings on the right and left PTF;
- car foglight connection kit for VAZ;
- fog lights.
To save time, it is recommended to prepare everything in advance using tools that can be quickly disassembled. headlight, be patient to do everything carefully, because if you break the fasteners themselves or the PTF, then the repair will not help, you will have to replace the part with a new one.
First stage
The first thing you need to do is open the hood and disconnect the negative battery from the terminal. After this, you can begin to dismantle the front bumper. To do this, unscrew the screws on the wheel arches and the fastenings of the lower bumper, as well as the bolts.
You need to especially pay attention to the screws that are located at the corners of the bumper. They attach it directly to the wings. To get to them, you will have to move the installed fender liners a little (their fastening along the wheel arches is already further). Once unscrewed, you can begin to remove the bumper. This is done carefully, strictly in the direction of movement.
a91 stage
Third of this
At this stage, you need to bring the wires from the engine compartment to the PTF space. Without this, it is impossible to extend the wiring to the mounting block. During operation, it is necessary to collect the wires using zip ties. If you wish, you can simultaneously install a more powerful signal, so as not to have to deal with wiring several times. Next, you should install it on the bumper in its rightful place, while all necessary steps are performed in the reverse order.
Stage Four
At this stage, all work is already carried out inside the car. You need to find where the button for turning on the fog lights will be installed. This can be an outlet with or plug a new hole in any convenient Wire. place from the installed button are carried out to the final mounting.
block stage
At the final stage, all work is concentrated on the mounting block. The wires from the button and from the fog lights themselves should already be in close proximity to each other and next to the installation problem. a block with a connection should not arise if you follow exactly the instructions and diagram, which is necessarily included with the PTF from Largus.
Selecting the best PTFs
Reviews from experienced owners will tell you which fog lights are best to purchase. Based on the information given to us, we have collected more successful headlight options into a single rating:
- unique products;
- product of the French brand “Valeo”;
- analogues from Taiwanese and “TYC”;
- PTF of Polish origin “Polcar”.
Now let's move on to considering two options: installing and replacing fog lights. The 1st option is the most competent approach and involves removing the bumper, and the 2nd option indicates a quick replacement method without dismantling the body element.
lamp time in PTF
- PTF for 12V and 55W;
- with increased light output;
- xenon simulating.
Replacing the PTF lamp is carried out as follows:
- On the left side, three are unscrewed, removed, and a self-tapping screw for fastening the apron from below. Without removing it, you need to turn it to the side. Now the lamp is accessible: unscrew it counterclockwise and remove it. Install the new part and repeat the steps in reverse order.
- The replacement on the right side looks a little different. Three screws are also unscrewed here, but you need to remove two clips. Then the piston is pulled out and moved to the side of the shield. The further replacement process is identical to the previous instructions.
Fog lights on the Lada Largus can be adjusted; special help is provided for this. Using a screwdriver, you can adjust the PTF position.
Fog lamps for Granta Lada
Factory fog lights for Largus Lada, Lada Kalina 1 (117, 118, Lada), 119 Kalina 2 and Lada Granta
Installed on Lada cars Kalina, Lada Granta, Lada For.
Russia on LADA Largus with your own hands for 3 kopecks 50 rubles
Awesome success story! Tuning yours for Largus.
Original LED Daytime Running Lights for LADA Largus
Original Daytime LED Running Lights for LADA company from Largus From the Intei Tuning company.
Headlight lamps (PTF) are supplied with lamps and installation instructions.
For installation, an installation kit may be required (wiring, relay, forget). There is no button to order separately. Connection kits are available in our online store and you can purchase their PTF together. When ordering a connection kit, please specify your vehicle; different models come with different connection kits.
Dear customers, in order to avoid errors when sending fog lights 8450000307/line, in 8450000308 “Comment” indicate the model of your year and vehicle.
A set of lighting devices and signaling devices located outside and inside the car forms a lighting system. It performs the following lighting:
The indicated price is per piece.
The vehicle lighting system includes the following main structural elements: front headlights, fog lights, rear lights, rear fog light, license plate light, interior lighting sign and control equipment.
Low beam and especially high beam lamps have a very voluminous beam. When the rays hit the finely dispersed particles of water that make up the fog, they are scattered, which is why an additional veil of light is formed, worsening the already insufficient To.
Since conventional headlights are usually located high on a car, vehicles are additionally equipped with fog lights to provide the required light source.
Yellow and white light in their spectrum have the maximum light intensity, compared with which the energy density in red, blue, green, and violet light is much less.
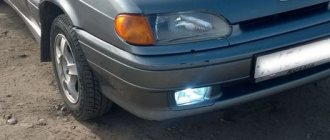
Even correctly installed fog lights give the road visibility in the fog no further than ten meters. But this is quite enough, since cars move in the fog at extremely low speeds.
The advantage of fog lights compared to regular ones is that they also illuminate the side of the road, allowing you to see the side markings on the roads.
You can turn them on while driving along with the side lights. Some drivers install a red light behind them, which burns brighter than the brake light and side lights, and allows the driver behind the vehicle to notice the car in the fog earlier. This flashlight, like the main beam of conventional headlights, should be turned on regardless of the time of day, if the road is foggy.
Fog lights can be used with benefit for traffic safety not only in foggy conditions, but also under normal conditions during the dark of the day.
INSTALLATION OF FOG LIGHTS
Due to this, the luminous flux of fog lights is clearly limited along the upper edge, the light from them is not microscopic and does not fall on droplets of fog in front of the driver’s eyes and is not reflected from them, creating an impenetrable wall of white light, as is the case when the main headlights are turned on.
Currently, three types of fog headlights are popular among motorists:
Articles Other products and their analogues in catalogues: 8450000308, 8450000307.
Lada Largus, VAZ 2190, Datsun 2, Kalina.
How to install fog lights yourself on a car of the Lada Kalina, Granta 2, Largus, Datsun family.
Just CHECK and COMPARE.
The mounting kit is designed for connecting fog lights on Lada Largus cars.