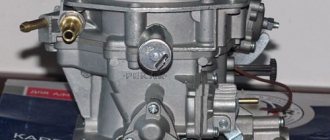
The VAZ 2108 carburetor is considered one of the main devices of the G8, which dispenses gasoline, is responsible for the correct formation of the combustible mixture and for its supply in strict doses to the engine cylinders.
- 2 How does a G8 carburetor work?
- 3 Features of the functioning of other Solex units
- 4 Cleaning the G8 carburetor without disassembling it
- 5 How to disassemble a carburetor yourself?
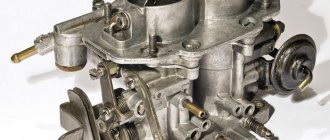
Briefly about the key components of the G8 carburetor
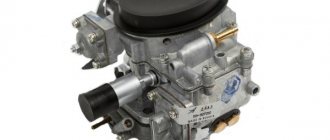
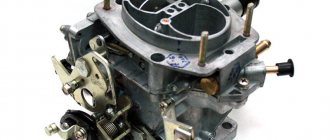
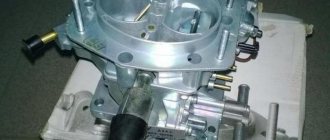
The Solex 1107010 carburetor, which is installed on the Lada 2108, is an emulsion device with two chambers. It has a cable-actuated throttle body (manual). The lower chamber of the carburetor contains dampers and a float compartment. It also has a housing with special diffusers. The upper chamber has a cover covering the body and fuel fittings. This cover is equipped with studs (they secure the air filter) and a flange.
The Solex 1107010 design provides for a number of key components:
- accelerator pump;
- float device;
- throttle control system;
- forced idle economizer system;
- two chambers and their dosing mechanisms;
- starting device (manually controlled);
- econostat;
- idle system.
In addition, the carburetor has many other mechanisms and individual parts that ensure its stable operation.
Wiring diagram for windshield wiper 2108 tailgate glass
| Position number on the VAZ diagram | Explanation of the position on the diagram |
| 1 | electric washer pump motor |
| 2 | electromagnetic throttle for connecting the rear window washer |
| 3 | Relay and fuse box |
| 4 | ignition switch |
| 5 | switch for windshield wipers and washer |
| 6 | rear window cleaner |
| A | to contact "30" magneto |
| B | plan for conditional numbering of contacts in the terminal block of the rear window wiper |
On some cars, tailgate glass cleaners may be installed along with electromagnetic washer chokes.
How does a G8 carburetor work?
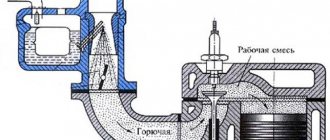
Gasoline is supplied through a valve and filter to the float device (into a chamber with two sections). The required fuel level in this two-section device is maintained by the mentioned valve (it has a needle shape). From the described chamber, gasoline is directed through the carburetor fuel jets into the emulsion wells. In them, fuel is combined with air supplied through the corresponding jets. The resulting composition is then sent to diffusers.
When starting a cold engine, the fuel mixture must be enriched.
This is made possible thanks to the trigger mechanism. The driver controls it with the “choke” handle. When he pulls it all the way, the air damper rotates along the axis and closes it. In this case, the camera opens slightly (by one millimeter). After starting the engine, there is an increase in the amount of vacuum in the intake manifold, which is directed into the cavity of the trigger mechanism.
Its diaphragm, due to the resulting vacuum, slightly opens the air damper to the level of the starting gap (about 3.5 millimeters). When the driver retracts the “choke” handle, a decrease in starting gaps is noted. If you press the gas pedal with the handle extended, the flap of the second chamber closes, and the first one opens. Due to this scheme, driving on a cold engine becomes more comfortable (as there are no dips or jerks of the car).
The selection of fuel from the emulsion compartment (the so-called well) is carried out by the idle mechanism (idle speed). Gasoline is supplied through XX jets and is combined with air. This composition goes through a special hole under the throttle valve. Using two screws, the throttle opening at idle is controlled:
- when the damper of the second chamber is opened (partially), a mixture of fuel and air is sent into it through the hole;
- if the damper of the first chamber is opened, the flammable composition passes through the vertical gap.
Ways to eliminate air leaks
Air leaks can be eliminated only by replacing old fuel hoses coupled with careful sealing of the connections. Cleaning the VAZ 21083 carburetor is carried out without dismantling the unit. List of necessary tools and cleaning products:
- key to 10;
- crosshead screwdriver;
- minus screwdriver;
- syringe;
- 200 ml of acetone;
- a can of aerosol for cleaning the carburetor;
- repair kit
Algorithm of actions.
Unit adjustment
- Remove the air filter along with the filter element.
- We start the engine.
- We spray the aerosol into all visible openings of the carburetor and constantly rev it up.
- After visible traces of dirt have been removed, we pull out the choke so that the crankshaft speed is kept within the range of 2500-3000.
- We unscrew the solenoid valve and spray the resulting hole with spray, gas it and blow through the hole using a pump or compressor.
- After this, turn off the engine and tighten the valve.
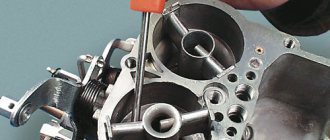
- Next, remove the carburetor cover by unscrewing several screws.
- Using a syringe, remove all gasoline from the float chambers.
- Pour acetone into the chambers and leave for half an hour.
- We unscrew all the jets, having previously remembered where they were located, and send them into the remaining acetone.
- After half an hour, remove the acetone from the chambers using a syringe and wipe off the undissolved dirt with a minus screwdriver wrapped in a cloth.
- We remove the jets from the solvent and blow them out with a pump, then screw them into their original places.
- Disconnect the fuel supply hose, remove the plug, the O-ring and take out the fuel filter. We replace it. Then screw everything back.
- Pour 3 cm of gasoline into the float chamber, put on the carburetor cap and start the car again.
After cleaning the carburetor, the engine should stop stalling without revving up. If there are still dips in the operation of the power unit, the accelerator pump parts should be replaced.
- We carry out the operations described above in paragraphs 1-12.
- Use a minus screwdriver to remove the accelerator pump nozzle.
- Pour gasoline into the float chamber and turn the control lever of chamber 1. If a strong stream comes out of the hole where the sprayer was located, then only replace it.
- If the flow is weak, remove the accelerator pump cover and change all the internals.
- We assemble the unit.
This completes the repair. We wish you good luck and smooth operation of your car!
Features of the functioning of other Solex units
To shut off the supply of gasoline to the first chamber (more precisely, to its transition device) and to the XX device, a valve called an electromagnetic valve is used. Its standard state (when no voltage is applied) is closed. Opening of this element is possible in two cases: when the crankshaft speed is less than 1900 per minute; when you press the gas. When the ignition is turned off, and also when the car picks up speed above 2100, the solenoid valve returns to its normal (closed) state.
Of great importance for the adequate operation of the G8 carburetor is an accelerator pump of a diaphragm design, equipped with a mechanical drive. It has two valves in its design. One of them is in the sprayer. Under the load of injected fuel, it opens, and when gasoline is no longer supplied, the valve closes under the pressure of its own mass. Thanks to this valve, there is no air leakage, and gasoline does not escape from the channels.
Another valve (check valve) is placed directly in the channel that connects the pump cavity and the float device. If the driver releases the gas, the chamber is filled with fuel and the check valve opens. Its closure occurs at the moment when fuel begins to be pumped.
The cam, which is part of the pump we are considering, presses on the lever when the throttle valve opens. This lever is connected by a diaphragm. Due to this, a portion of fuel is supplied to the carburetor chambers, which allows the fuel mixture to be qualitatively enriched when accelerating the vehicle.
When the throttle valves are opened significantly, another important mechanism begins to operate - the economizer. The essence of its work is this: through a valve (it has a ball design) gasoline is taken from the float device. The valve is held closed while vacuum holds the diaphragm in the manifold. When the dampers are opened, a decrease in vacuum is observed. It is important that the fuel for enrichment flows into the emulsion compartment through the economizer, bypassing the main jet.
Let us briefly describe several more systems of the carburetor we are interested in:
- Intake manifold (IMC). This mechanism is attached to the motor using heat-resistant gaskets and pins. The manifold is made from an aluminum-based alloy by casting. The task of the VK is to transfer the combustible mixture formed in the carburetor to the cylinders of the car engine.
- Econostat. The mechanism is necessary for additional supply of gasoline to the second chamber from the float device (fuel is supplied through an intricate system of tubes and econostat jets). The econostat turns on when it is necessary to further enrich the fuel mixture (for example, when driving at maximum power).
- Idle speed economizer (forced). This device includes in its design a shut-off solenoid valve, a screw sensor, and a control unit.
VAZ 2108 options
| Model | Option code | Location of controls | Execution | Engine | Injection system components and controller | Toxicity standards | Dashboard | Note |
| VAZ-2108 | 10 | left | “Norm” for the domestic market | 2108, 1.3 l, carburetor with contactless ignition system | — | R-83 | 2108 "low" | -> 01.00 |
| VAZ-21081 | 10 | left | "Standard" for the domestic market | 21081-10, 1.1 l, carburetor with contactless ignition system | — | R-83 | 2108 "low" | -> 05.97 |
| VAZ-21083 | 10 | left | “Norm” for the domestic market | 21083-50, 1.5 l, carburetor with contactless ignition system | — | R-83 | 2108 "low" | -> 09.00 |
| 10 | left | “Standard” for the domestic market “basic” | 21083-53, 1.5 l, carburetor with contactless ignition system | — | R-83 | 21083 "high" | 09.00-> | |
| 110 | left | “Norm” for the foreign market | 21083-50, 1.5 l, carburetor with contactless ignition system | — | R-83 | 2108 "low" | -> 09.00 | |
| 110 | left | “Standard” for the foreign market basic | 21083-53, 1.5 l, carburetor with contactless ignition system | — | R-83 | 21083 "high" | 09.00-> | |
| 143 | left | "Norm" for the Gulf countries | 21083-43, 1.5 l, carburetor with contactless ignition system | — | R-83 | 2108 "low" | ->09.00 with speed indicator | |
| VAZ-21083-01 | 10 | left | "Standard" for the domestic market | 21083-50, 1.5 l, carburetor with contactless ignition system | — | R-83 | 2108 "low" | -> 09.00 |
| 10 | left | “Norm” for the domestic market “basic” | 21083-53, 1.5 l, carburetor with contactless ignition system | — | R-83 | 21083 "high" | 09.00-> | |
| 110 | left | "Standard" for the foreign market | 21083-50, 1.5 l, carburetor with contactless ignition system | — | R-83 | 2108 "low" | ->09.00 | |
| 110 | left | The “norm” for the foreign market is basic | 21083-53, 1.5 l, carburetor with contactless ignition system | — | R-83 | 21083 "high" | 09.00-> | |
| 143 | left | "Standard" for the Gulf countries | 21083-43, 1.5 l, carburetor with contactless ignition system | — | R-83 | 21083 "low" | ->09.00 with speed indicator | |
| VAZ-21083-02 | 10 | left | "Lux" for the domestic market (basic) | 21083-53, 1.5 l, carburetor with contactless ignition system | — | R-83 | 21083 "high" | 09.00->;with fog lights and headlight cleaning |
| VAZ-21083-03 | 10 | left | "Lux" for the domestic market | 21083-50, 1.5 l, carburetor with contactless ignition system | — | R-83 | 21083 "high" | -> 09.00; with fog lights and headlight cleaning |
| VAZ-21083-20 | 10 | left | "Standard" for the domestic market | 2111-87, 1.5 l, with distributed fuel injection | GM, 2111-1411020-22 | R-83 | 21083 "high" | -> 03.00 |
| 10 | left | “Standard” for the domestic market (basic) | 2111-88, 1.5 l, with distributed fuel injection | Rus+B, 2111-1411020-70, 2111-1411020-71 | R-83 | 21083 "high" | 09.00->;with immobilizer | |
| VAZ-21083-21 | 10 | left | “Norm” for the domestic market (basic) | 2111-86, 1.5 l, with distributed fuel injection | Rus+B, 2111-1411020-60, 2111-1411020-61 | Euro 2 | 21083 "high" | ->03.00; with neutralizer and immobilizer |
| VAZ-21083-22 | 110 | left | for the foreign market | 2111-83, 1.5 l, with distributed fuel injection | GM, 2111-1411020-22 | Euro 2 | 2108 "low" | ->03.00; with neutralizer and immobilizer |
| 10 | left | Domestic Luxury (Basic) | 2111-86, 1.5 l, with distributed fuel injection | Rus+B, 2111-1411020-60, 2111-1411020-61 | Euro 2 | 21083 "high" | 09.00->;with neutralizer, immobilizer, fog lights and headlight cleaning | |
| VAZ-21083-23 | 10 | left | for the domestic market | 2111-82, 1.5 l, with distributed fuel injection | GM, 2111-1411020-22 | Euro 2 | 21083 "high" | ->03.00; with neutralizer and immobilizer |
| VAZ-21083-24 | 10 | left | for the domestic market | 2111-89, 1.5 l, with distributed fuel injection | Rus+B, 2111-1411020, 2111-1411020-70, 2111-1411020-71 | R-83 | 21083 "high" | with immobilizer |
| 20 | left | for the domestic market | 2111-86, 1.5 l, with distributed fuel injection | Rus+B, 2111-1411020-40 | Euro 2 | 21083 "high" | with neutralizer and immobilizer | |
| 21 | left | for domestic market | 2111-86, 1.5 l, with distributed fuel injection | Rus+B, 2111-1411020-60 2111-1411020-61 | Euro 2 | 21083 "high" | with neutralizer and immobilizer | |
| 110 | left | for the foreign market | 2111-86, 1.5 l, with distributed fuel injection | Rus+B, 2111-1411020-40 | Euro 2 | 21083 "high" | with neutralizer and immobilizer | |
| 130 | left | for the foreign market | 2111-74, 1.5 l, with distributed fuel injection | Rus+B, 2111-1411020-50 | Euro-3 | 21083 "high" | with neutralizer, immobilizer, rough road sensor and phase sensor | |
| 131 | left | for the foreign market | 2111-86, 1.5 l, with distributed fuel injection | Rus+B, 2111-1411020-40 | Euro 2 | 21083 "high" | with neutralizer, immobilizer and rear seat head restraints | |
| 138 | left | for Sweden | 2111-86, 1.5 l, with distributed fuel injection | Rus+B, 2111-1411020-40 | Euro 2 | 21083 "high" | with neutralizer, immobilizer and headlight cleaning | |
| 139 | left | for Scandinavian countries | 2111-74, 1.5 l, with distributed fuel injection | Rus+B, 2111-1411020-50 | Euro-3 | 21083 "high" | with neutralizer, immobilizer, rough road sensor and phase sensor, and headlight cleaning | |
| 143 | left | for Gulf countries | 2111-86, 1.5 l, with distributed fuel injection | Rus+B, 2111-1411020-40 | Euro 2 | 21083 "high" | with neutralizer, immobilizer, overspeed alarm | |
| 176 | left | for Israel | 2111-86, 1.5 l, with distributed fuel injection | Rus+B, 2111-1411020-40 | Euro 2 | 21083 "high" | with neutralizer, immobilizer, and tinted windows | |
| VAZ-21086 | 610 | right | Norm for the foreign market | 2108, 1.3 l, carburetor with contactless ignition system | — | R-83 | 21086 "low" | ->01.99 speedometer with combined MPH scale - km/h |
| VAZ-21087 | 610 | right | Standard for the foreign market | 21081-10, 1.1 l, carburetor with contactless ignition system | — | R-83 | 21086 "low" | ->01.99 speedometer with combined MPH scale - km/h |
| VAZ-21088 | 610 | right | Norm for the foreign market | 21083-50, 1.5 l, carburetor with contactless ignition system | — | R-83 | 21086 "low" | ->01.99 speedometer with combined MPH scale - km/h |
| VAZ-21088-01 | 610 | right | Standard for the foreign market | 21083-50, 1.5 l, carburetor with contactless ignition system | — | R-83 | 21086 "low" | ->01.99 speedometer with combined MPH scale - km/h |
| VAZ-21088-22 | 610 | right | for the foreign market | 2111-83, 1.5 l, with distributed fuel injection | GM, 2111-1411020-21 | Euro 2 | 21086 "low" | ->01.99 with neutralizer, immobilizer, speedometer with combined MPH scale - km/h |
Cleaning the G8 carburetor without disassembling it
If the engine of your “swallow” begins to stall, “eats” a lot of gasoline, or you feel jerks and dips when driving and starting the engine, it makes sense to clean the carburetor, since it is usually its contamination that causes all these troubles. Cleaning according to all the rules involves dismantling the carburetor and disassembling it, which, of course, is not suitable for all car enthusiasts. For “lazy” drivers, another, faster and quite effective cleaning method was invented, which involves the use of a special aerosol.
Such aerosols from different manufacturers (Kleen-Flo, MANNOL, ABRO, etc.) contain special compounds that do an excellent job of removing contaminants in the carburetor. They are very easy to use, all you need to do is:
- remove the air filter cover;
- unscrew the plug holder on the carburetor or the solenoid valve;
- using a nozzle tube, spray the nozzle channels, both chambers, the throttle and air valves and all other mechanisms;
- Spray liquid from a can onto the outer parts of the carburetor.
After applying the composition, it is advisable to rest for a few minutes. During this time, the cleaner will be able to soften and effectively corrode all contaminants. Then you should start the VAZ 2108 engine, pull the “choke” lever towards you and apply the cleaner into the air channels and chambers of the carburetor. A similar operation can be performed a couple of times. After such a simple cleaning, you will see for yourself how much more “vigorous” your “eight” has become.
Let's sum it up
Taking into account the above, it becomes clear that the carburetor on the 2109 or VAZ 2108 is a fairly reliable device that requires periodic cleaning and adjustment rather than repair. At the same time, the design is relatively simple; even car enthusiasts who do not have experience and professional skills can service the carburetor.
We also recommend reading the article about how to adjust and tune the VAZ 2107 carburetor. From this article you will learn how to adjust the carburetor, what you need to consider when setting up the carburetor, as well as what nuances you should pay attention to.
As a summary, we note that although carburetor metering systems are outdated and considered less economical, their undeniable advantage is the possibility of independent maintenance and repair.
For this reason, carburetor engines, including the VAZ 2108, remain quite in demand compared to more advanced, complex and technologically advanced injection analogues.
Connection diagram for the VAZ 2108 instrument cluster with a “low” panel (rear view)
| Position number on the VAZ diagram | Explanation of the position on the diagram |
| A | plan for conditional numbering of terminals in the instrument cluster blocks |
| A | PCB joints for instrument cluster without socket 17 |
| 1 | voltmeter |
| 2 | instrument lighting bulbs |
| 3 | antifreeze heat indicator |
| 4 | rear window heating control |
| 5 | high beam headlight control |
| 6 | backup control |
| 7 | rear fog light indicator light |
| 8 | size control |
| 9 | direction indicator control |
| 10 | "STOP" indicator light |
| 11 | oil pressure check |
| 12 | handbrake indicator light |
| 13 | emergency signal control |
| 14 | checking the brake fluid level; |
| 15 | carburetor throttle warning light |
| 16 | battery discharge control |
| 17 | socket for the relay-interrupter of the handbrake indicator light |
| 18 | gasoline level indicator |
| 19 | fuel reserve control |
The connections of the instrument cluster are made by printed wiring on a foil getinax plate. The plate is attached to the back of the case.
Preparing tools and devices
If you intend to thoroughly clean the carburetor of your V8, then you will not be able to do it without a compressor. To blow out accumulated dirt from the channels, it is necessary to supply air at a pressure of at least 6 bar. The remaining tools are common ones found in every garage:
- 2 screwdrivers - Phillips and thin with a narrow flat slot;
- a set of small open-end wrenches - 8, 10, 13 mm;
- round nose pliers;
- rubber bulb (syringe);
- 2-3 wooden toothpicks;
- rags.
Compressor for carburetor purging
Note. It would be nice to have a tester or multimeter on hand to check the voltage. But if necessary, you can do without it.
Liquids for cleaning carburetor channels
A special product sold in aerosol cans (for example, from the ABRO brand) is excellent for cleaning channels. Do not use acetone or inorganic solvents, which corrode plastic parts, for cleaning. Buy new paper gaskets for DAAZ 2108 carburetors in advance (they will also fit the “nine”). You cannot buy or change jets, since the standard ones are designed for the entire service life of the machine, and fakes with large holes for fuel are often sold in repair kits.
This material will help you repair the carburetor mechanisms of VAZ 2106/2107 cars:
Important points
- Before adjusting the carburetor, it is recommended to self-clean it. To do this, a special liquid for cleaning carburetors is poured into the gas tank, the engine starts and runs (the volume of liquid poured and the engine operating time are always indicated on the container with the cleaning liquid and depend on the specific brand). Sometimes this measure is enough to get rid of the above signs of carburetor malfunction and do without fine adjustments.
- If self-cleaning does not help, there is only one way out: you need to remove and wash the carburetor. For washing, both special liquids and ordinary kerosene are used. It is strictly not recommended to use brushes or fluffy rags to remove dirt. Hairs and lint remaining in the small holes of the carburetor can negate all efforts to clean it. The best option: thorough rinsing in a special liquid, and then blowing out all small holes with compressed air.
- Before removing the carburetor and cleaning the inside, it is recommended that the outside be thoroughly cleaned. Moreover, it is necessary to clean not only the carburetor itself, but also all the parts located next to it. Please be aware that any dirt left on adjacent parts may find its way into the clean carburetor when it is installed back into the engine. And if this happens, the entire cleaning procedure will have to start again.
In order for the carburetor to work correctly, attention should be paid not only to its adjustment, but also to cleaning. If any of these procedures are neglected, the carburetor will soon fail again. In addition, attention should be paid not only to the quality of gasoline, but also to the condition of the car’s air filter, since in some cases it is a worn filter that causes rapid contamination of the carburetor.
This is interesting: The first electric Chinese car
Copywriter with five years of experience. (1 vote, average: 5 out of 5)