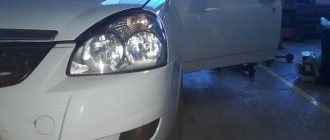
Automotive low and high beam lamps used on the Lada Priora in the restyled and pre-restyling versions are almost the same. The difference is in the layout of the headlight itself on the Priora.
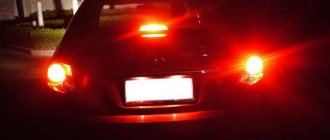
The lamp used in the dimensions of early cars has disappeared. The rear lights are distinguished by a diode insert in the brake lights; now there is a circuit with diodes, but before there was a light bulb.
Turn indicators, daytime running lights, low and high beam headlights, side lights, fog lights and reversing lights are very helpful to both the driver and other road users.
For example, the switched-on low beam lamp in a Lada Priora will indicate, for pedestrians and other drivers, the dimensions of the car and help to approximately determine the speed of movement. Lamps for a Lada Priora car should be selected with special meticulousness, with a long service life and moderately bright light.
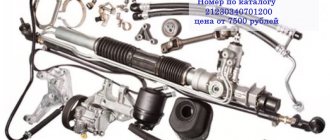
For example, in the headlights of a Lada Priora you can find from 4 to 5 different lamps at the front. Their markings are indicated by the factory, and it is not difficult to find light bulbs - they are manufactured by several manufacturers, from which you can choose. The power of a good headlight with mirror-clear illumination should exceed 58 W, otherwise visibility at night will remain the same, but I would like to give Priora the kind of lighting with which it would be pleasant to drive.
What standard lamps are used in Priora headlights?
The Priora headlight unit is equipped with:
- low beam lamp;
- high beam/running light lamp;
- turn signal lamp;
- side light lamp.
Designations
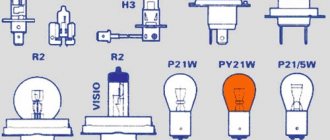
- Low beam, for example, is marked 55H7, where 55 is the power in Watts, and H7 is the designation of the base;
- The main beam is designated 55N15;
- turn signal – 21PY21W;
- side light – 5W5W.
The lamps are in the headlights in a single unit, and the headlight unit is not always replaced - only the bulbs are changed. And not in vain - the factory headlight produces a cloudy light. Prior owners try to install the best lamps so that the headlights shine longer.
Layout of the restyled version
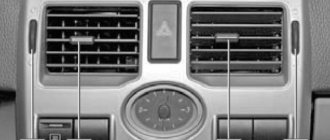
In the Priora, little has changed after restyling - small details invisible to the eye, the center console, the dashboard. The headlights have also changed - they have become quite a bit larger. The principle of their design has remained virtually unchanged, except that there is now one plug at the back to isolate the contacts.
The design of the headlamp unit has become more complex: now in place of the usual high beam lamp there is a light consumable, combined with daytime running lights, which switches between operating modes. PTF fog light bulb, everything is also mounted depending on the configuration.
What is the difference between PTF for Priora 1 and Priora 2
In fact, the Lada Priora does not have any generations or numbers. In 2013, this car was restyled, which significantly changed the appearance of the Priora, but this did not make it the second generation. As for PTFs, after restyling they did not change, just as the types of lamps used in them did not change. The only exception is the Lada Priora Restyling SE, which received new PTFs, but with the same H11 lamps.
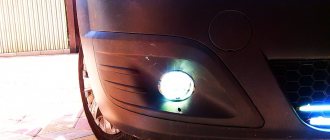
Third-party developers also produce LED versions of such headlights, and some of them can additionally serve as daytime running lights.
PTF with LED daytime running lights for Priora SE
That's probably all. If you carefully read the article, you will be able to equip your Priora with PTF yourself, and, if necessary, change the light bulb in the headlight.
How to change the low beam light bulb on a Priora
First of all, it is necessary to remove the battery, otherwise access to the headlight will be limited. And even if you stick your hand inside, working under the hood will be uncomfortable. The process of replacing a light bulb is described in several steps:
- Remove the rubber cover, the outermost one (it is located closest to the front fender of the car). At the same time, try to be careful with fastening the headlight housing;
- Disconnect the block with contacts from the lamp itself;
- We press the latch and remove it from engagement with the hooks carefully and without sudden movements;
- We take out a 55H7 light bulb;
- We do everything in reverse order with the new lamp.
It is recommended to do the entire mechanism according to the clockwise principle - first remove the old light bulbs from both sides, and then install new ones. Lamps used at the factory do not perform very well, even in terms of durability, and may require repairs a couple of months after purchase.
Comments
TOP materials of the week
TOP products in the store (more)
Your review of the sound insulation of the Lada Priora:
Lada.Online
Lada (“Lada”) is a brand of cars produced by JSC AVTOVAZ. Previously, it was used only for export cars, and for the domestic market, cars were produced under the Zhiguli brand. In 2004, the management of AVTOVAZ announced the transition to the Latin alphabet for the official spelling of the names of all cars produced by the plant: Lada - instead of "VAZ" and "Lada".
Lada.Online is the largest Russian-language automotive resource with a daily audience of thousands, which is dedicated primarily to cars of this brand, the domestic automotive industry and the automotive world in general.
This site is not the official LADA website.
© 2022 Lada.Online. Copying of material is permitted only with a link to the source.
Source
Replacing Priora high beam lamps
It all starts again with removing the battery - you can’t do without it now. The high beam lamp is located a little deeper and is not easy to get to. The sequence of actions when replacing a high beam lamp is as follows:
- We disconnect the rubber cover (it is larger than the one designed to protect the low beam lamp);
- Disconnect the block with wires;
- Unclench the spring clamp and disengage it from the reflector hooks. We release the light bulb.
- We remove the lamp socket from the headlight unit.
In fact, everything is simple: they opened the lid and took out one lamp. However, such minor operations will put a lot of strain on your wrist and palm - don’t forget to warm up, otherwise the new part may treacherously slip out of your hand when you don’t expect it.
Brief overview of the car model
The first cars went on sale back in 2007. It featured modern design, a new steering system and chassis tweaks. High security devices have been installed.
The engine design has changed significantly. Thanks to the technologies used, the car consumes resources more economically. The gearbox is mechanical with five levels of control.
Even the basic package contains many modifications: a multimedia system, heated seats, air conditioning. The model became the market leader in sales at the end of 2010.
What to look for when choosing?
If you notice the first signs of a malfunction, you should immediately conduct an initial assessment of the situation. If there is a problem with the fuse, you should consider replacing the lamp. This happens from time to time, so you should know which bulbs you can install.
You need to be able to distinguish the light bulbs on a Priora. Some are designed for high and low beams, others are used as turning lights. The low beam lamps are equipped with an H7 bulb with a halogen optical system.
In some situations, drivers decide to replace the optics. It is recommended to follow the manufacturer's standards when choosing lamps for Priora.
If we talk about the cost of the product, it differs depending on the store chosen. The price ranges from two hundred fifty to five hundred rubles.
The characteristics of each equipment differ significantly. It is worth carefully studying the suitable parameters of the device. All data is contained in the official documentation from the manufacturer. The luminous flux of the lamps must comply with the standards. If the values differ, it is recommended to discard such products.
The optimal power of low beam lamps is 58 W. If the value is higher, there is a possibility that the wiring will burn out. The shape of the light spot must correspond to the original fixture.
Replacing lamps in Priora taillights
Replacing the rear light bulbs is complicated by the fact that the combination unit inside supports the operation of the parking lights and brake signal. But it all starts just as simply, when replacing the bulbs in the rear headlights of the Priors, as well as the front ones:
- Remove part of the upholstery opposite the headlights;
- Unscrew the screws that support the protective housing of the rear light. In Kalina, there were nuts in place of the screws, and unscrewing them was even more fun - they fell into a huge gap and were lost in the car body forever;
- Turn the brake light and clearance holders counterclockwise. Do not remove the socket, take it out together with the light bulb;
- It is easy to press down the lamp, turn it clockwise and remove it from the socket with a slight movement (it will almost fall out on its own);
- Carry out the operation in reverse order.
All you have to do is remember about the combination headlight - remember where each lamp was located, so that you don’t confuse anything during installation. With the rest of the light bulbs, everything is different - in addition to the ground (black wire), wires from the ECU are connected to them. Thus, the “foglights” correspond to the red wire color, the turn signal indicator – blue, the green light is assigned to the reverse lamp.
Several recommendations for choosing
- When purchasing fog lights, you need to consider the possibility of installing them. This depends on the size, type of base, operating voltage and GOST approval (when purchasing xenon). All specifications can be found in the vehicle’s operating manual or from an authorized dealer.
- Headlights are exposed to gravel and other debris from the road surface, so the housing must be made of high-strength tempered glass
- Fog lights with a split housing allow only the emitter to be replaced if it burns out, and not the entire structure.
- The most popular lamp models are often counterfeited. Therefore, before purchasing, you should check the manufacturer’s website for a list of official dealers in the selected region.
Dorestyling
The life of the owners of pre-restyling cars was darkened by the fact that, in addition to the reduced service life, even then it was darkened by the fact that when replacing some light bulbs it was necessary to remove the socket along with the bulb - this, for example, happened when the owner wanted to replace a side light bulb. Owning a Priora became increasingly expensive; rarely did anyone think about buying another headlight - developed by other companies. Installing light bulbs from foreign manufacturers solved the problem of poor lighting well and for a long time.
Turn
The turn signal signal is located the highest (in relation to the hood), and to remove it you don’t even have to wrap your hand under the hood.
- Remove three screws and a self-tapping screw from the plastic cover, pry it up with a flat-head screwdriver and remove it;
- Turn the cartridge strictly counterclockwise;
- Remove the cartridge;
- It is easy to press down on the lamp and rotate it counterclockwise until it begins to fall out of the socket.
When choosing a turn signal PY21W (Voltage 21 W), you should be careful - a lamp with a similar marking - P21W - will not have orange, but colorless glass, and will not be suitable as a turn signal.
Difficulties with replacement
The most convenient thing is to replace the turn indicators. In other cases, you have to twist very tightly and stand in this uncomfortable position for a couple of minutes until the job is done. This is not very convenient, because the light bulb is a consumable, but the engineers could make sure that replacing it was as easy as the plastic steering wheel insert on the “ten”.
Another inconvenience is that you have to remove the battery. Nobody argues that it is better to turn off everything before starting work. But the battery is removed for reasons of rationality - the battery takes up a lot of space and interferes with working with your hands while you stand in an awkward position.
Why the headlights don't light up - reasons
The most common reason for headlights not working is a burnt out light bulb. Its service life is indicated in hours on the packaging. For a low beam bulb, this limit can be 400 hours of operation. The second extremely possible reason could be a wiring malfunction due to water leakage, or the wire simply frayed. This problem is already more serious, because you will have to fuss with it much longer than with a regular replacement of consumables.
Often, car enthusiasts are too lazy to change light bulbs, driving out onto the road in “one-eyed” cars. This is very unsafe - it is recommended that immediately after a malfunction is noticed, you go for a spare part to replace a new lamp.
Main conclusions
For low beam, the Priora uses H7 halogen lamps. It is not recommended to change the design and install xenon or LED analogues, as this will interfere with the design of the machine. There are quite serious penalties for such actions. The process requires step-by-step actions:
- purchasing a suitable set of lamps;
- temporary battery removal;
- removing the burnt out lamp and installing a new lamp;
- Reassemble all components in reverse order.
Halogen lamps should not be touched with bare hands, so you should use cotton gloves when handling new lamps. Before installation, the flask is wiped with alcohol. Please share your options for updating the Priora's low beam in the comments.
Sources
- https://enginehack.ru/lampy-primenyaemye-v-lada-priora-i-ih-zamena/
- https://avtobak24.ru/lampochka-blizhnego-sveta-priora-kakoj-cokol-v-farah
- https://vaz.today/lampy-blizhnego-sveta-priora-kak-vybrat-i-zamenit
- https://tmglass.ru/osveshhenie/avto/lampy-blizhnego-sveta-lada-priora-kriterii-vybora-luchshie-modeli-lamp
- https://ProDemio.ru/priora-blizhnij-svet-kakie-lampy-luchshe/
- https://AvtoSotka.ru/to/blizhnij-svet-priora-cokol.html