All internal combustion engines have a lubrication system. Thanks to it, the rubbing units work for a long time and without interruption, regardless of the load. The lubrication system consists not only of the oil pump, filter and channels in the cylinder block. The VAZ 2110 has another important part - an oil pressure sensor. This is a simple part that has a responsible function. The article will discuss how it works, where it is located and how to check the oil pressure sensor on a VAZ 2110.
Purpose
This device detects the oil pressure level and displays the corresponding information on the control panel. Timely notification allows the car owner to quickly fix the problem. If you ignore it, problems may begin with the engine, leading to expensive repairs. After all, if there is not enough oil in the engine, the piston of the car runs “dry”.
The oil pressure sensor on a VAZ not only notifies that this liquid has run out. Sometimes a glowing red indicator may indicate a malfunction in the pump. This happens even if there is enough lubrication in the motor.
What you need to know about DDM?
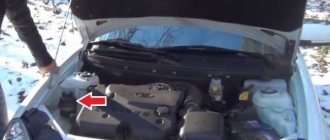
Before diagnosing and replacing the oil pressure sensor, you need to know where the oil pressure sensor is located. First, let's briefly talk about the purpose and installation location of the device.
Purpose and location
The VAZ 2110 oil pressure sensor is a device used to notify the car owner about the low level of consumable pressure in the engine. Thanks to this controller, the owner of the “ten” can promptly determine the cause of the malfunction, as well as avoid possible problems that may occur as a result of “dry” operation of the power unit. But it should be borne in mind that if the oil light on the dashboard suddenly lights up on a VAZ 2110, there is a possibility that the problem lies in the regulator itself.
To check the device, you must first find it - the device can be located in two places, depending on the design features of the motor:
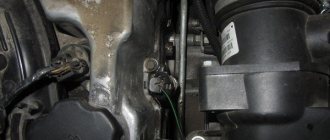
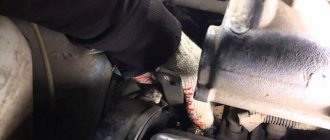
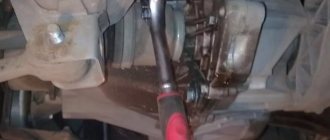
- On an 8-valve engine, the device is located on the rear of the power unit, on the right in the cylinder head connector, not far from the belt guard. One wire is connected to the DDM.
- As for engines with 16 valves, in this case the DDM should also be looked for on the rear of the internal combustion engine, only on the left, directly on the camshaft block. One wire is also connected to this controller, however, next to it there are two more bundles with wiring (the author of the video is the Auto_Remont channel).
Diagnostic features
If you notice that the emergency engine fluid pressure indicator on the dashboard is constantly on, then you should diagnose the regulator. It would be a good idea to check the wiring as well. Diagnostics of the device begins with checking the electrical circuit in the area directly from the DDM to the indicator on the device.
Diagnostics is carried out as follows:
- First, on an 8- or 16-valve engine, disconnect the wire and connect it to ground, in particular, the body or engine.
- If, after connecting the wire, the indicator on the device starts to light up, this indicates that this section of the electrical circuit is working properly, so you can start diagnosing the regulator. Dismantle it and carefully inspect the device - if it is dry and operational, then the reason for the lit indicator most likely lies elsewhere. For example, this could be a filter or oil pump. But if the controller itself is wet, in motor fluid, then this indicates that it should be changed.
If your oil pressure light comes on, first of all you need to check the oil level; in some cars the light comes on when the oil filter is clogged and the bypass valve in it has opened.
Replacement instructions
How to replace the VAZ 2110 oil pressure sensor:
- First you need to disconnect the power cord from the regulator.
- Using a 21mm wrench, you need to unscrew the DDM from its seat, and its steel seal is removed along with it.
- A new DDM is installed in place of the dismantled device; it is also necessary to replace the seal, which should be included in the kit.
- After the regulator is installed, it is necessary to clean the contacts on the connector, and also check the integrity of the dust seal. If everything is fine, then connect the power cable to the DDM and check its functionality.
Photo gallery “Replacing FLS on 8- and 16-valve engines”
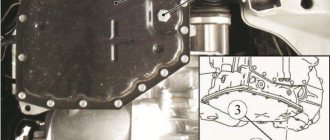
1. Removing the FLS on an 8-valve engine
2. Removing the regulator on a 16 valve engine
How the sensor works and how it works
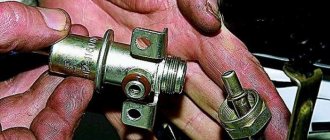
The oil pressure sensor on the VAZ 2110 includes the following components in its design:
- movable and fixed contacts;
- body (usually metal);
- membrane;
- pusher in the form of a rod.
On the VAZ 2110 model there is a contact sample sensor. It connects to the warning light on the panel. When you turn on the ignition, a “plus” from the vehicle’s power supply goes to one contact of the light bulb. The remaining, second contact, contacts the moving part of the meter.
The working principle of the part is not complicated. The algorithm is based on the fact that the lamp terminals are connected to ground. This is the functional task of the moving contact - it is through it that the pusher is connected to the diaphragm. Under the diaphragm itself there is a cavity in contact with the lubrication system in the engine block. When the pressure inside it increases, the load on the diaphragm also increases. And it begins to bend, as a result of which the movable contact moves away from the stationary one. If there is no pressure, the contacts remain closed and the corresponding indicator lights up on the dashboard. For the circuit to open, the pressure must rise above 0.3 atmospheres. At the same time, the light bulb goes out.
What to do if the sensor lights up
If the sensor is working properly, and during the operation of the car an emergency light comes on on the dashboard, you should immediately determine the cause of its appearance, and also solve this problem as soon as possible. The main reason for the appearance of the corresponding icon on the dashboard of the VAZ 2110 is a decrease in the amount of oil in the engine.
A lack of oil reduces the pressure in the oil system, and the sensor manages to detect this, sending a warning signal to the dashboard.
In this case, it is recommended to begin to resolve this issue as quickly as possible, since a lack of fluid can lead to such unpleasant consequences as premature wear of the car engine elements, as well as the wedge of the shafts (camshaft or crankshaft).
If you ignore the problem, you can subsequently spend a lot of money on repairing damaged parts and devices, up to and including major engine overhauls.
As a result, it should be said that the operation of any vehicle, including the VAZ 2110, requires a responsible and attentive attitude. The car owner must regularly inspect the performance of the car’s structural elements, as well as check the serviceability of the sensors and mechanisms present in it.
Where is
In the tenth VAZ model it can be located in two places, which depends on how many valves the engine has.
For 2110 8 valves, it is located in the rear right part of the engine, in the cylinder head socket, not far from the belt guard. It is easy to find by the single wire.
Drivers of a VAZ with a 16-valve working unit will have to look for it in a slightly different place. It is also located behind the engine, but to the left. The sensor is mounted on the camshaft block. There is also one wire coming from it, but nearby there are two bundles of cables protected with black insulation.
Important information to note
It happens that after replacing the oil pressure sensor, oil begins to leak through the new one. You buy a new one, change it, after a while the situation repeats itself. What causes this? The most common cause of such a malfunction is due to defective sensors , even new ones purchased in a store, and not on a tray around the corner. Many car owners complain about similar problems that they have to change the sweat several times in a row. However, in such a case, we recommend contacting a car service to find out the real reason, so that you don’t end up with a lot of stupid fuss, as already described above.
Possible faults
There are a number of situations that lead to the breakdown of the DDM on the VAZ-2110 8 valves:
- the membrane is damaged;
- the resistive layer is worn out;
- the heating element of the bimetallic plate has failed or is deformed;
- the channels through which oil is supplied are clogged;
- Wires are oxidized or torn. This leads to “parasitic” resistance;
- The sensor relay has failed. The relay's job is to sound a buzzer if there is not enough pressure in the system. It just starts at certain engine speeds (more than 1500). At idle, it is inactive, because the pressure does not even reach mark 1.
Replacing DaDM with VAZ 2114
A quick replacement of DaDM with a VAZ 2114 is possible if you have a minimum set of tools and instructions. The video attached below clearly demonstrates the replacement process.
In short, installing the new DaDM looks like this:
- Remove the negative terminal from the battery;
- Move aside the rubber cap that protects the DaDM from dust and dirt;
- Remove the element's power terminal;
- Using an open-end wrench set to “21”, unscrew it from its seat without dropping the rubber sealing ring;
- Install the new DaDM in the reverse order and change the ring if necessary.
The procedure can be carried out in any conditions without a pit or a lift.
Sensor check
Sometimes it happens that when starting the engine, when it is idling, the DDM light comes on. It continues to burn even if everything is fine with the motor. Another situation also occurs - the indicator goes out as soon as you turn on the ignition.
To make sure the node is working, you need to check it. It is likely that the wires through which it is connected are damaged. They are checked simply: connect one cable to the engine and see if the lamp lights up. If yes, then everything is fine with the wiring.
One of the reasons for its inoperability is that the sensor is simply oily. But, if upon visual inspection it turns out that it is dry, but the light is still on, this is not the reason.
Here you can already think about replacing the unit, fortunately, it is inexpensive - within 100 rubles. The VAZ 2112 oil pressure sensor is checked in a similar way.
Main set of sensors for 16-valve VAZ-2112 engines
The ECU must control many parameters at once. The most important information will be the position of the crankshaft. You can turn off all sensors except the DPKV, and this will not lead to the engine stopping.
Sensors connected to the ECU
Let's list all the elements one by one:
- 15 – DTOZH. A resistor screwed into the thermostat housing. The temperature of the antifreeze is determined;
- 17 – DPRV, also known as DF (phase sensor). The operating principle is the Hall effect. The position of the camshaft is controlled. Check it out here.;
- 20 – TPS. Resistor fixed to the throttle assembly 19. The angle of deflection of the throttle valve is measured;
- 21 – Mass air flow sensor. Sensor connected to the filter housing. Controls air flow; the main signs of its malfunction are discussed here;
- 22 – IAC. Not a sensor, but a regulator (electromagnet). Used in idle mode. About its testing and diagnostics here. About replacing the IAC here.;
- 24 – lambda probe or oxygen sensor (see above);
- 25 – speed sensor. Fixed in the gearbox slot. Operating principle – Hall effect;
- 26 – DPKV. Electromagnetic sensor. The position of the crankshaft is controlled;
- 27 – DD (knock sensor). A piezoelectric element mounted on the outer wall of the cylinder block.
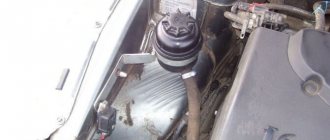
Let's take a look at how all the elements look in real life. Shown are pictures of VAZ-2112 sensors (16-valve internal combustion engine).
Each element will be easy to find under the hood
Everything said above is true for two engines at once - for units 21124 and 21120 (1.6 and 1.5 l).
You cannot unscrew the DTOZH sensor without draining the coolant. And to disconnect the sensor means to disconnect the connector, but not to dismantle the sensor itself.
Where is which sensor located - engine compartment diagram
Let's look at another picture.
Engine compartment and engine 21124
It is important to understand where the following elements are located:
The location of the phase sensor is indicated in the previous chapter.
Never unscrew the speed sensor. It will be difficult to install it in a way that maintains a seal.
How to replace
The replacement is easy to do with your own hands; you don’t even have to go to the garage or visit a service station, where the car owner will be charged a tidy sum.
Replacing a sensor is a task similar in complexity to replacing a wheel. What will be useful for work:
- spanners;
- gloves to avoid getting your hands dirty;
- new device.
Instructions for disconnecting the old sensor and installing a new one:
- Disconnect the wire going to the device.
- Remove the sensor using a 21 mm wrench.
- They take it out.
- Together with the DDM, the sealing ring, usually made of aluminum, is removed. It is also better to replace it with a new one.
- Install and tighten a working sensor.
- Connect the wire that was disconnected at the very beginning.
This is what the procedure for replacing a node looks like. You should be careful when buying DDM, since now about 40% of these products are fakes.
Important information about the oil level sensor
Now let's briefly talk about diagnosing and replacing the oil level sensor. Doing this at home is not at all difficult.
Location and diagnosis
DUM in the “ten” is a device used to measure the volume of motor fluid in the compartments of the power unit. This regulator is located next to the oil filter element, and the filter itself is located in the crankcase of the machine's engine.
How to check the oil level sensor on a VAZ 2110:
- First, drive your vehicle onto a viewing hole or overpass.
- Unscrew the bolts that secure the motor protection and remove it.
- Find the DUM and turn on the ignition - at this moment voltage will be applied to the regulator.
- Then disconnect the wires connected to the controller.
- The probes of a multimeter or voltmeter should be connected to the ground of the car and the power connector. If a voltage of 12 volts appears on the tester’s display, this indicates that the device is operational.
Oil level controller in the domestic “top ten”
Replacement instructions
The replacement procedure is as follows:
- As in the case of diagnostics, the car should be driven into a pit or overpass, and then the engine protection should be removed.
- Having done this, you need to turn off the ignition and disconnect the negative wire from the battery terminal.
- Disconnect the power cable connected to the DUM.
- Next, take a rag and use it to remove all dirt from the device. Using a 10mm wrench, unscrew the regulator lock; it is more convenient to use a socket wrench for this.
- Remove the old regulator from its seat. To remove it, you will have to rock it a little from side to side, but be careful when doing this, otherwise you may damage the float. After dismantling the regulator, install a new DUM instead. Further assembly is carried out in reverse order.
Device and connection diagram
The task of the membrane switch, made in the form of a nut with a terminal, is to promptly close the electrical circuit with the warning lamp when the lubricant pressure drops. The device consists of the following parts:
- metal body in the form of a hexagon;
- contact Group;
- pusher;
- measuring membrane.
The glow of the indicator depends on the position of the membrane, which is stretched under the pressure of the lubricant.
The element is connected to the circuit according to the simplest circuit - in series with the indicator. The normal position of the contacts is “closed”, so after turning on the ignition the light comes on. When the engine is running, there is a pressure of oil flowing to the membrane through the tee. Under the pressure of the lubricant, the latter presses the pusher, which opens the contact group, as a result the indicator goes out.
When one of the malfunctions occurs in the engine, causing a decrease in the pressure of the liquid lubricant, the elastic membrane returns to its original position and the electrical circuit is closed. The driver immediately sees the problem by the flashing “control”.
The design of the second element, the “barrel” called MM393A, is somewhat more complicated. The main role here is also played by an elastic membrane connected to an actuator - a rheostat and a slider. The rheostat is a coil of high-resistance chromium-nickel wire, and the slider is a movable contact that moves along the turns.
As the lubricant pressure increases, the rheostat reduces the chain resistance, the needle deviates more
The electrical circuit for connecting the sensor and pointer is similar to the first one - the rheostat and the device are in series in the circuit. The operating algorithm is as follows:
- When the driver turns on the ignition, on-board voltage is supplied to the circuit. The slider is in its extreme position, and the winding resistance is maximum. The instrument needle remains at zero.
- After starting the engine, oil appears in the channel, flowing through the tee into the “barrel” and pressing on the membrane. It stretches and uses a pusher to move the slider along the winding.
- The total resistance of the rheostat begins to decrease, the current in the circuit increases and causes the indicator arrow to deviate. The higher the lubricant pressure, the more the membrane stretches and the less resistance of the coil, and the device notes the increase in pressure.
The sensor reacts in the reverse order to a decrease in oil pressure. The force on the membrane decreases, it is thrown back and pulls the slider with it. He turns on new turns of the rheostat winding in the circuit, the resistance increases, and the instrument needle drops to zero.
According to the diagram, the sensor is connected in series with the indicator located on the instrument panel
Note to car owners
Quite often, the self-replacement procedure ends in a fiasco, since installing a new device does not give any result; lubricating fluid continues to flow from under it.
But the point here is not at all the crookedness of your hands or lack of repair experience. If you did everything according to the instructions, the culprit in this situation is no longer you, but the sensor itself.
Statistics show that approximately 40% of all auto parts sold on the market are counterfeits.
Therefore, your task is to take the defect you purchased along with the receipt and go to the store where you purchased it. The store employees are obliged to exchange the device for you or return your money. Of course, if you do not save the receipt, you will not be able to return the money or change the sensor according to the law. Therefore, think twice before throwing away this piece of paper.
Another important piece of advice is to avoid such purchases on so-called spontaneous markets. This is where the largest number of fakes and defective devices are concentrated. There are many reliable, certified outlets selling auto parts. If you go to a service station to replace the sensor, you will have to pay more than if you repair it yourself, but you will be provided with a quality guarantee. A kind of protection against counterfeiting.
Price and article
Below is a table with the most common oil pressure sensors that are used in the car in question, article number and price.
| Sensor | vendor code | Cost, in rubles |
| Oil pressure sensor Vernet | OS3573 | 150 |
| Oil pressure sensor TRS ERA | 330337 | 300 |
| Oil pressure sensor (Era) Iveco | 330684 | 250 |
At the moment, there are other names depending on the sensor model and its manufacturer.
Location and appearance of the device
The sensor installed on classic VAZ 2106 models consists of the following parts:
- an element in the form of a round metal barrel with one terminal for connecting a wire (factory name - MM393A);
- the second part is a membrane switch in the form of a nut with a contact at the end (designation MM120);
- a steel tee into which the above parts are screwed;
- sealing bronze washers.
The sensor includes 2 meters screwed to one tee.
The large “barrel” MM393A is designed to measure pressure, the “nut” with the MM120 terminal fixes its absence, and the tee is a connecting element screwed into the engine. The location of the sensor is on the left wall of the cylinder block (if you look in the direction of movement of the car) under spark plug No. 4. Do not confuse the device with the temperature sensor installed higher in the cylinder head. Wires leading inside the cabin, to the dashboard, are connected to both contacts.
The gauges are located on the left wall of the cylinder block, next to it there is a coolant drain plug