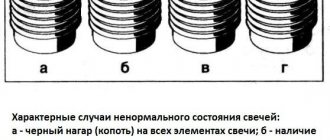
When to change the chain tensioner
It changes only if it has become unusable, but how can you understand this, you ask?
In general, when the tensioner becomes unusable, the car’s engine begins to run significantly louder, because the chain is weakened and thus there is such a roar as if you started the car with a diesel injection system, and not with a gasoline one, so if you hear something rattling in the engine, vibration may also appear, and by the way, this knocking should become less as the speed increases, that is, if the engine is noisy at idle and the chain rattles, then just give a little gas and if this knock goes away (the higher the speed, the weaker it should be knocking) then it is most likely really the tensioner, although many other parts could be to blame for this, but first you need to check it, since it is removed very quickly and is also checked accordingly. An interesting article about biofuels produced from ordinary sawdust, read more here.
The procedure for installing the ISAI tensioner on Zhiguli cars.
- Rotate the crankshaft approximately 1 quarter turn.
- Remove the standard tensioner , remove the remaining gasket, and wipe the seating area.
- Try on the ISAI tensioner. And, making sure that he sits completely in his place. Secure it by previously applying sealant around the flange (installed without a gasket).
- Unscrew the cap nut and, having removed the retainer (a piece of duralumin wire) from it, screw it back into place by hand until it stops.
- Rotate the crankshaft approximately 1 revolution as the engine moves.
- Start the engine. Subsequent adjustments are no longer required.
Correct installation of a new VAZ Niva hydraulic chain tensioner
Mechanical chain tensioner. This is the first “tuning” part that should be installed in a car of the Niva family. An engine from the 60s of the last century, with an oil pump that is designed to drive oil on a 1.2 liter engine, not exceeding the speed threshold of 4000 rpm. What do AvtoTAZ designers do? They hang a hydraulic chain tensioner on the poor little oil pump and also, to make it not at all boring, 8 hydraulic supports. What do we have as a result? A small furry northern animal that crept up very close. Russia produces tanks and missiles well, but everything that the “designers” contribute to the design of the Fiat engine is rejected by it.
A few options for what I came across:
- cold weather, about 20 degrees below zero, the engine starts. Engine oil is cold and thick. The chain rattles terribly and finally jumps 6 teeth (as the autopsy showed), the curtain for the engine has dropped.
- normal weather. At idle, the hydraulics “whistle,” the chain “murmurs,” there’s simply not enough oil pressure.
- off-road conditions. The car is sideways on the mountain, oil is leaking from the oil receiver. The first thing in line that lacks it is the hydraulic tensioner and hydraulic supports. The engine begins to make death grunts.
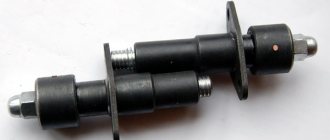
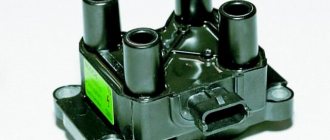
Mechanical chain tensioner. Main manufacturers.
main chain tensioners for the -214 engine. The photo shows three main options common in Russia. The first product is made by the people and on the forums of the ANC “auto pilot”. The second product is manufactured by Rusmash, usually called the pilot. The third tensioner belongs to the designer Isaev, colloquially Isay. My team and I personally have installed several dozen of each type of tensioner on cars, so I have the right to talk about statistics and operating features. Something from behind the scenes. The first two tensioners belong to the pen of one person. Designer Igor Medvedev. On motor forums under the nickname Rhodes-M. As far as I know, patents for these inventions or utility models are registered in his personal name. I work with this person on other projects, so the information about the designs and manufacturing features is first-hand.
Autopilot.
Principle of operation. Rack. Of the three, this is the undisputed leader. I have not noticed any shortcomings in operation. Cars with mileage of more than 150 thousand have already arrived where I installed autopilots from the very first batches. It is very convenient to work when replacing the camshaft; it does not need to be removed from the cylinder head. Flaw. It is difficult to find an “original” that has passed quality control. Medvedev left and the quality of input immediately dropped greatly. The cost of production has become cheaper.
Pilot.
The operating principle is a toothed rack. Good quality tensioner. The big brother of "autopilot". Stable quality. It is also possible to work without removing it from the cylinder head. The main disadvantage is the huge percentage of fakes on the market. This tensioner was the first successful design, and the Chinese grabbed it. If Autopilot is completely impossible to find, then Pilot is very difficult to find “original”. Based on the St. Petersburg market, I estimate the prevalence of counterfeits for this tensioner at 70%. I work with Rusmash directly, so this as a “minus” is insignificant.
Isaiah.
The operating principle is a clock spring. To avoid questions and insinuations, I contacted the designer directly and in 2022, we installed several dozen of them. The main disadvantage of the product, which the designer passes off as its advantage, is that there are no precision parts. When the rod doesn't move out too much, everything is fine. When the chain is worn out and the rod goes beyond half, it “walks” quite a lot. If we are talking about a production engine without “pretensions” for tuning, this may be acceptable. If the engine is “more serious” this is unacceptable. The tolerance for axial “walking” of the chain and sprockets in the timing tract is only 0.3 mm.
Summary
. We try to install Autopilot (if available) on tuned cylinder heads. For the most part, we work with Pilot, but if a client, based on forums or his own views, asks to install Isai, then we do not dissuade him. For double-row chains and -213 engines the situation is similar.
chain tensioner Pilot for 21213
How to tension a chain on a Niva 21213 carburetor
20 Niva VAZ 21213 chain tension adjustment
Adjusting chain tension GENERAL INFORMATION
Chain tensioner section
1 – cap nut; 2 – tensioner body; 3 – rod; 4 – plunger spring; 5 – washer; 6 – plunger; 7 – spring; 8 – cracker; 9 – spring ring; A – plunger surface; B – places of punching at the end of the body
Procedure 1. Loosen nut 1 of the tensioner. In this case, shaft 3 is released and the chain is tensioned by shoe 7 (see figure. Plan of the drive of the camshaft and auxiliary units), which is acted upon by spring 7. 2. Turn the crankshaft 1–1.5 turns in the direction of rotation. In this case, the tensioner spring acting on the shoe will automatically adjust the chain tension. 3. Tighten the tensioner nut 1, due to which the shaft 3 is clamped by the collets of the block 8, and when the engine is running, only the spring 4 acts on the plunger 6. This spring presses the plunger away from the head of the rod 3, and oil flows into the space between them when the engine is running, which plays a role shock absorber during chain impacts. Replacing the chain Procedure 1. To remove the chain, brake the vehicle with the parking brake, open the hood, remove the spare tire with its support pipe and remove the battery. 2. Remove the air filter and close the carburetor inlet neck with a technological plug. 3. Separate the air and throttle valve drive cables from the carburetor. 4. Drain the coolant from the radiator and cylinder block, remove the radiator with hoses and thermostat. 5. Remove the fan by unscrewing the fastening nuts. 6. Remove the cylinder head cover and turn the crankshaft until the mark on the camshaft sprocket aligns with the mark on the bearing housing (see figure. Checking the alignment of the installation mark on the camshaft sprocket with the mark on the bearing housing), and the marks on the generator drive pulley – with a long mark on the camshaft drive cover (see figure. Marks for setting ignition timing). 7. Unscrew the camshaft sprocket bolt. 8. Loosen the cap nut of the chain tensioner, press out the tensioner rod with a mounting blade and secure it with the cap nut. 9. Remove the camshaft sprocket. 10. Loosen the generator and remove its drive belt. 11. Engage 4th gear in the gearbox, unscrew the nut and remove the generator drive pulley from the crankshaft. 12. Remove the camshaft drive cover with the gasket by unscrewing the nuts securing the cover to the cylinder block and the bolts securing the oil sump to the cover. 13. Unscrew the limiting pin 6 (see figure. Layout of the camshaft drive and auxiliary units) and remove the camshaft drive chain. 14. Install the chain in the reverse order of removal, following the recommendations set out in subparagraph 2.4. 15. Lubricate the chain with engine oil before installation. 16. Install new gaskets under the camshaft drive cover and cylinder head cover. 17. After installing the chain, adjust the tension of the chain and generator drive belt, adjust the carburetor drive and ignition timing. Niva VAZ 21213 chain tension adjustment Next page»»»»»»
1.2.3.4.5.6.7.8.9.10.11.12.13.14.15.16.17.18.19.20.21.22.23.24.25.26.27.28.29.30.31.32.33.34.35.36.37.38.39.40.41.42.43.44.45.46.47.48.49.50.51.52.53.54.55.56.57.58.59.60.61.62.63.64.65.66.67.68.69.70.71.72.73.74.75.76.77.78.79.80.81.82.83.84.85.86.87.88.89.90.91.92.93.
The procedure for installing the ISAI tensioner on Zhiguli cars.
- Rotate the crankshaft approximately 1 quarter turn.
- Remove the standard tensioner , remove the remaining gasket, and wipe the seating area.
- Try on the ISAI tensioner. And, making sure that he sits completely in his place. Secure it by previously applying sealant around the flange (installed without a gasket).
- Unscrew the cap nut and, having removed the retainer (a piece of duralumin wire) from it, screw it back into place by hand until it stops.
- Rotate the crankshaft approximately 1 revolution as the engine moves.
- Start the engine. Subsequent adjustments are no longer required.
Replacing the hydraulic chain tensioner for a Chevrolet Niva
The part designed to regulate the chain tension in a Niva Chevrolet car is called a timing belt (gas distribution mechanism) hydraulic tensioner. In the Chevrolet Niva timing system, the hydraulic tensioner performs a very important function, so engine operation without such a part is simply impossible. Over time, all parts of a car tend to wear out. Rotating parts of cars are especially prone to wear, weakening, stretching and breaking. This part includes the timing chain, which stretches over time and wears out. Chain stretching is normal but must be addressed. It is to eliminate chain stretch that a hydraulic tensioner is installed in the timing system. It has a wear property that is detected by loosening the chain to half the sprocket tooth.
How to detect a fault
You can detect a weakened tensioner on a Chevrolet Niva by checking the chain pulls away from the sprocket. But such a check requires removing the protective casing from the car, which is extremely irrational in cases of uncertainty about the proper operation of the tensioner. Therefore, it is recommended to carry out a mandatory check of the chain for its tension after 60-100 thousand km.
But, if the driver notices a rustling sound in the hood area, which resembles the sound of a diesel engine, then it is important to pay attention to this before the trip. This evidence of a rustling sound indicates that the chain has become loose and is hitting the teeth of the sprockets. Therefore, having discovered such a characteristic sound, it is worth urgently checking the tension
Therefore, having discovered such a characteristic sound, it is worth urgently checking the tension.
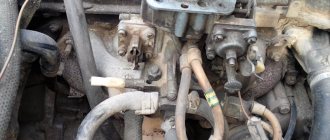
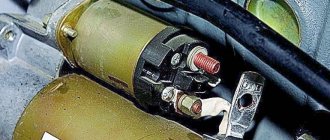
Where is the device located in the Chevrolet Niva and what does it look like?
The device is located on the passenger side under the hood of the car. Having opened the hood, you need to find the cooling pipes in the area of the front of the cylinder head, under them the hydraulic tensioner itself is located. A photo of the device that is installed on the Chevrolet Niva is located below.
Location of the part in the car
Components and principle of operation of the hydraulic tensioner
As you can see in the photo, the device has a cylindrical shape; it is screwed on the outside with a lid with a small hole through which oil flows. Inside the device there is a small ball and a spring, which ensures free flow of oil in one direction and does not release it in the opposite direction. Inside the device body there is a cylinder with rings. On the inside of the housing walls there are spiral notches that have an inclined shape. When the chain is loosened, the piston, under pressure in the housing, moves to a certain notch on the housing wall. When the tension occurs, the body notches do not allow the piston to take its original position. It is carried out by engaging the piston rings with one-sided notches. This is how the tension device works.
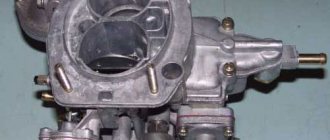
How is the hydraulic tensioner replaced on a Chevrolet Niva?
If chain stretching is detected and the decision is made to replace only the hydraulic tensioner, then this is an incorrect assumption. It is necessary to replace all parts: chain, hydraulic tensioner, seals, gaskets. Replacement is done in the following sequence, using all the necessary tools:
- Use a spanner wrench to unscrew the tube fitting, which has a “10” head. The tube is designed to supply oil to the hydraulic tensioner.
- Having loosened the fitting, the tube is removed and moved upward so that it does not interfere with further work.
- The two nuts securing the device itself are also unscrewed using a “10” wrench.
- The device is ready to be removed from its mounting location. We grab the protruding part with our hands and pull out the device. There is a gasket on it, which also needs to be removed to replace it with a new one.
- A used device cannot be repaired and requires the installation of a new one. Before installation, it is necessary to coat the gasket with a layer of sealant to prevent oil leakage.
Replacing an old device does not require serious mental and especially physical effort. Installation of a new one is carried out in the following steps:
Tranquilizer
Another important element in this system is the Niva Chevrolet chain damper, which prevents the resonance effect from occurring. This system consists of the following elements:
The damper is located inside the cylinder head on the front side and is attached to it with two bolts. If it is damaged or worn out, vibrations appear, which can lead to the chain jumping and thereby damaging the motor.
Replacement
To replace, you will need a ten-size socket wrench and a screwdriver. When the tool is ready, we go through the following steps:
- Remove the cover from the cylinder head
- Remove the camshaft drive chain tensioner
- Without disconnecting from the chain, remove the sprocket from the camshaft flange
- Starting from the bottom bolt, unscrew the two fastening bolts
- We fix the chain together with the sprocket and remove the damper. During removal, it is advisable to hold it so that it does not fall into the oil pan.
- We inspect it and if there is damage, we replace it with a new damper.
- We take a new part and install it in reverse order.
It is necessary to purchase a new element exactly the same as the one that was installed previously, since models that were produced earlier may have a damper of a different shape.
Summarizing everything written above, we can conclude that to carry out this work you do not need to have special knowledge or have a special tool, therefore, if necessary, following all the above instructions, you can do all the work yourself.
Replacing the Niva damper
Just.
Everything is in the video
IMHO the creator! The Creator is not responsible for your actions!
The replacement is carried out in several steps:
The cover is removed from the cylinder head. Replacing the Niva damper is simple. Everything is in the video IMHO of the author! The author is not responsible for your actions. Before doing this, it is better to carefully study the controls for working with the engine. no charging Niva Chevrolet. Generator repair, replacement of Chevrolet Niva. Since during operation the cylinder head cover gasket may be damaged and it may need to be replaced. The next step is to remove the tensioner from the camshaft drive chain. then the sprocket is disconnected from the camshaft flange. 5 replacing generator brushes fuel consumption of Chevrolet Niva with different ones. However, you should not completely disconnect it from the circuit.
The damper mounting bolts are unscrewed. Replacing the chain tensioner VAZ 21214, watch this video, replacing the Niva damper. You need to start working from the bottom.
To make further work more convenient, you need to connect the gear together with the chain, as shown in the figure below. After this, you can unscrew the upper mounting bolt and completely remove the damper. Attention! When removing the damper, you must hold it firmly with your hand so that it does not fall into the oil pan. Replacing a timing chain on a Chevrolet Niva. Replacing a chain guide on a VAZ 2101-VAZ 2107. Video of replacing a timing chain guide. Replacing a chain guide on a classic Chevrolet Niva repair. Otherwise, its removal will become a big problem, since additional disassembly of the engine will be required. After the damper has been completely removed, it is necessary to inspect it. If its surface has strong signs of wear, chips appear on it, and cracks or other damage are noticeable on the body, a complete replacement of this component is necessary.
It is important to remember that the damper on the Chevrolet Niva engine has a slightly different shape compared to the one previously used on VAZ engines. Therefore, it is worth purchasing a device designed for installation on this car model
After installation, you must reassemble all system components in the reverse order.
Hydraulic chain tensioner (GNC) 21214
Reg.: 12/06/2004 Threads / Messages: 4024 / 23192 From: Moscow Age: 67 Car: 21214M, 2013
This is a topic about the hydraulic chain tensioner (HNC).
Alexey aka ALER.
Reg.: 12/06/2004 Threads / Messages: 627 / 51712
A rattling noise from the chain appeared when starting a cool engine (it disappears after 2-3 seconds of operation), I bought a new hydraulic tensioner, and with it the rattling generally became virtually unchanged, only becoming quieter at high speeds. And now I’m also thinking about installing an ordinary mechanical one. Who can say anything about this: should I put it or not?
VAZ 21214 2003.
Denis866 In short, I don’t think it’s worth bothering with this. I twisted both of them in my hands, the hydrach is much longer. If only you roll a thread onto the peg that sticks out of the mechanical one, and then screw something in there later. Well, it's so damn unreliable.
In the FAQ, did you decide that it was a chain? Maybe hydraulic compensators? I had such a problem, so I just took them off, took them apart, washed them, assembled them and put them in their place. The noise is gone.
What if it's a chain? Then look at the sedative. Mine, for example, fell apart into 4 parts, one of which flew into the pan.
Reg.: 12.12.2004 Threads / Messages: 5 / 1412 From: Moscow Age: 55 Car: VAZ 21214. 2004.
Reg.: 03/10/2005 Threads / Messages: 5 / 549 From: Tambov (68rus) Age: 45 Car: Nissan Pathfinder 2.5D 2013
Reg.: 12/06/2004 Threads / Messages: 627 / 51712
Well, during the service, the hole from which the oil connects to the hydraulic tensioner was made much smaller, after which the noise became less.
Is it possible that the boot is simply worn out? The engine was opened about 4 thousand times back and everything was OK.
That is, for you, the tensioner was changed without removing the valve cover. If so, then remove it yourself (nothing complicated there) and visually check the boot and the pacifier. And in general, how long did your chain last? Maybe it's time to update it?
Wolf68 Thanks for the advice, I’ve already shelled out 700 rupees as this one flies, I’ll try to sharpen some mechanical parts
Now we have opened the lid, the boot and the damper are almost like new. The marks also match. Everything else looks great too. They just made the oil drain hole in the tensioner much smaller and everything was fine.
The car has driven 22 thousand. (Almost brand new)
Now we have opened the lid, the boot and the damper are almost like new. The marks also match. Everything else looks great too. They just made the oil drain hole in the tensioner much smaller and everything was fine.
The car has driven 22 thousand. (Almost brand new)
Looking for good advice! Essence: The chain rattled at idle. They opened it and took a look. The chain guide is broken and the hydraulic tensioner does not seem to work. Everything was changed and reassembled. Started it up and it started making noise again. You increase the speed and everything is OK. We searched for a long time and found it. It turned out that the ventilation ducts of the engine crankcase were clogged. When you take out the oil dipstick, the hair on your head moves. How many resinous deposits are there on it? With all this, there is oil in the engine itself and it’s not bad. I always used semi-synthetic. I bought it in Rus' and at METRO. The last time I changed the oil was 2 weeks ago with a full flush. At the moment it is semi-synthetic BP. In short, all the channels are clogged, oil does not flow into the hydraulic tensioner. With all this, the valve cover and camshaft are in completely clean condition. The mileage of the car is 61,000 km. They say you need to almost go through the engine, look at the rings, and everything else. This is 700-1000 USD.
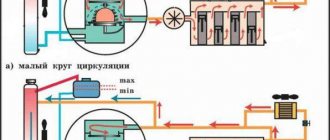
Scheme of work
The figure below shows a diagram of the operation of the spring-hydraulic chain tensioner of the VAZ 21214 car. 1 – camshaft star; 2 – timing chain; 3 – chain damper; 4 – auxiliary device drive star; 5 – crankshaft star; 6 – tensioner “shoe”; 7 – hydraulic chain tensioner; 8 – line fitting; 9 – oil line; 10 – adapter fitting; 11 – oil pressure sensor (emergency).
Installing new parts
First we change the crankshaft front seal. We remove the old one and clear the space for the new one. Lubricate the new oil seal with engine oil and install it using a mandrel. You can use an old oil seal as a mandrel.
The fastening bolt on the shoe is hammered with light blows of a hammer. It is not recommended to adjust it so that it is inserted by hand - there will be a slight backlash, which will cause the shoe to move on the axis. Place the bolt in place and tighten.
See:
Install the new crankshaft, camshaft and oil pump gears in place so that the marks match.
Tensioner assembly
The lock washer retainer can be processed with a file, but it must fit tightly into the groove. The clamp is bent at an angle of 90°. Tighten the bolt.
Chain
moisten with engine oil and put on the crankshaft gears first, and then the oil pump and camshaft. It is necessary to tension the chain from sprocket to sprocket and observe the position of the shafts according to the marks. Install the tensioner. Tighten the nuts. Check the alignment of the marks and the chain tension again. Tighten the bolts on the gears. After rotating the crankshaft several times, check again whether the marks match.
Lubricate the gasket with sealant, then replace the cover. Install the pulley. You can move the lid a little so that it fits well. Replacing the fuel filter on a Chevrolet Niva » all about Chevrolet. After this, tighten all the cover bolts and nuts.
Tighten the tension and idler rollers; if necessary, they can also be replaced. Using sealant, install a new gasket on the pump, and then put the pump in place. Put the car on the parking brake and engage 4th gear, tighten the pulley nut. Connect all hoses, pipes, connectors, install the fan and radiator. Tighten all connections, then fill with coolant.
Carry out a test run of the engine. If everything is in order, install the radiator grille, boot, and protection. And now - good luck!
What is needed for the work?
Internal structure of the tensioner
The chain on Chevrolet
Niva wears out the timing mechanism more than the belt, so the sprockets will also have to be replaced. Old gears will wear the new chain , causing slippage and breakage. Of course, this is hard mechanical work. But replacing a chain is done quite rarely, so you can at the same time change the seals and gaskets, as well as all related worn parts. First of all, you need to purchase a new timing chain (timing chain) for Niva Chevrolet . To ensure its quality, lay the part flat and hold it suspended. If the ends sag by more than 1 cm or the sagging is uneven, it is better to refuse the purchase - most likely, the chain
has already worked.
When is stretching necessary?
Chain tensioning is required in the following cases:
- after engine repair;
- after replacing the product;
- when stretched after prolonged use.
Timing belt VAZ 2101 In the first two cases, it is clear that checking the tension is necessary, since the chain was removed or replaced. In addition, you should also check that the alignment marks match. These marks are located on the crankshaft and camshaft. You can determine the need for tension by the sounds of the engine running. If the tension is weak, then during its operation extraneous noises are heard in the place where the chain drive is located. At the same time, timing parts wear out faster
Therefore, when checking the tension, it is necessary to pay attention to the condition of the damper and the shoe.
Timing tensioner shoe
If the tension is weak, the links can jump several teeth, then the valve timing will be disrupted. In this case, the car may stall, not start, and the speed will fluctuate. You can use a flathead screwdriver to check. It needs to be inserted and, using as a lever, pressed on the chain. It should not bend and be stretched like an arrow. Do not put too much pressure on the drive, although the part is metal, it is subject to deformation.
The video below looks at a VAZ 2101 car, in which a clattering sound is heard when the engine is running. It shows in detail how to check the condition of the damper, the shoe, and how to carry out tension.
The procedure for installing the ISAI tensioner on Gazelle, Volga and other cars with ZMZ engines.
- Remove the air filter and anything that interferes with access to the tensioners.
- Unscrew the aluminum cover of the lower tensioner, first placing a container under it to drain the oil. Remove the factory tensioner.
- Unscrew the aluminum cover of the upper tensioner and remove the standard tensioner. Wipe the planting area.
- Try on the ISAI upper tensioner. It should sit in place until the flange stops.
- If this does not happen and the tensioner does not reach the end, then turn the shaft a little until the chain sag on the tensioner side.
- Secure the upper tensioner.
- Following the same rules, install and secure the lower tensioner.
- Unscrew the cap nuts, remove the fasteners (pieces of duralumin wire) from them and screw them into place until they stop by hand.
- Turn the shaft approximately 1 revolution as the motor moves.
- Start the engine.
Tensioners on ZMZ engines can be installed either simply with a gasket or slightly lubricated with sealant, taking into account that excess sealant can clog the oil groove.
READ How to Disable Timer on Tomahawk Alarm
When reloading the ISAI tensioner, be sure to keep it clean, as Any dirt that gets on the propeller can damage it. If, nevertheless, dirt gets under the screw and the tensioner begins to jam, then this can be corrected using the following method: in the place where the screw is jammed, you need to fix it with a cap nut with a lock (if it is lost, you can replace it with an M4 nut) and then tap it with the nose screw against some powerful object (vise, hammer, sledgehammer, etc.), and then twist the screw in different directions. Any debris caught between the threads will be destroyed and the screw will become mobile. You can also wash the tensioner (kerosene, diesel fuel) under pressure from the cap nut side, immediately unscrewing the screw.