How many light bulbs are there in the dashboard of a VAZ 2107
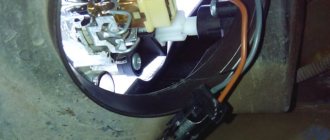
HomeVAZ 2110How many light bulbs are there in the dashboard of a VAZ 2107Burnout of lamps in the dashboard of VAZ cars is a common occurrence, since the conventional filament lamps installed there have a fairly short service life. Constant vibration and, due to the new rules, their almost continuous operation also do not add to their resource. To replace the lamps, it is necessary to disassemble the instrument panel and remove the panel. As in all cases related to the repair of electrical wiring, you must first disconnect the battery by removing the negative terminal , if you do not have a ground switch. Using a screwdriver, remove the stove control knobs. Unscrew the nut from the daily mileage reset cable. To do this, you can use pliers or wire cutters. We don’t bite it off with pliers, but with our open beaks we press it against the nut from the front and turn it.
We take it to the side, unscrew the speedometer cable, remove the econometric hose and disconnect the connectors. Remove the instrument panel. To remove the lamps, they need to be turned half a turn and removed. This dashboard uses two types of lamps and sockets. Backlight lamps are changed separately, control lamps are replaced along with the cartridge.
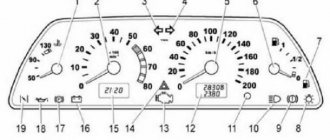
Fuel reserve lamp Backlight lamps Turn indicators CHECK ENGINE Parking lamp lamp Oil Parking brake lamp High beam Battery charge
I recommend replacing all lamps with LED ones, since today you can choose any size, type and color of light. ATTENTION! The battery charge control lamp cannot be replaced with an LED lamp, otherwise there will be no charging! to your website.moepervoeavto.ru
Illumination of the instrument panel VAZ 2107: design and repair
One of the breakdowns that does not directly affect the operation of the car, but causes a lot of trouble for the driver - the backlight of the VAZ 2107 instrument panel does not work. During the day the problem is invisible, but at night the missing backlight significantly complicates driving your VAZ 2107. Because of this malfunction It becomes impossible to see the readings of the main instruments: tachometer, speedometer, econometer, fuel level indicators, charge level, coolant temperature.
The task is simple and requires a minimum of tools and skills. However, in order to access the bulbs, you will have to remove the entire dashboard. Armed with a flathead and Phillips screwdriver, you can get to work by first removing the positive terminal from the battery.
Next, you need to use a Phillips screwdriver to unscrew the self-tapping screw hidden behind the plug next to the above-mentioned levers. The instrument panel is freed, it remains to perform a few simple manipulations to remove it completely and begin the repair:
- Unscrew the speedometer cable nut;
- Disconnect the hose from the econometer;
- Disconnect the three electrical connectors.
After this, we remove the instrument panel of the VAZ 2107 and begin replacing the failed light bulbs. Everything here is completely simple, we take out the burnt out ones and install new ones in their place.
Thus, on the VAZ 2107, both the backlight and control lamps are replaced. The diagram of their location is shown in the following figure. Here, the number 2 indicates the instrument panel backlight lamps. The remaining lamps are control lamps:
Fuel level; Direction indicators; Engine control systems; Turning on the side lights; Engine oil pressure; Activation of the handbrake; Turning on the high beam; Battery charge.
It should be noted that many car enthusiasts, having reached the instrument panel of the VAZ 2107, do not bother with trivial repairs and perform backlight tuning. To do this, instead of conventional light bulbs, LEDs of the appropriate size are installed. Thanks to this modernization, lighting works more efficiently. You just need to choose the right resistance (resistor) connected in the circuit in series with the LEDs. In addition, you can stick stylish scales on the instruments instead of dull standard ones. Another option for implementing LED backlighting is to install lighting elements not in standard places, but along the perimeter of the panel. This method requires large material costs, but the result is more effective. Assembling the dashboard is performed in the reverse order:
- The electrical connectors, the econometer hose, and the speedometer cable are connected in series;
- Install the panel in its regular place;
- Fix it with a self-tapping screw and put the plug in place.
- Put the handles in place and secure the daily counter reset handle with a nut.
As a result, the instrument lighting works, the task can be considered completely completed.
snyatie-paneli-vaz-210754.jpg
Removing the “tidy” of the presented car is carried out in the following sequence:
1. First, you need to prepare the car for operations (to do this, you should review the corresponding material called “Preparing the VAZ 2107 car for repair and maintenance”).
2. Then you need to disconnect the wire on the car from the negative terminal of the battery.
3. After this, use a screwdriver and carefully remove the handles from the stove control levers.
4. The next step is to unscrew the nut that secures the meter reset handle. We remove the nut together with the washer and push the handle into the space that is located behind the instrument panel.
5. Using a thin screwdriver, carefully pry and then remove the screw plug that secures the instrument panel.
6. Using a Phillips screwdriver, unscrew the fastening screw.
7. Carefully remove the “tidy” of the VAZ 2107.
8. Disconnect the cable after the union knurled nut of the car speedometer drive cable has been unscrewed.
9. After this, remove the vacuum supply hose from the econometric fitting.
10. Carefully disconnect the blocks (three colors) of the wiring harnesses.
11. Now you can remove the panel from the car. After this, you can safely perform the following operations:
-replace the backlight lamps;
-if necessary, replace the control lamps.
Installation of the “tidy” should be carried out in the opposite order of its removal.
Dashboard lighting and alarm
The dashboard of the VAZ 2107 has 11 (12) lamps: 7 indicator lamps (for a carburetor engine
| Appearance | Type according to GOST | EEC type | Purpose | Description | Location in the device (photo above) |
| AMN-12-3 | T3W | instrument cluster illumination | incandescent, power 3 W | 2 | |
| A12-1.2 | W1,2W | reserve fuel indicator | incandescent, with cartridge, power 1.2 W | 1 | |
| turn signal indicator | 3 | ||||
| injector service indicator (on modifications with an injection engine) | – | ||||
| battery low charge indicator | 4 | ||||
| side light indicator | 5 | ||||
| high beam indicator | 8 | ||||
| indicator of emergency level of brake fluid in the hydraulic brake drive (optional) | – | ||||
| low oil pressure warning light | 6 | ||||
| parking brake indicator | 7 |
Removing the instrument panel and preparing for replacement
To change the lamps in the instrument panel, the latter will have to be removed. It cannot be said that the PP can be removed with one movement of the hand: the designers of the VAZ 2107 made dismantling a little more difficult than on other cars of the VAZ family. Nevertheless, dismantling the PP is quite feasible in a garage or even a parking lot. In this case, the operation does not require any special knowledge. The tools we will need are:
- small flat screwdriver or knife;
- crosshead screwdriver.
I think all this will be found in the trunk of any VAZ 2107, and we can get started. First of all, we remove the plastic handles from the heating control knobs by prying them off with a flat screwdriver.
Removing handles from the seven's interior heating system
We unscrew the nut securing the daily counter reset button (marked with a red arrow), and push the button itself inside the shield.
Removing the daily counter reset button
Now you need to unscrew the screw that is located under the plug and secures the decorative trim. Remove the plug using a flat-head screwdriver and unscrew the Phillips screw.
Removing the fixing screw of the PP decorative trim
After this operation, the right side of the panel will move away so that you can get to the flexible speedometer control shaft.
Releasing the right side of the control panel on a VAZ 2107
The shaft is removed with bare hands: simply unscrew the nut securing it.
Removing the speedometer drive
Now remove the instrument panel from the clamp that secures its left side and pull it out slightly to get to the vacuum hose connected to the econometer. It can also be removed with bare hands, but be careful not to tear it.
Removing the vacuum hose from the econometer to the PP
It remains to disconnect the three power connectors of the instrument panel and the three wires on the VAZ 2107 heater switch. Before disconnecting, it is advisable to mark them so as not to confuse them when assembling the panel.
Disconnecting the power wires from the heater switch
We remove the decorative trim along with the PP and unscrew the four self-tapping screws securing the shelves (two on each, I marked them with red arrows) to the decorative trim, and the instrument panel can be removed.
Removing PP from a decorative trim
Good afternoon dear friends. Many Classic car owners do not like the backlighting of the instrument panel. The question arises whether you need to either change the lamps to brighter ones, or carry out tuning - upgrading the lighting of the VAZ 2107 dashboard. And it happens that you need to change the light bulbs for a completely banal reason - one of them has burned out. Today we will look at the process of replacing the backlight and alarm lamps of the VAZ 2105-07 panel . It is these two Zhiguli models, because their devices are similar.
Replacing burnt-out lamps on the dashboard of a VAZ Semerka
First of all, before you start replacing, you need to find out what kind of light bulbs are used on classic VAZ models . Because it will be a shame to buy the wrong one, or with a different base. And find out after the device is completely disassembled.
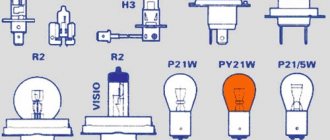
So, how are light bulbs used:
- Lighting for the speedometer and tachometer and the entire panel as a whole: power 3 Watt, base type – T3W,
- Signaling lamps for turning on the dimensions, high beam, parking brake, opening the air damper (choke for carburetor modifications), low battery charge, oil pressure, direction indicators: baseless linden lamps W1.2W, power 1.2 W.
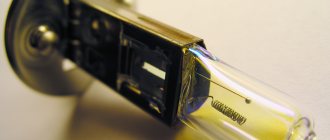
In some modifications, older models, alarm lamps with a T3W type socket with a power of 3 Watts can be installed in the dashboard. Here, unfortunately, you can’t guess. The figure below shows the appearance of all the light bulbs used on the VAZ 2107 to get an idea of what they look like.
Headlight adjustment
It is generally accepted that headlights perform their function if the road in front of the car is well lit and oncoming drivers are not blinded. To achieve such operation of lighting fixtures, they must be adjusted correctly. To adjust the VAZ-2107 headlights you need to:
- Place the car on a flat, strictly horizontal surface at a distance of 5 m from a vertical screen measuring 2x1 m. The car must be fully fueled and equipped with all the necessary equipment, the tires must be inflated to the required pressure.
- Draw a marking on the screen on which line C will indicate the height of the headlights, D - 75 mm below C, O - the center line, A and B - vertical lines, the intersections of which with C form points E, corresponding to the centers of the headlights. J is the distance between the headlights, which in the case of the VAZ-2107 is 936 mm.
On the vertical screen you need to make markings that are needed to adjust the headlights
- Move the hydraulic corrector regulator to the extreme right position (position I).
- Place a load weighing 75 kg on the driver's seat or place a passenger there.
- Turn on the low beam and cover one of the headlights with an opaque material.
- Achieve alignment of the lower boundary of the beam with the E–E line by rotating the adjusting screw on the rear side of the headlamp.
By rotating one of the adjusting screws, you should align the lower border of the beam with the line E-E
- Using the second screw, align the break point of the upper border of the beam with point E.
By rotating the second screw, it is necessary to align the break point of the upper border of the beam with point E
The same must be done for the second headlight.
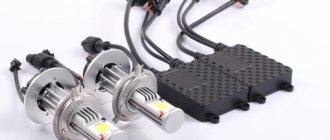
Replacing incandescent lamps in a 2107 headlight with LED ones
Let's start with the most interesting and important question. I know from myself that the low beam on the “seven” is intended only to illuminate the road a meter from the front bumper
It was precisely these considerations that were probably guiding the Tolyatti engineers. At night you need to look closely at what is happening in front of the car, the side of the road is not visible, and if there are potholes in front, then it is not possible to dodge them in time; late they fall into the light beam of the headlights.
For this reason, many car owners replace the factory lamps with brighter ones, in the hope of achieving the brightness of the head optics necessary for safe driving.
There are several tuning options:
- Installation of halogen lamps
- Xenon
- LEDs
We will immediately dismiss the second option, because it is not intended for installation in the standard headlights of a classic VAZ. To do this, you need to retrofit the optics with lenses that collect the light beam. Otherwise, the bright xenon light will simply be scattered by the headlight reflectors into space, without creating the desired cut-off boundary and directional beam shape.
As a result, you will blind oncoming traffic, and the efficiency of night road lighting will tend to zero. At the same time, there is a high chance of getting your driver’s license revoked for installing xenon in a VAZ 2101-07.
Alternatives can be halogen and LED lamps. But if you choose between them, LEDs have a certain number of advantages.
Advantages of LED technology over halogen and xenon
- Same power with low power consumption compared to halogen
- Durability with proper installation and decent quality LED technology
- High brightness. Its level can reach up to 2200 Lm
- There is no need to modify the headlight unit or install additional equipment (ignition units) as for xenon.
Modern LED lamps are available in different types of sockets, each brand of car has its own. It is enough to remove the old lamp and, using the same connection, insert a new LED lamp - there are no alterations or problems.
Floor lighting
One of the popular and modern methods of tuning is to make floor lighting with a 12 V LED strip. Many people wonder where the wires go in this case:
- The tape at the driver’s feet extends from the steering column, and a bundle of wires for connection is also located there.
- If you are lighting the passenger seat, the wires should be at the passenger's feet.
- To illuminate the rear seat, the tape is placed under the shelf.
Car enthusiasts can even place LEDs in the trunk or on the bottom of the car. It looks unusual and beautiful. For the floor, bottom, trunk, it is recommended to choose types of tapes that are protected from moisture and contamination. They
are much more expensive. Don’t try to save money, buy only high-quality LEDs. Carefully insulate the backlight connection points to prevent short circuits and protect the wiring from combustion.
Choose the color of the ribbon yourself. The most advantageous option is to match the color of the car with the shade of the backlight. You can choose exotic combinations. Some drivers of such cars specially repaint the body or cover the interior with leatherette. This requires a significant investment of effort. Large-scale tuning is recommended only for those who are familiar with the intricacies of this work.
Tuning the dashboard and dashboard of VAZ 2107
Car owners often do tuning of the VAZ 2107 dashboard with their own hands. The dashboard and dashboard of the VAZ 2107 are the first thing that catches your eye when entering the cabin. They determine the visual perception of the car.
A variety of ways to refine and improve the performance and aesthetic qualities of the dashboard and dashboard are used both individually and in combination. Typically, the following modifications to standard elements are made:
- Installation of adjustable LED dashboard lighting. As a result, you can achieve not only better illumination of the panel, but also make it glow in an unusual color to highlight the individuality of the car.
- Installation of LED backlighting of instrument arrows. This is not difficult, but quite labor-intensive work. But the result is worth it.
- Replacing instrument scales and needles with more beautiful ones. For this purpose, you can purchase ready-made parts or make (draw) yourself.
- Installation of a ready-made tuned instrument panel or dashboard and instrument panel from another car.
- Covering a standard VAZ 2107 torpedo with fabric or carbon fiber. In addition to the bright original look, such modernization allows you to rejuvenate old, time-worn interior elements (you can also cover the door trim, rear parcel shelf, and console with fabric or carbon fiber).
Removing the instrument panel and preparing for replacement
As mentioned above, when performing any work on electrical equipment, it is necessary to disconnect the power supply from the battery. Including when removing the dashboard and performing manipulations with it.
To remove the panel you will need a minimum of tools:
- Phillips screwdriver;
- flat screwdriver;
- pliers.
First, remove the plastic tips from the interior heater control levers using a flat-end screwdriver.
Using pliers, unscrew the nut from the trip odometer reset handle.
On the front part of the panel near the interior heater control levers, open the plug using a flat-head screwdriver.
Using a Phillips screwdriver, unscrew the screw that secures the decorative panel to the car frame.
We move the right side of the panel to the side and towards ourselves. Inside you can see the flexible speedometer drive.
Unscrew the nut by hand and remove the end of the drive cable. Remove the pipe connected to the econometer. Disconnect the electrical wires going to the instrument panel and the three wires going to the interior heater electrical switch.
How to change standard lighting
Standard lamps can be replaced with more powerful and modern ones. The most suitable option is considered to be the main lamp for interior lighting, borrowed from Priora. To install it you will need to have:
- masking tape;
- sharp knife (can be a stationery knife);
- wrench 12;
- Screwdriver Set;
- pencil or marker for making marks.
Carefully remove the visor next to the rear view mirror
Please note that its weight is quite high, so if you are not careful, the ceiling may collapse completely. Outline the place of the new shade on the visor with a pencil, cut a hole along the contour. Secure the new lamp in this hole using sealant
Secure the new lamp in this hole using sealant.
Stop signal
The brake light switch is located on the brake pedal hanger holder. The brake light is turned on as follows: when you press the brake pedal, the spring in the switch presses the control pin. At the same time, the contacts in the switch close the brake light circuit. When the brake pedal is released, the pin returns to its original position and the brake light goes off.
If the brake lights do not work on a VAZ-2107, you should make sure that the cause of the malfunction is not in the switch. To do this, you need to unscrew the ends of the power wires and place a jumper between them: if the brake lights turn on, the switch should be repaired or replaced. To replace the brake light switch, you must turn it clockwise 90 degrees and remove it from the mount. After installing the new switch, make sure that the neck of the switch fits snugly against the brake pedal and turn it 90 degrees counterclockwise. The new switch is adjusted automatically when the brake pedal is pressed. The switch operates normally if the brake light is turned on no earlier than the brake pedal has been moved 5 mm, but no later than it has been pressed 20 mm.
Fuse F11 is installed in the brake light circuit, which, in addition, is responsible for the operation of the interior body lighting.
Some VAZ-2107 owners install an additional brake light so that the signals given by the driver are more visible on the road. This type of brake light is usually placed on the rear window inside the cabin and operates on LEDs.
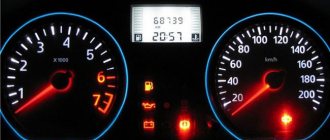
Digital indicators
Now let's move on to digital indicators. There are only two of them: the total mileage of the car and the daily mileage.
- Total mileage - located under the speedometer needle, has a value range from 0 to 99,999 km. Shows the number of kilometers traveled over the entire period. Helps determine the mileage required for an oil change and timely overhaul;
- Daily mileage - located above the speedometer needle. Its range is from 0 to 999 km. Helps calculate fuel consumption per 100 km, under different driving modes.
That's all, we have figured out what each sensor and device means. It is highly recommended that you do not ignore them, and the chance of an unpleasant surprise on your trip will be greatly reduced.
- Home
- Auto garage
- Replacing Light Bulbs in the Dashboard of a VAZ 2107
Spare lamps in the dashboard of VAZ 2107
Removing the dashboard from a VAZ 2107 car
1. Prepare the VAZ 2107 car for operations (see “Preparing the VAZ 2107 car for maintenance and repair”). 2. On VAZ 2107 we disconnect the wires from the negative terminal of the battery (see “Battery for cooking shafts 2107. removal and installation”). 3. Cut out the slotted screwdriver and remove the handles from the heater control levers.
4. Turn the knob nut to reset the daily odometer meter on the VAZ 2107. Remove the nut from the washer and push the knob into the space behind the dashboard.
5. Using a thin slotted screwdriver, pull up and remove the instrument panel self-tapping plug located on the right side of the HVAC control unit.
6. Using a screwdriver, unscrew the instrument panel mounting screw.
7. Remove the dashboard of the VAZ 2107.
Workflow Description
Preparation
If the low beam on a VAZ 2107 has disappeared and as a result of the check it is found that the lamps are to blame, then you should purchase new products. This model uses the AKG12-60+55 modification with an H4 socket; this marking indicates that the product has a power of 60 W for high beam and 55 W for low beam; you can purchase such an element at any store that deals in spare parts for domestic cars.
The working process
A huge advantage of the work is that, unlike modern models, access to the headlights is not limited in any way; this greatly simplifies doing the work yourself and allows you to achieve the best result, since you are in complete control of the process.
Important! To prevent the battery contacts from oxidizing during operation, you should protect them with lubricant; if there is no special composition, then ordinary grease would be an excellent option - it will protect lead from oxidation and ensure excellent contact over a long period of time
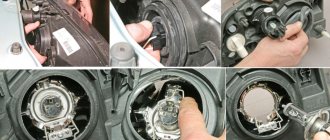
- If there is no low beam on a VAZ 2107 on only one side, then you can replace one lamp, although experts advise installing two at once, since the light may vary. One way or another, the work begins with any headlight that is convenient for you, first wipe the inside, since most often it is dirty and debris can get inside later.
- First of all, it is necessary to remove the plug, which covers the installation site of the light bulb and serves as protection against moisture and dirt getting inside the housing. This element is removed very simply: grab it and turn it counterclockwise until it comes off, usually this happens in half or even a quarter of a turn.
Advice! When disconnecting a block, it is better to immediately check how well the wires fit, since long-term use may cause the connection to break.
Next you will see a spring clamp that presses the lamp to the body and ensures its immobility during operation. To release it, you need to press the element on top and carefully move it to the side, everything is very simple and very quickly, when you see this knot, you can easily figure out how this is done.
Instruments and indicators of the VAZ 2107 panel
The VAZ 2107 dashboard includes the following many elements that provide visual perception of information about the operation of the car. VAZ panel instruments:
- Voltmeter showing the current voltage of the on-board network.
- Speedometer indicating the speed of movement.
- Odometer is a counter for the distance traveled by a car.
- A tachometer is a device that shows the crankshaft speed. The yellow zone of the device indicates high speeds, the red zone indicates unacceptable speeds.
- Coolant temperature indicator. The green zone is normal temperature, the red zone is engine overheating.
- An econometer is a device that shows how optimal the engine operating mode is in terms of fuel economy.
- Warning Indicators
- Indicator of the “daily” car mileage.
- Fuel level warning light
- Gasoline level indicator in the tank.
Warning lamp block:
- Turn signal indicator (flashes green when turned on).
- Injection engine control malfunction lamp (not available on carburetor “sevens”). When the ignition is turned on, the lamp glows orange and should go out after starting. A burning or flashing lamp on a running engine indicates a malfunction.
- Battery charge lamp. It lights up red when the ignition is turned on and should go out as soon as the engine starts. If it continues to light, the battery is not charged. In this case, it is necessary to determine the source of the problem and fix the breakdown.
- Dimensions indicator. Lights up green when the side lights are on.
- Lamp signaling the inclusion of high beam headlights (lights blue).
- Brake fluid level lamp for the hydraulic brake system.
- Low oil pressure indicator. Lights up red when the ignition is turned on. It should go out after the engine starts. It is unacceptable to operate the machine if the oil pressure light is on.
- Parking brake light that illuminates red when the brake lever is raised.
- Yellow fuel reserve lamp. Lights up when there is less than 5 liters of gasoline left in the tank.
Key switches VAZ-2107
1 - external lighting switch. This switch has three positions. The first signals that the external lighting is turned off; second - the lamps that illuminate the license plates, instrument illumination lamps and side lights are turned on; third position - additionally switched on low beam headlights;
2 - car rear window heating switch. If the ignition is on, press the key;
3 — transport switch for fog light of rear lights. It is turned on by pressing the key if the low beam headlights are on;
4 — heater fan switch. The switch can provide two speeds at which the fan can rotate - low and high.
In addition, the central console of the VAZ 2107 dashboard is equipped with additional warning lamps:
A – seat belts are not fastened (the lamp glows red when the ignition is turned on);
B – (CL) turning on the heated rear window (lights up with a special orange light);
B – emergency condition of the automobile service brake system (the lamp first lights up red in the situation if the fluid level in the tank of the engine hydraulic brake drive decreases).
Dismantling the VAZ-2107 dashboard
Removing the dashboard on a classic “Seven” is quite simple. This procedure is necessary when replacing lamps or electrical appliances, as well as if you want to tune the VAZ-2107 torpedo. The work is not a difficult process: it does not require special tools or extensive knowledge in the plumbing field.
Step-by-step procedure for dismantling the VAZ-2107 dashboard:
- the ground cable is disconnected from the battery terminal;
- the levers of the heating device are removed using a screwdriver;
- the protective plug is removed from the bolt responsible for fastening the panel;
- the bolt is unscrewed, after which the panel is dismantled;
- the speedometer cable nut is unscrewed, after which the device itself is removed;
- the voltage supply cables are disconnected from the economizer;
- the wire blocks are removed;
- The dashboard is removed.
After the structure is removed, you can begin work on replacing any of its components and elements. You can install the device using the same instructions, the steps of which are performed in reverse order.
Recommendations to avoid problems during the process of removing the torpedo
If you intend to remove the dashboard in a VAZ-2107 car for the first time, be sure to follow the following rules:
When removing the upper part of the steering column protective cover, be careful not to damage the ignition switch O-ring. This part is made of rather flimsy rubber that cannot withstand strong mechanical stress; label all connectors, wires and switches that you remove to gain easy access to the dashboard
They will avoid confusion during the installation process; When removing the additional dashboard, do not try to use force, as there is a fairly high risk of breaking the plastic clips. Finding a replacement for them will not be so easy.
Removing the panel
Any work related to the on-board electrical system of the VAZ-2107 requires first disconnecting the vehicle’s battery. Replacing light bulbs is not actually a repair, but there is still a risk of electric shock. For this reason, be sure to disconnect the negative cable from the battery.
Next, climb into the cabin and remove all the handles that control the heater and ventilation. Additionally (if available), the radio tape recorder is pulled out.
After this, you need to unscrew the nut holding the lever that resets the daily mileage counter. Remove it along with the washer, and push the handle itself inside the panel.
The next step is to unscrew the screw located on the upper right corner of the ventilation and stove control panel. He hides behind a decorative plug. The latter must be carefully pryed with a knife or flat screwdriver and pulled out.
Remove all the other 4 screws holding the dashboard in place and carefully slide it out towards you.
- unscrew the nut of the speedometer drive cable and disconnect it;
- also remove the vacuum pipe from the econometric fitting;
- disconnect the wire blocks - there are three of them.
Now all that remains is to pull the dashboard out of the cabin. The backlight and control lamps are easy to replace - just turn them in any direction until the protrusions on the bases coincide with the slots on the board. After this, the product can be easily removed. A working light is placed in the vacant space.
Now all that remains is to assemble the panel in reverse order. Before finally installing it in place, you need to connect the battery and check how the backlight and indication work.
To do this, activate the ignition and see if the backlight, turn control, battery, etc. are on. If everything is functioning properly, then complete the installation.
The control devices stopped working or they began to “confuse” the readings, the control lamps and lights do not light up - in this case the panel will have to be removed.
Preparing for work
Before starting work, you need to buy replacement light bulbs. You can choose standard ones with or without sockets, as well as LED ones. If it is necessary to replace the incandescent lighting elements responsible for the backlight, then you will need light bulbs of the AMN 12-3-1 (T3W) type. These are ordinary filament bulbs that are installed in the dashboard of VAZs from the factory. If it is necessary to replace indicator lights, then type A 12-1.2 elements are used. Are you choosing LED?
You don't need a lot of tools:
- flat screwdriver;
- Phillips screwdriver;
- pliers.
If you are going to disassemble the panel and repair it, you will additionally need:
- multimeter or probe;
- soldering iron from 40 Watt;
- solder and rosin;
- side cutters;
- small screwdrivers.
Workflow Description
Preparation
If the low beam on a VAZ 2107 has disappeared and as a result of the check it is found that the lamps are to blame, then you should purchase new products. This model uses the AKG12-60+55 modification with an H4 socket; this marking indicates that the product has a power of 60 W for high beam and 55 W for low beam; you can purchase such an element at any store that deals in spare parts for domestic cars.
The working process
A huge advantage of the work is that, unlike modern models, access to the headlights is not limited in any way; this greatly simplifies doing the work yourself and allows you to achieve the best result, since you are in complete control of the process.
Important! To prevent the battery contacts from oxidizing during operation, you should protect them with lubricant; if there is no special composition, then ordinary grease would be an excellent option - it will protect lead from oxidation and ensure excellent contact over a long period of time
- If there is no low beam on a VAZ 2107 on only one side, then you can replace one lamp, although experts advise installing two at once, since the light may vary. One way or another, the work begins with any headlight that is convenient for you, first wipe the inside, since most often it is dirty and debris can get inside later.
- First of all, you need to remove the plug, which covers the installation site of the light bulb and serves as protection against moisture and dirt getting inside the housing. This element is removed very simply: grab it and turn it counterclockwise until it comes off, usually this happens in half or even a quarter of a turn.
Advice! When disconnecting a block, it is better to immediately check how well the wires fit, since long-term use may cause the connection to break.
Next you will see a spring clamp that presses the lamp to the body and ensures its immobility during operation. To release it, you need to press the element on top and carefully move it to the side, everything is very simple and very quickly, when you see this knot, you can easily figure out how this is done.
VAZ-2107 instrument panel diagram
The instrument panel is an important part of every car, and the 2107 is no exception. For visual perception, it is better to look at what the VAZ 2107 “tidy” diagram looks like.
1 — automobile voltmeter;
2 - speed indicator or, more simply put, speedometer;
3 - machine trip meter - odometer;
4 - tachometer. It shows the frequency at which the crankshaft rotates. The yellow zone on the scale indicates that the engine is running at high speeds; the red zone indicates unacceptable modes. 6000 rpm is the maximum permissible speed.
5 - coolant temperature indicator. The green zone is the normal coolant temperature. The red zone indicates engine overheating. The vehicle must not be operated at a coolant temperature exceeding 118 °C;
6—econometer. This indicator helps you select the most economical mode for engine operation from all modes (the instrument needle should be in the green zone of its scale).
7 - block (CL) of warning lamps of the VAZ 2107 car:
Turning on the turn indicators (when a left or right turn is turned on, it lights up with a flashing green light);
Malfunction of the engine control mechanism (used on a car with an injection power unit. The lamp glows orange if the ignition is on. When the engine starts, it goes out). If there is a malfunction in the system, the lamp flashes or is constantly on. In such a situation, using the car is not prohibited, the system will simply switch to backup mode;
Battery charge lamp. When the ignition is turned on, the lamp on the instrument panel turns red and goes out when the engine starts. If the lamp continues to light, the battery is not charged. There may be several reasons: the generator drive belt is insufficiently tensioned, the control lamp or generator circuit is faulty. If you continue to use the car, this may lead to the battery being completely discharged and the engine stopping. A fire may also occur;
Side light indicator (lights up green if the side lights are on);
Indicator for turning on the high beam of the car's lighting fixtures (the lamp lights up blue if you turn on the high beam of the headlights);
Insufficient oil pressure. When the ignition is turned on, the oil pressure lamp begins to glow red and immediately goes out when the engine starts. If the light remains on, there is low oil pressure. To avoid failure of the power unit, you need to turn it off and try to eliminate the cause of the malfunction;
The parking brake is engaged (the lamp lights up bright red when the ignition is turned on and the parking brake lever is raised).
8 - indicator of the path traveled per day;
9 - (CL) fuel reserve. The yellow light comes on if there is less than 6-4 liters of fuel left in the fuel tank;
10 — fuel level indicator;
Instrument panel of the domestic seven
The VAZ-2107 panel, like any other car, is equipped with only the most important indicators of the “life activity” of the vehicle.
Of course, there are few of them, but they are mandatory and should be known well. This will help you notice a problem in time. While driving, every professional driver looks at the dashboard every few minutes to assess the operation of the vehicle's systems. This will help him, if necessary, correct his own actions in time.
However, there are times when inexperienced drivers do not fully understand the meaning of the instrument panel sensors.
The most common emergency situations are the following:
- The oil pressure warning light comes on. In such a situation, you need to stop driving by turning off the engine. It is necessary to check the oil level. If it is insufficient, you should add oil and only then start the engine. It is possible that the hazard warning lights will remain on. In this case, it is necessary to turn off the engine again and find a way to transport the car by tow to the place where the repair will be carried out. If you continue driving with the hazard warning light on, after a while the engine will “knock” due to the fact that the connecting rod bearings have rotated. If you continue to drive, the engine will jam. And in this situation, it will be necessary to carry out a major overhaul of the power unit.
- The battery warning light may come on. In this situation, you first need to check the terminals - perhaps they have oxidized and there is no reliable contact. If this does not help, then the problem is in the generator. It does not produce the required level of current to charge the battery. If the malfunction occurs during the daytime, it is better to try to get to the nearest service station. In this case, you need to turn off all electrical appliances. A high-quality battery in such conditions will “last” 100 or even more kilometers (the energy will only go to power the ignition system). Most often, in such situations, the voltage regulator relay fails.
- If the brake fluid warning light comes on, you should stop immediately. Driving without brakes is always a dangerous activity; this is not an extreme sport, but a normal safety precaution. If such a malfunction occurs, check the brake fluid level and, if necessary, add it. If the car can slow down, you need to try to slowly get to the nearest service station. If things are such that the car does not react, that is, does not brake, it is better to call a mechanic or, if you know how, eliminate the cause of the breakdown yourself.
- The sensor that shows the coolant temperature is “placed” in the red zone. The “classic” does not have a special alarm system that informs the driver about the “boiling” of the engine. Therefore, an inexperienced driver can easily “sleep through” such a moment (but it is very difficult not to notice the steam from under the hood). In such a situation, you need to stop and let the engine cool. You don't need to go under the hood right away. You may get severely burned. When the engine has cooled down, check the coolant level. If there is no break in the pipe of the coolant mechanism, then you need to try to get to a service station or garage and find out there why the temperature has increased. Most often this happens due to a thermostat failure or the radiator fan not turning on.
- The sensor that signals the fuel level is at zero. If there are less than five liters of gasoline in the gas tank, then the warning light will come on. In this situation, you need to refuel.
While driving, you should always pay attention to the tachometer readings. The speed of the power unit should not be higher than 5000 rpm. An experienced driver tries to keep the arrow in the green zone. Thus, an economical mode of vehicle movement is ensured.
Replacing low and high beam lamps, as well as a side lamp:
It is not easier to replace, first you need to open the hood, after which you can immediately start replacing, to do this, twist the cap and remove it immediately (see small photo) when you do not have excellent access immediately to the two lamps, namely halogen lamp and to the general one, to get the halogen, disconnect the terminal block from it (indicated by the red arrow) at the beginning and then pull the lock (it is metal, look closer, you will see it immediately, it looks like a shackle), and take it out of the lamp , and after you can also remove the lamp by simply pulling it, the new lamp is installed in the reverse order, now let's say a little about the parking light bulb, it is even easier to change, just grab the cartridge with your hand (indicated by the blue arrow), and then pull behind the cartridge, you need to pull out the lamp, and when it is in your hands with the cartridge, you must press the lamp (press it in inside the cartridge) and turn it counterclockwise, and it will come out of the cartridge more.