Removing the rear door trim on Kalina is quite simple. To do this you will need: a flat screwdriver, a small piece of rag, a knife or a super thin screwdriver. This work is not very difficult, you can easily do it without outside help, even if you have no experience in car repair.
And so, having obtained everything you need, you can begin to remove the casing. First, let's remove all the decorative trims - two on the handle and the cap on the lock lock. To remove the first ones, it is best to use a thin knife or flat-head screwdriver.
We gained access to the 2nd bolts - unscrew them. Now comes the fun part. You need to remove the window lowering/raising handle. It is secured with a plastic retaining ring. It's up to you to pull it out. This ring has a latch on the back. We insert a knife or screwdriver behind the locking ring, pull it towards you and pull it up.
Often, removing this handle causes difficulty for everyone. But, as you can see, it’s nothing complicated if you know the design.
Now all that’s left to do is to tear off the trim from the door. Wrap the screwdriver in a rag, insert it between the trim and the door itself and pull. The entire rear door trim on Kalina is attached using clips. So push on, don’t be afraid. It’s just advisable to have several of these clips in reserve, in case something goes wrong.
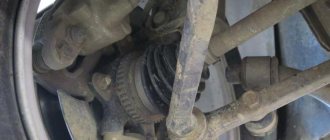
Once the rear door trim has been removed, you can perform basic repair work. This includes replacing the outside door handle.
Replacing the rear door handle Kalina
The handle is secured with one nut inside the door and one bolt outside.
We unscrew them. First, we pull out the part of the handle that is closer to the center of the door. Now we pull the entire handle towards the center of the door, lift it up a little, pull the bottom towards us and pull out the handle completely.
The new rear door handle and trim are installed in the reverse order.
The doors of any passenger car, including the Lada Kalina, are lined from the inside with special decorative panels. For various reasons, sometimes it becomes necessary to remove this trim, and here ignorant motorists are faced with a problem - there are no fastenings for the door card on the outside. In reality, the disassembly technology is not complicated, although it does include a couple of nuances that need to be taken into account.
Removing the front seat slide
We move the seat slide so that the bolts securing the slide to the seat frame are visible through the technological holes in the slide.
Using a 8mm socket, unscrew the bolts securing the slide to the seat frame.
Removing the panel on Lada Kalina 2
Remove the slide assembly with the longitudinal movement mechanism lever
We remove the end of the lever shaft of the longitudinal movement mechanism from the hole in the inner slide and from the hole in the outer slide
A spring is installed between the lever and the outer herrings. Similarly, we remove and disassemble the front passenger seat.
We assemble and install the front seat in the reverse order.
Before installing the lever shaft into the hole of the outer slide, first put a spring on the shaft and place the short mustache of 1 spring on the latch, then, squeezing the long mustache of 2 springs (can be tied with wire), insert the shaft into the hole of the slide so that this mustache goes under the slide .
Why is the door trim removed?
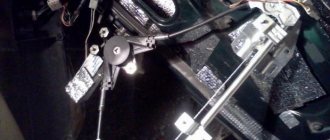
Most often, the trim of the rear or front doors is dismantled in order to get to the internal cavities where the window lift mechanisms are installed. Although during the entire period of operation of the car there are other situations when it is necessary to remove the trim:
- for installing acoustic speakers built into door cards;
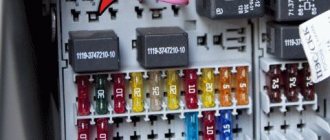
- in case of failure of the electric window lift buttons;
- for dismantling glass for the purpose of tinting or replacement;
- to repair or lubricate window lift mechanisms;
- to replace facing panels that have become worn or scratched over the years of use of the machine.
Theory and preparatory actions
On the front doors in the “Lux” and “Norma” trim levels, the upholstery is equipped with an acoustic trim:
On the front cards in the Luxury there is an overlay with slots
There are no such additions in the “Standard” package:
To protect the door to the maximum, the card was made blind
Everything said above also applies to the rear door trim. It has already been said that before dismantling, all windows must be lowered. It will also be necessary to remove the negative terminal installed on the battery:
Negative battery terminal
To perform this action you will need a 10mm wrench.
Be aware that you cannot work with electrical equipment while there is a battery in the on-board network. It’s easier to disconnect the connector with a minus sign, which is what is recommended in practice.
Preparation for dismantling
To unscrew the fasteners and remove the door trim, you need to prepare a simple set of tools:
- screwdriver with cross slots;
- long flat screwdriver;
- a pointed tool, such as an awl.
Door disassembly tool
Since the door card of the Lada Kalina car is held on by plastic fasteners (otherwise known as clips, pistons), there is a warning regarding the working conditions. It is strictly not recommended to dismantle door trim in the cold, when the plastic becomes brittle and easily destroyed. Hence, there is a risk of breaking all the clips during the process of removing the decorative panel. Therefore, in winter, perform this operation in a heated garage or box.
In the summer, there are no requirements for premises; remove the casing even in the open air. There is only one recommendation: in windy weather it is better to drive the car into the garage, otherwise a lot of dust will be brought into the interior when the doors are open.
This is what the door card lock looks like
Advice. In cars that are 5 years old or more, the plastic from which the retainers are made dries out and becomes brittle. When separating the trim from the door of such a car, you will probably ruin some of the clips. So it’s worth buying new ones in advance, there are 8 pieces in the front door, and 10 pieces in the back door.
Removing the front door trim — Lada Kalina Blog
Removing the front door trim
This type of work requires a minimum of tools and time, and a little care during certain procedures. We will need a Phillips screwdriver with a medium-sized blade. Below we will describe everything in more detail using the driver's door as an example.
A detailed guide to removing the front driver's door trim on a Lada Kalina
First of all, unscrew the two bolts that are located at the very bottom - in the pockets. The photo below clearly shows:
After this, you need to remove (pry off with a flat screwdriver) the round plastic plug, as shown below, and unscrew and unscrew the screw that is located under it:
Now we move the opening handle to the side and unscrew another bolt:
And the last screw that needs to be removed is located in the very recess on the case, an example in the photo below:
Now you can proceed directly to removing the casing itself. To do this, you must first pry up the casing from one edge with a flat screwdriver and carefully move it to the side, as if pulling it off the fastenings. It is at this step that you need to be careful, since the plastic clips that secure the upholstery are quite fragile and can break. The ideal option would be if you buy yourself a lot of these latches in advance; in any case, they will come in handy sooner or later, especially since the cost of these latches is actually pretty cheap.
After all the pistons have snapped off, unscrew the central locking latch:
Now we lift the casing up a little and free it from the traction shown above. Almost everything is ready, the only thing that will hold the door trim are two plugs from the power window unit and the wires of the front speaker, if you have one connected. The plug for the power window unit can be removed quite simply; you just need to press the plastic clips on both sides and pull it towards you.
When I close and open the front door behind the trim, the lock rod, in contact with the metal body of the door, probably produces an unpleasant rattling sound. To eliminate this type of noise, would anything prevent me from putting a PVC tube on this rod, of course of a larger diameter, without removing the door trim? then, as my practice shows, when trying to perform such an operation, the PVC tube protrudes only 10 cm. and then it seems to be resting on something. I don’t know, maybe you need to take a tube of even larger diameter to successfully complete the operation. I really don’t want to remove this notorious trim. Thanks in advance for your answer. I’ve only owned the car for 3 months, so I don’t know all the details and nuances.
hello!! can you tell me where to look and what to do about the situation when the “panther” alarm system closes all the doors using the remote control... but it opens all the doors also from the remote control, except the driver’s, although the door opens with the key through the cylinder! via the lock button everyone's door is the same.
https://ladakalinablog.ru
legkoe-delo.ru
Instructions for removing the cladding on Kalina
The first three operations are performed the same way for all Lada Kalina doors. The exception is the trunk hatches of hatchback and station wagon cars, where the disassembly procedure is much simpler. Here's what to do:
- By hand, unscrew and pull out the cap of the latch designed to lock the door lock from the inside.
- Using a Phillips screwdriver, remove the 4 screws holding the music system speaker.
- Remove the speaker and disconnect the wires from it.
Unscrewing the blocker and acoustics
Advice. The acoustics can be attached either to the door card itself or to the metal door frame. If, after removing the speaker, you observe the first option, then during assembly it is better to redo the fasteners by drilling holes for self-tapping screws. The acoustics should be mounted to the door, not to the upholstery.
Attaching the speaker to the casing is wrong
The further procedure of work differs depending on the location of the door that you are disassembling.
Front passenger door
Here the decorative panel is held on by 8 clips, 2 screws securing the internal handle and two self-tapping screws located under the plastic pocket. The algorithm for dismantling it is as follows:
- Using an awl, carefully pry the edge of the plastic plug hiding the screw in the door handle and remove it. Remove the second screw cover in the same way.
- Remove both handle screws.
- Pull the door opening handle towards you, unscrew the fastening screw and remove the lever. After which you will be able to remove the entire handle.
- Unscrew the 2 screws at the bottom of the door card, under the plastic pocket.
- Take a flat head screwdriver and pry the top right corner of the trim panel to disengage the first tab. Grab the casing with your fingers and release the remaining pistons manually.
- After separating the panel from the door, disconnect the wires coming from the power window button. To do this, pry the connector tab with a screwdriver and pull the block out of the button block. Dismantling of the cladding has been completed.
Removal from passenger door
Lada Kalina how to remove a ceiling glued to a sealant.
Lada Kalina how to remove a ceiling glued to a sealant. Once the music system is removed, you can begin the main part of the repair. You need to remove the door trim on Kalina in the passenger seat in a certain sequence:
- The decorative panel is removed. To do this, unscrew 8 clips and 2 screws. The inner handle is held on by two self-tapping screws.
- An awl is used to pry up the edge of the plug for removal. There are two of them, so you need to remove both.
- The opening mechanism is pulled back to remove the securing screw. After this, two screws are unscrewed from the inside of the handle. They are located opposite the cavity of the plastic pocket.
- One edge of the panel is pryed off; you can use a screwdriver to do this. When it becomes possible to grab the edge, all that remains is to pull the element towards you.
- The wires from the electric window lifter are disconnected, the block is removed.
To avoid scratching the panel with a screwdriver, wrap the tool in a soft cloth.
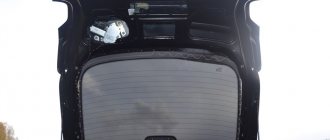
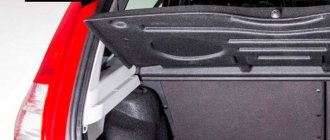
How to disassemble the trunk lid on a hatchback and station wagon
The interior lining of the Kalina rear hatch in hatchback and station wagon bodies is held on by 4 regular clips, 2 special black plastic fasteners (installed after installing the panel) and 2 screws securing the handle. In addition, the panel is hooked onto a metal protrusion by two brackets located in the lock area.
Handle screws
The procedure for removing the upholstery is as follows:
- Unscrew the 2 screws with a Phillips screwdriver and disconnect the handle.
- Place a flathead screwdriver under the glass side of the panel and unlock the lock. Release the remaining latches with your hands, pulling the panel along the contour.
- Remove the trim, lastly releasing the staples near the trunk lock.
The panel is detached from the glass side
Note. You need to start snapping the pistons away from the glass, because you won’t be able to remove the lining from the lock side without damaging the clips. This is prevented by 2 brackets hooked to the metal frame of the hatch.
The mounting brackets for the trunk hatch are located near the lock.
As practice shows, it takes no more than 10 minutes to remove the trim of one door of a Lada Kalina car. The operation is really simple, but if you lack experience, it is better not to rush, so as not to break all the fasteners and scratch the plastic facing panels. The door cards are installed in the reverse order: first, the clips are snapped on, then the handles are installed, and finally the plastic elements are attached. Don't forget to connect the connectors to the power window buttons.
Advice from car enthusiasts and recommendations from experts
Removing the door card, being a popular operation, fits into optimal action algorithms based on the experience of numerous car enthusiasts and auto repair specialists. At the same time, in addition to general recommendations, advice is also useful that takes into account the specific features of removing door trim related to climatic conditions, the age of the car and similar variations:
- In cars whose age has exceeded five years, the plastic retainers dry out and become brittle. Therefore, when separating the trim from the door, some of the clips inevitably break. Hence the advice that before this operation, take care of purchasing a certain number of new latches, based on the fact that there are almost 40 of them on the front and rear doors.
- In regions with low winter temperatures, it is extremely undesirable to dismantle upholstery in the cold, since the plastic of the fasteners under its influence becomes brittle and therefore easily destroyed. It is better to carry out this operation in a heated garage.
- In summer there are no temperature restrictions, however, in windy weather it is not recommended to remove the door trim, since an open interior can cause a lot of dust.
- Although the speakers are attached to both the door trim and the metal part of the door, experts advise that when replacing the trim in place, if the acoustic devices were previously attached to the door frame, attach them to the door metal. Here you must adhere to the following rule: the speakers should be mounted on the door itself, and not on its trim.
- When prying up the door trim with a flat screwdriver, be sure to place soft material under it so as not to damage the paint surface on the metal.
- It is recommended to combine the removal of the door trim with the subsequent installation of noise and vibration insulation, after which the car acquires more comfortable qualities for passengers and the driver.
Door seal
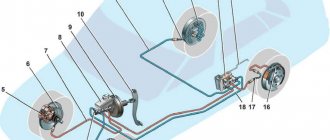
All four doors have a double seal to protect the interior of the body from water and dust. The first seal is external, carried out by a continuous seal 2 made of sponge rubber, glued to the door along its entire perimeter, including the upper frames of the door 7. At the lock chord of the front door, the seal is additionally pressed with a steel lining.
The second seal 4 is internal, made in the form of an elastic, also continuous rubber profile, attached to the doorway of the body. In the lower part of the doorway, in the threshold area, the seal 4 is pressed against the flange of the opening by the threshold lining 8.
The rotating window glass is equipped with rubber seals 1 and 8. The sliding glass 5 is sealed with pile grooves 6 along which the glass slides, as well as with an internal pile seal 2 on the window sill 3 of the door and an external rubber seal 6 clamped in the lower decorative lining 7 of the door.
The effectiveness of the main outer door seal depends primarily on the tension (adjusted by the position of the lock latch on the pillar) at which the door closes with a slight push, and the sponge seals are deformed to the point that there are no gaps between them and the door. To do this, check the tight fit of the door seals to its opening by rubbing the seals with chalk. When the door slams, there should be a chalk imprint on the body.
If, with a well-adjusted door tension and correct operation of the lock, the chalk imprint is missing, then in these places you need to carefully separate the seal from the door and place a rubber pad of the required thickness under it on the glue
Removing the trim from the driver's door
The algorithm for disassembling the driver's door structure is similar, but there are some subtleties of this process:
- First, the plugs are removed from all fasteners. They are pryed off with a screwdriver.
- The panel plastic will be easier to remove if you first unscrew the fragment for adjusting the mirror structures. Unlike the passenger door, the driver's door has one screw. It is located under the plug.
- The opening mechanism is removed last.
- If your car is equipped with electric mirrors with remote control, then to remove the rear view adjustment panel you need to unscrew the screw located at the bottom.
Overlays are used as decorated elements.
Sheathing installation
The fabric sheet should be removed after removing the fasteners on the back. Actions step by step:
- A new piece of material is attached. First, the outer side of the panel is lubricated, a cloth is applied and smoothed well.
- The edges are fixed at the back with hardware. It is better to use a construction stapler. The panel must be left alone for an hour so that the glue sets and the material spreads across the card.
- If there is a car radio, then a niche is cut for the speaker. At the back, around the rim of the hole, a special plate is attached to which the column is attached.
- The lower fixing pins are attached and the electrical wiring is connected.
- After the handle is in place and secured with bolts, the top fasteners are fastened.
- The overhead fragment is installed, the mounting screws are screwed in and the plugs are attached.
We must not forget about the mandatory treatment of internal elements with an anti-corrosion agent and silicone lubricant; they are performed as a preventative measure. It is advisable to carry out these actions at least twice a year: before the onset of winter and in the spring.
What is it and why is it needed
Door position clamps are devices that are installed on or near the door leaf in order to limit its movement in a certain direction. Structurally, these elements can be different, since their design depends on their purpose.
The simplest example is an ordinary rod that was inserted into the floor in the path of the doors. He only allowed it to open to a certain angle. Door stops are used for various purposes:
Protection from injury. The main purpose of using holders is to protect people from accidental slamming of doors. This is especially true if there are small children in the house who will not be able to open the door from the inside if it accidentally closes. They also protect the person entering from accidental blows. This can happen due to the fact that someone from the inside suddenly opens the door or the panels simply begin to move under the influence of a draft.
Such mechanisms are perfect for interior structures.
- Protecting furniture from damage. Very often, a closet, bedside table or mirror may be located in the path of the door leaf. If it is opened, the impact can destroy the structure or simply damage the decorative layer. Therefore, it is better to install the lock and forget about this phenomenon.
- Protection of door hardware. If the doors are opened to the maximum angle, this proportionally increases the load on the hinges, so many install limiters so as not to think about this phenomenon and preserve the fittings for a long time.