How to make interior light with your own hands, detailed instructions.
Many owners of a modern Lada are not satisfied with the lighting in the car's interior. In this regard, there is a need to modernize the lighting yourself. We'll tell you how to independently improve visibility in the vehicle interior.
Independent tuning of the Lada interior is quite common. Most vehicle owners strive to increase interior comfort and improve the appearance of the interior with their own hands. First of all, most car enthusiasts improve interior lighting. The desired result can be achieved by installing LED lighting for the Lada Granta interior. LED tuning is quite easy to do with your own hands, while significantly increasing the visibility of the interior and making the Granta’s interior more attractive.
Features of interior lighting fixtures
In the minimum configuration, Kalina's interior lighting is represented by one lamp located on the ceiling in the front of the car. It gives a soft yellow light, but according to car enthusiasts, it is not enough.
More equipped versions have two built-in lamps: one in front, the second above the rear seat. Lighting in luxury versions has been improved: some halogen lamps have been replaced with LED lamps.
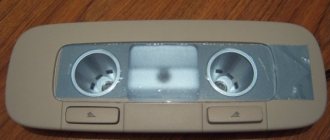
The front courtesy light in the Kalina's cabin, located above the rearview mirror, has a control unit. It consists of a right lamp for individual lighting, activated by a key, a left lamp, activated by a key, a lamp and a three-position switch that determines the interior lighting mode. When the switch is set to the far left position, the lamp lights up continuously until it is turned off. In the middle position of the three-way switch, the lamp is de-energized, and when switched to the extreme right position, the light automatically turns on when any of the car doors is opened and turns off when all doors are closed with the ignition on.
We replace standard lighting with LED lamps.
To complete the work we will need the following materials and tools:
- LED Strip Light.
- Double-sided tape.
- Stationery knife.
In order to tune the interior lighting grants, you need to stock up on high-quality LED strip. The choice of LEDs is one of the most important stages in interior modernization. Therefore, it is recommended to purchase quality products from trusted manufacturers. When choosing lamps, make sure that they are suitable for connection to the vehicle's standard 12-volt power supply.
Stages of work execution.
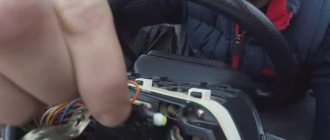
First of all, it is necessary to dismantle the standard interior lamp. After we have dismantled the diffuser, we can gain free access to the conductors.
Next, you need to prepare the LED strip by cutting it into several parts. Using double-sided tape, install the light bulbs on the Lada lampshade.
The final step is to connect the conductors of the LED strip according to the polarity and install the lampshade in its original position. We check the functionality of the light bulbs.
Tuning the Lada dashboard.
The dashboard of the Lada Granta is standardly illuminated with LEDs. Therefore, tuning this interior element is somewhat different from the pain of early models of the domestic auto industry.
In order to upgrade the panel, it is necessary to disassemble it. To disassemble the panel, you need to bend the holders that are located around the element.
The next step is to dismantle the cover. Once the panel cover is removed, we will have free access to the board, which also needs to be removed.
After the display is removed, you can freely work with the Lada LED panel.
Now we need to begin the most important stage of the work. We replace the standard LEDs with the purchased ones and check the correct operation of the devices. If the test is successful, assemble the panel in the reverse order. When assembling, you need to pay attention to ensure that the panel fits neatly into the seats.
During the operation, strictly follow safety precautions when working with wiring!
LED tuning is complete!
Now the interior of your Granta is equipped with high-quality lighting, which will delight you and your passengers for a long time. In this simple way, we have significantly improved the interior lighting of the Lada. With a careful approach to the matter, every Grant holder can successfully cope with this type of modernization.
Happy interior modernization!
Similar articles
Removing the trunk light on a Lada Granta car is done to replace it in case of failure, or when performing repairs in which the presence of the light will interfere with the progress of the repair. Prepare a flat-blade screwdriver and do the following:
- Open the trunk lid.
- De-energize the vehicle by disconnecting the negative terminal from the battery.
- Using a screwdriver, use a screwdriver to pry the edge of the lamp housing and remove it from its mounting socket.
- Disconnect the terminals with the power wires from the lampshade.
- Replace it or make any other necessary repairs, then install it in the reverse order.
At this point, the repair work to remove the interior lamp on the Lada Granta (VAZ 2190) has been completed.
Installation of floor (leg) lighting in Kalina
Installing driver and passenger footwell lighting
You will need: LED strip (total length 3 meters). The price is 600 rubles for the wire (several meters). tricks (2 pieces).
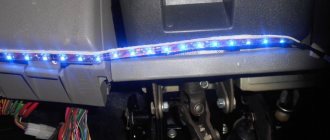
Driver's floor lighting. We fix the LED strip with double-sided tape, or use a plastic cable channel that is secured with self-tapping screws. The mounting location is the steering column casing and the bottom of the dashboard.
Front passenger floor lighting. By analogy, we attach the LED strip under the glove compartment.
By the way, for illumination you can also use the glove box lighting, which is most conveniently installed on the side trim of the dashboard. To make the lighting brighter, install an LED light bulb instead of a regular one.
Rear passenger footwell lighting. Here it is most convenient to glue the light source to the corners, which in turn are fixed to the air ducts. Note that it is not at all necessary to remove the seats for this; it is enough to simply move them forward as much as possible.
Connecting floor lighting in Kalina
Ground connection (select the one you need):
- From any nearby point on the body, if you want the backlight to turn on manually, via a toggle switch.
- To the door switches, if you want the backlight to turn on when the door opens. In order not to pull the wire out of the door (as we did when installing heated mirrors), you can hook it to the blue and white wire under the threshold of the left door. And under the threshold of the right door - red-brown.
Connection +12V (select the one you need):
- Plus from the dimensions (+12V appears after turning on the interior lighting). You can take it from the radio block, connector A6. Or from the cigarette lighter (white wire), but for this you will have to remove the central tunnel of the Kalina.
- Constant plus (+12V) from the red wire of the ignition switch or ceiling lamp.
- Plus, after turning on the ignition from the ignition switch, there is a thick blue wire with a black stripe (it says '15' next to the wire).
It is better to run the wires under the carpet. If you lay them on top, then make sure that they do not get in the way of your feet and are not torn when the seats move.
We recommend connecting Kalina's floor lighting to the interior lamp. We stretch the wires along the windshield pillar and solder the wires directly to the contacts on which the light bulb itself sits, otherwise operation in three modes will not work.
- ground to the green wire.
- +12V to red.
Thus, it will be possible to control the additional lighting of the car through the lampshade (turn it on if desired, or make sure that the lighting turns on itself when the door is opened). As a result, such additional lighting for Kalina’s interior will make the interior not only more comfortable, but also more practical. Carefully choose the color of the backlight so that it is in harmony with the overall color scheme. Do not forget that the polarity of LEDs is important; do not confuse the minus with the plus, otherwise nothing will light up.
Approach the issue of tuning the Kalina's interior in a comprehensive manner, install additional lighting for the interior handles.
| Getting into Kalina's cabin will be much more convenient if additional lighting is implemented. Let's dwell on interior tuning, and in particular, how to install lighting for the feet of front and rear passengers in the Lada Kalina. |
Connection
All the necessary contacts for connecting an additional lamp are in the front lamp. To install the wires, it is not at all necessary to remove the roof trim; just bend it slightly from the edge or move it slightly out of the door seal.
Lada Priora front lamp diagram:
- far left (red) – “mass”
- central (white) – +12V
- far right (black) – ground (door switches)
Diagram of the front lamp of Lada Granta (pre-style) and Lada Kalina:
- far left (black) – “mass”
- central (green) – “ground” (door switches)
- far right (red) – +12V
Diagram of the front lamp with ERA-GLONASS for Lada Granta FL:
- 11 and 14 – +12V appears after turning on the main relay (turning on the ignition, opening the doors). The power goes out 2-5 minutes after removing the ignition key.
- 15 – “mass”.
- 17 – “ground” (door limit switches), which appears for a while when the doors are opened.
The result of such a connection in the video:
Attention!
Wire colors may vary depending on vehicle equipment. Focus on the contact numbers and check the wiring with a multimeter.
Interior lighting of Lada Granta with LED matrix
As always, there is little light in the car interior. This is especially true for the Russian automobile industry. Let's consider one of the ways to improve the light in the Lada Granta interior. For this we need a minimum of materials. And most importantly, for those who save money, everything can be purchased on Aliexpress. It costs a penny, but is quite enough for interior lighting. And for a long time.
For this we need:
-2 COB LEDs, -2 adapters, - double-sided thermally conductive tape, - aluminum plate.
Let's get started. Firstly, you should immediately foresee what size and type of matrix you will purchase. It is possible, as in our case, with COB, or with SMD diodes. Fortunately there are a huge number of them. The seller stated 12 W matrices, but this is not true. After measuring, each output was 9 watts. But this is quite enough for our goal - to illuminate the interior of the Lada Grant using matrix COB LEDs.
Types of LED matrices for car interior lighting
1 of 2
SMD matrix
COB matrix
The Chinese have a fairly large number of COB matrices. As you can see in the photo, it does not have a resistor. It is not good. You can, of course, use it this way, but it’s better to solder a resistor. And this is laziness))). Therefore, we immediately buy it with a resistor. He looks like this.
Next to the matrix you can see various adapters; read on for what they are for. For some it is clear how to use them, but others (like me))) initially had no idea what to do with them before purchasing...
During operation, the LEDs get quite hot; for better thermal conductivity, use an aluminum plate and double-sided tape to glue it to the back of the matrix. Can. Of course, leave everything as it is, because... the matrix will not work constantly and rapid degradation is not terrible. But I still advise you not to worry too much and install the plates. The photo shows a simple fastening without plates and thermal tape. This is also possible.
Glue it all inside the lampshade on both sides
Next we take the notorious adapters. Before purchasing, you should look at your lampshade and decide on the original mounting socket. We have a regular pin from 31 to 42 mm. The most common adapters are shown in the photo. Because Since we have two matrices in the base, we carefully remove the metal caps and attach an additional output there to quickly and easily connect two matrices.
As a result, you should get something like this.
We check the connections and insert the adapter into the lamp base.
Let's put everything in its place. Our two LED matrices are visible inside the lampshade.
We install everything in place and check the operation of the “new” lamp in the Lada Granta interior using COB LED matrices.
Of course, after the native lighting - heaven and earth. Bright, fresh. One lamp is enough for the entire salon. For lighting, choose a cool color. Not very yellow. If you need a link to the seller, I will add it to the article at the request of readers.
LED navigation light
The first in line to improve the interior lighting is the standard lampshade. To improve lighting, we need to replace the incandescent lamp with an LED one, or use LED panels.
Before starting work, to avoid a short circuit, be sure to disconnect the negative terminal of the battery!
Tools required: slotted screwdriver, soldering iron or solder paste, LED lamp or panel.
1.
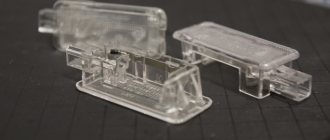
Using a flat-blade screwdriver, pry up the housing of the interior lamp on the right side and remove it, disconnecting the power connector.
2.
Next, we take out the incandescent lamp and change it to an LED lamp, with a distance between the contacts from 39 to 42 mm.
Or we use LED boards, they are more efficient and durable than ready-made lamps. Power for the panels can be taken from the copper legs that are used to mount the lamp. You can place the boards as shown in the photo.
Due to the larger number of LEDs, the brightness of LED panels significantly exceeds the brightness of a conventional LED lamp, so this method of improving lighting is the most preferable. Additional light from the courtesy lamp allows you to illuminate a significant area of the vehicle exit area.
3.
After finishing the work, return the power plug to its place and snap the lighting lamp into the frame body.
Installation of LEDs in the interior lamp of Kalina
You can’t just replace lamps with LEDs, because the polarity is wrong. In order for everything to work out, you only need a relay for closing and a block for it.
We connect two more to the white-red wire (we connect one to the relay winding, the other to one of the terminals). Take a brown and green wire and cut off a piece of wire with a terminal. We connect this piece to the second contact of the relay, and the wire itself to the free contact of the winding. The relay can be placed between the roof and the interior trim.
We connect it all to the lampshade like this:
- White with red - to black in the lampshade.
- Brown with green - to green.
- Black to red.