Exhaust system VAZ 2106
Any system in the design of a vehicle is designed to perform one role or another. The exhaust system on the VAZ 2106 allows the power unit to operate at full power, since exhaust gas removal is exactly the function for which all elements of the exhaust system are designed.
The engine, converting incoming fuel into energy, emits a certain volume of unnecessary gases. If they are not removed from the engine in a timely manner, they will begin to destroy the car from the inside. The exhaust system serves to remove harmful accumulations of gases, and also allows the engine to run quieter, since exhaust gases can “shoot” very loudly when leaving the engine.
Thus, the full operation of the exhaust system on a VAZ 2106 involves the implementation of three processes:
- distribution of exhaust gases through pipes for their further removal from the engine;
- noise absorption;
- soundproofing.
Exhausts are white - this indicates normal operation of the engine and exhaust system.
What does the exhaust system consist of?
Considering the structure of the exhaust system, you can see that the design on the VAZ 2106 is generally identical to the systems on the VAZ 2107, 2108 and 2109. The exhaust system on the “six” consists of the same elements:
- collector;
- exhaust pipe;
- additional first stage muffler;
- additional muffler of the second stage;
- main muffler;
- exhaust pipe.
The main elements of the exhaust system are pipes, and auxiliary elements are gaskets and fasteners.
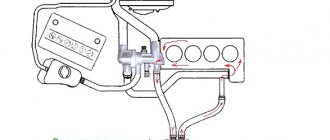
An exhaust manifold
The exhaust from the internal combustion engine cavity is collected in a manifold. The main task of the exhaust manifold is to collect all the gases together and discharge them into one pipe. The gases coming directly from the engine have a very high temperature, so all manifold connections are reinforced and very reliable.
The part collects exhaust from each engine cylinder and connects them in one pipe
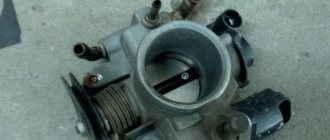
Downpipe
After passing through the exhaust manifold, the exhaust gases enter the “pants” or downpipe. The collector is connected to the intake pipe with a gasket to ensure reliable sealing of the fasteners.
The downpipe is a kind of transition stage for the exhaust.
The pipe connects the exhaust manifold and muffler
Muffler
The VAZ 2106 is equipped with a whole series of mufflers. Passing through two small mufflers, the exhaust gases quickly lose their temperature, and sound waves are converted into thermal energy. Additional mufflers cut off sound vibrations of gases, allowing you to significantly reduce noise when the car is moving.
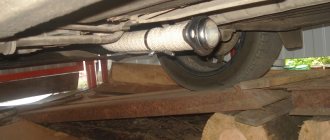
The main muffler is attached to the bottom of the “six” not statically, but movably. This is explained by the fact that final processing of the exhaust takes place in the main muffler housing, which affects its resonance. Body vibrations will not be transmitted to the body, since the muffler does not come into contact with the bottom of the car.
On the sides of the muffler body there are special hooks on which the part is suspended from the bottom of the car
Exhaust pipe
The exhaust pipe is connected to the main muffler. Its only purpose is to remove processed gases from the exhaust system. Often inexperienced drivers call the pipe a muffler, although this is not true, and the muffler is a completely different part of the car's exhaust system.
The exhaust pipe is the only element of the system that can be seen outside the body
Device functions
You need to understand that the exhaust system plays an irreplaceable role, so it should be given due attention.
Let's consider the main purpose of the muffler through its advantages:
- It serves to reduce the content of pollutants in exhaust gases;
- The exhaust gases make less noticeable noise;
- When performing all the above functions, the VAZ 2106 engine does not lose power.
Processes
Considering how the muffler works and is designed, we can distinguish three main processes:
- Distribution of gases throughout all tubes in the engine;
- Damping sound waves so that the noise becomes less pronounced;
- The predominance of shock waves in a medium that consists mainly of gaseous matter;
Muffler VAZ 2106
Today, mufflers for the “six” can be purchased in two versions: stamped and welded.
The stamp-welded muffler can be considered a classic option, since these are the models that were installed on all old cars. The essence of such a muffler is in its production: the two halves of the body are welded together, then a pipe is welded to the body. The technology is very simple, so the device is inexpensive. However, it is precisely because of the presence of welded seams that the stamped-welded “glushak” will last at most 5–6 years, since the seams will quickly corrode corrosion.
Products made using traditional technology are affordable
A sunset muffler is more durable and can last up to 8–10 years . Its production technology is more complex: a sheet of metal is wrapped around the inside of the muffler. Technology makes production more expensive.
Modern rolling technology allows us to produce high-quality and durable mufflers
Original mufflers for the VAZ 2106 can only be stamped and welded, since the plant still produces exhaust system elements using traditional technology.
Which muffler to put on the “six”
Choosing a muffler is not an easy matter. In auto stores and on the automobile market, sellers will offer a variety of models of mufflers, and at quite attractive prices:
- muffler IZH from 765 RUR;
- muffler NEX from 660 RUR;
- AvtoVAZ muffler (original) from 1700 RUR;
- muffler Elite with nozzles (chrome) from 1300 rubles;
- muffler Termokor NEX from 750 rub.
Of course, it is best to spend money on an original AvtoVAZ muffler, although it is 2–3 times more expensive than other models. However, it will serve many times longer, so the driver can decide for himself: buy an expensive one for a long time, or buy a cheap muffler, but change it every 3 years.
Original mufflers are preferable for the VAZ 2106, as they last longer and do not provide the driver with additional problems associated with maintenance
What materials are they made from?
Silencers of all types can be made from:
- Of stainless steel;
- Aluminized (alloy of aluminum and steel);
- Regular black steel.
A stainless steel product can last, during active vehicle use, from 6 to 10 years, as it is least susceptible to corrosion.
They are sold on the market in a high price range, their big advantage is that despite the high price, they are mass produced and can be matched to most car brands.
Products made from aluminized steel are sold in the middle price range, they are also quite durable, but they are difficult to match to a specific car brand, since the choice on the market is not large (only a few companies produce them).
It is problematic to make such a muffler in a garage. The main advantage is a long service life of up to 6 years, and are less susceptible to corrosion.
Products made of black steel are mass produced because they are the cheapest. They can be made in a garage for any brand of car, but they will serve for 3, maximum 5 years, then the aggressive environment and rust will do their dirty work.
Modification of mufflers for VAZ 2106
When the muffler begins to “tire” from work, the driver will begin to notice this on himself: increased noise when driving, the smell of exhaust gases in the cabin, a reduction in engine dynamics... Replacing the muffler with a new one is not the only way to eliminate all these problems. Fans of experiments often tune the exhaust system, because this way it lasts longer and works better.
Today, car enthusiasts distinguish three types of muffler modifications:
- Audio modification is the name of tuning, the purpose of which is to enhance the “growling” sounds in the muffler while driving. This modification really allows you to turn the quiet “six” into a roaring lion, but it has little effect on the performance of the exhaust system.
- Video modification is a tuning aimed at external decoration of the exhaust pipe rather than at creating improved performance characteristics. Video tuning usually includes replacing the exhaust pipe with a chrome one and using nozzles.
- Technical tuning is the most effective in terms of performance. It is aimed at improving the performance of the exhaust system and even increasing engine power by up to 10–15%.
How to make a sporty muffler
A sports muffler is a straight-through muffler. It is necessary to create additional dynamic properties and give the model a special sporty look. The straight-through muffler has an extremely simple design, so you can easily make it yourself, even from a standard VAZ 2106 muffler.
To make a sports forward flow you will need:
- standard muffler;
- a pipe of a suitable size (usually 52 mm);
- welding machine;
- angle grinder (grinder);
- drill;
- metal cutting discs;
- ordinary metal sponges for washing dishes (about 100 pieces).
Video: how forward flow works on a VAZ 2106
The procedure for manufacturing a direct-flow muffler boils down to the following work:
- Remove the old muffler from the car.
- Use a grinder to cut out a piece from its surface.
- Remove all internal parts.
- On a 52 mm pipe, make cuts in the form of a herringbone or drill many holes with a drill.
- Insert the perforated pipe into the muffler and weld it securely to the walls.
- Fill all empty space inside the muffler with metal sponges for washing dishes made of metal.
- Weld the cut piece to the muffler body.
- Cover the product with mastic or heat-resistant paint.
- Install direct flow to the car.
Photo: main stages of work
When working with power tools, all safety precautions must be observed.
Traditionally, perforation is performed with a drill
A perforated pipe is inserted inside the muffler, the free space is filled with sponges, and the body is welded
A direct-flow sports muffler of our own production optimizes engine performance and makes the VAZ 2106 more sporty and dynamic. There is a huge selection of such modifications of mufflers in stores, so if you have no manufacturing experience, you can buy a new one.
Do-it-yourself and purchased nozzles for Glushak
Attachments, which are usually used as a decorative element, allow you to modify the muffler and optimize its performance. Thus, a correctly made and installed nozzle is guaranteed to improve the following indicators:
- the fuel burns out completely;
- less carbon deposits form on the spark plugs;
- the power of the power unit increases by approximately 15%;
- fuel consumption is reduced (by about 20%).
That is, the use of an attachment can improve the basic indicators of vehicle convenience and efficiency. Today you can find attachments of various shapes on sale; the choice is limited only by the financial capabilities of the driver.
The nozzles create an attractive appearance for the body and also optimize the operation of the entire exhaust system.
However, you can make the attachment for the “six” muffler yourself. To do this you will need the simplest materials and tools:
- stainless steel sheet with a thickness of 1–1.2 mm;
- cardboard for template;
- Bulgarian;
- sandpaper and polishing materials;
- metal scissors.
A typical exhaust pipe nozzle has a round cross-section, so the easiest way to make just such an element is:
- Use cardboard to model the body of the future nozzle, taking into account the locations for fastening joints.
- Using a cardboard template, cut out a product blank from sheet material.
- Carefully bend the workpiece and fasten the joint with bolted connections or welding.
- Clean the future nozzle, you can polish it to a mirror shine.
- Install on the vehicle exhaust pipe.
Video: making a nozzle
The nozzle is usually attached to the pipe using a bolt and a through hole or simply on a metal clamp. It is recommended to lay fire-resistant material between the pipe and the nozzle to increase the service life of the new product.
Additional reasons
There are a number of other reasons why the exhaust pipe shoots. These include:
- Popping noises when idling the engine are possible for two reasons - a leak in the intake manifold, as well as a clogged idle system.
- Poor quality gasoline or gasoline with a low octane number. Try to refuel at reputable gas stations and use fuel recommended by the manufacturer of your car.
- Mixed spark plug wires. If, when replacing or checking spark plugs, you mixed up the wires connected to them, this will also be a likely cause of popping noises. In this case, the car may not start and “shoot” at the muffler.
- If your machine has an economizer, check its operation. Often the malfunction of this unit is also the cause of “shots”.
- Malfunction of the air damper. Check this element and adjust if necessary.
- One of the reasons when the muffler shoots when releasing gas is that the muffler downpipe (“pants”) is poorly screwed to the exhaust manifold. Check the tightness of the connection and tighten it if necessary.
- Another likely cause of popping noises is high performance fuel injectors (“leaking”). They supply too much fuel, which does not have time to burn completely, which leads to “shots”. There is a simple way to check. It is necessary to try to start the engine at high engine speeds (with the gas pedal depressed) (the so-called purge mode). If popping noises occur at this time, it means that at least one injector is leaking.
- In injection cars, late ignition and, as a result, popping noises can be caused by “fatigue” of the knock sensor. It can also respond to extraneous noises occurring in the engine. The operation of the sensor must be checked using computer diagnostics.
- If the muffler shoots when releasing gas, then one of the most common reasons for this is “burning” of the exhaust valves. Popping noises may also appear when descending a mountain in gear. Inspect and clean them.
- If your car uses a contact ignition system, then you need to check the gap on its contacts. Ignition problems, as described above, may be the reason that not all of the gasoline is burned.
- Leakage of the gas exhaust system. In this case, as a rule, single pops occur when the gas is released. First of all, check the gaskets at the connections of the pipes (catalyst, resonator, muffler).
Also, if lumbago occurs and traction deteriorates, it is recommended to check the fuel pressure in the system, as well as compression (cylinder tightness for leaks), and inspect the ignition coil.
Condensation in the muffler
The main reason for the formation of condensation in the muffler is the temperature difference between the ambient air and the muffler. Its formation in a car with a working catalyst is a natural phenomenon. It’s worse if it’s not there, but too much can cause corrosion. There is a Read more
As you can see, there are many reasons why a muffler shoots. Therefore, we advise you to start your diagnostics by checking the tightness of the exhaust system. Inspect the bolted connections and gaskets between its individual elements. This will save you time and money. This is especially true if popping noises are heard when releasing the gas or when descending a mountain in gear (when braking the engine).
If the audit does not give positive results, then it is necessary to check the operation of the carburetor, valves and other parts described above. This check is advisable if the muffler shoots when you press the gas.
Muffler mount
Each element of the exhaust system is fixed to the bottom of the car in a different way. For example, the exhaust manifold is “tightly” screwed to the engine with powerful bolts to eliminate the possibility of gas leakage. But the “glushak” itself is attached to the bottom with special rubber hangers on hooks.
This method of fixation allows the muffler to resonate during operation without transmitting additional vibrations to the body and interior. The use of rubber hangers also makes it possible to conveniently remove the muffler if necessary.
The muffler is attached to the bottom of the car using suspensions, which create a reliable fixation and avoid unnecessary vibrations on the body
Pros and cons of installing direct flow on a car
Installing a direct-flow system has both pros and cons. Each motorist decides for himself how appropriate it is to modify the car muffler in favor of direct flow.
Pros of direct flow:
- If a pipe with a slightly larger diameter than originally installed is welded on, it is possible to increase the exhaust gas throughput. An increase in airflow leads to an increase in engine power, up to 15%;
- Increasing the service life of the muffler. Most often, the muffler “from the factory” is not made from the best materials, but with such a modification, the motorist can use good pipes, even titanium options. If you want to increase the “lifetime of the pipes,” then after welding the resonator, you need to remove the end of the muffler with a grinder and solder a new pipe in its place, having thoroughly cleaned and primed it in advance.
Disadvantages of forward flow:
- Increased noise. Many car enthusiasts consider this parameter a plus and install the direct flow with their own hands solely for the purpose of increasing the “rumble” of the car when driving;
- Reducing the vehicle's ground clearance if pipes of larger diameter are welded onto the muffler;
- Problems during maintenance. Increased noise and the absence of a catalyst will lead to problems during maintenance;
The method of installing a direct flow with your own hands, described in this article, can be called “collective farm”. In professional racing cars, the direct-flow system is much more complex and is designed primarily to improve engine performance. At the same time, such a forward flow is unlikely to bring much benefit, only changing the sound of the car, which, in most cases, is the goal of independent tuning.
Materials and tools for manufacturing: - pipe, diameter is selected depending on the brand of car (VAZ usually has a diameter of 52 cm); — welding; — grinder and discs for cutting metal; — iron sponges for washing dishes (50-100 pcs.).
The manufacturing process of a direct-flow muffler based on a standard one:
Step one. Removing the muffler
First of all, you need to remove the muffler from the car. A VAZ car is considered as an example. Next, take a grinder and cut out a piece in it, as can be seen in the photo. Subsequently, all the insides of the standard muffler are dismantled.
According to the author, at engine speeds of 2500-3000 rpm, the engine sound is not audible in the cabin. At higher speeds the sound is already audible, but it is not as bassy as that of the “can”. From the outside, this muffler looks like a standard one, but is slightly longer.
Another way to make a direct-flow muffler
There is another option to make a direct-flow muffler, here only individual elements are used. Most often, two schemes for manufacturing such mufflers are used. Diagram No. 1 shows a reverse flow exhaust, and diagram No. 2 shows how a sports direct-flow muffler works. This muffler will be made exactly of this type.
The photo shows another similar direct flow with your own hands
The muffler is an element of the engine exhaust system. Its presence does not depend on the type of fuel the engine runs on - gasoline, diesel fuel or methane. The muffler dampens sound vibrations, helps attenuate, subside and resonantly reduce sound waves from engine exhaust. Interlocutors will not be able to communicate around a running engine without a muffler. The noise of the engine will drown out their speech. Nevertheless, many car owners dream of remaking the exhaust system and making it forward-flowing. Some people can create it with their own hands.
Muffler malfunctions on VAZ 2106
Like any part of a car’s structure, the muffler also has its “weaknesses”. As a rule, any malfunction of the muffler leads to the following:
- the cabin begins to smell strongly of exhaust;
- the motor loses its power characteristics;
- Clouds of black gas burst out of the exhaust pipe.
One way or another, having noticed any of these signs, the driver must immediately stop and figure out the cause of the breakdown. A muffler, especially a low-quality one, can quickly burn out, get a dent or hole when driving on uneven roads, rust, or lose its position under the bottom.
Black exhaust gases are the first sign of a muffler malfunction.
Knocks while driving
Muffler knocking while driving is perhaps the most common malfunction of all VAZ cars. At the same time, knocking can be eliminated very simply and quickly:
- It is necessary to find out why the muffler is knocking and what part of the car it hits when driving.
- It will be enough to shake the pipe a little with your hand to understand why the knocking occurs when driving.
- If the muffler hits the bottom, then stretched rubber suspensions are to blame. It will be necessary to replace the suspensions with new ones, and the knocking will stop immediately.
- In rare cases, the muffler may touch the gas tank housing. You will also need to change the hangers, and at the same time wrap this part of the pipe with insulating material - for example, reinforced mesh with asbestos. This, firstly, will reduce the load on the muffler during the next possible impact, and, secondly, will help protect the gas tank itself from holes.
By shaking the muffler with your hand, you can understand which part of the body it is knocking on.
What to do if the muffler burns out
On forums, drivers often write “help, the muffler is burned out, what should I do?” Holes in metal can usually be repaired with standard repairs such as patching.
However, if the muffler burns out while driving, it is not recommended to start the engine, since the exhaust system will not work normally.
Corrosion, dents and long-term use lead to the fact that the muffler can burn out while driving
Do-it-yourself muffler repair
It will not be possible to repair the muffler under “road conditions”. As a rule, repairing an old silencer involves welding - installing a patch on a hole in the body.
Therefore, repairing a muffler is a job that can take a lot of time. You need to prepare tools and materials in advance:
- two keys for 13;
- two keys for 17;
- screwdriver with a flat thin blade;
- welding machine;
- Bulgarian;
- stainless steel sheet for patch;
- brush for cleaning metal;
- degreaser;
- heat-resistant paint.
Muffler repair is carried out according to the following scheme:
- Dismantling a failed product.
- Inspection.
- A small crack can be repaired immediately, but if there is a fairly large hole, you will have to install a patch.
- A piece of metal is cut out of a sheet of steel, 2 cm larger on each edge than is necessary to install the patch.
- The damaged area is treated with a brush to remove all rust.
- Next, you can begin welding work: the patch is applied to the damaged area of the muffler and first tacked on all sides.
- Afterwards the patch is boiled around the entire perimeter.
- After the welding seam has cooled, it is necessary to clean it, degrease it and paint the welding areas (or the entire muffler) with heat-resistant paint.
Video: how to repair small holes in the muffler
Such a simple repair will allow you to use the muffler for a long time, however, if the hole or burnt-out part of the body has a large diameter, it would be advisable to immediately replace the muffler with a new one.
How to replace an old muffler with a new one
Unfortunately, the mufflers on the VAZ 2106 have one not very good quality - they quickly burn out during operation. Original products last up to 70 thousand km, but a self-made product is unlikely to last at least 40 thousand km. Therefore, every 2-3 years the driver should replace his muffler.
Before starting work, it is necessary to allow the entire exhaust system to cool down, otherwise you can get serious burns, since the pipes become very hot when the engine is running.
The easiest way to replace it is on a lift or inspection pit.
To replace the muffler you will need the simplest tools:
- two keys for 13;
- screwdriver with a straight blade.
It is also recommended to prepare WD-40 fluid in advance, since rusted fastening bolts may not be dismantled the first time.
The procedure for dismantling the muffler on a VAZ 2106 is not much different from removing the pipe from other VAZ models:
- Place the car on an inspection hole or on jacks.
- Climb under the bottom, use 13 keys to loosen the fastenings of the exhaust pipe clamp. Use a screwdriver to loosen the clamp and lower it down the pipe so that it does not interfere.
- Next, unscrew the bolt that holds the rubber cushion.
- Disconnect the cushion itself from the bracket and pull it out from under the car.
- Remove all rubber hangers that secure the muffler itself to the bottom.
- Lift the muffler, removing it from the last suspension, then pull it out from under the body.
Video: procedure for replacing the muffler and rubber bands
Accordingly, the new plug will need to be installed in the reverse order. Usually, with a new muffler, fastening elements are also changed - bolts, clamps and rubber suspensions.
Changing the exhaust pipe
The exhaust pipe (in common parlance it is called “pants”) on a VAZ 2106 car is attached to the exhaust manifold. Before starting the repair, it is necessary to disconnect the battery, since it is located quite close to the pipe, so the probability of shorting the wire going to the starter is very high. Complete removal of the battery from the car is not required - just disconnect the negative terminal. To work, you need an inspection hole, overpass or lift, since you will have to carry out some manipulations in the lower part of the car.
Replacing the exhaust pipe
The four nuts that secure the pipe to the exhaust manifold are secured with a flexible plate. It needs to be bent to release the edges of the nuts. Using a 13mm wrench (it is best to use a socket or socket), completely unscrew the nuts and inspect them for damage. If the threads are broken or the edges are worn out, it is better to replace the parts with new ones. Please note: simple steel nuts cannot be installed! They should be made of brass or bronze so that they do not stick to the studs. Now pull the pipe, then remove the gasket and clean the surface of dirt.
All elements of the exhaust system are exposed to high temperatures, so reusing the gasket is prohibited, as it will not be able to provide the required level of sealing. Now you need to get under the car and unscrew the bolt that secures the pipe to the gearbox. You will also see a clamp connecting the resonator to the exhaust pipe. Apply penetrating lubricant to the threaded connection on it to make it easier to unscrew the nuts. Give the grease time to soak in, then remove the nuts and move the clamp to the side, making room for repairs.
Using a hammer, gently tap the pipe at the joint, then try to separate it with your hands. Be careful not to cut yourself or hit your hands or head. After disconnecting, remove the old exhaust pipe and install a new one. Do not rush to completely tighten all threaded connections under the car. First you need to install a new gasket on the exhaust manifold studs. It is recommended to lubricate it on both sides with CV joint grease so that during operation it does not burn to the surface of the pipe or manifold. Then place the pipe and attach all four nuts. Tighten them carefully, crosswise, so as not to deform the gasket.
After final tightening, the nuts must be locked and installation of the clamp at the junction with the resonator can begin. Replacing a VAZ muffler and replacing the exhaust pipe are very similar, only they are carried out in different parts of the car.
To change the resonator, you will need to perform the same manipulations, only the clamps are removed at the same time, and the muffler and exhaust pipe remain in place. And you will have to tap two joints to remove the resonator. With the new exhaust system, the VAZ 2106 will run much quieter, and the engine will emit less harmful substances into the atmosphere.
Paying special attention to the engine, gearbox or suspension shock absorbers, car owners often forget to monitor seemingly insignificant units. One of these simple but very important elements is the exhaust system muffler. If you do not take timely measures to repair or replace it, you can deprive yourself of the ability to drive a car for a long time.
Resonator - what is it?
The resonator is the name given to the main muffler (usually it looks like the widest pipe in the VAZ exhaust system). The main task of this element is to promptly remove exhaust gases from the system to make room for new ones.
It is believed that the entire useful power of the motor depends on the quality of the resonator. Therefore, the resonator on the VAZ 2106 is located immediately behind the forward flow in order to absorb the main flow of hot gases.
Resonator Euro 3
With the development of the automotive industry, mufflers also developed. Thus, a EURO 3 class resonator for a VAZ is no different from EURO 2, however, to optimize engine performance, it has a special hole for installing a lambda probe. That is, the EURO 3 resonator is considered more functional and modern.
On the first VAZ 2106 models there was no resonator
Thus, the muffler on the VAZ 2106 needs special attention from the driver. The design is extremely short-lived, so it is better to periodically drive the car into a pit and inspect all elements of the exhaust system than to end up on the road with a rotten pipe.
Ways to muffle the exhaust sound
Before tuning the exhaust system, you need to understand the reasons why the sound of the engine becomes louder over time. The operation of the engine itself is a fairly loud process, but the muffler and other components of the exhaust system perfectly suppress this loud noise. Without a muffler, the engine noise is very loud.
The noise occurs because the fuel mixture explodes in the combustion chamber, releasing gases that then exit into the exhaust pipe. We will not talk in detail about the operation of the engine, you can read about this in another article, but here we will talk specifically about how to muffle the exhaust sound.
The explosion releases energy that pushes the piston, and when the piston has moved the required distance, the exhaust valve opens, through which the exhaust gases exit and go further through the exhaust system. To effectively absorb noise, thick metal parts are used. So, the thicker the metal used in the exhaust system, the quieter the car will drive due to the fact that there will be less vibration.
The exhaust manifold is the first one to absorb the noise, which is why it is made so large and thick, so it best dampens the noise that comes from the cylinder block. Even if you compare the exhaust pipe of any more or less normal foreign car with the exhaust pipe of a domestic car, you can see that in foreign cars the pipe is heavier and thicker, which is why such a car runs quieter.
This is why when you drive an old VAZ 2114, the noise is such that you can’t hear what the passengers in the rear seats are saying, which is why you start thinking about how to muffle the exhaust sound.
The exhaust system also has a resonator, which is needed to reduce the speed of gases through the exhaust pipe. And after the resonator comes a muffler. When exhaust gases pass through the resonator, they lose some energy and continue to flow more slowly.
Gases lose the largest share of their energy in the muffler. If we consider a good muffler, then it contains several separate housings, after passing through which little remains of the noise.
Popular method of installing direct flow
One of the options for transforming a regular muffler into a sports muffler involves the presence of the following materials and tools:
- Iron pipe with a hole size of 52 mm (ideal for domestic VAZ models running on a 1.6 l engine).
- Welding machine.
- Grinder with an attachment for cutting metal.
- Metal pipe cleaners in the amount of 50-60 pieces.
Let's move on to the actual tuning process:
The old muffler must be removed. Use a grinder to cut a groove along the entire length in the resonator.
Attention. Thus, a recess should be obtained that gives access to all internal parts of the resonator
All internal components of the resonator are cut out with the same grinder. These will be stiffening ribs, many pipes welded together, etc.
Important. The tubes should not be cut out at the root, but should be left 3-4 cm on each side
This needs to be done so that the new pipe has something to weld with.
- The prepared pipe is cut according to the obtained dimensions (its length should be equal to the segment between the cut ends of the resonator pipes).
- You need to make a lot of holes on the pipe every 1.5-2 cm.
Advice. You can make a hole in the pipe with a drill, but it will take a long time. It will be easier to use a grinder, making cuts at certain distances. As a result, the pipe should have a pattern resembling a herringbone.
- The resulting pipe section is welded to the ends of the resonator tubes.
- The free space of the resonator is clogged with pipe cleaners.
- The cut outer part of the resonator, the “lid” so to speak, is welded back.
- The end of the muffler is cut off.