Let's look at how to connect a subwoofer to the Kalina-2 Lux radio without using the line outputs. The main unit is equipped with speaker output, line outputs and a commutating cable. To connect a subwoofer, there is everything here, except for one thing: external devices will not be able to receive information about the volume level set on the radio. Therefore, below is a connection diagram that involves the use of wires going to the speakers. According to this diagram, you can connect any active subwoofer.
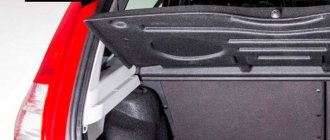
Subwoofer for the wing of the Kalina-2 station wagon
The review provides patterns of parts intended for assembling the subwoofer and its subsequent installation in the Lada Kalina station wagon. The subwoofer body in question can easily be placed in the trunk close to the left fender. For the manufacture of the case, chipboard with a thickness of 17 mm is used.
Let us note one important point: to make the upper and lower walls of the subwoofer, you will need an electric jigsaw. The design in question has no other features.
A little theory
After purchasing a new speaker, you need to measure its parameters. Based on the obtained values, the volume of the housing in which the speaker will be placed is calculated. The housing type can be one of the following:
- Bass reflex;
- Closed box;
- Housing with passive acoustic radiator;
- And so on.
The presence of boxes with holes (bass reflex, etc.) can lead to undesirable consequences. At a minimum, dust will collect inside. For a car, a housing with an acoustic radiator or even a “closed box” is better suited.
According to the drawings given below, it is possible to make a “closed box” class sub, the internal volume of which is 30 liters. Let's start manufacturing.
Case wall patterns
The design in question itself consists of ten parts that can be cut from a sheet of chipboard. The edges of some parts (5–8) should not be perpendicular to the surface of the sheet. However, the absence of inclined edges can be compensated for with sealant. Here are the drawings in a simplified form:
After assembly, the case looks like a monolithic block:
Subwoofer housing assembly
Each part is first made from corrugated cardboard for “fitting”.
You can try to assemble the body after you are sure that each of the parts will take its place in the structure. If necessary, an incorrectly manufactured element is replaced.
Tips for assembling chipboard cabinets
It would seem that it couldn’t be simpler - take and connect several sheet panels to form a single unit. The parts are fastened to each other with self-tapping screws. However, even before assembly, it is recommended to coat the edges of the panels with sealant. Then, all the parts are connected and wait for the fastening material to dry.
The screws can be screwed in when you are sure that the geometry of the structure is not broken.
In part “3”, using a “ballerina”, a hole is made for the speaker. The body can be covered with carpet, and sound insulation must be added inside. The result of all efforts looks like this:
As soon as the hole for the speaker appears on the body, all seams from the inside are coated with sealant. To prevent the material from getting on the skin of your hands, use plastic gloves.
Technical characteristics of the VAZ 1118 gearbox
| Type | Mechanics |
| Number of gears | 5 |
| For drive | front |
| Engine capacity | up to 1.6 liters |
| Torque | up to 145 Nm |
| What kind of oil to pour | Lukoil TM-4 75W-90 GL-4 |
| Lubricant volume | 3.3 liters |
| Change of oil | once every 75,000 km |
| Replacing the filter | every 75,000 km |
| Approximate resource | 150,000 km |
Selecting a subwoofer for Kalina
Many articles have been written about subwoofers, many programs have been filmed. Here and there the test results of various models of famous brands are shown. If you watch such programs in order to find out the winner, then we may upset you. After all, such competitions are mainly attended by such giants as PIONEER, SONY, KENWOOD.
And the sound of these acoustic systems is so good that for the average person there is no difference. Unless you are preparing to participate in a competition for the best acoustics, then the cost of music in your car should not exceed 20% of the cost of the car itself. We will tell you how to choose the right subwoofer for the Lada Kalina
Now let's talk about the subwoofers themselves. There are two types: active and passive. The difference between an active subwoofer and a passive one is that they have a built-in amplifier. The convenience of such a subwoofer is that it is immediately ready for use. The system is connected with two wires from the playing device, and is immediately ready for use. But there are also disadvantages: cheap components are used in the manufacture of such subwoofers, and this directly affects the sound quality.
The most famous active subwoofer models: KENWOOD KRC-WA82RC, PIONEER TS-WX205A, PANASONIC EAB-12132J, Earthquake ASB 10, Lanzar HWT-8.
In order to connect a passive subwoofer, you need an amplifier, which, when bridged, provides the power indicated in the subwoofer's passport as nominal.
Subwoofers also differ in type and design features. There are mainly four types of subwoofers:
- Subwoofers in a sealed housing, closed type ( closed );
- Subwoofers, with a bass reflex (pipe or slot, for adjusting the frequency response of the component in the low frequency region ( vented );
- A subwoofer in which the speaker is located inside the housing (the sound comes out through a bass reflex) is of the bandpass ;
- Subwoofers with a passive radiator have a second driver, which serves, for the most part, to lower the overall resonant frequency of the speaker.
Compared to closed subwoofers, vented are more effective at providing loud and deep sound, but due to this they are more expensive.
Subwoofers of the third type help to do without crossovers; they themselves act as a filter, passing signals in a certain band, and suppressing everything in a non-band. The disadvantage is the same: due to the complex design, the price is high. A passive radiator in a subwoofer requires very precise adjustment, so it is not widely used.
The efficiency of a subwoofer depends on its location in the car. In a sedan, the speaker and port are directed towards the rear seat; it is recommended to leave a small gap (about 8-10cm) between the subwoofer and the back of the rear seat. Where the back of the rear seat is equipped with an armrest, it is recommended to point the subwoofer speaker at this part. At the same time, the sound penetrates the cabin with the least distortion.
In a hatchback, maximum sound is achieved by placing the subwoofer speaker and bass reflex port upwards. It turns out that the sound does not pass through the back of the seat, but through the shelf.
In a station wagon car, the subwoofer is directed rearward by the speaker and bass reflex.
There is also a type of subwoofer called compact. Very popular due to ease of installation, small size, inconspicuousness (can be installed under the front seats, under the dashboard, etc.). But with such small dimensions, the dynamics have correspondingly decreased. The diameter of the speakers in compact subwoofers is 12-13 cm.
To achieve low frequencies, a number of changes were made to the design of such subwoofers: new housing shapes, compression mode of the speaker, filling the internal volume with mineral wool and many other gadgets. But with all this, its volume leaves much to be desired, so you shouldn’t put it in the trunk, you simply won’t hear it there.
The most popular are PANASONIC EAB-1213J, Blaupunkt CMS-265, PIONEER TS-WX50, RCF BL 130.
In conclusion, we can say that the choice of a subwoofer for the Lada Kalina depends entirely on your ability to sacrifice one thing or another: money, time, free space in your car. You can also turn to qualified specialists, and explain your desire to them, and get everything you want. But again, are you ready to pay that much?
Improvement of the scheme from option 1
Nobody bothers you to take a useful signal not from one speaker, but from two at once. It is clear that these should be rear speakers. You will need not one, but a couple of transformers. The connection diagram will be as follows:
Connection diagram for active subwoofer to MMC, option 2
Here everything is little different from the first option. Only now, selecting the phasing will take twice as long. But what about those whose sub is equipped with a single low-voltage input? Then, it is easier to use “scheme 1”. Although, there is a more interesting option:
Connection diagram for active subwoofer to MMC, option 3
At the subwoofer input, of course, the arithmetic mean of the channels we have selected will appear. This is better than using only one of them. And you can figure out the correct phase connection like this:
- One of the transformers (any) is completely turned off;
- They conduct a test and find out whether the wires need to be swapped;
- Having selected the phasing of the first transformer, the same is done with the other.
If you connect the car subwoofer incorrectly, then either it will play out of phase with the main speakers, or there will be no sound at all. But note: when using “Scheme 1”, the latter is excluded 100%. Make a choice.
Subwoofer in the wing of Kalina hatchback
Stealth subwoofer is an acoustic design for a subwoofer speaker that is placed in the trunk niches to preserve useful volume.
The use of ZYa , FI and bandpass cases greatly reduces the useful volume of the trunk and creates a lot of inconvenience - it is difficult to get a spare tire, large items do not fit.
This is my second attempt to make a stealth subwoofer, the first attempt was unsuccessful, I didn’t have enough patience or diligence, this time I finally decided to finish the job.
Raw materials for the manufacture of the STEALTH .
To begin with, I decided to prepare the trunk, make a hatch for the spare wheel and a thicker bottom.
I was very lucky with the closet, the back wall of which was one centimeter thick, just what I needed.
I twisted the two halves from the back wall of the cabinet.
I tried it on in the trunk where it was needed, filed it, sharpened it.
I cut a hole for the hatch.
The pieces of wood cut to fit the hatch hole were twisted together to form a hatch cover.
I placed the hatch cover on two small canopies, and fixed the base to the car body using self-tapping screws. In the process, I discovered one weak point, this is the rear wall of the trunk. With small blows of the palm, it rang. This did not suit me, because I was going to make the case aimed at the rear wall, because the reflected sound of the subwoofer is more powerful than that directed into the car interior. If I don't take action, I thought, the sound quality would be worse, so I decided to strengthen the rear wall of the trunk.
I cut the sheet to the required size. I applied sealant to it.
And screwed it on with self-tapping screws. Looking ahead, this turned out to be a very useful modification to the trunk, it practically stopped making sound. Before that, from the ringing of the trunk, it was immediately clear that there was a subwoofer, but now it’s as if there isn’t one and the interior is beautiful, everything is clear.
Now it's much easier to get the spare tire!
Using a furniture stapler, I restored the bottom of the trunk to its previous appearance.
And finally, I started making the case. The rest of the cabinet parts, two-centimeter-thick chipboard, were used for the production of the cabinet.
I cut a hole for the speaker and a hole for the bass reflex port.
I was going to use the entire space of the wing, but changed my mind due to the inconvenience of installing and removing the body, so I plugged the lower cavity of the wing.
From the photos below, I think everything will be clear to everyone, so I won’t describe it. Briefly: I cut out a template from cardboard, pieces of chipboard according to the template, glue the joints with “liquid nails” glue and twist them with self-tapping screws.
I placed an amplifier and a car capacitor against the case, looking for the optimal place to mount them. Then I installed the speaker to see how the whole thing would look together.
The stealth body is assembled.
Now the car putty is used.
After the front part of the body was leveled with putty, to improve the acoustic characteristics, the inside was covered with padding polyester.
The subwoofer housing was covered with carpet.
I screwed the case tightly with self-tapping screws.
I screwed on the amplifier and installed a subwoofer speaker.
The final view of the stealth subwoofer, the system is configured, all that remains is to warm up the subwoofer head.
Using a stealth subwoofer made life much easier, there were no problems with removing the spare tire, there was more space in the trunk, the armrest hole was freed up, and the bass potential was not affected at all.
Self-installation of a radio on a Lada Kalina
Improved car radio
Even in the “Standard” configuration, where the audio preparation is minimal, installing the radio will not be difficult, since all the wires necessary for this are already routed into the connector. The only problem that a car owner may encounter is the order and correctness of connecting the wiring to the system itself.
The two connectors for the radio are covered with a cover, which must be removed before installing the system. One connector is for powering the radio, and the second is for running under the door speakers.
The black and pink wires are the main ones for power. It is important to know and use the correct wiring diagrams, otherwise you can simply short out all the terminals and burn the fuses. At best, you simply cannot achieve the desired sound result.
Be sure to insulate all wires connected directly. Even those wires that are not useful for connecting the radio must be insulated in order to avoid their contact and short circuit.
Subwoofer for Kalina hatchback
The review provides patterns of parts intended for assembling the subwoofer and its subsequent installation in the Lada Kalina station wagon. The subwoofer body in question can easily be placed in the trunk close to the left fender. For the manufacture of the case, chipboard with a thickness of 17 mm is used.
Let us note one important point: to make the upper and lower walls of the subwoofer, you will need an electric jigsaw. The design in question has no other features.
Option 1, the simplest
The secondary winding of the transformer taken from the 220 - 12 Volt adapter is connected to the low-voltage input of the subwoofer. The primary winding taps are connected to the wires going to the rear left speaker. No additional grounding is required. Please note: we have selected the rear speaker in order to adjust the subwoofer volume regardless of the main level.
Connection diagram for active subwoofer to MMC, option 1
At first glance, connecting a subwoofer according to the indicated scheme is too primitive: wires from four speakers go to the standard radio, but we receive a signal from only one. But everyone knows that at frequencies below 300 Hertz the signals in each channel do not differ. So, the scheme has a right to exist. And the transformation coefficient equal to “1 in 20” is quite suitable for our case.
Having made the connection according to the indicated diagram, you need to conduct a little testing, which will allow you to understand whether it is necessary to swap wires 1 and 2. However, you can swap other wires connected to points 3 and 4. As a result, the phasing of the subwoofer and standard speakers should match .
A little theory
After purchasing a new speaker, you need to measure its parameters. Based on the obtained values, the volume of the housing in which the speaker will be placed is calculated. The housing type can be one of the following:
- Bass reflex;
- Closed box;
- Housing with passive acoustic radiator;
- And so on.
The presence of boxes with holes (bass reflex, etc.) can lead to undesirable consequences. At a minimum, dust will collect inside. For a car, a housing with an acoustic radiator or even a “closed box” is better suited.
According to the drawings given below, it is possible to make a “closed box” class sub, the internal volume of which is 30 liters. Let's start manufacturing.
Case wall patterns
The design in question itself consists of ten parts that can be cut from a sheet of chipboard. The edges of some parts (5–8) should not be perpendicular to the surface of the sheet. However, the absence of inclined edges can be compensated for with sealant. Here are the drawings in a simplified form:
After assembly, the case looks like a monolithic block:
Subwoofer housing assembly
Each part is first made from corrugated cardboard for “fitting”.
You can try to assemble the body after you are sure that each of the parts will take its place in the structure. If necessary, an incorrectly manufactured element is replaced.
Practical implementation
To access the main radio unit, you need to remove the center console. First, dismantle the climate control unit, then unscrew two screws and remove the decorative panel:
The fastening of the decorative trim is hidden under the climate control unit
We discussed all dismantling actions in detail earlier. The cassette recorder body is held in place by latches on both sides. To disconnect them, use the metal plates (similar to skewers) that are included in the repair kit. When the latches are loosened, the body is pulled towards itself.
The standard radio unit has been removed
After the unit has been dismantled, it is better to immediately disconnect all connectors. And no matter how highly qualified the installer is, the following advice should not be neglected:
When carrying out any work on electronics, you must first remove the negative terminal from the battery. This is how you can protect yourself from unforeseen consequences.
It remains to consider how to make the connection.
Tips for assembling chipboard cabinets
It would seem that it couldn’t be simpler - take and connect several sheet panels to form a single unit. The parts are fastened to each other with self-tapping screws. However, even before assembly, it is recommended to coat the edges of the panels with sealant. Then, all the parts are connected and wait for the fastening material to dry.
The screws can be screwed in when you are sure that the geometry of the structure is not broken.
In part “3”, using a “ballerina”, a hole is made for the speaker. The body can be covered with carpet, and sound insulation must be added inside. The result of all efforts looks like this:
As soon as the hole for the speaker appears on the body, all seams from the inside are coated with sealant. To prevent the material from getting on the skin of your hands, use plastic gloves.
I rummaged around the Internet a lot, looking for advice, and then I decided, I filed it, I put it together! Maybe someone will be interested. ? And so, I talked to a friend, and he told me the secrets of box building in a Kalina Hatch under a similar din, and now, having found out the dimensions, having obtained plywood, they measured, washed and assembled the box. Without taking into account FI and subwoofer it turned out
170 liters dirty. Well, a few photos of the process...
We measured it and cut it. The top lid was glued together from 2 sheets of 18mm plywood.
tried it on, looked at it, started assembling
a lot of screws were used, as well as sealant, but overall it turned out pretty good
connected the baby to the acoustic. 8Ga wires
at this stage the work stopped, I was waiting for pipes with openings
and so I waited, the pipes were in my hands, I hammered them into a box, and everything seemed to be fine, but not giving me any peace with the strongly protruding opening, I had to make small changes to the design. ))
and here is the (final) version of the box, I cleaned off the excess sealant, sanded the joints, sealed them with varnish, for now I brought the wires out through the pipe, and if possible I will also eliminate this flaw. ))
switched to 1 Ohm
I drilled holes for the wires, secured them with clamps, filled them with sealant and added the remains of splen, alas, this is not all in the photo, but I think the essence is clear?
Many articles have been written about subwoofers, many programs have been filmed. Here and there the test results of various models of famous brands are shown. If you watch such programs in order to find out the winner, then we may upset you. After all, such competitions are mainly attended by such giants as PIONEER, SONY, KENWOOD.
And the sound of these acoustic systems is so good that for the average person there is no difference. Unless you are preparing to participate in a competition for the best acoustics, then the cost of music in your car should not exceed 20% of the cost of the car itself. We will tell you how to choose the right subwoofer for the Lada Kalina
Now let's talk about the subwoofers themselves. There are two types: active and passive. The difference between an active subwoofer and a passive one is that they have a built-in amplifier. The convenience of such a subwoofer is that it is immediately ready for use. The system is connected with two wires from the playing device, and is immediately ready for use. But there are also disadvantages: cheap components are used in the manufacture of such subwoofers, and this directly affects the sound quality.
The most famous active subwoofer models: KENWOOD KRC-WA82RC, PIONEER TS-WX205A, PANASONIC EAB-12132J, Earthquake ASB 10, Lanzar HWT-8.
In order to connect a passive subwoofer, you need an amplifier, which, when bridged, provides the power indicated in the subwoofer's passport as nominal.
Subwoofers also differ in type and design features. There are mainly four types of subwoofers:
- Subwoofers in a sealed housing, closed type ( closed );
- Subwoofers, with a bass reflex (pipe or slot, for adjusting the frequency response of the component in the low frequency region ( vented );
- A subwoofer in which the speaker is located inside the housing (the sound comes out through a bass reflex) is of the bandpass ;
- Subwoofers with a passive radiator have a second driver, which serves, for the most part, to lower the overall resonant frequency of the speaker.
Compared to closed subwoofers, vented are more effective at providing loud and deep sound, but due to this they are more expensive.
Subwoofers of the third type help to do without crossovers; they themselves act as a filter, passing signals in a certain band, and suppressing everything in a non-band. The disadvantage is the same: due to the complex design, the price is high. A passive radiator in a subwoofer requires very precise adjustment, so it is not widely used.
The efficiency of a subwoofer depends on its location in the car. In a sedan, the speaker and port are directed towards the rear seat; it is recommended to leave a small gap (about 8-10cm) between the subwoofer and the back of the rear seat. Where the back of the rear seat is equipped with an armrest, it is recommended to point the subwoofer speaker at this part. At the same time, the sound penetrates the cabin with the least distortion.
In a hatchback, maximum sound is achieved by placing the subwoofer speaker and bass reflex port upwards. It turns out that the sound does not pass through the back of the seat, but through the shelf.
In a station wagon car, the subwoofer is directed rearward by the speaker and bass reflex.
There is also a type of subwoofer called compact. Very popular due to ease of installation, small size, inconspicuousness (can be installed under the front seats, under the dashboard, etc.). But with such small dimensions, the dynamics have correspondingly decreased. The diameter of the speakers in compact subwoofers is 12-13 cm.
To achieve low frequencies, a number of changes were made to the design of such subwoofers: new housing shapes, compression mode of the speaker, filling the internal volume with mineral wool and many other gadgets. But with all this, its volume leaves much to be desired, so you shouldn’t put it in the trunk, you simply won’t hear it there.
The most popular are PANASONIC EAB-1213J, Blaupunkt CMS-265, PIONEER TS-WX50, RCF BL 130.
In conclusion, we can say that the choice of a subwoofer for the Lada Kalina depends entirely on your ability to sacrifice one thing or another: money, time, free space in your car. You can also turn to qualified specialists, and explain your desire to them, and get everything you want. But again, are you ready to pay that much?
Installing a subwoofer in a car: where, how and why
Actually, it’s no secret to every experienced car enthusiast that installing a subwoofer in a car largely depends on the vehicle’s body type. Moreover, today there are three main classes (of course, this is conditional) - convertible, sedan and hatchback (station wagon). Each type must be considered separately, which is what we will do next.
Installing a subwoofer in a sedan
One of the options for installing a subwoofer in a sedan
So, let's start our excursion with one of the most difficult options - installing a woofer in a sedan. There are “craftsmen” who install a subwoofer in the trunk or mount it in the side wall, believing that this is enough. But this is the wrong approach. With this method of “installation”, only the lowest frequencies will reach people in the cabin, and this will happen due to the body elements. Therefore, there is no need to talk about any sound quality. What options are there?
1) Installing a subwoofer in the rear shelf. This method is considered the most convenient and promising in terms of sound quality. Moreover, the car enthusiast has the opportunity to use a variety of sound design options:
— endless acoustic screen. One of the simplest ways. But here it is necessary to acquire special low-frequency heads, without which it is impossible to achieve high sound quality. In addition, the task of the car enthusiast is to completely separate the trunk from the passenger compartment. This is easy to do - you just need to seal all existing holes. The next step is to redo the rear shelf. It is desirable that it be made of thick MDF board. As a last resort, you can use regular plywood or a sheet of chipboard. The use of these materials will avoid rattling of the speaker. In general, the thicker the rear shelf, the better for overall sound quality. In addition, a thick shelf allows you to “get” the subwoofer out of the trunk a little and save time on creating a hole for it.
To prevent the speaker from breaking down after just a few days of active use, it is very important to use a special infra-low frequency filter (the ideal setting in this case is about 30 Hz). With such an installation, we must not forget that the quality of low frequencies will directly depend on the contents of the luggage compartment;