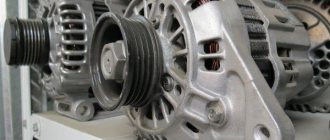
The generator produces electricity using the mechanical energy of a car engine. Acts as a miniature power plant, providing power to an ever-growing number of consumers.
Automakers strive to improve the comfort of using a car by installing additional devices, controls, and controls.
The article is devoted to the following questions:
- how to remove a VAZ 2110 generator,
- how to replace,
- how to change the diode bridge of a VAZ 2110 without removing the generator.
Withdrawal procedure
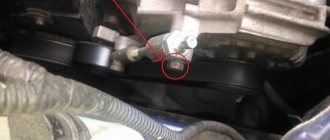
- First of all, remove the belt from the generator.
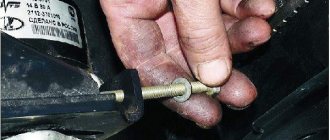
4. Unscrew the tension bolt.
5. Unscrew the top mount of the generator.
6.Remove the tension bar.
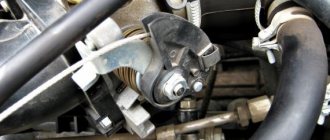
7. Unscrew the lower mount of the generator.
8. Remove the spacer bushing.
9. Remove the generator mounting bolt and remove it.
Methods for replacing brushes
Unit repair is carried out using 2 methods:
- with equipment removal;
- without dismantling.
The method for restoring the unit depends on the layout of the units in the engine compartment and the condition of the threaded connections. If there is a coating of rust and oxides on the steel elements, it is recommended to remove the electrical machine.
Before replacing the brushes on the generator, you need to prepare:
- wrenches or sockets (size and type depend on the car model);
- screwdrivers with flat and Phillips blades;
- a set of new parts (selected from the catalog depending on the modification of the electric machine);
- a bottle of WD-40 liquid, which allows you to unscrew dirty or rusted threaded connections.
On a removed generator
Algorithm for servicing a unit using the example of a VAZ-2113 car with an 8-valve power unit:
- Stop the engine, engage 1st gear and tighten the parking brake lever.
- Open the hood and disconnect the negative cable from the battery housing (it goes to the car body).
- Loosen the bolt in the lower support.
- Disconnect the patch cables.
- Unscrew the drive belt tension adjuster nut, and then use a mounting spudger to carefully move the generator towards the engine block.
- Remove the drive belt, unscrew the bolt securing the tension bracket to the cylinder block.
- Unscrew the bottom bolt holding the electrical machine to the motor.
- Place the equipment on the workbench and remove the plastic cover, which is held in place by latches.
- Remove the voltage regulator housing, which is secured with Phillips head screws. The unit is attached to the windings using a quick-release block.
- Remove the brushes; parts must be replaced if the remaining length of the graphite elements is less than 5 mm.
- Install new parts and reassemble in reverse order. Adjust the belt tension, and then start the power unit and check the operation of electrical devices. If an on-board computer is installed on the car, the device shows the voltage in the on-board network.
Removing the alternator on other vehicles may require removing the air filter housing or air ducts. On some foreign-made machines, automatic tensioning devices are used; the body of the electrical device is rigidly bolted to the cylinder block.
The owner needs to loosen the belt tension and then remove it from the pulley. On Toyota vehicles, the electrical components are covered by a metal casing secured with nuts.
Under the cover there is a brush block, a diode bridge and a charging control unit (equipped with an aluminum radiator). After removing the brushes, the collector rings are inspected; if there is wear on the parts, you will need to remove the rotor to correct the defect. After assembly and installation, the voltage in the on-board network is checked with the engine turned off and running.
Directly in the car
Replacing the brush assembly without dismantling the generator is possible provided there is free access to the back cover of the electric machine. A similar design is found on domestic or imported cars with naturally-aspirated engines of simple design (with 2 valves per cylinder). For example, to change the unit on “classic” VAZ cars, you will need to remove the wire from the negative terminal of the battery, and then remove the cables from the generator housing.
Using a short screwdriver, unscrew the fastening screw and remove the worn assembly. The problem is corrosion of threaded connections; applying WD-40 does not correct the situation, since due to the cramped space it is impossible to apply force to the tool. In addition, it is impossible to correctly check the condition of the collector rings with an installed generator. New brushes, when in contact with a damaged commutator, wear out within 500-1000 km, after which the generator fails again.
On some cars, access to the generator is possible from the bottom of the car (for example, on the Lada Kalina with a 16-valve engine). The owner needs to dismantle the protective shields; work is carried out from an inspection hole or on a lift. After dismantling the wires and the protective screen, you need to unscrew the fastenings of the voltage regulator, and then remove the brush assembly. Replacing the manifold rings requires removing the generator.
Dismantling and assembling the generator of a VAZ 2107, 2108, 2109, 2110, Kalina 1118 car
Restoring a generator is a rather complex process. The difficulty lies in the fact that not every motorist can understand the work scheme.
The best option would be to replace the failed device. This is the only way to get rid of problems in the operation of the autonomous battery charging system. However, on the VAZ 2107 and other models, motorists are in no hurry to change generators. The reason is the high cost of new devices. It is easier for drivers to pay specialists for repairs or restore the generator themselves.
The repair process consists of several steps that must be performed sequentially. Only following a certain procedure will allow you to restore the mechanism correctly.
Replacement of brushes, as well as other small structural parts, must be done in a workshop. If the use of specialized equipment is not possible, repairs in garage conditions will be much more difficult.
- It is necessary to unscrew the armature shaft nut. For convenience, you can fix the shaft with a bar wrench. The nut in this position can only be unscrewed with an open-end wrench.
- Once the nut is unscrewed, you need to pull the drive pulley off the axle.
- The segment key is removed from the axle.
- After this, they begin to dismantle the brush holder and voltage regulator. To do this you will need to unscrew the fasteners.
- It is recommended to mark the position of the bearing holder on the reverse side and then unscrew the fastening hardware. As a result of these manipulations, it will be possible to separate the front cover from the back.
- When using a specialized puller, you must follow the order in which the grips are installed - they are inserted under the holder plate.
- The internal screws are removed if the bearing needs to be removed from the shield.
- Press out the bearing.
- Unsolder a special holder for the diode assembly. For safety and convenience, it is better to hold the wires in the area between the soldering iron and the stator using pliers.
- Remove the rectifier diodes.
Checking the brushes is quite simple. You need to make sure that there is contact with the slip rings. After this, you need to check the movement of the brushes in the guides. If problems are detected in the operation of this mechanism, cleaning of the fasteners is required.
The protrusion of the brushes must be at least 0.5 mm. If this value is less, the brushes urgently need to be replaced.
It is also necessary to check the operation of the rotor and stator. The first element is checked for contamination. If dirt is detected, the oily parts are wiped with solvent. If various scratches appear on the product, you can polish the surface with polishing paste.
The winding is checked with an ohmmeter by connecting two contacts to the rings. The optimal range is 3.4 - 3.7 Ohms.
The stator on Kalina and other models is also easy to check. If the assembly overheats, it means there is a short circuit in the windings. In this case, one probe is applied to the plate-type rings, and the second one in turn to the stator wires.
For assembly, use the reverse order of the disassembly shown. During installation, you must carefully monitor the correct location of all parts.
Voltage regulator - its main functions
On a VAZ 2110 car, the voltage potential in the generator is formed under the influence of alternating current. This phenomenon is made possible by the presence of silicon diodes in the car's power supply. The operating principle of the generator rotor (the rotating part of the mechanism) is shown below.
- First, the crankshaft begins to work, which is excited by current.
- The crankshaft drives the rotor.
- Then the generator set itself starts working.
All stages of this process are controlled by a voltage regulator, also often called a relay. It is believed that this is the main control unit of the generator.
Without a regulator, the mechanism of the current generation of the VAZ 2110 car would not be able to perform its tasks, which are listed below.
- Starting the alternator.
- Manage (offline) ongoing delivery.
- “Hold” within a certain voltage interval.
The described relay cannot be repaired. In the event of a malfunction, it is necessary to replace the regulator; this is done after checking the functionality of the device.
How to check the relay on a VAZ 2110?
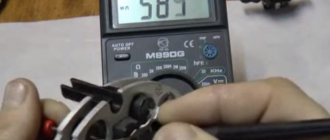
To analyze the condition of the regulator, you need to purchase a voltmeter, the measuring range of which is 15-30 volts. The test is carried out as follows.
- Start the car engine at medium speed and let it run for a quarter of an hour (work with the headlights on).
- Using a voltmeter, measure the voltage between the generator set ground and battery positive.
If the measurement shows a voltage between 13.5 and 14.2 volts, there is no need to replace the voltage regulator. However, in cases where the voltage has different values, indicating that the battery is constantly overcharging or undercharging, the relay must be replaced.
The voltage regulator can also be removed and checked together with the generator brush holder. To do this, a light bulb with a power of 1-3 watts and a voltage of 12 volts is placed between the brushes, and the power source is connected to the “ground” and the positive pole of the battery, from where a voltage of 12 volts is first supplied, and then -16 volts.
If the light comes on at a voltage of 12 volts and goes out at a voltage of 16 volts, then replacing the regulator on a VAZ 2110 car is not required. If the lamp does not light up, then there is no necessary power contact between the relay terminals and the brushes or there is a break. If the light comes on at voltages of 12 and 16 volts, then there is a malfunction in the AVR.
How to replace the generator voltage relay?
With some skill, disassembling and dismantling the mechanisms described in the article does not present any difficulties for a person. Replacing it the first time is the most difficult, but subsequent replacements are usually quick and without problems.
The regulator on a VAZ2110 car is disassembled according to the following diagram
- Disconnect the negative terminal from the battery.
- Disconnect the drive terminal marked "D+".
- Unscrew the nut located under the rubber cover (it should be slightly moved to the side).
- Disconnect all existing wires in the studs.
- Unscrew the nut on the generator set circuit (this fastener holds the terminals) and remove it.
Then you need to remove the generator housing, unscrew the nuts holding it in place (there are three of them), remove the relay housing and unscrew the screws holding the removal mechanism from the rectifier compartment. Now the VAZ 2110 voltage regulator can be easily removed. A new block can be installed in its place. After replacing the relay, all the described operations are performed in the reverse order.
Installing a generator on a VAZ
The installation process deserves attention, since this step can be called one of the most critical stages of repair. The quality of the generator will depend on the correct installation.
- When lifting the generator to the engine, it is necessary to put the device on the mounting location. Special brackets are often located on the engine. It is to them that the installation is carried out.
- Support the fixture and install the lower mounting bolt for the generator.
- When installing special hardware, you must remember that there is a washer.
- After this, you need to put the wires on the stator winding plug and on the brush holder output.
- Screw the nut securing the wires to the generator connection point.
- Put on a protective cap.
- Put on the washer and screw the nut to the tension bar that secures the device.
- Place the belt on the generator and pump pulleys.
- Tighten the drive belt tensioners.
- Strengthen the tightening at the point where the generator is fixed to the tensioner bar.
- Install the dirt shield.
Detailed review of alternator replacement:
Diagnostics
If noises and hums appear in the operation of the engine, it is necessary to check and find the culprit of the noise. Most often it is the generator, but in order to exclude other culprits it is necessary to diagnose it.
It is not difficult to independently check the condition of the bearings; this only requires compliance with the points described below.
- Remove the generator belt from the crankshaft and generator pulleys
- We start the engine and listen
- If the noises, whistles, vibrations have disappeared and the internal combustion engine is working properly and smoothly, then the culprit is definitely the generator bearings.
- You can also grab the generator pulley and shake it up and down; there should be no play. Turn the rotor manually, there should be no whistles or squeaks, the rotor should rotate smoothly and softly.
Generator mounting bolt on Oka
On the Oka and many VAZ models, the lower fastening is additionally tightened. For this, an M8 × 1.25 × 16 bolt is used. Parts can be adjusted at any time without fear of the threads being damaged. The main thing is to give preference to high-quality fasteners.
Thus, it is possible to carry out maintenance of the generator yourself. To do this, you will need to read the step-by-step dismantling instructions. In some cases, generator parts can be repaired without completely unscrewing the mounting bolt. However, such work will take more time.
The best option is to remove the device, which will allow you to easily replace the brushes. Also important is the restoration of the voltage regulator - the main element of the generator. To check the voltage regulator, use a charger or an regulated power supply.
Hello to all those celebrating ( : ! Congratulations on the upcoming eN Ge on the 14th ( : ! I decided to write what I did not have time to write that year. There will be many letters ( : ! Gennady began to show signs of his ill health at the end of summer, this was manifested in in the form of the rustling of the bearings. The bearings were bought and were waiting in the wings, but with the repair I took more and more time. As they say, until the roast rooster pecks, the man can’t cross himself! And because of my laziness, for the most part, I missed this moment and the crocodile said on his incomprehensible spinning shaft, something like: “Grry drty drynt squabbles and Happy New Year, please send NAFIH owner!”.
When he lived out his last days, there were the following symptoms: - very noisy and loud operation of the generator; — generator low charge, very low: 9 -11 V; — endless whistling of the belt.
The car was left for a week near the house. A little creativity in my performance (: .
During this week I removed the generator near the house, through the top, then as it turned out, I had to do all this wisely, more on that a little later. There is a service station near my house, for a hundred rubles they let me disassemble the generator using their tools, so two days passed. When I installed the bearings, it immediately became clear that everything was broken due to the bearings not being replaced in time. The play of the rotor axis along the generator was, to put it mildly, terrible. Verdict: replacement with a new generator, bearings did not help.
I started looking for Gena with a higher current output. There was no point in installing an 80-amp one, so I started looking for a 100-amp one. The search path led me to Volga Motors on Nikitina Street. There were three versions of crocodiles: Russian, Belarusian and Bulgarian, I think I don’t remember exactly, it was almost a month ago. The seller unpacked all three and after a short comparison, the choice fell on the Belarusian one, BATE 110 ampere. I liked the assembly, very high quality.
I also put the gene through up. Guys, this is a complete f*ck, put it through the top! In general, I installed almost everything and then there was a problem, the belt tension adjusting plate (let’s call it that), or rather the bolts did not want to be screwed into the block that attract this plate. What was my mistake when I removed the gene through the top. This plate had to be removed, because... According to another gene, I couldn’t pull it out through the top; I could have pulled it out through the bottom, but I have protection. The position of the car made it impossible to climb down and unscrew it. The plate was screwed onto one pin, which stuck out from the block; I could not tighten two bolts.
Everything was ready, the key to start and here it was, happiness, the car was working, the generator was delivering an excellent charge, I was pleased with the absence of any extraneous noise.
Thanks to the generator, the torque from the power plant is converted into electrical energy. During rotation, the rotor creates a magnetic flux, which is regulated by a relay, and the pulley carries out a belt drive. The rotor moves with the help of bearings, and when they work well, the shaft moves easily.
Another purpose of the relay regulator is to limit the output voltage in the range from 13.6 to 14.7 V. The voltage is transmitted through the commutator rings to the brushes, and the rectifier bridge is responsible for ensuring that energy is transferred in one direction.
Technical specifications
If the old generator fails, many motorists wonder which generator they should now replace the old one with.
There is no need to invent anything here. The most correct solution is to install the same generator as before, or a more powerful one.
Today, the VAZ 2110 provides for the use of three types of power supply devices:
- Katek 5102.3771. The generator produces 80 Ampere power and its voltage is approximately 14V.
- Katek 94.3701. This is a device with the same parameters. They are not seriously different.
- Catek 120 amp. A generator that is more adapted to modern realities, when in addition to standard electrical equipment, motorists install many additional devices.
If you have a powerful audio system in your car, you use an electric pump powered by the car, as well as a number of other additional consumers, it is recommended to install a 120-amp unit instead of a standard 80-amp generator.
If we take into account the size of the devices, then we can distinguish between ordinary and compact ones. They have a certain difference in design
To be specific, the differences are in the following components:
- Brackets;
- Anchor;
- Excitation wire;
- Drive pulley;
- Number of mounting bolts.
But in reality this does not play a special role. After all, the structure of all generators used for the VAZ 2110 is the same. Therefore, let's look at the circuit and structure of this unit.
| Element | Functions |
| He's an anchor. It is a rotating element of the generator, which creates a magnetic field due to the excitation winding located on the shaft. The field wire receives power from the slip rings. They are mounted on the same shaft. There was also room for a drive pulley, field winding wire, bearing assembly and fan impeller. There may be 1-2 last ones | |
| This is a stationary three-phase element that includes three windings. They provide the creation of alternating current. The windings are connected to each other using a triangle or star | |
| A lightweight non-magnetic aluminum alloy is most often used to make the generator housing. The body looks like a pair of covers connected by a bolt. The front cover is located near the drive pulley, and the rear cover is located on the side of the slip rings. Each connecting bolt must be tightened. To disassemble the housing, simply unscrew the mounting bolts. | |
| The upper mounting bracket for the generator uses two bolts, while the lower bracket is predominantly mounted on one bolt. In some cases there are two. It is not recommended to modify the brackets, since the factory one performs important functions. The purpose of the brackets is to hold the generator. It is recommended to monitor the condition of the brackets as they are subject to wear and breakage | |
| Brush unit | It consists of a pair of graphite brushes, springs that press the brushes, as well as a brush holder |
| Brush holder assembly and voltage wires | This design is typical for modern Katek generators. Therefore, if the regulator fails, you will have to replace the entire assembly |
| Rectifier block | Equipped with 6 diodes, it is responsible for converting alternating current into direct current. It is direct current that is required for the operation of all auto equipment. This element charges the battery, among other functions. |
| Belt drive transmission | The belt drive allows you to increase the speed at which the crankshaft rotates. If the pulley has a small diameter, then the V-belt will wear out faster. Therefore, for small driven pulleys it is recommended to use a poly-V-ribbed drive. It is most often found in modern generators |
The presented device is relevant for all generators used on the VAZ 2110, regardless of their power - 80-120 Amperes.
Margin of safety
If we take into account the standard Katek generator, which is installed on domestic dozens, then its resource is enough for about 10 years of operation or 140 thousand kilometers. The specified safety margin of the device can only be relied upon if it is handled properly
The specified safety margin of the device can only be relied upon if it is handled properly.
Many people fear that a powerful 120 A generator can negatively affect the condition of the battery. In practice, nothing like this happens. Moreover, installing a more powerful unit is recommended if you plan to install an impressive audio system or video equipment on the car.
Necessary parts and tools for repair
Troubleshooting the cylinder head begins with the purchase of original parts and various consumables, the list of which is as follows:
- Fuel intake system valve 8 pcs. (art. 21120-1007010).
Exhaust gas valve 8 pcs. (art. 21120-1007012).
Installation of valves on a VAZ 2112 is carried out using a standard set of tools, as well as several specialized types of keys:
- standard set of spanners from 8 to 24 mm;
- socket sockets in a set from 8 to 27 mm;
- end internal hexagons;
- mechanical valve retaining ring remover (depressurizer);
- torque wrench for tightening the cylinder head and camshaft bolts;
- paste for grinding valves (set for rough and fine grinding);
- metalworking cloth gloves to protect hands while working.
The work of replacing 16 valves on a VAZ 2112, the price of which as of this fall is about 50 thousand rubles at AvtoVAZ dealerships (or approximately 35-40 thousand rubles at ordinary car repair shops), is not a very complicated process. You can carry out the work yourself, for which it is enough to purchase the above-described spare parts and the necessary tools.
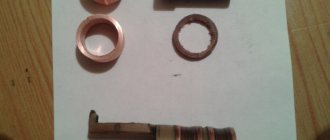
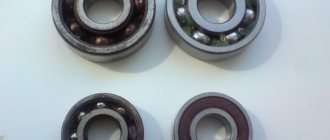
Size and catalog numbers
These parameters of the ball bearing are necessary for purchase, since without these numbers it is very difficult to buy the right part suitable for your car.
The dimensions of the bearings varied depending on the year of manufacture of the car, so the selection of a bearing can be carried out based on the year of manufacture. auto.
Cars manufactured before 2001 with carburetor engines they have bearings of type 6302 front and 6202 rear.
Cars produced after 2001 with injection engines, have bearings type 6303 front and 6203 rear.
Catalog numbers (articles) and external dimensions
| Bearing, no. | vendor code | Dimensions, mm |
| 6303 | 180302 | 17*47*14 |
| 6203 | 80203 | 17*40*12 |
| 6302 | 180303 | 15*42*13 |
| 6202 | 80202 | 15*35*11 |
What types of breakdowns are common?
Most often, the generator for 8 and 16 valve VAZ-2110s fails as a result of moisture and dirt. Another reason is the wear of the components of this assembly, namely the brushes. Most often, the malfunction manifests itself as follows:
- the generator does not produce electricity;
- output current is either too high or low voltage;
- During engine operation, extraneous sounds are heard, most often a squeak or squeal.
The operation of the generator is checked using special stands or a digital voltmeter. If extraneous sounds are heard in the engine compartment area, then first of all you need to check the timing belt tension. Most often this is the reason, but after checking, remove the belt from the pulley and start the engine. The absence of noise is a reason to check the performance of the generator more carefully.
When replacement is required
If you hear creaking and howling while the generator is running, then you have discovered the main sign of bearing failure. The only correct solution is replacement.
Creaking and howling occur due to the fact that the bearing separators lose lubrication, they wear out, and are destroyed as a result of prolonged use under heavy loads.
Sometimes a thin creaking sound can be heard from the generator, which is often confused with bearing failure. In fact, it could be the timing belt pulley or the water pump. Because to make sure, just remove the belt. If the sound remains, then the culprit is the bearing.
What to use
Before you start replacing the bearings on the generator, you need to determine what elements are on your car, as well as what they can be replaced with.
Bearing
Number
When choosing bearings, pay attention to the hub manufacturers. For VAZ 2110, bearing hubs are produced in the city of Samara and are marked SPZ-4. But there are also Vologda and Saratov hubs marked 23 GPZ and 3 GPZ, respectively. It is not recommended to purchase bearings with unmarked hubs, much less use Chinese generator elements.
Front and rear
Dimensions
It will not be superfluous to know what dimensions the standard front and rear generator bearings for your “ten” should have in order to make sure that the spare parts are selected correctly.
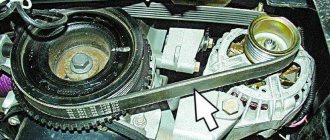
Where is the generator for 2110 located?
The VAZ 2110 generator is located in the engine compartment on the left side (located closer to the engine cooling radiator).
You can also notice that the engine crankshaft is connected to the generator using a belt. Let us add that the generator on the VAZ 2112 is located by analogy with the “ten”.
In terms of operation, the installation location is not the best, however, the location of the generator is quite convenient for servicing or removing the device. In practice, before dismantling, it is advisable to treat the generator mounting with a penetrating lubricant (such as WD-40).
Checking the generator and choosing a new one
How to remove a generator on a Priora with a steering wheel
Generator failure causes some side effects that may signal it. The main signs of a node malfunction are:
constant “glow” of the battery charging indicator;
Battery charging indicator stays on
The easiest way to check the functionality of the generator is to measure the voltage supplied to the battery terminals with a multimeter. If it deviates from the norm, then there are clearly problems. More complex diagnostic measures involve dismantling the part and checking the operation of each component separately, with the possibility of partially repairing the part. This type of diagnosis and repair can only be successfully carried out by a professional electrician.
Check the voltage at the battery terminals with a multimeter while the engine is running.
In the event that the need for replacement is confirmed or there is a desire to perform it due to some other purpose, first of all, it is necessary to select a new generator set. According to drivers and auto specialists, the best generators for the VAZ-2114 are:
- any generating set from Lada: Priora and Kalina, equipped with air conditioning, its power is 115 A;
- identical factory generator set from the manufacturer Eldix;
- generators from PRAMO, the most successful option would be to choose a unit with a power of 120 A.
How to properly remove the generator on a VAZ-2110
If you have a power unit with 8 valves, then it is best to work from above. In the sixteen-valve version, the generator must be removed from below. To do this, first unscrew the pan. Before work, prepare several different keys. You can remove this assembly quickly if you follow the following instructions:
- De-energize the vehicle's on-board system - to do this, simply remove the negative terminal from the battery.
- Find the M10 nut on the positive stud of the autogenerator and unscrew it.
- There are wires connected to the generator on the back of the device, which must be disconnected before the next stage of disassembly.
- Using a 13mm wrench, loosen the upper and lower nuts.
- Unscrew the tension bolt with a 10mm wrench to loosen the belt tension and remove it.
- Then completely remove both nuts (upper and lower) and remove the tension bar.
- Carefully rotate the generator at a right angle and remove it from the engine compartment.
If you want to repair this unit, you should thoroughly wipe it with a rag to remove all dirt.
Price list
- Special offers
- KAMAZ spare parts
- Spare parts KAMAZ-5490
- Spare parts MAZ, YaMZ
- ZIL spare parts
- Spare parts ZMZ, for GAZ vehicles
- Spare parts for Volzhanki cars
- Spare parts for Gazelists
- Spare parts for trucks Lawns
- Spare parts for GAZ-71 caterpillar
- Spare parts UAZ, UMZ
- Spare parts KrAZ, BelAZ
- Spare parts URAL
- Spare parts BUSES
- AMAZ spare parts
- IKARUS spare parts
- KAVZ spare parts
- LAZ spare parts
- LIAZ spare parts
- NEFAZ spare parts
- PAZ spare parts
- Other buses
- Tractors, computer equipment, attachments
- Tractors and walk-behind tractors
- Municipal vehicles
- Attachments and trailed equipment
- Spare parts for TRACTORS and SPECIAL EQUIPMENT
- JCB - spare parts for special equipment
- Truck crane (KS-3577, KS-4517, etc.)
- AMZ (A-01, A-41, D-440, D-442, D-447, D-461, D-467)
- Amkodor (TO-18, TO-28, TO-30, etc.)
- ATZ (T-4A, TT-4M)
- VgTZ (DT-75)
- VMTZ (D-120, D-144, D-130, D-145T)
- VTZ (T-25, T30A-80, VTZ-2048)
- LTZ (T-40, LTZ-55, LTZ-60)
- MKSM, UNC, DETVAN
- MTZ - spare parts for tractors
- OTZ (TDT-55)
- PTZ (K-700/701/702/703/704)
- KhTZ (T-150, MT-LB)
- ChTZ (T-130, T-170, B-10, B-12, B-170, T-10M, DET-250)
- YuMZ - spare parts for tractors
- Other special equipment and tractors
- RVD - high pressure hoses and sleeves
- MMZ spare parts and engines
- Spare parts for MMZ engines
- MMZ engines: D-242, D-243, D-245, D-246, D-260
- VAZ spare parts
- Spare parts OKA VAZ 1111
- Spare parts VAZ classic 2101 - 2107
- Spare parts VAZ front wheel drive
- Spare parts VAZ Granta and Largus
- NIVA spare parts and all-wheel drive
- Spare parts Moskvich, IZH
- Spare parts for Korean trucks
- Spare parts for Starex, H-1
- Spare parts for Porter, H-100
- Spare parts for HD65,72,78, County
- Spare parts for HD120, AeroTown
- Spare parts for HD160,170, . ,700,1000
- Spare parts for HYUNDAI, KIA buses
- Spare parts for Korean passenger cars
- Spare parts DAEWOO, CHEVROLET
- FOREIGN CAR spare parts more
- BMW spare parts
- DAF spare parts
- FIAT spare parts
- FORD spare parts
- Spare parts HONDA, ACURA
- IVECO spare parts
- MAN spare parts
- MAZDA parts
- MERCEDES spare parts
- MITSUBISHI spare parts
- Spare parts NISSAN, INFINITI
- OPEL spare parts
- Spare parts PEUGEOT, CITROEN
- RENAULT spare parts
- SCANIA spare parts
- SHAANXI spare parts
- SSANGYONG spare parts
- SUZUKI parts
- Spare parts TOYOTA, LEXUS
- VAG spare parts: VW, AUDI, SEAT, SKODA
- VOLVO spare parts
- Other foreign cars
- Trailers and semi-trailers
- SEMI TRAILERS foreign
- Domestic SEMI-TRAILERS
- TRACTOR TRAILERS
- Passenger TRAILERS
- Towbars and spare parts for passenger trailers
- Car audio and navigation
- Antennas
- DVRs
- Automotive video equipment
- Memory cards, flash drives
- Speakers, subwoofers, acoustics
- Accessories
- Radio tape recorders
- FM modulators, MP3 players
- Navigation, parking systems
- Radar detectors, antiradars
- Radio stations and accessories for them
- Sound amplifiers
- Auto chemical goods, filters
Installation of the generator with subsequent adjustment
When installing a generator on a VAZ 2109 (no matter the injector or carburetor) and other models, be sure to check whether the purchased clamps, bolts and nuts fit the installation locations. Also, we must not forget that the mounting holes on old-style electric generators are different from new ones. Therefore, when installing a modern autogenerator on front-wheel drive models of the first generations (08, 09, 99), you should purchase the appropriate fasteners.
The generator mounting mount cannot be taken from Grants or Prioras. You can take a new potassium generator and no additional modifications will be required, but the mounting plates must be type 21082. In addition, you will need to purchase a pulley 2110 and a tensioner type 21082.
The installation process is identical to the removal process. If the standard strips are worn out, they are replaced with new ones; this will require unscrewing several bolts and installing new strips.
When installing the electric generator, start from the bottom fastening plate, tighten (but not completely) the fixing bolt (do not forget to put the bushing), put the belt on the pulley and move to the top. To fix the generator, install the top fastening, but do not screw it all the way. Then the tension bar is inserted. Then tighten the tension bolt, checking the belt tension.
The belt should not bend more than 1-1.5 cm when pressed with a force of 10 kgf. It is quite difficult to maintain these indicators in garage conditions, so you should focus on the gap between the frame and the tension bolt of 15–20 mm. There should be a small gap (15–20 mm) between the tension frame and the screw (from the thread side). Then turn the engine crankshaft two turns with a wrench and monitor the position of the belt and its tension.
If, after checking the engine by turning the key, the gap changes, then the bolts securing the electric generator should be tightened. As soon as, after a control rotation of the crankshaft with a key, the gap remains the same, and the belt bends slightly when you press it, the bolts of the upper and lower fastenings are finally tightened, a control rotation of the crankshaft is performed two turns, the wires are connected to the electric generator and the engine is started.
If, when starting the engine, the belt does not make unwanted noise or whistle, and the charge level is normal, then the installation procedure was completed correctly. If a whistle appears, then most likely the belt is too tight and should be loosened.
Video about tightening and adjusting the belt:
Installation of generator from 2110 to 2109/08/99 – video:
Did you manage to solve your problem using the recommendations from the article?
No. More answers required. I'll ask in the comments now.
Partially. There are still questions. I'll write in the comments now.
Stages
The replacement procedure is different for cars equipped with and without power steering. Below we will look at both options.
Replacing the alternator belt on a VAZ 2112 16 valve with installed power steering consists of the following steps:
- First, remove
the power steering fluid reservoir. - Then, using a key set to “13”, you need to unscrew the nut, thanks to which the generator is attached to the mounting plate.
Generator drive with hydraulic booster
the motor from the support. First you need to unscrew the cushion, and then jack up the engine in anticipation of the gap. We take out the belt through the gap formed.
KEY-DOP
This is where the difference between a car with a hydraulic booster appears - there is no adjusting bolt. The tension is adjusted using a tension roller.
The procedure on a car without power steering is simpler:
- Using a wrench set to “13”, unscrew the generator mounting nut.
- We loosen the belt tension by turning the adjusting bolt with a wrench to “10” counterclockwise.
- Having moved the generator
towards the cylinder block, we remove the belt. - Next, we put the new consumable on the drive by rotating the adjusting bolt.
- Next, we tighten the strap using the adjusting nut. We move the generator
furthest away from the cylinder block. By rotating the adjusting bolt clockwise, we increase the tension, and counterclockwise, we loosen it. - Then the crankshaft must be turned two turns and the tension checked again.
Generator drive without power steering
At this point, the procedure for replacing the alternator belt on a VAZ 2112 16 valves is completed. Having completed it in a homemade manner, you benefit from a trip to a car service center. Now, knowing how to change the alternator belt, you will feel confident when traveling, because you can always change this spare part without the help of others.
How to disassemble a generator
First, make two marks on the metal covers. This will help you later assemble the unit without problems.
- Press out the metal latches and remove the plastic cover.
- Use a Phillips screwdriver to unscrew the voltage regulator mounting screws.
- Unscrew the M10 nut. Then use a screwdriver to remove the screw and remove the capacitor.
- To remove the pulley, clamp the generator housing in a vice. Put a 21 socket on the nut, and through the hole in the head put a 8 hexagon on it. Only after you unscrew the nut can you remove the washer and pulley.
- Remove the four mounting screws to disassemble the generator into two parts.
- From the back of the housing, unscrew the screws securing the stator wire and diode bridge.
- Remove the diode bridge and the oscillator winding.
- Press the rotor out of the cover with your fingers along with the bearing.
- Carefully remove the bearing bushing.
- Take a puller and remove the bearing.
Work progress
- Remove the generator from the car (see Removing and installing the generator).
- Mark the relative positions of the generator covers.
- Press out the three latches.
- Remove the plastic casing.
- Remove the two screws securing the voltage regulator.
- Remove the voltage regulator with brush holder...
- ...by disconnecting the wire from the regulator terminal.
- Unscrew the four screws securing the rectifier unit and the screw securing the capacitor.
- Bend the three leads of the stator winding so that they make it possible to remove the rectifier unit.
- Remove the rectifier unit with the capacitor.
- To replace the capacitor, unscrew the contact bolt nut, remove the washer and spacer sleeve. Remove the capacitor wire lug from the contact bolt.
- Unscrew the four tightening screws (the screws are tightened with a large torque). Spring and flat washers are installed under the screw heads.
- Using a screwdriver, remove the generator cover from the slip ring side.
- Clamp the generator rotor in a vice (not too tightly, so that the rotor does not rotate) and unscrew the pulley mounting nut. Remove the spring washer and pulley.
- Remove the thrust washer.
- Remove the rotor from the drive side cover.
- Remove the spacer ring from the rotor shaft.
- Inspect the slip rings. If they have burrs, marks, scratches, signs of wear from brushes, etc., the rings must be sanded. If the damage to the rings cannot be removed with sandpaper, you can grind the rings on a lathe, removing a minimum layer of metal, and then grind them.
- Check the resistance of the rotor winding with an ohmmeter (tester) by connecting it to the slip rings. If the ohmmeter shows infinity, it means there is a break in the windings and the rotor needs to be replaced.
- Check with a test lamp whether the winding is short-circuited to the rotor body. To do this, turn on the test lamp to a 220 V AC power supply (you can use a battery and a 12 V lamp). Connect one wire to the rotor body, and the second to each ring in turn. In both cases, the lamp should not light. If in at least one case the lamp is on, it means there is a short circuit and the rotor needs to be replaced.
- Inspect the stator. There should be no traces of the armature touching the stator on the inner surface of the stator. Otherwise, replace the bearings or generator caps complete with bearings.
- Check if there is a break in the stator winding. To do this, turn on the test lamp to a 220 V AC power supply (you can use a battery and a 12 V lamp). Connect a test lamp one by one between all winding terminals. In all three cases the lamp should be on. If in at least one case the lamp does not light, it means that there is a break in the winding and the stator or winding needs to be replaced.
- Check if the stator windings are shorted to the housing. To do this, turn on the test lamp to a 220 V AC power supply (you can use a battery and a 12 V lamp). Connect the lamp to the terminal of the stator winding, and the wire from the current source to the stator housing, but the lamp should not light. If the lamp is on, then a short circuit has occurred and, therefore, the stator or winding must be replaced.
- Inspect the drive-side generator cover and bearing assembly. If, when rotating the bearing, play is felt between the rings, rolling or jamming of the rolling elements, the protective rings are damaged or there are traces of lubricant leakage, and cracks are found in the cover, especially in the places where the generator is attached, it is necessary to replace the cover assembly with the bearing (the bearing in the cover is rolled) .
- Check the ease of rotation of the bearing on the slip ring side. If, when rotating the bearing, you feel play between the rings, rolling or jamming of the rolling elements, the protective rings are damaged, or there are signs of lubricant leakage, the bearing must be replaced. To do this, use a puller to press the bearing off the rotor shaft and press on a new one using a suitable mandrel, applying force to the inner ring of the bearing.
- Inspect the generator cover from the slip ring side. If cracks are found, the cover must be replaced.
- Reassemble the generator in the reverse order of removal. At the same time, orient the generator covers in accordance with the previously made marks. Install the spring washer of the generator pulley with the convex side facing the nut. Tighten the nut to a torque of 39–62 N·m (3.9–6.2 kgf·m).
Replacing timing belt VAZ 2110 16 valves
Replacing the VAZ 2110 timing belt 16 valves in VAZ 2110, VAZ 2112 cars. Requires regular performance. Of course, an injector with sixteen valves adds agility to our Lada and this is pleasantly pleasing. There is a fly in the ointment. The timing belt must not be allowed to break due to wear. This leads to damage to the cylinder head.
The content of the article:
How to avoid valve failure
The camshafts are stationary and at the moment when the piston approaches top dead center, the valves remain open, resulting in the piston hitting the open valves, which leads to the valves bending and in some cases destroying the seats and guides. Repairs are of course expensive.
This can be avoided by installing pistons in the engine with recesses for the valves, such as in the photo. It is not advisable to replace this on purpose, since engines have a significant service life, and there is no point in disassembling a working engine. Therefore, it is easier and cheaper to simply change the timing belt in a timely manner, especially since it does not require extensive experience in locksmith work and deep knowledge in the field of car repair, but just attentiveness and knowledge of some of the nuances when installing the belt itself.
Disassembling the timing belt
Where to start replacing the belt. First, you need to remove the alternator belt drive pulley. It’s convenient to do this if you remove the right front wheel and the protective cover, if you still have one. The pulley mounting bolt must be unscrewed. Then remove the timing belt protection covers and the mechanism before your eyes. The nuts securing the tension rollers must be unscrewed so that when replacing the belt, the rollers can also be changed, and remove the rollers, then remove the belt itself
Replacement process detailed instructions
We will look at options with 8- and 16-valve engines, which are present in the VAZ 2112 and 2110 models. Regardless of the number of valves, the same set of tools will be required for replacement. The list includes standard tools that can be found in almost every driver's garage.
Timing belt for VAZ 2110 16 valves
In addition to the timing belt itself and the roller for the VAZ 2110 or 2112, you will need:
- a special key that regulates the degree of tension of the roller;
- spanner set to “17”;
- key to “15”;
- key to “10”;
- installation, as an alternative - a powerful screwdriver.
Replacement on an 8-valve engine
Replacing the VAZ 2110 8 valve timing belt is as follows:
- First of all, we de-energize the battery - for this you need to get the negative wire;
- We unscrew the bolts that hold the timing belt protective casing, and then remove the casing;
- On the passenger side, it is necessary to remove the engine compartment mudguard along with the protective element and the right wheel;
- Our task is to ensure that the marks on the cover and, accordingly, on the pulley match, as indicated in all the diagrams. To do this, you need to twist the part clockwise;
- We go to the gearbox and remove the plug from it;
- We need to check the alignment of the marks in this hole;
- We block the flywheel - for this you can use a mounting tool or a powerful screwdriver;
- Now you can remove the timing generator pulley;
- We got to the nut that holds the timing belt pulley - it needs to be loosened, but not unscrewed;
- Now we have reached the required element of the VAZ 2110 or 2112 timing belt. Now it can be removed. All parts that it covered must be cleaned with detergent. After removing dirt, the area should be wiped with a clean rag;
- Next, a new timing belt and tensioner roller are installed - follow the direction indicated on the arrow. Sometimes it happens that the manufacturer does not indicate the arrows, in which case, you need to place the element so that the inscription is read from left to right;
- To tension, you need to turn the roller counterclockwise.
- The next step is to test the timing belt and its tension. You need to check the element with a cold engine, and the temperature in the garage or box should be within +15-+30C. We start the engine and inspect the timing belt.
If there are no unnecessary sounds or vibrations, then all the elements can be installed back - these are the wheel, casing and mudguard.
Replacement on a 16-valve engine
Despite the fact that there are more valves, replacing the timing belt is no more difficult than on the version with 8 valves. So, replacing the VAZ 2110 16 valve timing belt is performed as follows:
- As in the case of the VAZ 2110 or 2112, where there are 8 valves, we need to dismantle the belt protection. It is held in place by 6 bolts.
- Next, you need to remove the chip from the crankshaft sensor - unscrew the mount and take out the sensor itself. For clarity, you can study the photo.
- If you dismantle the gas distribution mechanism yourself, then you probably noticed the absence of one tooth. This is done so that the sensor can independently find the dead center. This feature can also be used to lock the crankshaft.
- Blocking can be done when a tube of a suitable size is placed in the hole under the sensor. Now the pulley is blocked, as a result, it can be safely dismantled.
- Next, the work scheme is practically no different from removing the 8-valve timing mechanism with your own hands - loosen the roller fastening and remove the faulty or worn belt.
- There are two ways to install a new element: remove the tension roller and then install the belt along with it, or do it by turning the camshaft.
- When the new element is installed, you can return everything to its original position. You should start by fastening the pulley - tighten the bolt and align the gear - the marks on the oil pump will help with this. If they are missing, then you can make a mark yourself.
- The parts must be combined carefully, since the timing gear should not get knocked out.
- Using a special wrench, we must tighten the belt. Not everyone has such a wrench, but as an alternative you can always take a powerful screwdriver and two nails. It is also worth remembering the nut, which must be tightened tightly.
- We check the tension; the rubber should move away from the gears, but there should be no folds.
- All that remains is to turn the crankshaft 2 times and make sure that the marks remain in the same place - the work is completed
Check the gas distribution mechanism every 10 thousand kilometers, and then you will not have to spend money on expensive repairs.
Malfunctions of the VAZ-2110 generator
Now let’s look at the breakdowns of the “tens” generator, which car owners have to deal with most often. These include:
- incorrect tension of the drive belt;
- bearing wear;
- failure of the rectifier unit;
- malfunction of the voltage regulator relay;
- break (short circuit) of the rotor or stator windings.
Let's look at each of the faults in detail separately.
We identify the reason
In order to carry out the test, you need to start the engine and warm it up, bring the crankshaft speed to approximately 3000 per minute. Now turn on all the lighting devices (turn the headlights to high beam) as well as the heater, windshield wiper, emergency lights, and heated glass.
If the battery voltage measurement is below 13 V, it can be assumed with a high probability that there are breaks or short circuits in the generator windings. Another reason may be a malfunction of the voltage regulator or the contact rings of the field winding have simply oxidized.
This material will help you figure out why the battery on a VAZ 2110 is discharged and cannot crank the starter: https://vazweb.ru/desyatka/elektrooborudovanie/razryazhaetsya-akkumulyator.html
Various breaks in the components of the generator can be checked if only it is removed. Do-it-yourself repairs can help in some ways, however, if the problem is serious and you do not have enough skill or driving and plumbing experience, then the best solution is to replace the failed unit assembly.
How to properly maintain and repair a generator on a VAZ 2112 on your own?
In a VAZ 2112 car, the generator is designed to power electrical equipment when the engine is running. If this unit fails, full operation of the car will be impossible, so the driver may encounter certain difficulties while driving. You can read more about the principle of operation, as well as the replacement of some elements of this unit, below.
Technical characteristics and principle of operation of the generator set on the Dvenashka
First, let's look at the operating principle of the 2112 generator. One of the main design elements is the rotor, which performs the function of generating a magnetic field. This component is a shaft on which the field winding is mounted. The halves of this winding are installed in special pole parts, and the winding is supplied with current thanks to slip rings. The rotor rotates thanks to a belt drive from the drive.
Removing the Unit Cover
Another equally important component is the stator, consisting of a core and a winding. This mechanism produces alternating current that passes through the electrical network through slip rings. To supply current to the rings, the design of the unit is supplemented with special brushes. After them, according to the scheme, a rectifier unit is installed, which is used to convert the voltage that the device produces. Depending on the device model and its technical features, different winding connection diagrams can be used.
The generator unit relay is used to maintain the voltage within specified limits. This element, if necessary, changes the frequency and duration of electrical pulses. By design, a relay consists of several controllers, as well as executive components. The purpose of these components is to determine the time during which the field winding must be connected to the network. If the relay fails, an unstable voltage will be supplied to the battery.
As for the technical characteristics of the generator on the VAZ 3701010-07, the voltage limits generated in the winding are 13.2-14.7 volts. The unit itself allows you to generate current up to 80 amperes. It is important that the VAZ generator belt is tensioned properly, otherwise the operation of the device as a whole may be incorrect. If you want to check the belt tension with your own hands, then keep in mind that when there is pressure on it with a mass of about 10 kilograms, the deflection of the belt should be at least 8 mm (the author of the video is the channel In Sandro’s Garage).
Service Features
The need to repair the generator unit on a VAZ 2112 16 valves does not arise often, but in order for the unit not to have to be repaired, it must be properly maintained. In general, this unit has a fairly high margin of reliability.
What maintenance features must be observed to prevent repairs:
- It must be remembered that the outer surfaces of the unit must always be clean.
- When carrying out maintenance, you also need to check the quality of fastening of the unit - it must be securely fixed at the installation site.
- It would be a good idea to check the functionality of the voltage regulator; a multimeter is used for this.
- The same applies to belt diagnostics. As stated above, first of all you need to check its tension - the belt should not be too tight, but it should also not be loosened. In addition, diagnostics of the condition of the strap should be carried out every 10 thousand km - there should be no signs of damage, cracks, and the belt should not peel off.
- Another point in maintenance is checking the condition of the bearings. For diagnostics, you need to remove the strap, and the rotor of the unit must be rotated by hand. If during rotation you feel a gap or even slight jamming, then the bearing devices need to be changed. The same applies to the appearance of sounds uncharacteristic of their normal operation.
Photo gallery “Main device malfunctions”
1. New and worn brushes 2. Bearings with frozen grease 3. Worn belt
Possible malfunctions and ways to eliminate them
The need to repair a generator unit may arise for various reasons. As practice shows, the most common of them are failed brushes or bearings. Read below about repairing these components.
There is bearing noise when the engine is running, from the side of the generator and the timing belt, in order to accurately understand whether it is the generator or the tension roller, you need to remove the generator belt and start the engine, if the sound remains, we change the rollers, and if the sound disappears, we proceed to replacing the generator bearings. Loosen the generator mounting nut and the adjusting bolt. We remove the generator belt and start the engine; if the bearing noise disappears, we continue disassembling. Disconnect the negative battery terminal and disconnect the wires from the generator. We unscrew the front part of the crankcase protection, unscrew the lower mount of the generator. We remove the generator through the bottom. Carefully block the generator rotor with a screwdriver and unscrew the pulley. Pull back the latches and remove the casing.
We unscrew the brushes and four bolts of the generator halves. We make marks on the two halves and use a screwdriver to remove the back cover. Screw the nut onto the rotor thread. The easiest way is to remove the rotor from the front cover bearing, grab the ears of the generator front cover with both hands and tap the nut on a piece of wood. We place a suitable object on the bearing, in my case a 27mm head, and knock it out. Carefully open the new bearings and fill them with grease. We drive the new bearing through the old one. To securely fix the bearing in the cover, use a core or chisel to flare the edges. We are replacing the rear bearing of the generator. We place a thin chisel, a thick screwdriver or something like that under the bearing and hit it with a hammer from above, moving the chisel in the opposite direction.
In what cases is replacement necessary?
Like any consumable material, the alternator belt has a certain resource and requires constant technical inspection. According to the advice of the manufacturer at VAZ 2112
Regardless of whether there are 16 valves on the engine or 8, it is necessary to change the consumables after 45 thousand kilometers. But these are only tips; you need to constantly worry about the condition of the product and change it when it’s time. The service life depends on the following reasons:
- driving habits;
- operation criterion;
- product properties.
A visual inspection of the drive components should be carried out when the car has traveled a maximum of 10,000 km and before a long trip. This makes it possible to avoid nasty surprises while driving – a broken belt. It is recommended to carry a spare one in the trunk on your own, because if it breaks, the car will no longer be able to move without the help of others.
It is necessary to change the strap if it is torn, stretched, as it is also called, and has become unusable. There is an option to find a bad tension by the specific whistle that occurs when starting the engine. Tension plays an important role in the performance of a belt drive. If the tension is weak, the unit does not produce the amount of electricity required for normal vehicle operation. If it is strong, the service life of the belt, drive bearings and crankshaft is reduced.
KEY-DOP
It is natural to find the need for replacement when examining the following signs:
- the appearance of cracks and tears;
- worn surface;
An old product with a worn surface
- material delamination;
- frayed edges;
- strong stretch.
It's easy to check the strap tension. It is considered normal if, with a force of 10 kg, it bends by 10-15 mm. To check, he needs to press with his huge finger approximately in the center of the belt between the crankshaft pulley and the generator.Place to check tension (where to press)
Replacing the generator on VAZ 2110-2112 and 2114-2115
You can remove the bearing with a large open-end wrench, using it as a lever. Drive a new bearing through the old bearing and head 27, or you can use a piece of tube or a tubular wrench to press in a bearing of a suitable diameter. The generator bearings have been replaced and assembly can begin. Assembly must begin with the front cover of the generator, and then proceed in the reverse order of disassembly. Replacing generator bearings for VAZ 2111 and VAZ 2112 is similar. Often, many VAZ 2110-2112 car owners are in too much of a hurry at the first generator malfunction and prefer to replace it with a new one, instead of simply finding out the cause of the breakdown and eliminating it.
In this case, we will not consider repairing this device, but will only look at the procedure that must be performed to remove and install the unit. So, in order to dismantle it without problems, we will need a tool such as: Especially for this post, I decided to make a video instruction to explain everything clearly and clearly. If you have any questions about the video review, you can ask them on my YouTube channel. Below will be presented everything in the usual format. I would like to warn you right away that in this example of my VAZ 2110, the generator is slightly clamped by the mounting bracket, since it broke off during the accident, so I cannot show you the removal procedure in all its details. But still, the main points will be shown quite clearly in the photo.
We unscrew the tensioner nut, which is shown by the arrow below: After this, move the generator back (towards the car interior) and remove the belt from the pulleys. PNow you can disconnect all power cords. One bundle is attached using a pin and a nut, and another plug is simply fixed with a connector: Then you can unscrew the lower nut securing the generator, first crawl under the car and remove the engine protection (if installed): Usually the bolt sits tightly, so you can carefully and without excessive force, knock it out with the handle of a hammer: Next, unscrew the tensioner nut from top to bottom and you can carefully move the VAZ 2110 generator to the side in order to remove it later: If you change the device assembly, then install it in the reverse order.
Article: 21120-1001371-00, additional articles: 2112-1001371
Order code: 041045
- Buy with this product
- show more
Thread diameter – M10*1.25 L (length) – 55 S – 15 Strength class -8.8 Note: b=26; D=20min. Included in 2110-1001219
Information used: JSC "AVTONORMAL"
- Passenger cars / VAZ / VAZ-21102 drawings
- » href=»/catalog/vaz-3/legkovye_avtomobili-30/vaz_2110-10/podveska_dvigatelya-89/#part40035″>Bolt M10x1.25x55Engine / Engine mount
- » href=»/catalog/vaz-3/legkovye_avtomobili-30/vaz_2110-10/istochniki_toka_i_starter-219/#part42393″>Bolt M10x1.25x55 Electrical equipment / Current sources and starter
- Passenger cars / VAZ / VAZ-21122 drawings
- » href=»/catalog/vaz-3/legkovye_avtomobili-30/vaz_2112-12/podveska_dvigatelya-89/#part48651″>Bolt M10x1.25x55Engine / Engine mount
- » href=»/catalog/vaz-3/legkovye_avtomobili-30/vaz_2112-12/istochniki_toka_i_starter-219/#part51009″>Bolt M10x1.25x55 Electrical equipment / Current sources and starter
- Passenger cars / VAZ / VAZ-2110, 2111, 21123 drawings
- » href=»/catalog/vaz-3/legkovye_avtomobili-30/vaz_2110__2111__2112-415/podveska_dvigatelya-102/#part1302298″>Bolt M10x1.25x55Engine / Engine mount
- » href=»/catalog/vaz-3/legkovye_avtomobili-30/vaz_2110__2111__2112-415/podveska_dvigatelya-102/#part1302297″>Bolt M10x1.25x55Engine / Engine mount
- » href=»/catalog/vaz-3/legkovye_avtomobili-30/vaz_2110__2111__2112-415/generator_s_armaturoiy-246/#part1305193″>Bolt M10x1.25x55 Electrical equipment / Generator with fittings
- Passenger cars / VAZ / VAZ-21131 drawing
- » href=»/catalog/vaz-3/legkovye_avtomobili-30/vaz_2113-648/generator_s_armaturoiy-137/#part1670616″>Bolt M10x1.25x55 Electrical equipment / Generator with fittings
- Passenger cars / VAZ / Lada Priora 21702 drawings
- » href=»/catalog/vaz-3/legkovye_avtomobili-30/lada_priora_2170-480/privod_raspredelitelnogo_vala-75/#part1578860″>Bolt M10x1.25x55Engine / Camshaft drive
- » href=»/catalog/vaz-3/legkovye_avtomobili-30/lada_priora_2170-480/podveska_dvigatelya-69/#part1578732″>Bolt M10x1.25x55Engine / Engine mount
- Passenger cars / VAZ / Lada Kalina 2192, 21941 drawing
- » href=»/catalog/vaz-3/legkovye_avtomobili-30/lada_kalina_2192__2194-1646/privod_valov_raspredelitelnyh-23/#part3652511″>Bolt M10x1.25x55 Main elements of the engine / Camshaft drive
- Passenger cars / VAZ / Lada Kalina 21942 drawings
- » href=»/catalog/vaz-3/legkovye_avtomobili-30/lada_kalina_2194-1886/a140__privod_vala_raspredelitelnogo-96/#part4209990″>Bolt M10x1.25x55 Main elements of the engine / A140. Camshaft drive
- » href=»/catalog/vaz-3/legkovye_avtomobili-30/lada_kalina_2194-1886/a141__privod_valov_raspredelitelnyh-97/#part4210027″>Bolt M10x1.25x55 Main elements of the engine / A141. Camshaft drive
- Passenger cars / VAZ / Lada Granta 21901 drawing
- » href=»/catalog/vaz-3/legkovye_avtomobili-30/lada_granta_2190-1893/a141__privod_valov_raspredelitelnyh-93/#part4242421″>Bolt M10x1.25x55 Main elements of the engine / A141. Camshaft drive
- Passenger cars / VAZ / VAZ-21112 drawing
- » href=»/catalog/vaz-3/legkovye_avtomobili-30/vaz_2111-11/podveska_dvigatelya-89/#part44343″>Bolt M10x1.25x55Engine / Engine mount
- » href=»/catalog/vaz-3/legkovye_avtomobili-30/vaz_2111-11/istochniki_toka_i_starter-219/#part46701″>Bolt M10x1.25x55 Electrical equipment / Current sources and starter
- Passenger cars / VAZ / VAZ-21151 drawing
- » href=»/catalog/vaz-3/legkovye_avtomobili-30/vaz_2115-65/istochniki_toka-166/#part54386″>Bolt M10x1.25x55 Electrical equipment / Current sources
- Passenger cars / VAZ / VAZ-21141 drawing
- » href=»/catalog/vaz-3/legkovye_avtomobili-30/vaz_2114-647/generator_s_armaturoiy-137/#part1670616″>Bolt M10x1.25x55 Electrical equipment / Generator with fittings
- Passenger cars / VAZ / VAZ-21091 drawing
Replacing a standard 55A generator (2108-99, carburetor) with an 80A generator (2110-70, injector)
But please note that the generator model, if possible, should be the same as the one installed by the factory. That is, first of all, look at the applicability specifically to your car, and then at the current rating in Amperes. As for the price of generators for VAZ 2110-2112, it may vary depending on the type and manufacturer. But if you take the KZATE model, which in most cases is installed by the factory, then the cost can be about 3,500 rubles. Although, Chinese options can be obtained at almost half the price. True, you should not chase low cost, since the service life of these parts can be quite short.
How to install an additional diode?
This is another way to modify the generator set to increase the battery charging voltage. This method is somewhat more complicated, since it will require complete disassembly of the generator. The modification consists of changing the connection of terminal D of the relay regulator.
The diagram in red indicates an additional diode that needs to be installed. 2D219B device is well suited for such a semiconductor device.
, but you can choose a similar one with similar parameters.
You need to find about half a meter more of two-core wire, two terminals “male” and “female” number 4, as well as a heat-shrinkable casing. At one end of the wire, terminals are soldered and insulated with heat shrink. The free ends of the wire must be soldered to the diode, the “mother” is soldered to the cathode, and the “male” is intended for the anode. Now you need to connect the “mother” to the RN
, and the standard wire is connected to the “male”. At this point the modification is completed, all that remains is to assemble the device, install it on the car and carry out tests.
As you can see, the alteration is not so difficult. Modification of the VAZ 2110 generator (installation of a diode) will allow fans of loud music and additional lighting effects not to think that the battery is not charging enough.
More details about replacement
Of course, this procedure can easily be performed by a technician at the nearest service station. However, many car enthusiasts prefer to repair or change parts on their car themselves. If you have knowledge and experience in this matter, then follow this algorithm:
- At the very beginning, you should turn off the power to the VAZ-2110.
- Next you need to disconnect the battery.
- Then pull out the pink wire that turns on the generator. To do this, unscrew the nut from the positive bolt.
- Then you need to loosen the upper and lower nuts and remove the tension bolt. After all this, you need to remove the belt.
- Next, the generator is turned 90 degrees, removing the lower mounting bolt.
- Then all connections need to be cleaned, including the rectifier housing.
- The upper part must be cleaned especially carefully.
- After this, the mechanism is replaced, and all connections are assembled in the reverse order.
- Finally, you need to check how the generator works.
When purchasing a new mechanism, you need to know that it must come with a warranty card. That is why you should buy only in specialized stores. If you find it difficult to replace the diode bridge yourself, then it is better to entrust this work to specialists from the technical service. They will easily perform the replacement, without removing the generator and with a guarantee.