As practice shows, the longer a machine is used, the more often something breaks down in it. This statement is especially true for domestic cars.
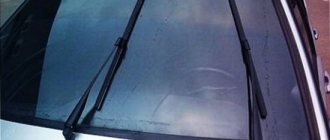
In this article we will tell you how to make the wipers work faster on a VAZ-2109. Reviews from the owners of this model indicate one thing - it is the glass cleaning system in it that is extremely weak and capricious. Moreover, disruption usually occurs quite unexpectedly - everything was fine the day before, and today the wipers can barely move.
It goes without saying that with such a malfunction it is inconvenient to drive a car, and moreover, dangerous, especially in the off-season, when almost every day it rains or snow falls from the sky.
Why do the wipers on the VAZ 2109 work slowly?
Are you faced with the fact that your VAZ-2109 wipers are working slowly? It doesn’t matter, this problem haunts many motorists. A careless mechanism, which only yesterday worked like a clock, has a stupid habit of slowly and inexorably breaking down. This unpleasant feature of cars of this brand has already managed to annoy all owners of the VAZ model 2109, if you believe the reviews of the majority of domestic motorists.
There can be a huge number of reasons for this, and it is not always due to driver negligence. Windshield wipers often fail due to banal technical imperfections in the design of everyone's favorite VAZ. But you shouldn’t scold the manufacturers prematurely and go to a car service center. Speeding up a worn-out mechanism with your own hands is simple and anyone can do it.
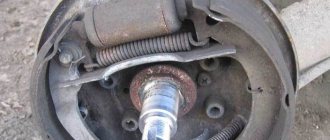
Replacement
The process of replacing brushes on a VAZ 2109 is not difficult. The type of fastening on all machines in this series is a hook.
Installing new brushes includes the following steps:
- the leash should be located perpendicular to the windshield - it is fixed in this position;
- The plastic body of the fastening is squeezed with two fingers - after which, by rocking, the part is pulled out of the seat.
It is necessary to carry out all actions as carefully as possible. Otherwise the plastic may be damaged. It is advisable to carry out replacement at a positive temperature. When negative, the plastic becomes brittle and very easy to damage. If the owner of the car does not plan to use the old brush in the future, there is no need to stand on ceremony with the fastening.
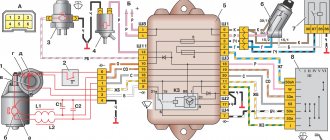
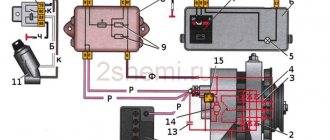
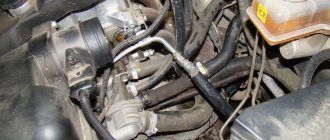
Gear motor design
In short, a gearmotor is a pair of worms driven by an electric motor. The engine is two-speed. One brush has a common contact for both speeds, the other two, due to the “transfer” of power from one to another, change the frequency of rotation of the armature.
The gearmotor is protected from overload by a bimetallic thermal fuse 6.
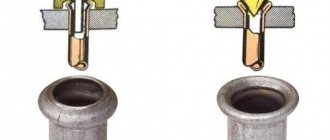
The driven gear has a contact plate, and the cover has three contacts sliding along it (indicated by a red arrow in the figure below).
This design is made in order to ensure that current is supplied to the first-speed brush when the contacts of the steering column switch are opened until the windshield wipers are “parked,” as well as during intermittent operation.
How to remove
First of all, it is necessary to de-energize the system. To do this, simply disconnect the negative terminal on the battery.
- set the wiper arms to a vertical position;
- unscrew the nuts and remove them from the rollers;
- remove protective caps;
- twist the nuts (one on each side) securing the brackets at the top;
- dismantle the rubber sealing washers;
- in the engine compartment, remove the wiring harness from the connector;
- unscrew the bolts holding the lower part of the bracket;
- the mechanism rollers are removed from the holes;
- unscrew the nut securing the windshield wiper crank and remove it;
- dismantle the bolts holding the wiper gearbox and the motor in place;
- disconnect the wires from the bimetallic fuse and remove the engine from the bracket.
All that remains is to remove the locking ring and adjusting washers from the gear shaft and install a new motor. Assembly is carried out in reverse order.
To make it more convenient to work, we recommend moving the stove fan slightly to the right. Without this, it will not be possible to remove the windshield wiper. You will also need to remove the fuse box cover and all the relays located there.
The windshield wiper itself must also be moved slightly to the left before removal.
It is better to number the adjusting washers so that they are not confused during assembly.
How to speed up wipers on a VAZ 2114
Are you faced with the fact that your VAZ-2109 wipers are working slowly? It doesn’t matter, this problem haunts many motorists. A careless mechanism, which only yesterday worked like a clock, has a stupid habit of slowly and inexorably breaking down. This unpleasant feature of cars of this brand has already managed to annoy all owners of the VAZ model 2109, if you believe the reviews of the majority of domestic motorists.
There can be a huge number of reasons for this, and it is not always due to driver negligence. Windshield wipers often fail due to banal technical imperfections in the design of everyone's favorite VAZ. But you shouldn’t scold the manufacturers prematurely and go to a car service center. Speeding up a worn-out mechanism with your own hands is simple and anyone can do it.
Common causes of malfunction
Why did the wipers start working slowly? This question is asked most often among VAZ owners. It just so happens that almost all cars of the 2109 model suffer from this disease. So why do the wipers not work? Why does the system wear out so quickly? Below is a list of the most common windshield wiper problems:
- Damage to system levers. Even a slight change in the shape of these parts can affect the speed of the mechanism.
- Faulty power cords. If there is not enough electricity supplied to the system, it is no wonder that it will slow down.
- Foreign objects in the mechanism. Any pebble or blade of grass that accidentally gets into the device can cause serious damage, not to mention slowdown.
- The blades are frozen to the windshield. In winter, you need to pay especially close attention to the mechanism if you do not want to tear off its frozen parts from the glass.
- Short circuit in the winding or excessive contamination of parts. The structure must be carefully monitored; it must be cleaned from time to time and the winding changed if necessary.
But all these malfunctions most often have nothing to do with the slowing down of the windshield wipers on the car. Experienced car owners have long figured out what the true cause of windshield wiper failure is. Most often, the reason is that drivers do not take good care of their car. The VAZ needs especially close attention due to its design.
True problems and ways to solve them
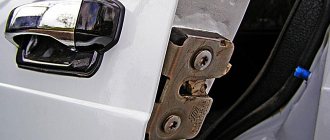
The mechanism’s motor and the windshield wiper trapezoid itself are the main pitfalls of this malfunction. Once you forget about them for just a couple of months, the wipers begin to slow down, gradually becoming unusable. Unfortunately, there is no easy way to find out about this problem. You can learn how to properly and promptly care for a car only by facing all its shortcomings face to face or by asking your friends, at worst.
The thing is that without timely cleaning and lubrication, both parts quickly wear out and eventually refuse to work. Trapezium malfunctions lead in frequency of occurrence. Either the hinges begin to jam, or the strips bend for unknown reasons. However, the motor is also not far behind. Coupled with the loss of voltage due to damage to the wires, the part causes many problems, sometimes forcing an inattentive driver to buy a new one if he does not check the serviceability of the electrical wiring.
So what can you do to return your wipers to their former speed?
The answer is simple: disassemble the mechanism, clean and sand the motor with sandpaper, lubricate the hinges located between the trapezoid bars - that’s all.
Unfortunately, if this does not help, and you have not found any other faults, only replacing parts or a trip to the service center can help you. However, replacing the notorious trapezoid or motor solves the problem in most cases.
Other ways to solve the problem
But it’s not for nothing that a whole list of various problems that occur in addition to trapezoid malfunctions was presented. If there are no problems with it, but the wipers are still working slowly, it would not hurt to completely disassemble the system and check all its mechanisms for problems. Pick up a standard set of tools and go!
It is recommended to check in this order:
- First, inspect the electric motor, the winding of its wires, and the armature shaft. Look carefully for any damage. If you notice a scratch on a part that cannot be smoothed out with sandpaper, it would be best to completely replace the item.
- Check the condition of the brushes and springs. If parts lose proper elasticity, they should also be replaced.
- Find out how easily the brushes move in the holders. If you find any jams, you can use emery, but if there are too many chips or cracks, you should think about replacing parts.
- Check the condition of the collector. Any damage must be smoothed out with sandpaper, and carbon deposits must be removed with a special polishing paste.
- Find out the condition of the gearbox drive. There should be no chipped teeth or other irregularities on the gear. Sandpaper won't help here; you need to replace the gear.
Causes
In reality, there are quite a few reasons why wipers fail. And what’s interesting is that improper vehicle care in all cases comes first. Often the problem arises due to the weakness of the design itself - the engineers of the Volzhsky Automobile Plant clearly did not work on it for very long and did not bother much.
Malfunctions in the operation of nine windshield wipers usually occur due to the following reasons:
- destruction or deformation of the levers driving the brushes;
- breakage of the supply wiring or contamination, wear of the contacts in the connecting terminal;
- foreign objects entering the drive mechanism - even a small pebble can easily disable it;
- freezing of brushes to the glass is a fairly common situation in winter;
- short circuit of the motor winding.
Meanwhile, 2109 is a model that requires constant supervision and prevention.
The weak electric drive of the brushes and the poor quality of the materials lead to everything breaking down literally at once; you just have to forget about preventive maintenance for some 2-3 months. As a result, accumulated dirt and corrosion lead to the fact that the windshield wipers barely move.
All wiper components require regular lubrication, cleaning and maintenance. In winter, do not forget to remove the brushes when leaving the vehicle outside. If there is the slightest problem, the windshield wipers must be repaired - this is the only way to extend their service life. Otherwise, the car owner will have to regularly replace one or another part of the system that has failed.
Dimensions
The driver and passenger side brush lengths are different. The difference is small - only 20 mm. If possible, avoid installing brushes of the same length. Otherwise, a path of water will form in the middle of the windshield during rain. Which will lead to a significant deterioration in visibility. The rear window is equipped with a 300 mm long brush.
The rear hemisphere allows for the installation of a brush 400 mm long. In this case, the lower part of the window will not be affected. But you will have to limit the stroke of the brush on the gearbox. To do this, you need to disassemble the motor that drives the brush.
| Year of issue | Generation - body | Driver side | Passenger side | Rear | Mounting type |
| 1987-2004 | 1 | 530 mm | 510 mm | 300 mm | "hook" |
Original articles
It will no longer be possible to find original parts for this car produced by AvtoVAZ. It is only important to note: in the assortment offered by stores, it will not be difficult to choose a high-quality analogue. In the last years of car production, the manufacturer no longer made brushes on its own. Ready-made solutions were purchased from Bosch.
Original articles used back in the Soviet Union:
| vendor code | Car model | Group | Part serial number |
| 21086-52050 – driver’s side 2108-520505 – passenger’s side | VAZ 2109 | Frame |
Replacement options
There are quite a lot of companies involved in the production and sale of various brushes. Including for the VAZ 2109. When choosing, you should give preference to well-established manufacturers. But it is important to remember: there are always many counterfeits of well-known brands. You should carefully inspect the boxes before purchasing. This will avoid purchasing a fake.
All presented brushes are divided into 4 main categories:
- frame;
- frameless;
- hybrid;
- winter.
Frame
Designated as classic. They are distinguished by their low price and simple design. The strength of such products is great. But a serious disadvantage is the poor aerodynamic shape. When air resistance occurs when driving at speeds over 100 km/h, the brush rises slightly above the glass surface. Which leads to a decrease in the contact area. Deterioration in the degree of glass cleaning.
Frameless
Brushes of this type do not have the disadvantages of classic models. They have an optimal aerodynamic shape and look aesthetically pleasing. At the same time easy to install. The only negative: low strength. At the same time, the cost is relatively low.
Hybrid
Hybrid – a design that has all the advantages of classic and frameless brushes. Today this is the best option. Low cost, coupled with low aerodynamic resistance and good cleaning properties, makes their use convenient and effective. The brush itself is made of a single piece of rubber. There is a frame inside. Some modifications are equipped with a spoiler. Which makes the brush even more streamlined.
Winter
Winter wipers are distinguished by their elasticity - even at sub-zero temperatures they clean the glass well. The effect is achieved by adding rubber to the rubber composition. It retains its flexibility regardless of the ambient temperature. As a result, its cleaning qualities do not change in any way.
| Replacement options | |||
| Name | vendor code | Characteristics | Price |
| Frame | |||
| CHAMPION | E51B02 | Universal | From 610 rubles for 1 piece. |
| Frameless | |||
| Trico Flex | FX500+FX500 | Symmetrical spoiler | From 1.7 thousand rubles |
| Hybrid | |||
| NWB AERO RAIN 50 + 50 cm | ND-020+ND-020 | ND (Aero rain wiper) | From 2 thousand rubles |
| Winter | |||
| Maruenu Gyraless Snow 50 + 50 cm | TS-50+TS-50 | With tourmaline | From 4.5 thousand rubles per pair |
When choosing new wipers, take into account:
- mode of operation of the vehicle;
- maximum driving speed;
- the region in which the car is located.
If the car is used in the Far North, then it is advisable to purchase winter brushes. Driving at speeds over 100 km/h - the windshield will only be cleaned with the proper aerodynamic shape (frameless, hybrid blades). If you have no experience, you should contact a consultant.
Some drivers purchase several pairs of brushes at once:
- for summer;
- for winter;
- for long trips and highway driving.
It is very comfortable. Allows you to avoid unnecessary expenses. Spare parts are always available.
Troubleshooting methods
If the wipers on a VAZ 2109 do not work, then you can detect and fix the breakdown yourself.
The renovation is taking place in stages:
- first the assembly is disassembled;
- then faults are identified;
- then repair or replacement of faulty parts is carried out;
- At the final stage, the assembly of the unit is performed.
Removed glass cleaner
Dismantling consists of the following sequence of actions:
- First of all, you need to de-energize the car by removing the negative terminal from the battery.
- Next, the brush arms are installed in a vertical position, then the fastening nuts are unscrewed. Now they can be removed.
- Armed with pliers, we pull the levers off the slots, trying not to damage the threads.
- The plastic protective caps are removed from the slots.
- Then you need to unscrew the nuts securing the bracket and you can remove them along with the washers that are located under them.
- Next, in the engine compartment, you need to disconnect the wire block that serves to power the windshield wiper motor.
- At the next stage, it is necessary to move the heater fan so that it does not interfere with removing the mechanism. To do this, unscrew the fastening screws.
- We remove the cover from the mounting block and dismantle all the relays located in it, since they will interfere with further work.
- Unscrew the lower bolt securing the purifier bracket.
- Then we remove the plastic wire holder through the gap in the body and remove it so as not to lose it.
- We remove the device rollers through the holes in the body. Then, slightly lifting and moving the windshield wiper with the motor up and to the side, remove the assembly.
Next, the mechanism is completely disassembled. A visual inspection of all parts is carried out, including the wipers of the VAZ 2109. A broken brush can be replaced, but it is better to change both. If mechanical damage is detected or parts are severely worn, they need to be replaced.
After all faults have been detected and eliminated, we reassemble the unit in the reverse order and install it in its original place. After the repair, it is necessary to connect the negative terminal on the battery and check the operation of the windshield wiper.
Symptoms of a problem
To understand the breakdown of the windshield wiper, let's look at what signs it may have.
Symptoms of a malfunction may be the following:
- when turned on, the device does not react at all (the relay does not click, the electric motor does not work);
- the relay is triggered, but the electric motor does not turn on;
- both the relay and motor work, but the brushes do not move or move in the wrong direction;
- The intermittent mode of the VAZ-2109 wipers does not work;
- the electric motor does not stop in intermittent mode;
- The wipers are slow.
Now let’s look at each of the signs separately in the context of probable malfunctions and ways to eliminate them.
If, when you turn on the wipers, you find that the intermittent mode does not turn on, try switching to others. Wipers operating in other modes will indicate a faulty relay.
The reasons why the wipers move slowly may depend on the following factors:
- from low air temperature;
- development of connection splines;
- incorrectly operating electric motor.
Verdict
On a VAZ 2109 car, the electric motor and wipers do not work at the same time for the following reasons:
- frozen brushes;
- incorrect location of brush holders in extreme positions and defects in geometry;
- oxidized/burnt contact connectors and defective wires;
- defective relay;
- wear of the brush-collector unit in the gearmotor;
- faulty limit switch.
A properly functioning gear motor may not transmit torque to the wipers in the following cases:
- the nuts securing the levers on the axis of the driven shafts of the trapezoid are loosened;
- the nut pressing the trapezoid crank to the driven gear of the gearbox is unscrewed;
- The teeth on the gears of the gearbox are chipped.
Failure to operate the windshield wipers is a very common malfunction on VAZ 2108, 2109, 21099 vehicles. Its main causes are problems with the electrical part and mechanical failure of the windshield wiper elements. Let's consider a situation where the wipers have completely failed and do not react in any way to moving the lever in the right steering column switch.
List of malfunctions leading to failure of wipers on VAZ 2108, 2109, 21099
At the beginning of the electrician:
— the fuses in the mounting block have blown;
For the old-style mounting block - 17.3722 these are No. 5 and No. 4, for the new ones 2114-3722010-60, 2114-3722010-10, 2114-3722010-18 - F16 and F7. Fuses No. 5, F16 – cleaner, No. 4b A7 – washer.
If the fuses blow, there may be a short circuit in the electrical circuits of not only the windshield wiper, but also other circuits protected by them. See “Fuses and circuits of mounting blocks they protect for VAZ 2108, 2109, 21099”.
— the windshield wiper relay has failed (52.3747, 525.3747);
The relay should click when operating. If this is not the case, either it itself is faulty, or its contacts have oxidized. Sometimes, to restore its functionality, it is enough to take it out and put it back in several times. We replace the faulty relay with a new one.
You can check its serviceability by moving the steering column switch to the uppermost position. In this position, the brushes should work even if the relay is faulty.
Assignment of windshield wiper relay contacts for checking it: input – 15, output – S.
— the steering column switch for the windshield wiper operating modes is faulty;
The purpose of the switch terminals for checking it is: current input - 53a, 1st speed - 53, 2nd - 53b, intermittent mode input - 53e, intermittent mode output 53.
The faulty switch should be removed, disassembled, the contacts cleaned, or replaced with a new one.
— the connectors in the electrical circuit of the windshield wiper have come off;
In the mounting block these are X1, X2, X3, X4, X11, next to the mounting block there is a connecting block for the electric motor, a block on the steering column switch.
— the contacts in the connectors of the electrical circuit of the windshield wiper have oxidized;
We disconnect all the connecting blocks one by one and clean the contacts with a small needle file. It is better to start with the electric motor block next to the mounting block, as it is constantly exposed to moisture. Here you can check the connection of the “mass” wire of the electric motor.
— the windshield wiper motor brushes are severely worn or stuck;
The commutator against which the brushes are pressed may also burn out.
- or in the windings of the windshield wiper motor.
You can check the serviceability of the wiper motor by applying voltage to it directly from the battery. Input: 1st speed - gray wire from the mounting block, 2nd speed - gray-orange wire from the mounting block. Input for intermittent operation - gray wire from the mounting block.
— the brushes are frozen to the glass;
— after a long period of parking, the brushes stuck to the windshield;
— the windshield wiper drive levers are damaged, jammed or incorrectly installed after repair;
— the teeth of the plastic gears in the electric motor gearbox are damaged.
Notes and additions
— Other malfunctions of the windshield wiper (the blades do not work in intermittent mode, stop during operation, do not work synchronously, etc.) of VAZ 2108, 2109, 21099 cars are described on our website in the article “Malfunctions of the windshield wiper of VAZ 2108, 2109, 21099 cars.”
The role of wipers for any car is underestimated by many. But try to drive out on the road during rain or snow, and then you will understand that driving without windshield wipers is impossible and incredibly dangerous, because you simply cannot see anything in front of you.
Repair
To troubleshoot problems with the wipers on your VAZ 2109, it is not at all necessary to contact a service station. The work can be done with your own hands, saving a decent amount of money.
Repair consists of performing several operations:
- Disassembling the unit;
- Troubleshooting;
- Eliminating the causes of purifier failures;
- Reassembly.
Dismantling
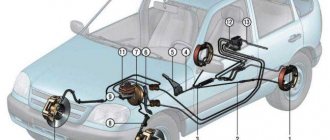
The first step is to learn how to remove windshield wipers. This will give you access to the device and all its components.
It is enough to follow the specified sequence of actions and first familiarize yourself with the wiper diagram in order to do everything correctly.
Scheme
- First, disconnect the negative terminal of the battery to de-energize the car.
- Remove the brush arms by moving them to a vertical position and unscrewing the fastening nuts. Unscrew the nuts carefully so as not to push the lever out. Otherwise, under the action of the spring, it will fly into the glass and break it.
- By unscrewing the fasteners, the levers can be removed. It is not always possible to do this manually, so arm yourself with pliers. Be careful not to damage the threaded area. To avoid this, screw the nut back onto the splines, but not completely.
- Remove the protective caps made of plastic from the slots on each side.
- Unscrew the upper mounting nuts with the bracket and remove them. Under them there are rubber washers, which are also dismantled.
- Lift the hood and disconnect the wiring harness that powers the wiper motor.
- Unscrew the heater fan mounting screws and move it slightly to the side. This way, when dismantling the purifier, it will not interfere with you.
- Remove the cover from the relay and fuse box. You need to remove not only the wiper relay, but also everything else. Otherwise, they will interfere with your further processes.
- Unscrew the lower fastening nut of the mechanism, remove the plastic holder of the wiring harness from the electric motor from the hole in the car body. Now you can remove the holder so that it does not get lost during the repair.
- All that remains is to push the mechanism roller inside, then lift the electric motor and the windshield wiper mechanism slightly up and to the side. This way you can easily remove the node.
After completely disassembling the unit, you can check the condition of each wiper mechanism and determine the cause of any malfunctions.
Device
Checking the status of elements
By disassembling the design of the wipers on your VAZ 2109, you can identify the damaged components that led to the problem. We will tell you exactly how to find the culprits.
| Element | Your actions |
| Electric motor housing, stator windings and armature shaft | These elements need to be checked for mechanical damage on the surfaces. The stator should not have any traces of contact with the armature, and vice versa. If defects or scratches are found on the surfaces, try sanding them. If this measure does not help, the components must be replaced |
| Brush springs | Springs may become damaged and lose their elasticity as they are used. The brushes themselves suffer from this and do not work properly. The presence of wear on the springs indicates the need to replace them. |
| Brushes | Check how freely the brushes move in the holders. If there are any jams, try sanding the assembly. The presence of chips, cracks and signs of wear requires replacement of brushes |
| Collector | It is not uncommon for traces of soot and brush friction to appear on the surface of the commutator. Polishing paste will help to cope with the problem. The anchor must be clamped in the drill chuck, which will increase the efficiency of polishing. There should be no scratches, chips or other damage on the collector. Again, if you have them, try sanding them. Otherwise, the anchor is changed to a new one |
| Reducer drive gear | Check for mechanical damage and chipped teeth. If some teeth are missing, the brushes may work slowly or the intermittent operation may be disrupted. It's best to replace the gear. When replacing, treat the new gear with plastic grease and lubricate the gear housing, having first cleaned it of traces of old lubricant |
| Wiper drive rods | Make sure they are not bent. If there are slight deformations, you can try to align the rods manually or with tools. If alignment cannot be achieved, replace |
| Threaded part of lever rollers | Threads and splines are often damaged. If this happens, you will have to replace the entire linkage assembly. |
| Fuses and relays | Quite often, the cause of a wiper failure is a relay or a blown fuse. The fuse for the glass washer motor is element F7, and the relay responsible for the unit of interest to us is indicated in the mounting block K3. |
Checking the fuse box
If the windshield wiper fails, first check to see if the fuse has blown and if everything is in order with the relays that are responsible for the operation of this unit. Often complex repairs are not required; it is enough to simply remove the burnt-out fuse element and replace it with a new one.
In some cases, a blown fuse indicates something more than just a broken fuse. What exactly causes the fuse to break is an important question. Therefore, it is recommended to disassemble the wipers, check the condition of all components and figure out what was the real reason for the failure of the brushes on the VAZ 2109.
Other ways to speed up your windshield wipers
If the slowdown occurs mainly in winter, we recommend replacing the lubricant with Ciatim. This substance is not afraid of cold temperatures down to minus 60. Moreover, it is quite thick and adheres well to parts - one treatment lasts for a long time.
Remember that before lubrication, you should clean the moving elements from rust and degrease. It is also worth using Ciatim in the gearbox.
Experienced people advise to speed up the work of wipers:
- swap contact 53 with 53b;
- adjust the windshield wipers;
- make sure that the mass coming from the motor is holding well.
Common faults
The main signs of a malfunction of the VAZ 2109 wipers:
- complete stop of the wipers, no response to pressing the levers;
- brushes do not work intermittently;
- wipers work slowly;
- the movement of the brushes does not correspond to the mode turned on in the cabin.
The most common malfunctions of VAZ 2109 windshield wipers are:
- contacts have oxidized;
- fuses are blown;
- electrical circuit breakage, wiring damage;
- the switch does not work;
- the wiper, which worked in one mode, does not switch to another;
- The windshield washer motor does not work;
- The rear wiper of the VAZ 2109 does not work;
- breakdown of the electric windshield wiper motor.
Rear window wiper
Windshield wiper functions
Nature does not have bad weather, but driving a VAZ-2109 without wipers in conditions of insufficient visibility becomes almost impossible. What properties do quality products have?
- Resistance to natural disasters and weather vagaries.
- Ability to work properly even at sub-zero temperatures.
- No drying out in extreme heat.
- When moving across the windshield, windshield wipers should not leave scratches, much less damage the coating.
- A long period of active use is another distinctive feature of high-quality wipers for the VAZ-2109.
Let's start the renovation
Our instructions are suitable for the VAZ 21099 repair and replacement of windshield wipers. The windshield wiper mechanism on the VAZ 2109 and other models is removed if a complete replacement is necessary (if they are completely out of order), for repairs or to perform other work when its presence interferes with the progress of their implementation. You will need a set of open-end wrenches and a set of screwdrivers to repair the windshield wipers on a VAZ 2109 yourself, proceed in the following sequence:
- Disconnect the negative battery terminal wire
- We turn both levers of the wiper blades to a vertical position, unscrew the nuts securing them
- Remove the blade arms from the windshield wiper rollers
Unscrew and remove the windshield wiper arms
Note: If suddenly you cannot remove the lever by hand, unscrew the nut securing the wiper arm, but not all the way, to avoid damaging the thread.
Using pliers (pliers), pull the lever off the slots, then completely unscrew the nut. Remove the windshield wiper arm.
- Remove the protective caps, one on each side.
- Unscrew one nut from the upper bracket mounting on both sides
- Remove the special leveling rubber washers located on both sides
- Open the hood of a VAZ 2109 car, disconnect the connector with wiring from the block
- Then we move the heater fan to the right side along the compartment located in front of the windshield; if this is not done, the fan will interfere with us, remove the windshield wiper.
- Remove the cover from the fuse and relay box
- We remove all the relays from the mounting block: since they interfere with the removal of the wiper
Disconnect the connector from the block. We take out all the relays so as not to interfere with the removal of the wiper
- Unscrew the lower mounting bolt from the wiper bracket.
- Squeeze the plastic wire holder and remove it from the slot in the body
- Remove the holder from the wires so as not to lose it
- We remove the rollers of the wiper mechanism from the holes located in the body
- We move the windshield wiper so that its motor is in the wide part of our compartment located in front of the windshield (this is where the heater fan is installed)
- We turn the windshield wiper and remove its motor from the compartment
- Move the wiper towards the fuse and relay box
- We take it out of the compartment
- Unscrew the nut securing the crank of the wiper mechanism
- Remove the crank from the wiper gear shaft by prying it off with a flat screwdriver
Using a flat screwdriver, remove the crank from the gear shaft
- We unscrew the three bolts securing the wiper gear with the electric motor
- Unscrew the two screws securing the windshield wiper motor wires
- Disconnect the wires from the bimetallic thermal fuse
- Remove the windshield wiper motor from the bracket
- Then remove the retaining ring from the wiper gearbox shaft
- Remove the adjusting washers from the gearbox shaft
Tip: Be sure to mark all the adjusting washers so that when assembling the windshield wiper mechanism, install them in the same quantity and in their original places
- Unscrew the three screws securing the wiper gearbox cover
- Removing the gearbox cover
We unscrew the screws (there are three of them), they are indicated by arrows, to remove the gearbox cover
Warning: When disassembling the windshield wiper gearbox, do not unscrew (do not touch at all) the adjusting screw (in the photo above it is marked in red) otherwise you will violate the axial clearance (it is adjusted at the factory) of the armature shaft.
- Remove the panel from the wiper gearbox
- We take out the gear of the wiper gear
- Unscrew two screws (the second is located behind the wiper gear housing) and remove two cage nuts
Unscrew the screws and remove the cage nuts
- Remove the wiper gear housing from the electric motor housing along with the brush holder
- We remove the armature from the wiper motor housing
- After disassembling the electric motor, we blow through the housing with compressed air in order to remove coal dust from it.
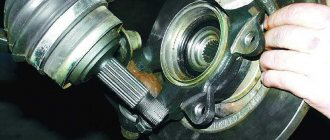
- Remove the retaining rings from both rollers of the wiper mechanism
- Then remove the adjusting washers from the two rollers of the windshield wiper mechanism.
- We remove the rods from the bracket and remove the adjusting washers from both rollers
- We remove the O-rings from the special grooves on both sides of the bracket.
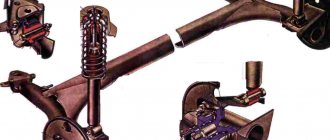
It is impossible to further disassemble the trapezoid system; its rods have a completely non-demountable design (photo below):
- 1 – crank designated
- 2 - short wiper rod
- 3 — linkage joint
- 4 is the wiper mechanism roller
- 5 - long pull
Non-removable design of wiper rods
- We check the brush springs; if the electric motor brush springs are damaged or have lost their elasticity, replace the brushes with new ones
- Checking the ease of movement of brushes in the brush holder
- We replace worn or chipped brushes; they should move freely and without jamming
- Solder the leads of the new brushes (when replacing) to the brush holder
We check the elasticity of the springs and the smooth movement of the brushes themselves
- We clean the collector with fine sandpaper if it is dirty or if there are marks, scratches, etc.
- If the collector is badly worn or burnt, replace the armature or gearbox assembly with the electric motor
- Having found traces of jamming on the anchor journals themselves, we clean them with fine sandpaper
The armature journals are indicated by arrows, check the condition of the journals and commutator
- We replace an electric motor gearbox with broken or heavily worn teeth
- We straighten the bent wiper arms. If it is impossible to straighten them, replace the entire windshield wiper trapezoid
- If damage to the splines or roller threads is detected, replace the entire wiper trapezoid
- We clean burnt or oxidized contacts of the self-stopping mechanism using fine sandpaper.
- We replace torn, lost elasticity or cracked rubber cushions and other rubber parts
Advertisements on NN.RU. Auto
Production invites you to upgrade the basic version of Fiat Ducato Fiat Ducato to make a decision.
We sell KAMAZ fuel pumps (All types). BOSCH fuel injection pumps for KamAZ. 1 year warranty. Fuel injection pumps Bosch Euro-3 1 0402698817 (electronic), EURO-3. 134200 rub. 2. Price: 131,000 rub.
A specialized production company for the conversion of trucks offers you: 1. Expand the frame, expand again.
Washing gasoline injectors on a stand, with removal (liquid or ultrasonic), cleaning the throttle valve. Price: 1200 rub.
We should buy unnecessary things because they come with the right ones. Moreover, according to sellers, they are inseparable, like Jack and Rose.
Today is a real holiday for fast food lovers in Nizhny Novgorod: a new outlet has opened all over the world on the renovated embankment of the Nizhny Volga.
The street film festival will be held in Nizhny Novgorod for the second time. Short films by young Russian directors will be free.
An accident occurred in the Moscow region of Nizhny Novgorod: a girl was swinging her friend, but the swing unexpectedly fell. Because of.
Source
Many people have encountered such a slight inconvenience when operating a regular VAZ windshield wiper 2109
: When the windshield washer is turned on briefly, the blades make 3 strokes, although the last stroke of the blade was made on dry glass, and two strokes would be enough to remove all the water sprayed by the washer.
READ Soundproofing VAZ 2115 Do It Yourself
This inconvenience, as it turns out, can be easily eliminated. To do this, buy a new windshield wiper relay (if something does not work, you can insert the old one and therefore not be left without wipers), enter 526.3747 or similar. Markings may vary depending on the relay manufacturer. Resistor R4 must be replaced in the circuit of this relay. The nominal value is 130 kO, we need to set it less, within 40 kO. 70 kO. I have 56 kO. You can find it at radio parts stores, it will cost pennies, or you can get it from old equipment.
Relay race in a black field
Car wipers VAZ 2109
The internal design of such a relay can be different:
In all cases, the resistor we need is connected to the fourth branch of the chip. This is highlighted in the pictures above.
By the way, this publication is also relevant for VAZ 2114-2115, VAZ 2110, Lada Kalina, Lada Granta. for all models where this type of relay is used.
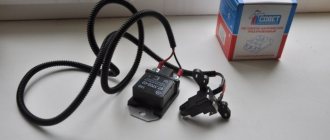
New relays may have a completely different design. For example, I came across this relay marked 723.3777 from the Energomash plant:
Relay 723.3777 Energomash. We can't repeat this
We cannot remake such a relay, so we can leave it as a spare (original), and we solder the original one, removed from the mounting block:
Appearance of the original relay
Regarding the number of strokes of disassembled brushes. Now one more thing.
When you first press the lever to wash the glass, it usually happens like this: the brushes are gone, but there is still no water on the glass. This is due to the fact that the pump takes time to pump water through the pipes from the tank to the washer nozzle. Installing a check valve in the pipe can correct this situation to prevent water from draining from the pipes back into the tank when the pump is not running. Personally, I don’t really care about this point, because the brushes dry out only the first time they are turned on, and installing a check valve increases the resistance to the movement of water in the pipes and the already weak pump washer. I haven't done such a modification on my car and don't plan to.
And for those who want to give it a try, here's the information: You can set the details of the following ratings: R2. 2.2 kO, C2. 47 uF, R4. 22 kO. The value of C2 affects all three relay parameters. the delay between strokes, the number of strokes when turning on the washer and the delay in starting the brushes, so there are options. If anyone succeeds, unsubscribe from comments.
If you don't want to redo anything, you can install a special programmable relay. In this case, the blades will start with a delay of about 0.5 seconds, you can also set the pause between the blades in intermittent mode by manipulating the wiper lever. 723.3777-01 (analogous to 411.3777) that are of interest are marked. Google and Yandex for help. I would recommend setting the pause manually, as was done in the previous article.
Together with soldering a resistor into the relay to reduce the number of brush strokes to two, in my opinion, this is a necessary and sufficient number of improvements for the VAZ wiper 2109.
Source