If you are the owner of a Niva-21213 and are in love with this vehicle, then you are unlikely to give it up if you find some technical defects in it. In principle, this is absolutely correct; you can remain faithful to your “iron horse”, and if defects are identified, try to eliminate them yourself.
Niva-21213, indeed, needs some of your intervention; tuning the Niva stove will not be superfluous at all.
In the summer, you won’t be able to notice any inconvenience, but with the onset of cold weather, you definitely won’t be able to do without enhanced wardrobe equipment in the form of cotton pants and a jacket.
You don’t want to constantly feel like a “tanker”, so most owners of this car decide to roll up their sleeves and modify the stove of their own Niva. By the way, the same problems are inherent in another domestic model - the UAZ, the owners of which are also actively searching for what to do to improve the performance of the stove.
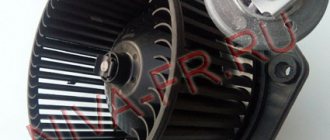
Fan replacement
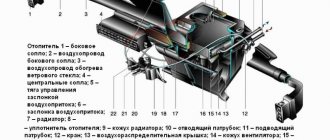
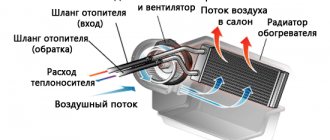
The main reason for the low temperature in the car is the poor performance of the heater fan, which forces warm air through it into the cabin. In addition, being directly inside the car, it operates quite loudly at high speeds and whistles unpleasantly, especially in winter. Therefore, it is replaced with a fan from a VAZ-2108 (“eight”) car, which together with the casing is often called a “snail”. Their sizes differ slightly, so installing a new one is quite simple, with minor design modifications. Place the fan in the engine compartment, inside the air intake. This significantly reduces the noise from it. The heater radiator shutter needs to be removed.
You can leave the standard two-speed airflow mode switch
or replace it with a three-position (and, if desired, four-position) installed on 2108, adding an additional resistor from the “eight” to the fan circuit.
They place it inside the air duct, since it needs airflow.
The cross-section of the wires suitable for it needs to be increased, since the new motor consumes more power.
The outer openings for air passage in the hood must be sealed to reduce the flow of cold air through them to the stove by half.
Lada 4×4 3D Blue Bestia › Logbook › Interior ventilation valve
Until recently, I not only didn’t know about the existence, I didn’t even think about the presence of such a device in the field.
Around the beginning of summer, when the garage washing season opened for Bestia, I began to notice the presence of water in the trunk. At first I didn’t attach much importance, but then it got to the point that there was a lot of water, so much so that rags were laid out in the trunk, and diapers were placed under the sofa to absorb the water. All sorts of modifications and manipulations with the seal did not help, I had to turn to tyrnet. At some point I even got the feeling that I was the only one with water flowing from behind not onto the lights, but into the trunk; I didn’t know where to dig at all. But then I came across a forum thread and it hit me:
Around spring, I did noise and vibration insulation of the rear part of the cabin, including the trunk. For this event, the interior was dismantled mercilessly and everything that was not glued was torn off, and everything that was glued was torn off with particular cruelty. During this obscurantism, I also tore out the ventilation valves. I still can’t call this oilcloth a valve, but it is what it is...
It hit me immediately and specifically. These oilcloths release air to the outside and do not allow anything outside, provided they are in working order, which has been very poor for many manufacturers lately
Having torn off these evil fucking valves, I made myself a mega-ventilation and, at the same time, built a trunk washer, and a double-sided one at that. The washer turned out to be so powerful that there was even water in the speakers
I read the forum and in my head
After all, I successfully lost these “oilcloths” and hid them somewhere, and as it turned out later, buying them is more difficult than flying to the moon. I called Yaroslavl auto stores - the result was zero, there is nothing like this anywhere. I looked on the Internet - it’s a bummer, only if you use collective farms from other cars - I scored. Then I reached into the trunk again, there was water again, I need to solve the problem and make them myself...
To begin with, I decided to take the path of I don’t know what kind of resistance: I turned to the officials. Moreover, in two directions: by telephone and in writing. I've been waiting for a written response for a week now. But on the phone, after several hours of searching, they sympathized with me and said that “well, there’s no way at all” that they couldn’t find such a part in the catalogue...
Fucking summer has decided to become spring-autumn, constant rains - I don’t want to turn the trunk into an aquarium.
I considered different options for making these valves, but all these options had to be bought or begged, and the most interesting thing is that I could not find the necessary material either in stores or from those from whom I was going to beg - tin. And here, I’m sitting at work today, asking our beautiful women about the extra baby oilcloth, and I’m looking at the office document folder
The material is neither thick nor thin, light and hard, easy to blow away and the horseradish will allow water to pass through - just what you need.
All the folders at work turned out to be colored, I had to tint them a little
The coolest thing about today's masturbation was something else. When I removed the right lining, I saw that I had one whole living valve there, which for some reason had not been amputated. Thanks to his presence, I decided to write this entry; without him, this whole story would have a completely different meaning.
First of all, I made blanks that will become future valves that will stop letting water from above into the trunk
Replacing the heater tap
The standard heater tap on Niva 21213 does not do its job. Since it has a small cross-section, coolant flows quite slowly through the radiator. In addition, it often becomes a place for coolant to leak into the cabin. Therefore, car owners prefer to exchange it for similar models from other AvtoVAZ, Volkswagen, Toyota or Opel cars. For example, the ceramic faucet installed in 2108 has a large diameter passage opening, which increases the performance of the stove. It is better to install it in the pipe that supplies coolant to the stove, otherwise even if it is closed in the warm season, heated air will still flow into the cabin.
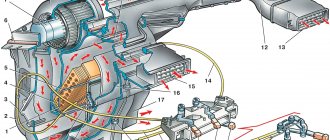
Removing the radiator of the VAZ-2121 stove
The procedure for removing the heater radiator on a VAZ Niva does not require any special skills or abilities. It is important to prepare the necessary materials and tools in advance. Most instructions for repairing car heaters contain a recommendation to drain the coolant before starting work. In practice, many car enthusiasts limit themselves to draining only that part of the antifreeze that is located in the radiator itself and the nearby pipes of the cooling system.
Preparing tools
To replace the radiator, you will need the following tools:
- pliers;
- slotted screwdriver;
- Phillips screwdriver;
- a set of markers for identifying wires;
- spanner set to “7”;
- socket wrench set to “10”;
- socket wrench set to “7”;
- socket wrench set to "10".
Procedure for dismantling the radiator
All operations must be performed in the following sequence:
- Unscrew the left self-tapping screw securing the storage shelf.
The self-tapping screw is unscrewed with a Phillips screwdriver
The right side of the shelf is attached to the upholstery
The central part of the shelf is unscrewed from the front panel
The right edge of the shelf moves down freely
There is a special spike on the left side of the shelf
The lower part of the panel is also fixed with a self-tapping screw
The process is shown on the right side, the left side is similar
The panel is moved to the side
The wire blocks are detached to remove the entire radio panel
After disconnecting the wires, the panel can be easily removed
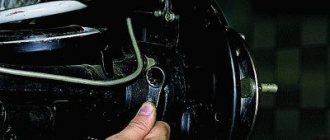
Loosening the clamp is shown using the example of the lower pipe; a similar operation is performed with the upper
The screws are unscrewed with a socket wrench with a “7” head
The removed seal allows you to remove the radiator pipes from the engine compartment
The fastening nut is unscrewed with a “7” key
The rod is removed from the crane lever
The rod is disconnected from the fan casing
The staples are pryed off with a slotted screwdriver
The casing with the fan is moved to the side
After removing the fan, the radiator is carefully removed from its compartment
The tap and pipes are turned off with a key to “10”
The removed tap is checked for leaks
The bottom nut often falls out and gets lost
Disconnect the outgoing pipe.
The two fastening nuts are unscrewed with a “10” wrench
After dismantling, you should carefully inspect the radiator for blockages in the grille and leaks from the tubes. Based on the results of the inspection, a decision is made on the possibility of repair or installation of a new radiator.
Video: installing a radiator
The process of replacing the heater radiator on a classic Niva has been studied far and wide by many car owners. In fact, the procedure is similar to the entire family of AvtoVAZ classics. However, caution and safety precautions should be observed when working. After completing the repair, before driving on public roads, you must make sure that all components and mechanisms of the vehicle are operating normally. Only then should you begin daily use of the machine.
When starting to tune a VAZ 2131 Niva, every SUV owner must choose one of two options. The first method is budget-friendly; it involves minor modifications to the engine and increased interior comfort. The second option is more expensive, it is aimed at upgrading the suspension of the Lada 2131 4x4 for off-road driving. Let's look at what both methods of improving the VAZ are, and what they give us in the end.
Other details
The standard heater radiator and thermostat are also replaced. Preference is given to three-row copper radiators. They are more efficient in operation and leak less often. The thermostat is replaced with an analogue one or its thermal insert is modified.
Do-it-yourself modification of the stove on Niva 21213 with your own hands is quite labor-intensive and takes a lot of time. To modify the heating system of this car, you can find ready-made kits on sale that make this work easier. The procedure is presented in the video “Remaking the stove on Niva 21213 with your own hands: video instructions.”
The process of refining the heating system
It is useful to note that modification of the VAZ-2121 stove is not accompanied by high problems. Even a car enthusiast who does not have special technical and repair skills can eliminate such technical defects.
In addition, modification of the Niva-2121 stove may involve performing a variety of actions, including the most basic ones.
Heating in your car can be improved by even just slightly upgrading the air ducts. If you want to radically improve the heating system and increase comfort, then, of course, you will have to tinker a little more.
Fault Diagnosis
The stove supplied as standard will need to be modified for preventive purposes. The procedure will not take much time, but it will prevent many problems in the future. Driving experience suggests that the first severe frosts will undermine the “health” of the device. The list of main weaknesses is as follows:
- the optimal operating temperature range for model 2121 is from -5 to +10°C;
- inability to warm up the air in the cabin if outside is -8°C or lower;
- when the blowing power increases, the temperature does not increase;
- When driving in 2nd gear, the noise from the Niva's stove becomes significant.
That is why it is better to take the necessary measures in advance. The driver has few alternatives. On the one hand, everything remains in its place. The heating device is used at minimum power. During mild winters this is still tolerable, but with the onset of real cold weather the conditions will become unbearable. On the other hand, it's easy to spend a few hours rectifying the situation.
Let's sum it up
As you can see, on all modifications of the domestic Niva SUV, the interior heating system works extremely poorly, and this is mainly due to its design flaws. For this reason, vehicle owners have to constantly look for different ways to solve the problem, constantly upgrading the stove in the car.
As practice shows, it is not difficult to correct all the shortcomings and improve the interior heating. Any driver can carry out the procedure for independently tuning the interior heating system in a Niva-21213 car.