The car drive part responsible for transmitting torque from the gearbox to the wheel is called a CV joint (constant velocity joint) or is also called a grenade due to its external similarity.
The CV joint is a ball bearing that rotates transversely rather than longitudinally. Despite its simple design, the hinge performs a very important function in the vehicle’s chassis system.
The grenade normalizes the constantly changing angle of the axle shafts connected to each other, which allows the front wheels to freely turn left and right.
There are two CV joints in one car:
- The internal one is designed to transmit rotation from the gearbox to the shaft.
- The external one transmits rotation from the shaft to the hub.
Replacing the outer and inner CV joints of Lada Kalina: photo, video
CV joint (constant velocity joint - approx.) or popularly just a “grenade”, is designed to transmit torque to the wheels of a car. CV joints can be internal or external, and the devices themselves are quite simple in technical terms and consist of a ball bearing that rotates transversely to its axis.
In the video, replacing CV joints on a Lada Kalina:
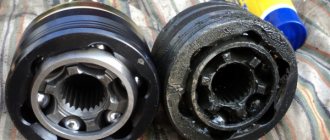
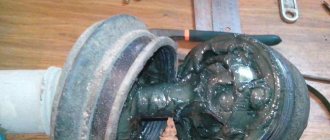
Failure of the CV joint on the Lada Kalina is a very common occurrence, and the main reason for its failure is torn anthers. Because, together with dust and water falling under them, the lubricant turns into thick mud, and it is no longer able to fully perform its functions.
Replacing the outer CV joint
In the process of replacing the outer CV joint
The work of replacing an outer or inner CV joint is not very difficult and can be done by any motorist who has at least once repaired a car with his own hands. And in order for the repair to be easier and faster, you need to prepare the following tools:
- Socket heads for “17” and “30”.
- Driver or ratchet.
- Extension for the wrench.
- Jack.
- Wheel chocks.
- Hammer.
- Vise.
Step-by-step disassembly procedure
After you are convinced of the malfunction of one or another CV joint, you can begin to work.
- First of all, we tear off the mounting bolts from the wheel and the hub nut, then we set the wheel chocks under the rear wheels. (To make it easier to tear off the nuts, it is better to use an extension for the wrench - approx.).
- We put the car on a jack and hang the wheel.
- We remove the wheel and, for greater reliability, place it under the car next to the jack.
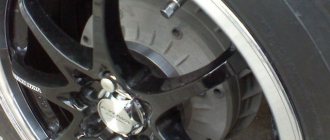
- Now that this picture appears before you, all that remains is to unscrew the 2 bolts that secure the ball joint to the steering knuckle. Unscrew the bolts marked with a red marker on both sides.
- When unscrewing the ball joint, apply force and use a wrench extension.
- Turn the steering wheel as far as possible to the side and slightly pull the steering knuckle with the stand and remove the outer part of the hub along with the CV joint (For convenience, you can make several gentle blows with a hammer - approx.).
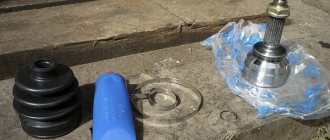
Dismantled CV joint - The next step is to dismantle the old boot and clamps. You shouldn't use them again; it's better to take a set of new ones.
- Next, you need to remove the CV joint itself. If you have a special removable device, then use it. If not, then you will have to knock it out of place with a hammer. Without causing strong blows, the CV joint will move out of place
- Hit the CV joint with a hammer, rotating it along the axle shaft. After some effort, the CV joint should give way.
If the internal CV joint is supposed to be replaced, then work 1 to 6 should be performed as well, after which, using a pry bar, we remove it from the gearbox and take out the entire assembly.
We take the inner CV joint assembled with the axle shaft to a vice where we clamp it and dismantle it.
- After the “bare” axle shaft appeared before us, the work on removing the CV joint can be considered completed.
Step-by-step assembly procedure
Work on assembling all parts should be carried out in the same order as removal, however, there are some nuances in these works.
- First of all, we put the new boot on the axle shaft; this may cause some difficulties. To make the task easier, the axle shaft can be coated with lubricant.
- Then add lubricant to the CV joint. New lubricant added to CV joint
- And the remains are in the dustbin.
- Now you need to use a hammer and a block to install the grenade on the axle shaft, using gentle blows we mount it in place.
- After it is fixed, we remove the air from the boot and secure it with clamps.
- Next, when everything is installed, all that remains is to put on the steering knuckle, fix the new hub nut and put on the wheel.
Tighten all the nuts and lower the car from the jack.
All work on changing the CV joint, if the work is carried out correctly, will not take more than 1.5-2 hours. You can check the quality of the work performed immediately after the repair. If you start driving with the wheels turned to the side and there is no crackling, squeaking or noise, it means that the repair was carried out correctly and the car can be safely operated further.
Signs of CV joint failure
The first signs of a faulty grenade are crunching sounds in the area of the front wheel on turned out wheels when starting to move. When the fault is severe, noise appears at less significant loads.
The anther begins to “repair”
Selection of CV joints
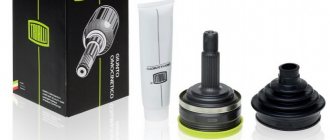
CV joint in original packaging. Usually inside the package is a pomegranate produced by VIS
There is no consensus among car owners regarding the choice of one or another brand of constant velocity joint, but clear leaders stand out:
- VIS.
- GNK. Original packaging of GNK CV joint
Inside the GNK CV joint package - boot, CV joint, clampsGNK outer CV joint installed
- GLO.
Basic faults
The most common failures of a grenade include: failure due to contamination and due to wear of the part (end of service life or defect).
A faulty grenade can itself reveal its unsatisfactory condition in the form of crunching sounds, crackling sounds when turning wheels, and body vibrations. But in this case, you will have to buy a new part, but you can notice the malfunction much earlier (at the stage of damage to the cover) and prevent serious repairs.
There are several ways to identify a breakdown:
- shake the drive shaft with your hand. If play is detected, the element should be replaced;
- Turn the steering wheel all the way to the left, and then to the right, and at each stage assess the condition of the anthers. If damage (cracks, breaks) is detected, replace them.
The CV joint is protected by anthers from getting dirt into it, which disables the part. But their service life does not last forever; regular inspection of these parts is necessary (as described above) to prevent more serious damage to the grenade.
When operating a car with a faulty joint, also known as CV joint, there is a high probability of it breaking in half. In this case, the vehicle will not be usable. This means repairs will be required and most likely (if this happens on the road) expensive tow truck services.
It is recommended to replace the grenade in a timely manner to avoid unpleasant situations.
An internal CV joint will cost an average of 1,500 rubles, an external CV joint will cost 1,300 rubles. For the anthers they will ask about 150 rubles each. Replacing anthers will cost much less.
Replacing CV joints at a car dealership will cost 1,200 rubles (600 rubles each).
It is recommended to buy a new part using an old one, so the likelihood of an incorrect purchase is minimized. In addition, the purchase of CV joints should be carried out in trusted stores. You should not buy these parts at a disassembly site; it is possible that a breakdown will occur within a few meters.
It is recommended to drive the car onto an inspection hole or overpass, put the handbrake on, engage the gears and support the rear wheels with wheel chocks to ensure safety during repairs.
We arm ourselves with the following tools: wrenches 17.19, socket 30 and 13-17, mount, wheel wrench, wrench, lift (jack), lubricant and pliers.
Both hinges, internal and external, are located on the shaft drive, which means replacing them is identical and the point is to get to this very drive.
- At the rear on the crankcase protection we unscrew two nuts with a 19mm wrench, and at the front there are also two, but with a 17mm wrench.
- Drain a little oil (less than half) from the box.
- From the required side we tear off the wheel bolts with a balloon.
- Unscrew the nut of the outer grenade using a 30mm socket.
- We lift the vehicle using a jack.
- We remove the wheel by unscrewing it first.
- Find the bolts on the hub that secure the CV joint and unscrew them using a 13mm wrench (only two bolts).
- Use a pry bar to move the hub away from the reaction rods.
- We take the grenade pin out of the hub, to do this we pull the stand towards ourselves.
- We move the shaft drive aside.
- Now you need to remove the inner hinge from the box. To do this, open the hood and, using a pry bar inserted between the parts, jerk it towards the box. The CV joint must move, otherwise we repeat the action. As soon as it works, we go down to the wheel arch and remove the shaft drive with two CV joints.
- Remove the clamps (large and small) of the protective cover from the hinges. If damage to the anthers is detected, we replace them; if the condition is satisfactory, we move them to the side.
- Using a hammer, we hit the inner clip of the inner grenade with force, making sure that it flies off. We repeat similar actions on the other side.
- We remove the old rings from the shaft drive, put on new ones and a boot.
- We install the new hinge using a hammer and lubricate it and the boot with grease.
- Using clamps, we fix the protective cover on the grenade and the shaft. We do the same with the second part.
- We drive the shaft drive into the box, having first screwed the nut onto the CV joint.
- We collect spare parts in reverse order.
Replacing the CV joint on a VAZ 2110 with your own hands
CV joint - A constant velocity joint, which is also called a “grenade,” can cause a lot of problems for the owner of a VAZ 2110 if the replacement is not carried out in time. This material describes in detail how to replace a VAZ 2110 CV joint. We will look at the design of the joint, the main faults and their symptoms.
Purpose and device
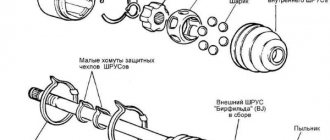
The CV joint performs an important function in a car; it consists of seven parts:
- Retaining ring.
- Balloons.
- Separator.
- The boot, which is indicated in the technical manual as a bellows cover.
- Frame.
- Drive shaft.
- Inner ring.
The VAZ 2110 drive unit is responsible for transmitting torque to the wheel from the gearbox. The CV joint allows the front wheel pair to make turns by normalizing the changing angle between the axle shafts. The machine has two grenades: the external one transmits rotation to the hub, and the internal one is needed to transmit rotation from the gearbox to the shaft.
Signs of CV joint failure
Wear of the grenade due to defects or the end of its service life and contamination of parts are the most common failures of the angular velocity joint. A faulty CV joint will itself “inform” the driver that it is time to replace the outer joint and boot. While driving, a crunching sound appears, crackling sounds are especially noticeable when turning, and vibrations appear in the body of the VAZ 2110. If measures are taken in time, then you will not have to replace the internal and external hinge; it will be enough to install a new boot. To find out the extent of the damage, you will need to conduct an analysis.
You can identify the breakdown and confirm your guesses in the following ways:
- Turn the steering wheel all the way to the right, and then to the left. During this process, the condition of the anther should be assessed. If there are breaks in it, then the element needs to be changed.
- Take the drive shaft and rock it from side to side. If play appears, then replacement of the inner and outer CV joints is required.
Anthers protect the grenade from dirt, which destroys the part. They wear out faster than other components of the assembly, so the covers should be inspected regularly. If you ignore the malfunctions and continue to use the car, the CV joint on the VAZ 2110 may break in half. These are not only costs, but also the danger of getting into an accident, because a breakdown can happen on the road.
Necessary tools and preparation for work
- Standard screwdriver set.
- Extension.
- Mounting and breakdown.
- Set of socket wrenches.
- Hammer.
- Jack.
To make repairs convenient, the “ten” should be driven onto an overpass or into a pit, do not forget to put the car on the handbrake. You need to put clamps under the rear wheels, and then engage the gear. Both CV joints are installed on the shaft drive, replacement takes place according to the same scheme.
Step-by-step instruction
- We unscrew the nuts on the crankcase protection, there are two nuts on each side, 19 at the back, 17 at the front.
- Drain some of the oil from the gearbox (less than 50%). We remove the bolts using a spray can from the side of the faulty grenade. Armed with a 30mm socket, unscrew the outer CV joint nut.
- We jack up the car and remove the required wheel. On the hub you will see two bolts that hold the grenade. We unscrew it with the 13th key and move on.
After the work is completed, you can hit the road to test the new grenade. If you still have questions, you can watch the video instructions below.
Troubleshooting grenades
Causes
Without exception, all specialized literature states that in the manufacture of CV joints only super-strong alloys are used, the wear of which is minimal and practically unnoticeable. But as practice shows, and especially the sales statistics of any car dealership, nothing lasts forever under the sun, including CV joints. This is due to:
- Counterfeits, defective components and frankly low quality;
- Poor quality and sometimes lack of lubricants;
- Damage to the boot (and this is a separate topic) and, as a result, “undesirable elements” getting into the hinge.
Before replacing the CV joint on a VAZ 2110, it is necessary to troubleshoot it, preferably with your own hands.
Checking the outer CV joint
Smart people call changes in the properties of a part, its dimensions and the presence of wear on its rubbing surfaces wear, which we will look for in constant velocity joints. The main sign of extreme wear of a “grenade” is its “crunch”, which appears when the ball rolls in a groove that has wear, as a rule, “crunch” appears when the car moves in turns, sharp accelerations and when overcoming obstacles. The following actions will help you to finally verify the malfunction of this unit, which will cause a characteristic sound:
- When starting the car, create slight jerks;
- When the load changes (accelerate sharply and release the gas).
You can also try to move the shaft between the “grenades” in the transverse direction to feel the characteristic sound of wear - backlash.
Checking the inner CV joint
Although both hinges are links of the same chain, it must be said that due to the nature of its operation (significant loads and operating angles), the external hinge fails much faster, although it is smaller in size than the internal one. The above-described symptoms relate to a greater extent to external hinges, which raises a reasonable question - how to check the internal “grenade” since in its working position it is almost impossible to achieve a large operating angle? The fact is that, unlike the external one, the internal “grenade” can signal with sounds that it is malfunctioning when the car is moving in a forward direction, especially when overcoming all kinds of obstacles (bumps, snowdrifts, holes). It will also help to verify the malfunction by checking the shaft by hand for play. Finally, the following experiment will help you convince yourself of the need to replace the device:
- We suspend the driving wheels of the car, which will bring the internal grenade to the maximum operating angle;
- We start the engine;
- We engage first gear.
If the inner hinge has extreme wear, that peculiar crunching sound will appear, which suggests immediate repair.
How to independently replace the internal grenade on VAZ cars
CV joint (constant velocity joint) is a mechanism that allows you to transmit torque between misaligned shafts. The device is actively used on front-wheel drive vehicles. On each shaft coming out of the gearbox there are two of them - internal and external. Repair is impossible; if the unit breaks down, it is replaced as an assembly.
In what cases is it necessary to replace the inner CV joint?
Replacing the internal CV joint on front-wheel drive VAZ vehicles is required if the following symptoms are present:
- Crunching and knocking noises when driving and accelerating in a straight line;
- Vibration and shock when changing gears;
- Significant play when testing by hand;
- If the “grenade” fails completely, the vehicle cannot move further.
The main reason for the malfunction of the VAZ grenade is the entry of water and dirt through the hole in the torn boot. The second possible cause of failure is a sharp press on the gas with the wheels fully turned, although in this case you risk killing the external rather than the internal grenade.
Be sure to read
In addition to the above, replacing the internal CV joint on VAZ-2110 and other models may be necessary if the quality of the previously installed joint is poor.
Replacing the inner CV joint with your own hands
The procedure for replacing a “grenade” is the same for the entire front-wheel drive VAZ line, starting with 2108 and ending with VAZ-2115, “Kalina”, “Priora”, “Grant”. Before removing the inner CV joint, the oil is drained from the gearbox. Then proceed according to the following algorithm:
- Unlock and unscrew the hub nut. To make the work easier, a piece of pipe about 1 meter long should be put on the key.
- The desired side of the car is hung on a jack or lift.
- Remove the wheel.
- Remove the washer located under the hub nut installation site.
- Disconnect the steering tip.
- The CV joint is removed from the hub.
- Using a pry bar, remove the drive and internal joint from the gearbox.
Note: when removing both drives at the same time, a suitable mandrel should be installed in their place.
How to change the “grenade” with the drive removed? To do this, clamp the shaft in a vice, loosen the clamps and remove the boot. After this, the hinge is knocked off the splines with hammer blows.
The new CV joint should be hammered by applying light blows to its end with a hammer. For this it is better to use a wooden mallet. The “grenade” is first filled with a special lubricant.
Before installing a new constant velocity joint, it is necessary to clean its seat from old grease and install a new boot. Assembly is carried out in reverse order.
The repair is considered complete after successful sea trials. In this case, there should be no extraneous sounds from the drive side in all modes of vehicle movement.
Boot replacement and repair
The boot can be changed without removing the grenade if you have special equipment. His work is demonstrated on video.
If you do not have such a device, to remove and replace it, you must perform the above procedure for removing the drive and dismantling the hinge. The procedure is necessary if there is even minor through damage on the boot.
Temporary repairs to the CV joint boot can be made without removing it from the vehicle. To do this, you need to thoroughly clean and degrease the damage, then seal it with a piece of rubber and cyanoacrylate-based glue (superglue).
Note: express repair is a temporary measure. Replacing the inner joint boot may be delayed for a short time, but not completely cancelled. Typically, these types of repair methods are used to get to the point of repair.
CV joint repair
As mentioned above, the hinge cannot be repaired. Conventionally, one of the repair measures includes washing the “grenade” after driving with a damaged boot.
Washing is carried out at the same time when the damaged boot on the pomegranate is replaced. The hinge is carefully knocked off the shaft, inspected for damage and thoroughly washed to remove any dirt and grease in gasoline or kerosene.
After washing, the assembly is filled with lubricant and mounted in place, having previously installed the boot. The procedure makes sense only if there are no obvious signs of a joint malfunction.
A crunchy or knocking part definitely needs to be replaced, since wear forms on the working surfaces of the inner race, and it is no longer possible to stop the destruction. Continued operation of the vehicle may be dangerous for the driver and other road users.
When to replace
In order for this part to work long enough, sand, dirt and dust should not get into it. Contamination significantly accelerates wear and reduces the service life of the unit. But to protect against this, a boot is provided, which can become unusable relatively quickly. Therefore, timely replacement of the boot will keep the CV joint in working condition for a long time.
The wear of the CV joint is indicated by a noticeable crunch and extraneous sounds when turning the steering wheel. In this case, it is recommended to replace the unit.
Where is the inner CV joint of the VAZ 2110 located?
It’s easiest to see it from below the car, by the way, and you’ll have to remove it by crawling under the bottom, although you can do without it (For example, you can put planks under the front wheels and lift the front part with two jacks, provided that both jacks stand on these planks, thereby in front of will be higher, this is especially convenient if the car is tall), but it’s still better to put the car on a lift and replace the CV joint you need with a new one, but we’ll immediately explain to you what outer and inner CV joints mean so that you understand this and are no longer confused (It’s just that in the article we will often talk about them and so that you can immediately understand what kind of CV joint we are talking about), so the outer one is the one that faces the car wheel and is inserted into the hub (Both outer ones are indicated by green arrows), and the inner one is the one that is inserted into the box (They are indicated by yellow arrows) and there are four total CV joints in front-wheel drive cars, two of them are located on the left side and go to the left wheel, and the other two are on the right and go to the right wheel, but here are the drives on which CV joints Only two are installed and both of them are indicated by blue arrows in the photo.
The location of the internal and external CV joints of the VAZ 2110 is indicated by arrows
Nissan X-Trail › Logbook › Inner left front grenade - damn it)))
I don’t even know where to start)) How much time I wasted: - searching for useful information on the Internet; — visited all the investigations in the city; — called investigations in cities that are closer; — how many people have I troubled with my problem))). etc. Finally I made up my mind and ordered a low-quality substitute for Febest (0211-T30LH). By the way, it’s cheaper at www.repart.ru/.
Internal CV joint, gearbox side (0211-T30LH)
When purchasing the car, I immediately noticed the torn boot of the inner left grenade. Well, okay, I thought))).Then I’ll put on the dust cover and that’s it)))…that’s not the case. I called some stores in the city (I was looking for a boot), everywhere from 1500 rubles. and higher. I decided to wait and order through existential for 750 rubles. Febest (0215-071T)
Internal CV joint boot (0215-071T)
While I was waiting for the boot, I wrapped a bag))) with lubricant)). I noticed a slight vibration especially during acceleration. Well, it’s a small thing)))… I waited for the boot. I changed it, it took about 2 hours to replace it… Then I went for a ride)) only then I read on the Internet about the vibration during acceleration. Everyone who wrote about vibration mentioned the torn left boot! In existential terms, the cheap Febest substitute at that time cost 4,700 rubles, a couple of months later it began to cost 3,200 rubles.)) Having already driven 6-7t.km. The vibration has increased and it’s not bad))) (by the way, the boot is still intact) I was thinking about a used drive unit, but if X-trails have this problem, then it makes sense to take a used one. I read on the Internet that the left front drive fits from Nissan Cefiro (A33), from Nissan Primera (P12) and, with minor modifications. I was more inclined towards the drive from the Nissan Cefiro (A33), because... The internal grenade will be stronger)).
But nowhere in Kurgan was there a used drive (((in other cities a used one from 5-7 t.r. immediately disappears. To order through the website www.japancar.ru/ it also costs about 5 t.r. and so on will come...unknown((In the end, I made up my mind and ordered Febest (0211-T30LH) 2860 rubles, I couldn’t continue to worry myself and those around me)) Only reviews about those who installed Febest were not found as a substitute((about the fact that Febest is complete shit..., this okay)) let’s see how long it lasts and if the vibration goes away))
As soon as it arrives, I’ll change it right away))
Video text
When removing the CV joint, the retaining ring jammed. Before that I screwed in the hub bolt, but it didn’t bring any results, it just became deformed - I could barely unscrew it. Also, shock manipulations were useless. How I solved this problem, watch the video. POPULAR VIDEO OF THE CHANNEL: RESTORING A BALL JOINT WITH YOUR OWN HANDS. HERE: https://www.youtube.com/watch?v=1-CjF.
REPAIRING BENDEX – EASILY WITH YOUR OWN HANDS. HERE: https://www.youtube.com/watch?v=vdeFs.
Good luck to everyone with the renovation!
===================================================== ====Optimization (not for reading!) remove the grenade, CV joint, removing the CV joint, how to remove the CV joint, cannot be removed, car repair, car repair, auto repair, chassis repair, replacing the CV joint, grenade VAZ, grenade, replacing the grenade, outer boot , engine repair, how to remove, dismantling, grenade repair, remove, axle shaft, replacing a grenade with abs, replacing an external grenade, replacing a grenade on a Prior, a grenade with abs, difference between CV joint and abs, CV joint puller (replacing a grenade), splines, removing a grenade , hub, grenade stuck, knocking out CV joint, grenade boot, replacing grenade boot, solaris box, solaris repair, box repair, repair, Solaris, solaris, hub puller, drive, tripoid, OLEG Vinokurov boot, remove grenade, CV joint, CV joint removal, how to remove a CV joint, not removable, car repair, auto repair, auto repair, chassis repair, CV joint replacement, VAZ grenade, grenade, grenade replacement, external boot, engine repair, Car repair, how to remove, dismantling, grenade repair, REMOVE, how to remove CV joint from the shaft, how to knock the CV joint off the shaft, the CV joint cannot be removed, how to knock the CV joint off, how to remove the grenade from the drive, how to knock off the outer CV joint, how to remove the grenade, how to knock the CV joint off the shaft, how to remove the CV joint from the drive, how to remove the CV joint without a puller ,the grenade cannot be removed, how to knock a grenade out of the drive, replacing the CV joint, the outer CV joint cannot be removed, how to knock a grenade off the drive, how to knock a grenade off the shaft, how to remove the retaining ring on the CV joint, the retaining ring of the CV joint, the outer CV joint, how to knock out a grenade, daewoo lanos, how to shoot down a grenade, VAZ 2110, replacing CV joint drives, replacing CV joints, VAZ 2110, 2112, Kalina, Granta, Priora, replacing CV joint drives, outer CV joint, cars, auto, car, car repair, do-it-yourself VAZ, Lada Kalina repair , AvtoVAZ, CV joint replacement, grenade replacement, external grenade, the cv joint replacement, toyota joint replacement, how to change a grenade, replacing a CV joint with your own hands, changing the CV joint, external grenade, external grenade, CV joint boot, cv joint replacement, ersatz gleichlaufgelenk, puller CV joint, replacing a grenade with a puller, a grenade puller, a do-it-yourself puller, how to make a puller, making a puller, how to remove a grenade with a puller, replacing the outer CV joint, extractor, extractor cv joint, ท่านครับ-ตาพวกนายแล้ว ข้อรูปแบบสากล, abzieher gleichlaufgelenk . replacement of the outer Geely grenade, replacement of the Geely ck grenade, grenade, CV joint, puller, replacement of the grenade (CV joint) with a puller, replacement, replacement of the outer grenade and internal drive boot on a VAZ 2112, replacement of the outer VAZ 2112 grenade, replacement of the internal drive boot of the VAZ 2112, replacement grenades and boot of VAZ 2112, replacement of outer CV joint of VAZ 2112, do-it-yourself VAZ repair, do-it-yourself VAZ repair, youtube editor, toyota
In the article we will look at how to change a grenade on a VAZ-2109 and similar cars. The latter include models 2108, 21099, 2113, 2114, 2115. However, all front-wheel drive VAZ cars have a similar design, so our manual can be used when repairing other models. But first, let's look at what a grenade is, what it consists of, and for what purpose it is installed on a car.
What else needs to be dismantled?
Before dismantling the joint, remove the cotter pin from the tie rod end pin. Unscrew the nut with a 19mm wrench. Install the puller on the pin. Rotate its bolt until the tip pops out of the steering knuckle. Move it aside so it doesn't interfere. Tie the brake hose with flexible wire so as not to accidentally tear it. Then you need to unscrew the two bolts that secure the ball joint to the hub. By pulling the strut towards you, you can remove the CV joint from the hub. But in order to remove the entire drive, it is necessary to remove the internal CV joint of the VAZ-2110. The cost of replacing one side is approximately 900 rubles. How much will the kit cost? If you go to a car service, the cost will be higher.
How to properly remove and disassemble the CV joint in your garage
AUTOSIZE
Hello, dear car enthusiasts! Front drive wheels provide car owners with many bonuses in the form of: more responsive steering, increased maneuverability, stability on slippery roads and other delights.
In return, the machine, namely its chassis coupled with the drive, will require additional attention. The front wheels are able to pull the car only thanks to the presence of a shaft connecting the hub to the variable gearbox.
However, that's not all. It would be impossible to transmit rotation from the transmission to the wheels without special devices installed at the ends of the shaft - CV joints.
A constant velocity joint is, today, the only way to transmit rotational motion between axle shafts located at an angle to each other.
In this regard, any self-respecting car enthusiast should know how to remove and disassemble the CV joint, diagnose, maintain and repair it.
How to remove a CV joint yourself without the help of a car service
Despite the apparent complexity of the front-wheel drive design of a car, regardless of its make and model, the design of this unit is quite simple and similar in all cars.
In order to remove and replace the CV joint, it is enough to have a garage with an inspection hole or an overpass to facilitate access to the lower part of the car, as well as a set of standard tools.
As a rule, experienced car enthusiasts manage their work without any special devices, but if there is a desire to speed up repair work, you can purchase a CV joint puller.
Considering that each drive wheel has two hinges, repair work can be carried out depending on the following types of failure:
- removal of the internal CV joint and its repair;
- removing the outer CV joint;
- Removal and repair includes a shaft and two joints.
How to remove the inner CV joint in the garage
Repairing an internal CV joint is an event that is quite rare, but you must have the skills to handle this mechanism, because for its long life it is necessary to carry out preventive measures, replacing the boot and lubricant.
Before describing the technology that includes removing the internal CV joint, it should be noted that in this case, an inspection hole will be simply necessary, because the joint cage is bolted (6-8 pieces) directly to the differential gears, and this is the lowest point of the transmission.
After all the fastening bolts have been unscrewed, the steering wheel should be turned to free the spline joints from moving freely. Using a pry bar, the CV joint is very easily removed from the mounting socket. Removing it from the shaft is also easy; to do this, you just need to unfasten the retaining ring and the boot clamps.
A strong recommendation to all car enthusiasts: you should not remove the CV joint from the shaft under the car and, especially, do not disassemble it. It is much more convenient and rational to remove the shaft with two CV joints at the same time, and then perform all the manipulations on the workbench with a vice.
How to remove the outer CV joint yourself
The outer CV joint, which is installed directly at the hub, although more accessible, will require more time and effort to remove. Here you will have to almost completely disassemble the front suspension.
The wheel is removed, the hub nut is unscrewed and the lock washer is removed. After unscrewing the lower ball joint, the moving strut allows you to remove the CV joint axle shaft.
Repairing CV joints can be associated with certain difficulties. The first is the inability to remove the axle shafts or shaft from the splined joint. There are several options for getting out of the situation. First you need to take a wooden or brass spacer and try to knock out the axle shaft.
If nothing could be done at this stage, you will need a CV joint puller. One of the most common and simple pullers is made in the form of a horseshoe, which is attached to the axle shaft, and the thrust bolts remove the CV joint when rotating.
It is not difficult to disassemble the CV joint itself; for this you need:
- apply marks on the holder and body for reassembly in the same position;
- tilt the shaft with the holder at the end as much as possible to one side;
- Remove the ball from the holder on the opposite side and perform the procedure with all the balls in turn.
There is an opinion among some experts that it is enough to simply wash the CV joint with diesel fuel and “fill it in” with lubricant again without disassembling it.
In this case, there is a high probability that fragments of old retaining rings or other debris will remain inside. If the CV joint has already been removed, then it is better to disassemble it, wash it, reassemble it and lubricate it.
Installation of the CV joint after replacement or maintenance is carried out in the reverse order of removal.
Replacing the corner joint boot
To carry out the replacement, you need:
The drive axle is secured in a vice. This must be done carefully so as not to damage the part. Using a screwdriver, loosen the clamps that secure the anthers sitting on the bodies of both grenades. After removing the clamps, the anthers can be cut off. They won't be needed anymore. Using a hammer with a wooden head, both grenades are removed from the drive axle.
The hinges are washed with gasoline. A thorough inspection of the technical condition of the hinge parts is carried out. When there is no need to replace other parts, new boots are installed on the shaft. A special lubricant is packed into the body of the external grenade. Then the part is pressed onto the drive axis with a hammer. Lubricant is applied before the retaining ring is put on.
The clamp securing the boot is clamped with a special tool on the drive axis. After putting the boot on the grenade body, lift it slightly with a screwdriver. This is done in order to allow the accumulated air to escape.
The installation of the internal grenade boot is also done. There is one small difference. A plastic plug must be attached to the end of the internal hinge axis. After this, the clamps securing the boot are tightened. The replacement has been completed, all that remains is to install the drive shaft.
The work of replacing VAZ 2110 anthers is available to almost every car enthusiast. It doesn't pose much of a challenge. You just need to follow the sequence of operations exactly and be careful.
Front-wheel drive and CV joint
What is a CV joint? This is a kind of hinge, which is responsible for equal angular velocities. The VAZ CV joint, or as this part of the grenade is called, serves to transmit torque directly to the wheels of the car. The design of this part, although responsible for important running parameters, is a fairly simple design. Thus, a car grenade consists only of a ball-type bearing, rotating not along its axis, as is customary, but across it.
Note. In other words, a hinge or grenade connects axle shafts that are at an angle to each other. At the same time, we should not forget that this angle is constantly changing, and the grenade or CV joint is the part that normalizes all this.
Required spare parts
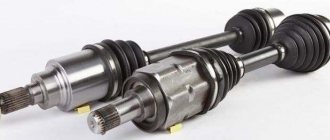
Each car is equipped with two grenades: internal and external. The first joint transmits rotation to the shaft from the gearbox, the second – to the hub from the shaft. Depending on the scope of the repair, you may need:
- internal hinge (article 302315, 2108-2215056);
- external CV joint (article 3107K, 2110-2215012);
- front wheel drive shaft (article 2110-2215070, 21100221507000);
- cover (article 2110-2215068, 21100221506800, 2108-2215068);
- buffer (article 2108-2215073-01);
- hinge clamp (article 2108-2215086);
- internal hinge retaining ring (article 2108-2215104, 21080221510400, 2121-2215084);
- thrust ring (article 2121-2215082);
- clamp (article 2108-2215034Ч, T-00040, 2108-2215036, 2108-2215034-31, 2108-2215034);
- protective ring (article 2108-3103060, 21080310306000).
Attention! It is better to purchase a new hinge using an old grenade, so the risks of purchasing the wrong part will be reduced to zero. It’s better to go to a trusted store for a CV joint.
First type
Let's start with the most popular. This is the so-called “Ford” clamp. Recently, it can increasingly be found in kits from various manufacturers of grenades for the VAZ 2110 and other domestic cars. Among its advantages, of course, is the full connector, that is, if you accidentally forget to put it on in advance, you can do it at any time. In addition, you can’t “tighten” it. Among the disadvantages, of course, is its disposability; you can use it a maximum of 2 times. Many may think that there is always a new one in the kit, but they would be extremely mistaken. It also happens that he is not there. Anything can happen. To install it you will need pliers or regular side-cutting nippers. We just tighten it as much as we can with our hands, then squeeze it.
Second type
These are purebred Chinese clamps. As soon as you see them, you will immediately understand why there is such an opinion about them. These clamps are simply made almost from foil. That is why they are tightened in two turns. To install, simply place the screwdriver into the plastic to avoid turning, then tighten it, bend it, bend the antennae, cut off the excess. The advantages include ease of installation; absolutely no tool is needed except a screwdriver. Well, the downside, as with the previous option, is that it is disposable, since after installation you will have to cut off the extra tail of the clamp with scissors.
Third type
The third type can only be found on grenades for domestic cars. On the one hand, they are the most convenient, since they are made of thick metal, which, by the way, is quite soft; installation takes about five seconds. It can be installed at least 10 times, it all depends on accuracy. Of course, there is one drawback - the need for a special clamp, the cost of which is several times higher than the cost of replacement at a service station. Of course, if you plan to buy only the same grenades, then you can buy the necessary thing.
How to Check All-Wheel Drive on a Captiva ~ AVTO-MELVIN.RU
Four-wheel drive
"Chevrolet Captiva"
The Chevrolet company produces cars for various purposes. Among them are comfortable passenger cars, business class cars, SUVs and small cars. "Chevrolet Captiva" is intended for off-road travel and public roads.
This car is positioned as a jeep. The all-wheel drive version of the car is supplied to the Russian Federation. Let's look at the principle of operation of the drive device.
How the Chevrolet Captiva all-wheel drive works
In ordinary driving conditions (highway, asphalt, dry and hard soil), the Captiva moves only thanks to the front drive. The rear axle does a passive function. If you drive onto a road with a difficult surface (mud, melted snow, etc.) and the front wheels begin to slip, the wheels of the rear axle of the car are automatically connected. Activation occurs by means of a special clutch lock.
The transmission of torque from the engine to the tire is carried out through a gearbox and transfer case, which in turn distributes power flows along the axles. The rotational motion is supplied to the wheels using axle shafts or CV joints. In the Chevrolet Captiva, torque is distributed equally between the front and rear axles.
Climbing with and without ESP.
Captiva - all-wheel drive - motherfucker.
Four-wheel drive does not work
preconditions
The all-wheel drive system in most cases has three locking devices:
- front interwheel differential;
- coupling;
- rear interwheel differential.
When the front wheels slip, a signal is sent to the clutch control module that blocks it. After which the rear-wheel drive is engaged, which helps to drive well off-road.
The clutch works as follows. When the drive axle shaft begins to spin rapidly (wheel slipping), the pressure of the rotating discs increases in the clutch, which is transmitted to the discs of the disabled axle. As a result, the coupling is rigidly locked onto the body and both axles are put into operation. When the rotation speed of the driven shaft is miniaturized, the all-wheel drive
turns off.
In the Chevrolet Captiva, the clutch is locked and unlocked automatically, without the driver's role.
Additional features and connection with systems
The all-wheel drive system in the Chevrolet Captiva interacts rather closely with the driving assistance assistants (ESP, Abs).
The car is equipped with ESP, which subsequently affects the operation of the chassis and gearbox. The brake system control unit monitors the speed of rotation of all wheels of the car. From it, information is sent to the clutch control module.
When entering a turn, when the rear wheels are spinning faster than necessary, the directional stability system automatically disengages the rear axle and the clutch is unlocked. In this case, ESP will brake one of the wheels to align the trajectory of the machine. When the front wheels slip while turning, the clutch is blocked and the clutch engages fully
drive unit. At the same time, ESP brakes one of the rear wheels.
Electrical adjustment of all-wheel drive on Captiva
» allows you to improve the off-road properties of this car.
Automatic all-wheel drive
widely used on modern cars. This greatly simplifies the operation of the car, which leads to greater driving comfort. In addition, such a system increases road safety and vehicle cross-country ability.
Self-replacement of the VAZ 2110 CV joint
The CV joint (constant velocity joint) is shaped like a grenade. Its task in a car is to transmit torque to the wheels of the car. It includes 7 elements:
- outer ring in the housing;
- separator;
- balloons;
- inner clip;
- drive shaft;
- corrugated cover (aka boot);
- retaining ring.
Replacing the CV joint is required if there is play and crunching in the connections of the device when the wheels are turned. Before replacing it, you need to carry out diagnostics and make sure that it is the cause of the malfunction. To do this, you need to check the drive shaft play.
1 way. Grab the drive shaft with your hand and rock it. If there is a large stroke and play, the CV joint must be replaced.
Method 2. After installing the car on the inspection hole, turn the steering wheel as far as possible to the right or left. If cracks or tears with traces of lubricant are visible on the boot, it means that the CV joint boot needs to be replaced. If this is not done, you will soon need to replace the entire part.
Algorithm for replacing the VAZ 2110 CV joint
Before you start work, you need to prepare everything. To do this, secure the car, engage 4th gear, and tighten the handbrake. Secure the rear wheels with wheel chocks. If they are not available, use bars of a similar shape. Remove the protective cap, unscrew the hub nut using an “arm” (extension) - a pipe or a pry bar. After the hub nut is removed, unscrew the wheel mounting bolts.
Also check out
- Using a jack, hang up the wheel on which the CV joint is supposed to be replaced.
- Unscrew the bolts to remove the thrust washer of the hub nut.
- Remove the 2 bolts that secure the lower ball joint of the steering knuckle.
- If the CV joint is being replaced on the right, turn the steering wheel as far as possible to the left, and if on the left, then to the right.
- Pull out the steering knuckle and strut. Remove the splined end of the outer CV joint from the hub. Using a pry bar, remove the inner joint from the gearbox.
- Fix the drive shaft in a vice, remove the clamps from the outer and inner CV joints. Turn the anthers inside out. If they are torn or cut somewhere, you can simply cut them off with a knife.
- Remove the VAZ 2110 CV joint from the shaft. You can use a hammer and a wooden or bronze adapter.
Assembly is performed in reverse order. At the same time, install a new hub nut. Upon completion of the tightening, you need to touch its edge to avoid unwinding.
- When installing the inner CV joint, a plastic plug is placed on the end of the shaft.
- Before installing the VAZ 2110 CV joint, you need to make sure that a sufficient amount of lubricant is applied. Place a retaining ring on the inner CV joint.
- After the drive is placed in the box, place it in the side gear so that it is completely locked. This can be done by lightly tapping the surface of the wooden adapter with a hammer along the entire perimeter of the shaft axis.
We recommend reading
Naturally, the idle speed controller (IAC) is responsible for the idle speed of the engine; with its help, the optimal speed required at .
Let's get acquainted with the process of replacing ball joints on VAZ 2107 cars. To replace the ball joint, you will need to put the car on a lift or.
Other articles have already described how to replace the fine filter on Lada Kalina cars. Today this procedure will be discussed on.
If the fuel used for the car is good, then the fuel filter will need to be replaced after a mileage of 20-30 thousand kilometers. Today, .
Work when replacing a grenade
Before you start changing the VAZ 2110 grenade, the car is set to the handbrake. For greater stability, wheel chocks are placed under the wheels. Sequencing.
- The protective cap is removed.
- The hub nut is unscrewed. Since a lot of force is required, it is necessary to use a wrench extension. Usually, for this purpose, a pipe is taken, which is put on the key. The large lever will help you quickly unscrew the nut.
- The wheel bolts are unscrewed.
- The car is raised on a jack. A wheel is hung from the side of which the grenade will be changed.
- The thrust washer is removed.
- The ball joint is released.
- The steering wheel is turned all the way in the opposite direction.
- The steering knuckle is pulled back together with the strut.
- The splined end is removed from the hub of the outer grenade.
- To reach the inner end of the grenade, you need to slightly pry it with a pry bar.
- The drive axis is clamped in a vice.
- All clamps are removed.
- The anthers are cut off with a knife.
After replacing all failed parts, the VAZ 2110 grenade is assembled. During assembly, you need to install a new hub nut. After tightening it, so that it does not unwind, the nut must be locked.
When installing the drive into the box, it is necessary that it connects with the side gear until it is completely locked. This can be done with light blows from a wooden backed hammer. The blows are applied evenly along the axis of the shaft.
What are the types of CV joint defects?
Replacing a CV joint on a VAZ 2110 involves a preliminary study of the problem: what defect has occurred, so as not to harm the condition of the structure. In practice, there are situations when replacing the internal CV joint of a VAZ 2110 does not bring the expected results, or problems arise during the operation of the new part.
Among the main defects are:
- Unsatisfactory quality of the material from which the parts are made.
- Defective design or counterfeit.
- Low quality components or lack of lubricant. As a result, the grenade quickly receives mechanical damage and breaks.
- The outer CV joint boot of the VAZ 2110 needs to be replaced if debris and dirt gets inside the mechanism.
In the case where the VAZ 2110 internal or external CV joint has not been replaced before, it is recommended to watch a video on the topic and understand the proposed operating instructions.
Causes of CV joint failure
- Factory defect (marriage), low quality metal;
- Violations of installation rules during CV joint replacement;
- Lack of graphite lubricant or its complete absence. Lubricant may leak if the boot is damaged while the car is moving;
- Damaged boots or their poor quality, as a result of which dirt and sand got onto the rubbing elements of the CV joint, which did “their job”;
- Bad roads, bumps, careless driving on a bad road;
- Natural wear and tear of parts (for example, when a CV joint “dies” on a car over the years, there is nothing surprising here).
Disassembling and assembling the drive
Now you need to replace the VAZ-2110 CV joint with your own hands. The hardest part is knocking off the old hinge. If you don’t plan to use it again, but you can’t knock it down, then use the simplest method. Use an angle grinder (grinder). Just follow safety precautions. Otherwise, the disc may bite. But if you plan to reinstall the hinge, try to carefully remove it without damaging the internal and external parts. The old boot can be cut off with a knife or scissors. You definitely don't need it.
First, put the boot on the drive axle. Fixation is carried out only after final assembly. Then install the new CV joint on the drive. But before that, clean all surfaces from dust and lubricant residues. Be sure to replace the retaining ring. Under the boot, fill the grease with graphite that comes with the kit. It is recommended to additionally purchase a tube of similar lubricant to add - there is not enough of it in the kit. Try to force the grease inside the joint so that it gets onto the entire inner surface and balls. Now you can fix the boot on the axle with clamps and install the CV joint in place in the reverse order.
Should I wash it or install a new one?
The most common problem with hinges is dust getting inside the case. Therefore, if you find fresh cracks or cuts on the boot, it is easier to wash and replace the damaged elements. But if the boot is torn a long time ago, then most likely a lot of dirt got into it and the metal is heavily worn. Therefore, only replacing the VAZ-2110 CV joint will help; flushing will not give visible results. And in a month, or even earlier, you will have to carry out all the work again. A new joint can last several years - over five, if it is used sparingly and rarely driven off-road.
At this point, the replacement of the VAZ-2110 CV joint can be considered complete. All assembly work is carried out in reverse order. Try to do as much work as possible during repairs - replace all damaged rubber boots. This way you can ensure maximum service life of the car’s suspension elements.
CV joint - A constant velocity joint, which is also called a “grenade,” can cause a lot of problems for the owner of a VAZ 2110 if the replacement is not carried out in time. This material describes in detail how to replace a VAZ 2110 CV joint. We will look at the design of the joint, the main faults and their symptoms.