Avtovaz cars are popular among car enthusiasts, since the cost of the car and its repairs are inexpensive. The VAZ 2114 car is no exception; it is bought as a workhorse.
The secondary market mainly sells cars with an injection engine and an on-board computer installed in the cabin. Malfunctions that occur in a car can be detected using an odometer and a computer by connecting a laptop with a special program to it.
Car diagnostics
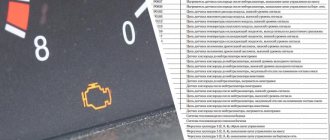
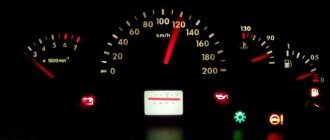
The appearance of a "Check Engine" indicator on the dashboard indicates to the driver that there is a problem in the vehicle's electrical system. You need to understand that driving a vehicle with your own hands and at a gas station can give different results. Special equipment available to professionals will allow faults to be detected with greater accuracy.
Self-diagnosis
On a VAZ 2115, the owner can carry out independent diagnostics and find out what errors are stored in the memory of the engine control unit. The procedure is performed by calling up fault codes on the dashboard or using a diagnostic adapter.
To carry out diagnostics of the electronic instrument cluster, it is necessary to perform a certain sequence of actions:
- Sit in the driver's seat, insert the key into the ignition and press the reset button on the instrument cluster.
- Turn the lock key to the on position.
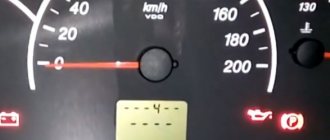
- Release the button, starting the self-test process. Visually, the backlight, all indicators, any symbols on the LCD screens, and the instrument test will appear to turn on (arrows will move across the entire scale in both directions).
- Press the button again and release. The second press displays the instrument panel software version on the screen located under the speedometer (inscription like Uer x. X).
- Press the button again and the screen will display memory errors.
Instrument cluster VAZ 2115, button located on the right side of the speedometer
The driver can carry out self-diagnosis on the electromechanical panel and on the control unit in the following sequence:
- Turn off the ignition.
- Open the cover of the diagnostic connector located on the center console.
- Connect terminal B to the negative terminal of the battery (case). Contact A, connected to the motor casing, is suitable for this.
- Turn on the ignition. The Check Engine light flashes with code 12, indicating the start of diagnostics. The light signal looks like this: a long flash, then a pause (about 2 seconds), two short flashes, a long pause (about 3 seconds). Signal 12 is given three times. If no signal is received, the diagnostic system is inactive or faulty. Next, the Check Engine light will flash with memory errors. Each code is repeated three times. If there are no errors in memory, code 12 will continue to be transmitted.
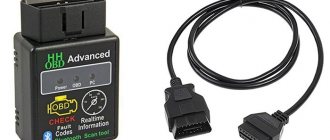
To read controller errors, a special K-Line adapter is used, which is connected through a connector to the diagnostic connector.
This connector is located on the center console behind a plastic plug (under the cigarette lighter and ashtray). The adapter has one end of a USB cable that connects to any laptop. A special program for reading and repairing errors (OpenDiagFree version 1.4 or 1.6) must be installed on the device.
The procedure for reading errors is quite simple, you need to:
- Check the process fluid level.
- Open the connector cover and turn on the ignition.
- Connect the adapter or scanner to the diagnostic connector.
- Launch the program on your laptop.
- Displays existing errors in the program dialog box.
- Decipher the codes using the software interface or decryption table.
- Eliminate the causes of malfunctions and re-diagnostics.
Incorrect data during self-diagnosis
According to reviews from experienced VAZ-2115 owners, the on-board computer on this model cannot be called ideal.
They recommend not relying entirely on self-diagnosis, since the data obtained with its help does not accurately indicate the problems of transport hubs. The self-diagnosis system is based on processing signals from conventional sensors. They cannot convey the specific data needed to identify the problem. Almost all components have flaws. Several controllers are located on the pneumatic system and on the fuel injection mechanism. They can fail either in the event of a serious breakdown or in the event of a wire break.
Most often, VAZ-2115 owners encounter incorrect operation of the generator. It is this unit that often supplies too low or high voltage, which leads to malfunction of all controllers.
Errors that the injector may produce
Malfunctions of the fuel injection unit and combinations associated with engine malfunctions should be placed in a separate group. During self-diagnosis, they may exhibit the following symptoms:
- 44 and 45 - malfunctions in the injection system, the fuel is excessively enriched or, conversely, has run out;
- 55 - at high speeds the fuel mixture is lean.
- 54 - the octane corrector controller does not respond;
- 43 - incorrect signal from the beat regulator, often appears when the electrical circuit is broken;
- 35 - malfunction of the idle speed sensor, must be replaced;
Combinations 44, 45 and 55 should be considered in more detail. If the malfunction is not hidden in the sensors themselves, you can notice its signs on the engine side:
- jerking is felt when changing gears;
- in rare cases, the VAZ-2115 simply crashes for no reason.
- triple;
Instructions for performing diagnostics via a laptop with your own hands
For diagnostics you will need a laptop and a diagnostic adapter. The laptop can be of any power, for diagnostic purposes it does not matter. The adapter is universal and suitable for all VAZ models (video KV Autoservice).
There may be a mismatch between the diagnostic electrodes. In this case, you can buy an adapter. A diagnostic program is included with the adapter, but it can be downloaded on the Internet at specialized sites. They have the same set of functions, they may differ in unique characteristics.
When connecting a laptop, you must turn off the ignition.
One end of the adapter connects to the DR, and the other end directly to the laptop's USB port. After connecting the adapter, turn on the ignition. At the next stage, we launch the program and begin diagnostic work. When the program starts, the computer connects to the electronic control unit.
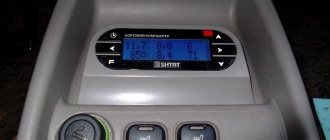
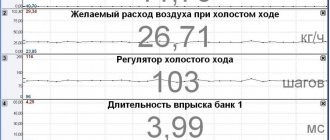
The interface will depend on the loaded program. These can be lists with indicators or graphs with values. Based on these readings, you can draw the first conclusions about the operation of the engine and the main systems of the car.
Pinout
Depending on the DR installed on the vehicle, diagnostic equipment is connected.
1. Diagnostic block diagram
2. Old style pinout
3. OBD-II cable pinout
By purchasing a diagnostic adapter and learning how to do the diagnostics yourself, you can save yourself from visiting a car service center, unnecessary expenses and be able to monitor the health of your car.
Loading …
Diagnostic tool interface
When a list of detected errors is displayed, their explanation can be found in the test file that is usually included with the program. Decipher all errors that may occur in the event of a malfunction.
After deciphering the detected error codes, you should begin to eliminate them. First of all, it is worth checking the sensors, since the correctness of the readings and the operation of the ECU depend on their functionality. A faulty sensor may be causing the error message. For a more accurate diagnosis, additional checks of machine components may be required. Once you have fixed all the problems, be sure to run a test to make sure everything is working without errors.
Don't forget that all data is stored in the microcontroller's memory. Therefore, before a new scan, they must be reset.
To do this, turn off the ignition and turn off the diagnostic equipment. To reset the microcontroller, simply disconnect the negative battery terminal. Then the process is repeated - the laptop is connected and diagnostics are repeated. The process is repeated until all errors are eliminated.
What to do if after replacing the sensor the error does not disappear
There may be several reasons why the error persists:
- it was recorded in the memory of the VAZ-2114 computer;
- you have installed a faulty element (in this case, it must be returned to the store along with the receipt and replaced with a new one);
- The fault was not related to the coolant sensor.
To solve the problem, you need to remove the negative terminal from the battery for a few seconds, then perform self-diagnosis again. If error 14 persists, then you need to contact a service station to establish which sum of codes led to the appearance of this entry.
Source
Connecting the diagnostic connector to the unit
Troubleshooters for elm 327 can be downloaded from the Internet, many of which are free versions. Now your VAZ is ready to detect errors in various vehicle systems and you can always download error codes from us.
Currently, most car manufacturers install injection engines in their cars. And if you own a car with a fuel injection system that uses injectors, then you need to at least know the principle of operation of the injector in order to detect this or that malfunction in time.
Therefore, the processes in this mechanism are as follows. The high pressure air flow is analyzed by a special electronic sensor, which measures a certain volume of air masses. Data from the sensor enters a computer unit, which also analyzes other data, for example, air temperature, engine. After processing all the information received, the computer determines the size of the fuel mixture required for the resulting volume of air in order to obtain maximum efficiency from the engine output.
By the way, they increase engine efficiency. Injector diagnostics are usually carried out after engine malfunctions or when purchasing a used car. A special device for diagnosing the engine management system, the functions of which can be performed by a regular on-board computer with the ability to diagnose engine problems.
A compressor that can measure compression in engine cylinders. This device helps detect holes in the cylinder head gasket, valves, etc. A pressure gauge is a device that can be used to measure the level of fuel pressure and thereby diagnose a malfunction of the pressure regulator, fuel pump, or clogged fuel filters.
Self-diagnosis of faults on the VAZ 2115
Of course, it is impossible to detect a malfunction in the operation of a vehicle without diagnostics. This can be done using special equipment, which can be found at every specialized service station. But you can also check your car for faults on your own. Note that when checking the car yourself, the error codes will not be the same as when diagnosing on the equipment.
Car VAZ 2115 tuning
So, how can you independently diagnose the state of the VAZ 2115 on-board computer? This question came to the mind of every owner of these car models. Now we will tell you about this in more detail. But diagnosing the car is half the battle, because the resulting combinations of faults also need to be deciphered.
Self-diagnosis of VAZ:
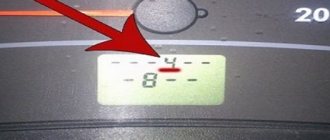
Pressing the odometer button to carry out self-diagnosis of the VAZ 2115
How to decipher codes
If you do not know the meaning of the data displayed on the display, there is no point in checking the functionality of the sensors yourself. Therefore, it is important to know how to decipher combinations. The most common numbers are:
- If code 1 is displayed, the fault lies in the microprocessor of the on-board unit itself. This error can be corrected by changing your computer software. It is important to use only official firmware, otherwise you will destroy the entire electrical system of the car.
- If the malfunction lies in the incorrect operation of the fuel sensor, the display will display 2. The same number indicates problems with the wiring, especially if only 8 is displayed.
- When the voltage in the network increases, error 4 is displayed, and when the voltage is low, error 8 is displayed. If you notice this data, you need to check the generator and battery. VAZ-2115 owners most often encounter generator malfunctions. It will need to be repaired or completely replaced.
- Malfunctions of the signal lamp in the diagnostic circuit are displayed on the display in combination - 12.
- A malfunction of the oxygen level sensor is displayed as error 13. Check the filters, very often they are the cause of this combination. Combinations 33 and 34 indicate mass air flow, in which case the sensor itself may need to be replaced. A malfunction of the controller itself is indicated by code 61 displayed on the display. Experts recommend that if any of these combinations occur, conduct a full check of the vehicle components. Let's start with the electrical wiring.
- Motorists often encounter combinations 14 and 15, which may appear along with an indicator indicating the need to add antifreeze. It is important to correctly interpret this fault: the appearance of this data on the display means that the temperature in the system has increased or decreased. This could be due to a faulty thermostat. If the drive is not damaged, most likely the problem is in the control unit.
- Combinations 16 and 17 are issued when the voltage in the on-board network is insufficient or too high. All wiring must be checked for short circuits and breaks.
- Code 19 occurs if the crankshaft position sensor did not respond correctly to the test. In this case, you need to control the car from an external device. If it shows a combination in the range of P0340 to P0343, the fault may be hidden in the controller itself.
- With error 24, the on-board computer stopped receiving data about the vehicle speed.
These combinations are very common. If the display shows a different number, refer to the vehicle's technical documentation. In most cases, it is necessary to check the electrical circuit for faults. Since problems very often arise in it, and errors are the result of incorrect processing of requests by sensors.
Checking the oxygen sensor
If there is an error, you need to check the sensor and power circuit. To do this, the machine is installed on an overpass. First, an external inspection of the wiring is carried out for breaks or oxidation. You need to check the wiring. You need to use a diagnostic fault scanner and record the available error information.
Checking the lambda probe begins with inspection:
- When feeding a thick mixture, a layer of soot will be visible on the sensor. A clogged element can cause its failure.
- The mixture supplied contains lead. During operation, it is deposited on the oxygen sensor, clogging it.
- If low-quality additives are used in the fuel, this can be visually detected by the presence of white spots.
If the causes of the error were not visually detected, diagnostics are carried out using a voltmeter as follows.
- The engine starts and warms up to operating temperature.
- The multimeter is turned on in voltmeter mode.
- One probe is connected to the signal wire, the other to ground.
- Engine speed should be between 2500 and 3000 rpm. A multimeter for a working unit should show a value in the range of 0.2-0.9 volts.
If the signal falls outside the specified limits, this indicates a sensor malfunction. Sometimes the problems are related to the slow operation of the device. It is believed that the signal value should change every second.