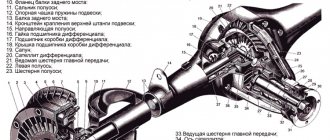
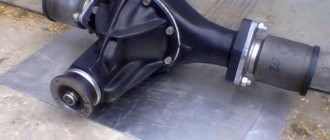
Purpose of the gearbox oil seal
The gearbox increases torque and transmits it from the driveshaft to the rear wheels of the car. This increases the force transmitted from the secondary shaft of the gearbox. All rotating gearbox parts located in the differential and final drive unit operate in an oil environment to reduce wear and reduce friction when the parts rotate. To prevent oil from leaking, a VAZ 2107 rear axle gearbox seal is installed on each of the axles coming out of it. If the seals are worn or damaged, oil leaks from the rear axle of the car are observed. In this case, damaged seals need to be replaced.
Causes and signs of failure
As a rule, the oil seal in the VAZ 2107 gearbox is replaced because it begins to leak. Over years of use, the sealing lip may dry out or tear. A leak can also be caused by improper installation of the oil seal.
You can definitely identify a malfunction by the following signs:
- After parking for a long time, an oil stain remained on the road.
- Droplets of oil appeared on the bridge body.
- Near the gearbox shank, characteristic traces of leaking oil are visible.
Instructions for replacing the gearbox seal of the rear axle VAZ 2107
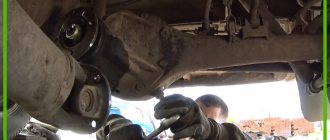
Before starting work, you should hang the rear axle and remove the rear wheels. After this, you need to drain the oil from the gearbox by unscrewing the oil drain plug.
Important: the oil drain plug should be screwed back in immediately after draining the oil. This way it won’t get lost and you won’t forget to tighten it after repairs before adding oil.
The further procedure is as follows:
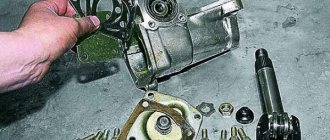
- Remove the two axle shafts from the rear axle.
- Unscrew the nuts and remove the 4 bolts connecting the flanges of the gear and universal joint. When unscrewing the nuts, it is necessary to prevent the propeller shaft from turning with the help of a mounting blade.
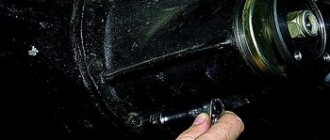
- Separate the cardan and gearbox flanges using a strong screwdriver.
- Measure the rotation resistance of the gear. To do this, wind a strong cord around the flange of the gearbox gear, attach its end to the dynamometer and, pulling the cord, rotate the gear. Remember the dynamometer readings - they will be useful in determining the correct tightening torque for the rear axle nut. A simpler, but not as reliable option is to remember the number of turns of the bridge nut so that when reassembling it, tighten it as it was.
- Unscrew the nut that secures the flange and remove the washer.
- Remove the flange.
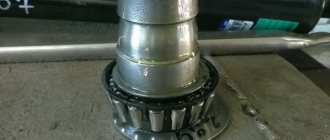
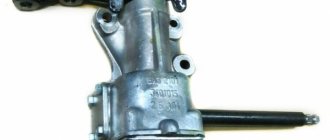
- Using a screwdriver or open-end wrench, remove the VAZ 2107 rear axle oil seal from the crankcase neck.
- Clear
Protect the oil seal seat from corrosion and dirt.- Lubricate the surface of the cuff with Litol lubricant.
- Place the oil seal in place and press it in using a hammer and mandrel.
Note: the oil seal must not be skewed when pressed. The end of the oil seal should be recessed relative to the end of the crankcase by 1.7-2 mm.
The mandrel can be made from an old bearing ring or a pipe of suitable diameter.
Site about off-road vehicles, SUVs, off-road vehicles
The preload in the bearings of the drive gear of the VAZ and Lada Niva gearbox is created using a S24 M16x1.5 nut with a nylon insert. It is necessary to ensure accurate rotation of the drive gear, and therefore maintain the correct meshing of the gears.
Tightening the nut of the drive gear (shank) of the VAZ and Lada Niva gearbox, symptoms and troubleshooting, diagnostics of the condition of the gearbox.
The nut is tightened with a significant torque of 12-26 kgcm. With a wrench with a 300 mm arm, this corresponds to a force of 36-72 kgf; tightening this connection is not easy. It is this force, the nylon insert, the fine thread and the elastically deformable bearing spacer that prevent the nut from loosening itself. However, gradually the tightening of the nut begins to weaken, the elastic spacer sleeve is unloaded and the tension in the thread disappears.
A feature of the hypoid gears of the rear drive axles of VAZ cars is that when moving forward, the drive gear seems to be pushed out of gear, and during reverse and engine braking, it is retracted. The main gear of the front axle of the Lada Niva works in the opposite way - when moving forward, the drive gear is pulled into gear.
Any movement of the drive gear is undesirable. But it is especially bad if retraction into engagement occurs with weakened bearing tension. The transmission jams (pinches), the load on the bearings increases sharply.
Characteristics of gearboxes for VAZ cars.
The first signal that the drive gear nut has become loose is the hum of the rear axle's final drive when the engine brakes (the wheels rotate the engine). This hum can be heard both when shifting gears “up”, when the engine slows down slightly, and when shifting “down”, when it accelerates. When coasting there is usually no hum, since there is no load.
Only the drive gear rotates from the wheels (here it is already the driven gear), the driveshaft and the driven (secondary) shaft of the gearbox. It is advisable not to let things get to the point of buzzing, but in any situation when the propeller shaft is removed, check the tightness of the drive gear nut. This operation can be done by lifting only one wheel without a lift or ditch. But there will be fewer amenities, and you will spend more energy and nerves. Don't forget about stands and wedges (stops) for the wheels.
Checking the tightening of the drive gear nut of the VAZ and Lada Niva gearbox.
First of all, we clean the gearbox neck, drive gear flanges and cardan joint from dirt. To get to the nut (S24 M16x1.5), you need to disconnect the flanges and move the propeller shaft to the side. It is balanced separately from the drive gear with a flange and still mark the relative position of the flanges with paint or a punch.
The nuts (S13, M8) of flange bolts with special heads that are to be unscrewed require very careful attention. Do not use a spanner or socket here. A regular open-end wrench “13” (S13) must be new or, in any case, tightly cover the edges of the nut. You can make a “dense” S13 key from an S12 key.
The fact is that the nuts of the flange bolts can be tightened to a torque of up to 3.5 kgf (with a wrench arm of 150 mm - a force of 21 kgf). If we take into account that the coefficient of static friction is always greater than the coefficient of sliding friction, the force on the key will be considerable. At the slightest “slack” in the key, the hexagon of the nut will quickly be crushed (“licked”). When rounding the corners of the nut faces, as a rule, a hammer and chisel are used. If there is nothing to replace the nut after this, you have to machine its edges for an S12 hexagon.
We begin to unscrew the nut that is in a comfortable position (then we turn the driveshaft), not forgetting about the bolt. The fact is that the conical head of the bolt has a flat, while the bolt rests against a special milling of the flange and is kept from turning. There is no point in rotating the nut and rotating the bolt along with it, thereby crushing the edges. It is better to jam the bolt head with a screwdriver in a timely manner.
When all the nuts are unscrewed, the bolts are removed, and when removing the propeller shaft flange, oil is found between the flanges - this is the first sign that the shank nut has been unscrewed and hot oil has easily penetrated into the interflange space through the unclamped ends of the parts and the spline joint.
Installation of the drive gear of the VAZ and Lada Niva gearbox.
The second sign of a loose nut is the presence of axial play in the drive gear. Grasp the flange with both hands and move it back and forth (the car is on a stand, with stops under the wheels). The drive gear nut may be unscrewed a full turn or more (1 turn - axial movement - is equal to the thread pitch, i.e. 1.5 mm). Here we are no longer talking about preload and you are lucky that the gearbox is still working.
Tightening the drive gear nut of the VAZ and Lada Niva gearbox.
So, you got to the shank nut, but before you tighten it, it makes sense to unscrew it. This can often be done by hand without using a key. But you may need more than one key. You can unscrew the nut only by holding the drive gear flange. A special or universal wrench is used to hold the flange.
Universal wrench for flanges and hubs.
If tightening the nut is a “one-time event” and there is no special wrench, you can get by with two M8 bolts and a wrench (metal rod). The bolts are inserted into the flange holes, and the knob is placed between the bolts in front of the flange. If the knob is placed behind the flange, you may accidentally press on the dirt deflector, after which it will need to be secured to the flange.
After unscrewing the nut, it is necessary to remove oil from the threads of the nut and the gear shank, which will significantly increase the coefficient of friction and, consequently, the moment of resistance to unscrewing the nut. It is better to install a new nut, since the thread of the gear shank is imprinted in the nylon of the insert, which reduces the resistance to self-loosening of the nut.
The nut must be tightened, as noted above, with a torque of 12-26 kgcm; tightening is controlled by the moment of resistance to rotation of the drive gear - 4-6 kgcm. Since this moment cannot be measured “in its pure form” (the gearbox has not been removed), we measure it with the nut loosened and, adding 4-6 kgcm to the resulting value, we obtain a controlled moment of total resistance.
The easiest way to measure torque is with a spring scale (steelyard). So, if the moment of resistance is 4-6 kgf, and the hook of the scale is hooked onto the flange hole, then the force on the scale should be 1.1-1.7 kgf. Let us remember that the moment of resistance to rotation is measured, and not the starting moment, which is much higher. All these measurements may seem complicated, but they are necessary for reliable operation of the gearbox.
Diagnostics of the condition of the gearbox (bearings, gearing) of VAZ and Lada Niva cars.
Now let's look at cases where tightening the nut alone is not enough. We will also talk about diagnosing the condition of the gearbox (bearings, gearing).
1. Rotating the drive gear by the flange, we feel a uniform periodic increase and decrease in the moment of resistance - “roller busting”. This phenomenon is the stronger, the greater the preload, if both wheels are raised and, of course, in the case when the gearbox is removed and the differential box with the driven gear is removed from its housing.
“Roller busting” is a violation of the geometry of the raceways and bearing rollers, a sign that if the gearbox has not yet “hummed,” then this is about to happen. In the latter case, the matter may be aggravated by the appearance of waves on the gear teeth. Then the hum will turn into a howl - and the defect (waves on the teeth) cannot be eliminated.
Assembly
- Install the drive gear flange and washer.
- Tighten the nut to a torque of 117-254 Nm. It can be determined more accurately by measuring the force of rotation of the gear. It should correspond to the value measured before removing the flange. When tightening the nut, it is necessary to hold the flange using a wrench, which can be made from a pipe with a pair of bolts and nuts attached to it.
- Install axle shafts and wheels.
- Fill the rear axle gearbox with new oil.
Universal wrench for flanges and hubs
If tightening the nut is a “one-time event” and there is no special wrench, you can get by with two M8 bolts and a wrench (metal rod). The bolts are inserted into the flange holes, and the knob is placed between the bolts in front of the flange. If the knob is placed behind the flange, you may accidentally press on the dirt deflector, after which it will need to be secured to the flange.
After unscrewing the nut, it is necessary to remove oil from the threads of the nut and the gear shank, which will significantly increase the coefficient of friction and, consequently, the moment of resistance to unscrewing the nut. It is better to install a new nut, since the thread of the gear shank is imprinted in the nylon of the insert, which reduces the resistance to self-loosening of the nut.
How to replace the rear axle gearbox seal of a VAZ-2107
The VAZ-2107 rear axle gearbox seal prevents lubricant leakage, so if it is displaced or worn out (rubber is not elastic), it is necessary to fix the problem as soon as possible. Replacing the oil seal suitable for the rear axle is a serious procedure, but if you want, you can learn everything.
Sometimes it is even difficult to find an oil seal of the required size for a VAZ-2107, then to replace it you should take a regular oil seal from a similar engine. For example, if the new oil seal is larger than the old one, it will not be possible to put it on, so it is better to buy a smaller sample.
Make sure that the oil seal has an oblique cutting format, and a boot is also required. A traditional new oil seal is enough for 40,000 - 50,000 km. The boot prevents dirt and moisture from getting inside the part, which is especially valuable on Russian highways. The side thread, playing the role of a pump, prevents the oil from leaking and throws the solution back into the crankcase.
Defects in the gearbox
Increased play in the RZM can be formed due to wear of the differential pinion pin - if you grab the driveshaft and rotate it clockwise and counterclockwise, this play can be felt. Also, increased clearance can be formed due to wear of the splines inside the differential housing itself.
If the gaps in the main pair of gearboxes are not adjusted, a characteristic noise occurs when the car moves:
- when the load increases (sharp acceleration), a characteristic howl is heard in the bridge;
- When I let off the gas the noise goes away.
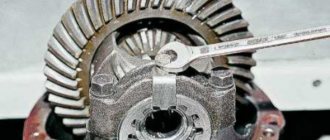
The engine can hum in a different way, but the characteristic feature described above can most often be heard on VAZ classic cars. Worn teeth of the main pair are clearly visible on the planetary gear - they become rounded, and they often show traces of rust.
Replacing the rear axle oil seal of a VAZ-2107
The VAZ-2107 is a rear-wheel drive car, the chassis of which is located on the rear component. If the car is used every day, the oil seal has the main function of moving the vehicle. That is why the condition of the oil seal located on the rear axle of the VAZ-2107 must be regularly monitored and, if possible, replaced.
To make replacing the VAZ-2107 rear axle gearbox seal quick, prepare the following set of tools:
- puller equipped with 2 types of removal;
- torque wrench.
Another nuance is that an oil leak indicates a malfunction of the oil seal, but if an oil film has formed on the gearbox housing, this does not indicate a oil seal failure.
When starting work with your own hands, treat it with full responsibility, otherwise you will have to disassemble the gearbox, and this can only be done by highly qualified specialists using special equipment.
Difficulties will not arise if you use these step-by-step instructions:
Torque Tips and Common Mistakes
- Do not jerk the cylinder head bolts. Tightening should be done smoothly.
- When installing cylinder head bolts (especially old ones), carefully examine their condition - there should be no damage to the threads. Exactly the same as inside the installation site.
- If necessary, the part must be cleaned of contamination.
- It is better to lubricate the threads with oil, but pouring them into the mounting holes is not recommended. If the wells are blind, then the lubricant must be applied very carefully. Fluids do not compress and excess lubrication will prevent you from tightening the bolt all the way.
- Failure to use a torque wrench may result in inaccurate tightening torques and incorrect gasket operation or damage to the cylinder head.
The rear axle gearbox oil seal (REA) is a lip seal located in the mechanism housing on the installation side of the bevel gear bearings. The main function of the oil seal is to ensure the tightness of the gearbox, eliminating the leakage of lubricant located in the rear axle housing.
Causes of wear
The lip seal of any vehicle component wears out over time, losing its properties. One reason is physical wear and tear. But the oil seal can also be damaged by the aggressive influence of oil on it, for example, when using low-quality lubricant. In addition, the oil seal itself may be initially defective.
If the oil has barely come out, then there is no need to rush to replace the cuff, but you need to periodically monitor the condition of the element and, if a leak occurs, make repairs.
Signs of wear
The main sign of a worn VAZ 2121 shank oil seal is the presence of oil leaks on the rear axle in the area where the REM flange is located. To identify a faulty element, it is enough to drive the car into an inspection hole or overpass, or simply crawl under the car. If the cuff is worn heavily, then after a long period of parking an oil puddle will form under the rear axle. If you neglect to timely replace the rear gear oil seal, this will lead to increased wear of the internal elements of the mechanism due to lack of lubrication and their subsequent failure.
Replacing the cuff
If the lip seal has become unusable, it only needs to be replaced, since the element is non-repairable (rubber ages over time and cannot be restored). To replace the oil seal, you need to know the size of the element:
- outer diameter 68 mm;
- internal diameter 35.8 mm;
- height 12 mm.
To carry out repairs, you will need to prepare the following list of tools:
- key to 13;
- 24mm head and knob;
- hexagon 12;
- powerful slotted screwdriver;
- hammer;
- dynamometer and torque wrench;
- container for draining oil.
The process of replacing the shank oil seal is carried out with the rear axle hanging and is carried out as follows:
- Unscrew the rear axle housing plug and drain the lubricant into a prepared container.
- We unscrew the fastening bolts of the rear cardan to the RZM flange, move the shaft to the side and secure it with wire to the longitudinal link of the bridge.
- Using a dynamometer, we determine the moment of resistance to gear rotation by turning the flange nut clockwise.
- To hold the flange, insert the cardan bolts into the holes and screw the nuts onto them.
- We place a mounting spatula or screwdriver between the bolts and unscrew the nut with a socket and wrench.
- Remove the nut and washer from the shank.
- We dismantle the flange itself by hitting it with a hammer through a wooden adapter.
- To remove the oil seal, hook it with a screwdriver and remove it.
- We apply Litol-24 to the working edge of the new cuff, after which we mount the part into the crankcase using a suitable attachment.
- We put the flange and washer in place and tighten the nut with a torque wrench with a torque of 117–255 N*m (12–26 kgf*m), using a dynamometer to control the moment of resistance of the bearings to turning the drive gear. If during the initial measurement of the moment of resistance the value was at least 6 kgf*cm, then when re-tightening it is necessary to increase it by 1-2 kgf*cm. If initially the value was 6 kgf*cm, then we achieve a torque of 6-9 kgf*cm. At the same time, the tightening torque should not exceed 12-26 kgf*m. If, while tightening the nut, the moment of resistance exceeds 9 kgf*cm, the spacer sleeve on the bevel gear will need to be replaced.
- After the adjustment work, we install all the elements in the reverse order.
Rules for installing a new cuff on the rear axle
Before installing a new oil seal, make sure that the flange surface is in good condition:
- matches the seal format;
- no corrosion; if there is one, go over the surface with polishing material;
- no deep grooves. If grooves are present, the cuff is pressed to move it so that it slightly extends beyond the neck of the gearbox.
When installing a new reverse gear cuff on a VAZ-2107, remember the following rules:
- First, apply a small layer of grease to the surface of the cuff.
- Then press the part into place with light hammer blows on the steel seal ring. Avoid distortions.
- Reinstall the dismantled mechanism components onto the shank.
- Replace the fastening nut located on the shank flange.
- Hang up the rear part of the VAZ-2107.
- Disengage the axle shafts from the differential gears.
- Using a 120 Nm torque wrench, tighten the shank nut, remembering to support the shank flange by the fasteners the entire time.
- Now turn the flange by hand. The part should not jam, and rotations should be carried out without much effort.
- Check to see if there is any end play. If there is one, increase the nut tightening torque by 20-30 Nm and check the operation again.
- Adhere to the total tightening torque limit of 225 Nm. If the indicator exceeds this value, there is a risk of damage to the special spacer type sleeve.
- If tightening the flange does not allow the backlash to be eliminated, then only service station specialists can handle this step.
- If the spacer is seated, the torque of the locked nut does not increase even if additional tightening is performed. Therefore, the indicator is equal to a value slightly short of the required size. It is impossible to do without disassembling the gearbox, which, again, is carried out only in a car repair shop.
Step-by-step video instructions on what it looks like to replace the gearbox seal of a VAZ-2107 rear axle with your own hands can be seen below:
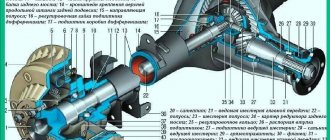
Differential device
The planetary gear is mounted on the differential housing. The differential consists of two axle gears, two satellites and a pin. The main, most common differential malfunctions are wear of the pinion pin (play) and wear of the splines on the axle gears.
On a car, the play of the pin of the satellites can be determined by turning the driveshaft by a quarter or more; if there is no play, then the shaft practically remains in place when you try to turn it in one direction or another.
It's also worth noting that there is never any noise coming from the differential. When moving forward (in a straight line), the differential rotates as one unit and it turns out that there is simply nothing to make noise there.
The cause of noise from the rear axle gearbox when gas is added and the noise disappears after releasing gas is (almost 99.9%) wear of the teeth of the main pair. This is clearly visible on the removed gearbox. The forward side of the teeth has significant wear, while the reverse side shows little wear.
If, after disassembling and troubleshooting the parts of the main pair, wear of the teeth is detected, then no repair will help and it will simply be a waste of time and money. Only the main pair needs to be replaced.
Home-couple
The gears of the main pair are selected at the factory based on contact patch, noise and other parameters and are marked. For example, on the planetary gears it is stamped - VAZ 2103 (model), 10 41 (gear ratio), 4091 (pair number). The main pair number 4091 is also marked on the bevel gear.
After marking these parts, they became the “main pair” and are not installed one without the other, that is, “family”. “- 6” is also marked on the “tip”; this is an amendment for assembling the main pair in the gearbox. When troubleshooting a differential, its bearings are also checked for wear and, if necessary, replaced. Bearing wear is often caused by unprofessional replacement of the gearbox seal.
For example, after replacing the oil seal, tighten the shank nut without observing the tightening torque (pull as much as possible) and the force is transferred not to the spacer sleeve, but to the differential bearings.
As a result, after a short run after replacing the shank oil seal, noise from the gearbox appears. Only in this case, the “hum” noise in the gearbox is constant and unlike the noise from worn teeth of the main gear. In this case, the hum is constant, regardless of whether gas is added or released.
Rear axle gearbox assembly video
During assembly, the gearbox is adjusted according to 4 parameters:
1. Selection of the adjusting ring
Parameters from 2.6 to 3.5. The ring serves to adjust the depth of engagement of the teeth of the “tip” and “planetary gear”, which is strictly specified. This is where the “correction -6” is needed for this main pair, which was mentioned above. Of course, this amendment will be individual for each main couple.
In this video, the main pair will be adjusted using a special device. It is clear that the vast majority of motorists do not have such a device and this is just a clear example of adjusting the engagement depth parameter. An option will also be given for adjustment without a “device”.
A “device” with a micrometer is also installed on the device, simulating the gear of the main pair. The indicator shows zero. Then the indicator leg is transferred to the bearing bed and in this case the indicator shows a value of 3.25, which is not good, since it should be within the range of 3.0. On the second landing plane it turned out to be 3.45. The arithmetic mean is 3.3. To adjust, we will use the correction at the “tip” - “-6”. In this case (– 3.3) + (-6) = 3.36. The thickness of the adjusting washer required is 3.36 mm. Using a micrometer, select the washer of the required thickness.
Note. When the shank bearing wears out, it begins to rotate on the “tip” body. As a result, the bearing end, adjusting washer and shank gear bodies wear out. It turns out that when replacing the shank oil seal, even with the correct tightening torque, the adjustment of the depth of engagement of the teeth of the gears of the main pair is lost and the “howl” of the pair is ensured, as is its early failure.
2. Adjusting the preload of the shank bearings
The shank bearing sits on the “tip” and a NEW spacer sleeve MUST be installed. The video clearly shows that the new bushing is smooth without any deformation, while the previously installed one is deformed. What happens is this: When the shank nut is tightened to the prescribed torque (from 12 to 26 kgf), the bushing takes on the tightening force and, when deformed, works like a spring, creating tension. The tightening force for the VAZ 2107 gearbox nut is significant and the shank must be secured against turning.
In the video we see what kind of “device” the master uses. It is necessary to tighten the shank nut until there is no play. When the nut is tightened correctly, the shank should rotate with a resistance force of 0.3-0.4 kg, therefore, the bearing preload is correct. This assembly rule applies to old (used) bearings.
The differential with bearings is installed and secured with covers (tightening torque is about 8 kgf) and the adjusting nuts of the differential bearings are tightened.
3 and 4. Simultaneous adjustment of the thermal clearance of the main pair and the preload of the differential bearings
For these purposes, another “device” with two indicators is needed. Using the adjusting nuts in the video and everything is shown well, we move the planetary gear towards the teeth of the “cone” to achieve the required clearance. Factory clearance adjustment data is from 0.08 to 0.12 mm. However, such a gap is provided for the new main pair (“tips” and “planets”). The gap is checked in 4 planes by turning the gear. The gap for the working main pair after adjustment is 0.13-0.14 mm.
After making the adjustment, the adjusting nuts are locked with special plates for this purpose, with one or two “antennae”. This completes the assembly and adjustment.
Replacing the rear axle gearbox seal on a VAZ 2101-VAZ 2107
Welcome! Rear axle gear oil seal - in general, oil seals serve for a long time, but if they are of poor quality, or if they are not installed correctly, or ultimately if the oil is poorly filled, then their life is immediately shortened, previously (and still) data things were called oil seals, but by the new name they are rubber cuffs, but rarely does anyone say this, and it’s not customary, thanks to this unit, engineers ensure oil containment in the steering mechanism, in the engine and in other places, the oil seal can also serve to contain diesel fuel and water and thanks to it, by the way, dust and dirt do not get into the mechanism they close.
Note! To replace the oil seal on a car, you don’t need much, the most important thing is: Stock up on all kinds of wrenches, also screwdrivers, and if you have torque wrenches, then it’s generally good (Thanks to these wrenches, the tightening torque of the bolts can be set correctly, just if you don’t tighten the bolts while driving they can get unscrewed, and re-tightening won’t lead to anything good) take them too, you’ll also need to stock up on a mounting blade and a torque gauge, but that’s if you don’t have a single torque wrench!
Summary:
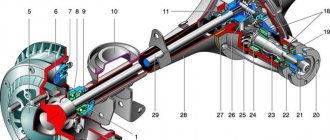
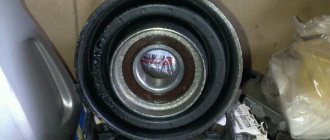
Where is the rear axle gearbox seal located? You won’t see it that easily, firstly you will need to crawl under the car from below, you will see the driveshaft (Many people call the driveshaft, but this is not the correct name, since the driveshaft consists of shafts and in this case the term driveshaft, means any part of the cardan transmission) with the rear shaft it will be connected to the rear axle gearbox, namely to the rear flange of the gearbox (indicated by the blue arrow) it will be connected using four bolts (On the flange, see the photo below, the slots for the rear cardan mounting bolts are visible, for clarity, one of the slots is indicated by a green arrow) and the flange itself is secured by a healthy nut, which is indicated by a red arrow, so you will need to disconnect the rear driveshaft (As you read the article, we will explain to you how to do this) and hang it, then the same Unscrew the healthy nut and, using a hammer or a special puller, remove the rear gearbox flange, which is indicated by the red arrow. After removal, you will see the picture shown in the small photo, namely the same oil seal that you are going to replace, it is also indicated by the red arrow.
DIY repair
Rear axle gearbox repair
Repairing the rear axle gearbox is not very complicated and does not require specialized knowledge, but before disassembling and reassembling it is better to familiarize yourself with the technical documentation. Before starting all work, it is necessary to raise the rear of the car so that the wheels are free and the gear is in neutral. Next, you need to unscrew the plug to drain the lubricant, and while it flows out, proceed to remove the cardan. When raised, you can freely scroll it in order to unscrew the 4 bolts that secure the shank. But before disconnecting, it is necessary to put a mark on the shank of the transmission mechanism and on the cardan, because it is screwed in only one of 4 positions.
Repairing leaks
If the shank is always wet from grease, then the gearbox seal most likely needs to be replaced. To do this, just disconnect the cardan. Next, you need to unscrew the drive gear nut and remove the flange from its shaft. Under it there is an oil seal, which can be removed using a thin but hard tool, slightly picking. Then use a clean rag to remove all the old grease and evenly press in the new oil seal and put on the flange. The hook must be clamped with the required force, which should be 1 Newton.
If the shank is dry, and the source of the leak is the junction of the transmission unit with the bridge, then it is necessary to replace the cardboard gasket; for this it is necessary and sufficient to unscrew the gearbox itself. Here a 12mm socket wrench will help you, with which you need to unscrew 8 bolts. After removing the mechanism, it is necessary to thoroughly clean the contacting surfaces of dirt and old gasket and carefully put on a new one, lubricated with sealant. The bolts are tightened thoroughly, but not to the point of stripping the threads. A new lubricant TAD-17, GL-5 or TM5-18 is poured.
Next, align the driveshaft shank with the flange at the mark and tighten it using new nuts, because they have plastic retaining rings that are disposable.
Adjustment of the rear axle gearbox consists only of the main gear hook, which is attached to the shank, so, as a rule, there is no problem with it. The only problem is the application of a force of 1 N and how to measure it.
The entire repair of the rear axle gearbox usually takes little time, because there is nothing complicated.