Checking the tightening of the drive gear nut of the VAZ and Lada Niva gearbox
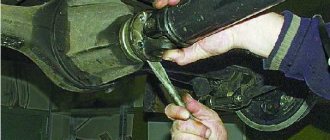
First of all, we clean the gearbox neck, drive gear flanges and cardan joint from dirt. To get to the nut (S24 M16x1.5), you need to disconnect the flanges and move the propeller shaft to the side. It is balanced separately from the drive gear with a flange and still mark the relative position of the flanges with paint or a punch.
The nuts (S13, M8) of flange bolts with special heads that are to be unscrewed require very careful attention. Do not use a spanner or socket here. A regular open-end wrench “13” (S13) must be new or, in any case, tightly cover the edges of the nut. You can make a “dense” S13 key from an S12 key.
The fact is that the nuts of the flange bolts can be tightened to a torque of up to 3.5 kgf (with a wrench arm of 150 mm - a force of 21 kgf). If we take into account that the coefficient of static friction is always greater than the coefficient of sliding friction, the force on the key will be considerable. At the slightest “slack” in the key, the hexagon of the nut will quickly be crushed (“licked”). When rounding the corners of the nut faces, as a rule, a hammer and chisel are used. If there is nothing to replace the nut after this, you have to machine its edges for an S12 hexagon.
We begin to unscrew the nut that is in a comfortable position (then we turn the driveshaft), not forgetting about the bolt. The fact is that the conical head of the bolt has a flat, while the bolt rests against a special milling of the flange and is kept from turning. There is no point in rotating the nut and rotating the bolt along with it, thereby crushing the edges. It is better to jam the bolt head with a screwdriver in a timely manner.
When all the nuts are unscrewed, the bolts are removed, and when removing the propeller shaft flange, oil is found between the flanges - this is the first sign that the shank nut has been unscrewed and hot oil has easily penetrated into the interflange space through the unclamped ends of the parts and the spline joint.
Purpose of the gearbox oil seal
All classic Lada car models, up to VAZ-2108, have rear-wheel drive. Starting from VAZ 2108 and higher, cars are driven by front-wheel drive. Everyone knows that a gearbox is a device through which torque is increased with its further transmission from the cardan to the rear wheels. All parts of the rear axle operate predominantly in an oil environment, which has a positive effect on the following factors:
- The service life of rubbing parts increases due to reduced wear.
- The heat generated by gear friction is removed.
- The friction force is reduced.
- The gears are cleaned from metal dust and shavings that are formed when metal parts come into contact with each other.
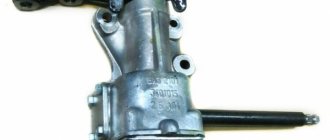
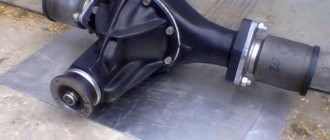
In order to transmit torque from the engine to the rear wheels, a cardan shaft is used, which is connected to the gearbox flange. An oil seal is installed on the flange axis to prevent lubricant from leaking out of the rear axle gearbox. When the cuffs wear out, oil stains and even puddles appear under the car, leaking outward. To avoid significant loss of oil in the rear axle of the VAZ 2107, the cuffs should be replaced in a timely manner when oil leaks are detected.
Checking the serviceability of the shank oil seal
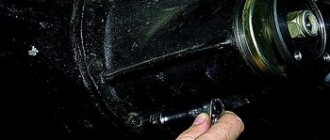
The first sign that it is necessary to replace the shank oil seal on a VAZ 2107 is the presence of traces of lubricant, dust and dirt on the outer part of the rear axle. Determining the presence of leaks on the rear axle is not difficult. To do this, you need to climb under the car and inspect the bridge.
If the oil seal is worn significantly, a puddle of oil may be found under the car. If the problem is not resolved in a timely manner, oil may leak out of the bridge, which will lead to its rapid breakdown. Despite the fact that the cuff is a small part in a car, its serviceability plays a very important role.
What will be required when carrying out replacement work
To replace the device in question on a VAZ 2107 car, you will need a number of the following tools:
- Open-end wrenches for 13 and 24.
- Calipers.
- Screwdriver.
- Flange puller. This tool is not difficult to make yourself.
- Dynamometer or torque wrench.
After all the tools are ready, you can install the car on the inspection hole, since it is much easier to carry out work on replacing the cuff.
Step-by-step instructions for replacing the oil seal on a VAZ 2107
Replacing the rear axle oil seal of a VAZ 2107 with your own hands begins with the need to find the oil drain plug, which is located in the lower part of the axle, and unscrew it, thereby draining the oil.
It is important to know! If the oil has not been changed for a long time (mileage more than 60 thousand km), then it is necessary to replace it simultaneously with the work on replacing the oil seals.
After draining, you should immediately tighten the drain plug, which will avoid unintentional leakage after repair work. Further replacement steps are performed in the following order:
- Using a 13mm wrench, you unscrew the four bolts with nuts that secure the cardan to the gearbox flange. After unscrewing, you should move the cardan to the side and hang it with a rope or wire.
- The next step is to measure the tightening torque of the nut. You can determine the torque using a torque wrench or a dynamometer. A method for measuring the tightening torque of a nut using a dynamometer can be seen in the video. The second method, using a torque wrench, involves screwing in the nut and determining its tightening force. This nut will need to be tightened to the same torque after the seal is replaced.
- After the nut tightening force has been determined, you need to pick up a 24mm wrench and unscrew the nut. When unscrewing the nut, lock the flange to prevent it from rotating. You can lock the flange using a homemade key or a handy tool.
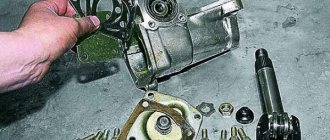
- The flange is being dismantled. You may need a bearing puller.
- Removing the old oil seal. We don't need the old cuff, so we can dismantle it with a screwdriver or the end part of an open-end wrench. The device should be pryed up and then removed from its seat. After removing the cuff, the location of the cuff should be thoroughly wiped with a cloth.
After this, all that remains is to screw the propeller shaft into place, and pour new oil into the gearbox to the bottom of the oil filler plug, then tighten the plug. At this point, the process of replacing the VAZ 2107 shank oil seal is completed, and you can check its serviceability.
We recommend watching:
Tightening torque for the shank nut of the VAZ 2107- Color code yellow green
How hard should I tighten the connecting rods?- Replacing the bearing of the rear axle gearbox of a VAZ 2107
- and there is an indicator for replacing the rear axle tail seal. You can easily repair such damage yourself.
Necessary tools for replacing oil seals:
If you decide to start replacing the oil seals yourself, prepare the following tools first:
- Screwdriver Set;
- Set of wrenches;
- Hammer;
- A small container for oil;
- A socket wrench or a 24mm socket;
- To unscrew the drain plug, take a hexagon;
- Two-jaw puller;
- Torque wrench;
- To fill the lubricant with a syringe;
- Jack;
- Body stands.
Important: all work on replacing oil seals on a VAZ 2106 should be done efficiently. Otherwise, any oversight and carelessness may lead to unpleasant consequences and lead to repair of the axle gearbox. If you doubt your abilities, it is better to contact the service. This way you will protect yourself from unnecessary costs and unexpected car repairs.
- ratchet crank;
- set of heads;
- twelve hexagon;
- two slotted screwdrivers;
- hammer;
- jack;
- wheel bolt wrench;
- mandrel for installing the oil seal;
- penetrating lubricant;
- container for collecting oil;
- torque wrench;
- digital or mechanical scales;
- fresh oil to the rear axle.
- We drive the car into the pit and unscrew the propeller shaft mounting bolts, having previously made a mark on the flank of the cardan and gearbox. After unscrewing the cardan, we tie it with a wire so that it does not interfere.
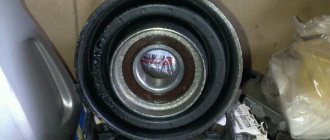
Using a special wrench, we secure the flange from turning and, using a wrench or a twenty-seven socket, unscrew the nut. The key for fixing the flange is shown in the photo below. You can also screw two universal joint mounting bolts into the flange and insert a powerful screwdriver between the bolts.
Installation of the drive gear of the VAZ and Lada Niva gearbox.
The second sign of a loose nut is the presence of axial play in the drive gear. Grasp the flange with both hands and move it back and forth (the car is on a stand, with stops under the wheels). The drive gear nut may be unscrewed a full turn or more (1 turn - axial movement - is equal to the thread pitch, i.e. 1.5 mm). Here we are no longer talking about preload and you are lucky that the gearbox is still working.
List of required tools
Set of wrenches
Attention: Unskilled replacement of the oil seal in the rear axle gearbox can lead to disassembly and repair of the entire axle gearbox, which is only possible in a workshop; the cost of the issue increases many times over. If you don’t know how to do it yourself, use the advice and help of a familiar specialist, or go straight to a service station.
Universal wrench for flanges and hubs
If tightening the nut is a “one-time event” and there is no special wrench, you can get by with two M8 bolts and a wrench (metal rod). The bolts are inserted into the flange holes, and the knob is placed between the bolts in front of the flange. If the knob is placed behind the flange, you may accidentally press on the dirt deflector, after which it will need to be secured to the flange.
After unscrewing the nut, it is necessary to remove oil from the threads of the nut and the gear shank, which will significantly increase the coefficient of friction and, consequently, the moment of resistance to unscrewing the nut. It is better to install a new nut, since the thread of the gear shank is imprinted in the nylon of the insert, which reduces the resistance to self-loosening of the nut.
The nut must be tightened, as noted above, with a torque of 12-26 kgcm; tightening is controlled by the moment of resistance to rotation of the drive gear - 4-6 kgcm. Since this moment cannot be measured “in its pure form” (the gearbox has not been removed), we measure it with the nut loosened and, adding 4-6 kgcm to the resulting value, we obtain a controlled moment of total resistance.
The easiest way to measure torque is with a spring scale (steelyard). So, if the moment of resistance is 4-6 kgf, and the hook of the scale is hooked onto the flange hole, then the force on the scale should be 1.1-1.7 kgf. Let us remember that the moment of resistance to rotation is measured, and not the starting moment, which is much higher. All these measurements may seem complicated, but they are necessary for reliable operation of the gearbox.
Diagnostics of the condition of the gearbox (bearings, gearing) of VAZ and Lada Niva cars.
Now let's look at cases where tightening the nut alone is not enough. We will also talk about diagnosing the condition of the gearbox (bearings, gearing).
- Rotating the drive gear by the flange, we feel a uniform periodic increase and decrease in the moment of resistance - “roller busting”. This phenomenon is the stronger, the greater the preload, if both wheels are raised and, of course, in the case when the gearbox is removed and the differential box with the driven gear is removed from its housing.
“Roller busting” is a violation of the geometry of the raceways and bearing rollers, a sign that if the gearbox has not yet “hummed,” then this is about to happen. In the latter case, the matter may be aggravated by the appearance of waves on the gear teeth. Then the hum will turn into a howl - and the defect (waves on the teeth) cannot be eliminated.
If, while rotating the drive gear, you notice an increase and decrease in the moment of resistance in only one place along the angle of rotation, this means that pitting has begun on the outer tracks of the bearing (or bearings) - “pitting” has appeared. This also requires disassembling the gearbox.
- The shank nut is already tightened to the maximum torque (26 kgcm), but there is still no preload in the bearings. Moreover, there may be axial play. The fact is that the preload of the bearings is “metered” by their spacer sleeve.
As the bearings wear out, the bushing may turn out to be too long, and it is impossible to “settle” it by tightening the nut with a torque of more than 26 kgcm - it will take the form shown in the figure below, i.e. will fail completely. There is only one way out - after disassembling the gearbox and assessing the condition of the drive gear bearings, make the bushing shorter.
Shank bearing spacer.
- When the nut tightening torque is less than 12 kgcm, the resistance moment increases sharply. This most often indicates that the bushing has served its purpose - it has “shattered” and needs to be replaced. It is also possible that the crushing and wear of the ends of the parts have made the entire chain and the bushing itself shorter. You can “lengthen” the bushing by using spacer washers installed at the ends of the bushing.
Preventing the nut of the drive gear (shank) of the VAZ and Lada Niva gearbox from loosening.
Is it possible to prevent the shank nut from coming loose? The locking option is shown in the figure above. The nut rests through the bushing on the flange of the universal joint. The 12 mm sleeve size may require specification (adjustment) in place. The required size can be determined using plasticine by connecting the flanges with two bolts.
The standard spacer sleeve plays the role of a spring washer (one of the means of locking the shank nut), but spring washers, as a rule, are split and perform their role much better. Instead of a spring spacer, a rigid spacer can be used. In the absence of a spring spacer bushing, it is much easier to make a rigid one. A gearbox with a rigid spacer sleeve is used on rear-wheel drive Moskvich and IZH vehicles.
Purpose of the gearbox oil seal
All classic Lada car models, up to VAZ-2108, have rear-wheel drive. Starting from VAZ 2108 and higher, cars are driven by front-wheel drive. Everyone knows that a gearbox is a device through which torque is increased with its further transmission from the cardan to the rear wheels. All parts of the rear axle operate predominantly in an oil environment, which has a positive effect on the following factors:
- The service life of rubbing parts increases due to reduced wear.
- The heat generated by gear friction is removed.
- The friction force is reduced.
- The gears are cleaned from metal dust and shavings that are formed when metal parts come into contact with each other.
In order to transmit torque from the engine to the rear wheels, a cardan shaft is used, which is connected to the gearbox flange. An oil seal is installed on the flange axis to prevent lubricant from leaking out of the rear axle gearbox. When the cuffs wear out, oil stains and even puddles appear under the car, leaking outward. To avoid significant loss of oil in the rear axle of the VAZ 2107, the cuffs should be replaced in a timely manner when oil leaks are detected.
Checking the serviceability of the shank oil seal
The first sign that it is necessary to replace the shank oil seal on a VAZ 2107 is the presence of traces of lubricant, dust and dirt on the outer part of the rear axle. Determining the presence of leaks on the rear axle is not difficult. To do this, you need to climb under the car and inspect the bridge.
If the oil seal is worn significantly, a puddle of oil may be found under the car. If the problem is not resolved in a timely manner, oil may leak out of the bridge, which will lead to its rapid breakdown. Despite the fact that the cuff is a small part in a car, its serviceability plays a very important role.
What will be required when carrying out replacement work
To replace the device in question on a VAZ 2107 car, you will need a number of the following tools:
- Open-end wrenches for 13 and 24.
- Calipers.
- Screwdriver.
- Flange puller. This tool is not difficult to make yourself.
- Dynamometer or torque wrench.
After all the tools are ready, you can install the car on the inspection hole, since it is much easier to carry out work on replacing the cuff.
Step-by-step instructions for replacing the oil seal on a VAZ 2107
Replacing the rear axle oil seal of a VAZ 2107 with your own hands begins with the need to find the oil drain plug, which is located in the lower part of the axle, and unscrew it, thereby draining the oil.
It is important to know! If the oil has not been changed for a long time (mileage more than 60 thousand km), then it is necessary to replace it simultaneously with the work on replacing the oil seals.
After draining, you should immediately tighten the drain plug, which will avoid unintentional leakage after repair work. Further replacement steps are performed in the following order:
- Using a 13mm wrench, you unscrew the four bolts with nuts that secure the cardan to the gearbox flange. After unscrewing, you should move the cardan to the side and hang it with a rope or wire.
- The next step is to measure the tightening torque of the nut. You can determine the torque using a torque wrench or a dynamometer. A method for measuring the tightening torque of a nut using a dynamometer can be seen in the video. The second method, using a torque wrench, involves screwing in the nut and determining its tightening force. This nut will need to be tightened to the same torque after the seal is replaced.
- After the nut tightening force has been determined, you need to pick up a 24mm wrench and unscrew the nut. When unscrewing the nut, lock the flange to prevent it from rotating. You can lock the flange using a homemade key or a handy tool.
- The flange is being dismantled. You may need a bearing puller.
- Removing the old oil seal. We don't need the old cuff, so we can dismantle it with a screwdriver or the end part of an open-end wrench. The device should be pryed up and then removed from its seat. After removing the cuff, the location of the cuff should be thoroughly wiped with a cloth.
After this, all that remains is to screw the propeller shaft into place, and pour new oil into the gearbox to the bottom of the oil filler plug, then tighten the plug. At this point, the process of replacing the VAZ 2107 shank oil seal is completed, and you can check its serviceability.
Transmission
- Reversing light switch M14x1.5 28.4-45.1 (2.9-4.6)
- Bolt securing the clutch housing to the engine M12×1.25 53.9-87.2 (5.5-8.9)
- Nut securing the clutch housing to the gearbox M10×1.25 31.8-51.4 (3.25-5.25)
- Nut securing the clutch housing to the gearbox M8 15.7-25.5(1.6-2.6)
- Rod clamp cover bolt M8 15.7-25.5(1.6-2.6)
- Rear cover mounting nut M8 15.7-25.5(1.6-2.6)
- Nut of the rear end of the secondary shaft M20x1.0 66.6-82.3 (6.8-8.4)
- Intermediate shaft bearing clamping washer bolt M12×1.25 79.4-98.0 (8.1-10.0)
- Bolt securing the fork to the gearshift rod MB 11.7-18.6(1.2-1.9)
Replacing the gearbox seal (help)
- Answer
- Go to first unread message
#61 Vitaliy2008
- Protection against spam bots: 730
- City of Gatchina Len. region
- Car: BMW 730 i burned out after a crooked repair, sold VAZ 21043 sold, BMW X3 E83 2005 I'm driving now
American forum question = answer Jewish forum question = question Russian forum question = you listen for two days what a moron you are and then maybe they will answer Ancient Chinese wisdom says: “NI SY!”, which means: “Be serene, like a lotus flower at the foot of the temple of truth »
- Top
- Answer
- Quote
- Insert nickname or quote
#62 Andrew
- Yekaterinburg city
- Car: VAZ
If it suddenly became dark. don't be scared. you just overtook the light.
- Top
- Answer
- Quote
- Insert nickname or quote
#63 angel4130-2
- City VA3 21043, Rzhev,
Andrejj (10 February 2012 — 12:38) wrote:
I tightened it according to the book with a torque of 120 Nm, if you exceed the tightening torque, the mono gearbox will be damaged
https://remont-vaz210. -mosta-vaz-2107 As you tighten the nut, check for axial play in the shank bearing; it is not allowed. Eliminate the presence of play by tightening the nut to a torque of 20-30 Nm, but do not exceed a tightening torque of 225 Nm. If the play still remains, then repair of the rear axle gearbox is required, namely bearing replacement.
- Top
- Answer
- Quote
- Insert nickname or quote
#64 sergo68
- City VAZ 21053, Tambov region,
The new camshaft must be lubricated with engine oil before installation.
- Check the lever springs. If they are broken or bent, replace them.
- Screw the adjustment bolts into place.
- Install the springs, then attach the rocker to them.
- Now you can insert the camshaft with housing. Lubricate the levers, cams and journals of the camshaft with oil. Fit them on and tighten them with a torque wrench. The procedure is performed from the center to the edge. Tightening torque – 2 kgf*m.
Engine
- Bolt for fastening the main bearing caps М10×1.25 68.31-84.38(6.97-8.61)*
- Oil pump mounting bolt MB 5.10-8.20 (0.52-0.85)
- Breather cover mounting stud M8 12.7-20.6(1.3-2.1)
- Breather cover mounting nut M8 12.7-20.6(1.3-2.1)
- Cylinder head bolt M8 31.36-39.10(3.20-3.99)
- Nut of the stud securing the inlet and outlet pipelines M8 20.87-25.77 (2.13-2.63)
- Connecting rod cover bolt nut M9x1 43.32-53.51 (4.42-5.46)
- Flywheel mounting bolt N110x1.25 60.96-87.42 (6.22-8.92)
- Chain tensioner shoe mounting bolt M10×1.25 41.2-51.0 (4.2-5.2)
- Bolt for fastening the head cover of the cylinder block MB 1.96-4.60 (0.20-0.47)
- Oil pump drive shaft sprocket mounting bolt М10×1.25 41.2-51.0(4.2-5.2)
- Camshaft sprocket mounting bolt М10×1.25 41.2-51.0(4.2-5.2)
- Spark plug M14x1.25 30.67-39.00 (3.13-3.99)
- Coolant pump mounting bolt M8 21.66-26.75(2.21-2.73)
- Nut for fastening the outlet pipe of the cooling jacket M8 15.97-22.64 (1.63-2.31)
- Crankshaft ratchet M20x1.5 101.30-125.64 (10.34-12.80)
- Generator bracket bolt M10×1.25 44.1-64.7(4.5-6.6)
- Generator bar mounting nut M10×1.25 28.03-45.27 (2.86-4.62)
- Nut of the bolt securing the generator to the bracket M12×1.25 58.3-72.0 (5.95-7.35)
- Nut securing the mounting bar to the generator M10×1.25 28.03-45.27 (2.86-4.62)
- Nut for fastening the front engine mount bracket M8 10.4-24.2(1.1-2.5)
- Nut securing the front support cushion to the cross member bracket M10×1.25 27.4-34.0 (2.80-3.46)
- Nut for fastening the cross member of the rear engine mount M8 15.0-18.6 (1.53-1.90)
- Nut securing the rear engine mount to the gearbox M8 28.3-28.8 (2.38-2.94)
- Nut securing the rear engine mount to the cross member M8 15.9-25.7 (1.62-2.62)
Cylinder head (cylinder head) bolt. M12×1.25:
1st step - tighten bolts 1–10 to a torque of 20 Nm; 2nd step - tighten bolts 1–10 to a torque of 70–86 Nm, and bolt 11 to a torque of 31–39 Nm. 3rd step - then turn bolts 1–10 by 90°; 4th move - and another 90°;
Camshaft bearing housing stud nut M8 18.33-22.64(1.87-2.30)
How to change?
If the mechanism is seriously damaged, it makes sense to replace it with a new one. To do this you will need a new gearbox and a small set of tools:
- wheel wrench;
- jack (if the work is done in an inspection hole);
- chisel:
- hammer;
- hex wrench 12;
- ring or open-end wrenches for 13, 17 and 27;
- syringe for filling transmission oil;
- container for processing.
Important: replacement or repair of the gearbox cannot be performed without a lift, inspection ditch or overpass
Operating procedure
- Place a waste container under the gearbox.
- Unscrew the drain plug, then the filler plug.
- Wait until the entire transmission flows out of the gearbox.
- Unscrew and remove the front wheels.
- Unscrew the cardan shaft from the flange on the shank.
- Undocking and hanging the cardan.
- Unscrew the fastening of the right cover from the suspension cross member.
- Unscrew the fastening nuts and disconnect the shock absorbers from the front control arms.
- Unscrew the threaded connections holding the wheel drive bearing caps.
- Unscrew the nuts securing the brackets holding the gearbox.
- Unscrew the nut securing the left gearbox cover to the cross member.
- Remove the hub cap and unscrew the right wheel hub nut.
- Remove the centering sleeve.
- Compress the suspension spring and unscrew the ball joints.
- Move the steering knuckle to the side.
- Disconnect the exhaust pipe from the exhaust manifold.
- Pull the gearbox back.
- Remove the right wheel drive.
- Remove the gearbox from the machine
To install the new unit in place, you must perform the operations in reverse order.
Important: after installing the gearbox, do not forget to fill it with transmission oil. Otherwise, you will soon have to change it again with another one
Important nuances in work
- When driving the oil seal using a mandrel, do not overdo it. Apply gentle blows and control the depth of the oil seal. If you hit it hard, you can easily damage the oil seal;
- Before installing the oil seal, lubricate the rim and sealing edge with fresh oil;
- Before installation, inspect the flange for wear in the area where the sealing lip of the oil seal meets. If there is a “groove,” the flange must be replaced.
As you can see, the process of replacing the VAZ 2107 gearbox seal is quite simple and does not take much time. The most important thing in this job is to properly tighten the rear axle flange nut.
We welcome car enthusiasts of classic VAZ models to the autoblog RtiIvaz.ru! In these videos we will look at the VAZ 2107 gearbox and adjustment. Nikolai Vladimirovich dedicated the video to the owners of rear-wheel drive cars, since today the trend is towards rear axle gearboxes. As a visual aid for repairs and adjustments, we showed the rear axle gearbox of the VAZ 2107, a common domestic car.
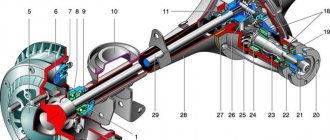
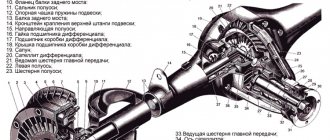
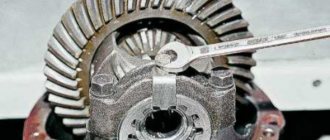
The main elements of the gearbox are helical gears of the main gear, the so-called “conic” and “planetary gear”, which make up the main gear pair. The plant produced four versions of the main pairs:
It should be noted that the main pair with a gear ratio of 4.44 for the VAZ 2102 was, generally speaking, not produced as spare parts and was intended only to complete the VAZ 2102 gearboxes on the factory assembly line.
Adjusting the shank of the rear axle of a Chevrolet Niva
Increased gear backlash. How to measure gearbox play.
Niva transmission play
ABOUT NIVA! Faults in the transmission and play in the front drives of the VAZ Niva 21213! Elimination!
VAZ gearbox adjustment
Replacing the rear axle gearbox seal of a Chevrolet Niva
Adjusting the rear axle gearbox. Tutorial. Part 1
What is humming, gearbox or axle shaft, how to determine?
Repair of the front gearbox of VAZ 21213 Niva
Replacing the front axle oil seal on a Chevrolet Niva
Hello! Most Chevy owners service the undemanding units of this popular car without the help of others. During intensive use, it is often necessary to change consumables, especially in the chassis. I will tell you about this type of service, like replacing the front axle seal of a NIVA Chevrolet. A replacement operation is performed when oil leaks from the axle housing. A clogged breather causes lubricant to squeeze out.
If the lubricant drips immediately after stopping (while the gearbox is hot), and then the leak stops, the breather needs to be cleaned. When it is clogged with dirt, the heated air does not bleed out during movement. Under pressure, the working fluid of the gearbox will be squeezed out even through serviceable gaskets and seals.
If the breather is in order, and the oil penetrates indifferently, you will have to change the warped gaskets of the covers, or, in other words, the O-rings. of them in the front bridge, and they are different:
Reasons for replacing the oil seal and symptoms of malfunction
The seals in the gearbox are changed for one reason: they begin to leak . The oil seal may become old, tear, or be of poor quality from the very beginning, which will inevitably affect its service life. In addition, the tightness of the gearbox may be compromised due to improper installation, as a result of which the seals are compressed too much. The malfunction can be identified by the following signs:
- Small drops of oil appeared on the rear axle, near the gearbox.
- After leaving the parking lot, an oil stain remains on the asphalt.
- A small radial play appeared on the gearbox shank. It is easy to determine: just move the shank up and down with your hands. As a rule, such play indicates not only torn oil seals, but also worn bearings.
It is there that you can detect the backlash
Steering
- Steering housing mounting bolt nut M10×1.25 33.3-41.2 (3.4-4.2)
- Nut of the pendulum arm bracket mounting bolt M10×1.25 33.3-41.2 (3.4-4.2)
- Ball pin nut for steering linkages** M 14×1.5 42.1-53.0 (4.3-5.4)
- Nut securing the steering shaft bracket and ignition switch M8 15.0-18.6 (1.53-1.90)
- Steering wheel nut M 16×1.5 31.4-51.0 (3.2-5.2)
- Bipod fastening nut M20x1.5 199.9-247.0 (20.4-25.2)
- Pendulum arm axis nut M 14×1.5 63.7-102.9 (6.5-10.5)
Installing front axle decoupling on Niva
Uncoupling the front axle gearbox - independent fastening of the front axle gearbox on Niva .
Uncoupling the front axle gearbox - independent fastening of the front axle gearbox on the Niva, why is this necessary. After another trip over a fairly long distance (700 km) along intercity roads in Russia and neighboring countries, I again thought about how else I could improve the Comfort of my five-door VAZ 2121 (VAZ 2131). To form the overall picture of my car: it is soundproofed, anatomical seats, power sills, an expeditionary trunk and quiet road tires on alloy wheels are installed. The experienced reader does not need to be told how the long Niva behaves on the highway: after four years of driving the “short one” (VAZ 21213), I now feel like the captain of a cruiser - in a word, the feelings are only positive.
So, what's the matter? When moving at a constant speed, everything is almost perfect - there is no unnecessary noise or vibration. But, unfortunately, only military equipment can drive on our roads at a constant speed, and on the roads of neighboring countries you have to constantly adapt to speed limits: 60, 80, 100 km/h. This entails the need to constantly slow down and, therefore, accelerate intensively - in other words, actively work with the gas pedal and the engine, which, structurally, is practically integral with the front axle gearbox. Thanks to this design, all the vibrations that occur with a sharp increase in engine speed are transmitted to the gearbox and, conversely, all the moments of force working to twist the gearbox due to the rotation of the front driveshaft and axle shafts are supplied to the engine, and from it through the cushions to the body. This is if the Niva does not implement independent fastening of the front axle gearbox - decoupling of the front axle gearbox. From here, vibration arises in the front part of the car, which, as it turns out, can (and even, I think, should!) be eliminated.
READ How many splines are on the CV joint of a Niva Chevrolet
The solution that I found for myself is a kit for independent fastening of the front axle gearbox (detachment of the front axle gearbox). In short, this is a set of parts that allows you to detach the front axle gearbox from the engine and attach it to the front suspension beam and front suspension stabilizer. This simple and effective design solution was implemented on the Chevrolet Niva and has been tested by more than one generation of athletes and car drivers. Installing an independent gearbox mounting kit significantly reduces vibration and, as a result, low-frequency hum in the car, which is so tiring on a long journey.
In short, any Niva can be made more comfortable and reliable thanks to this kit
As I already said, this solution was implemented on the Chevrolet Niva by the manufacturer, but there is also an opportunity for it to work on fastening the front gearbox and protect it from stones and logs off-road - this is the installation of an independent mounting kit for the Chevrolet Niva front axle gearbox of increased strength. In short, any Niva can be made more comfortable and reliable thanks to this kit.
Differential device
The planetary gear is mounted on the differential housing. The differential consists of two axle gears, two satellites and a pin. The main, most common differential malfunctions are wear of the pinion pin (play) and wear of the splines on the axle gears.
On a car, the play of the pin of the satellites can be determined by turning the driveshaft by a quarter or more; if there is no play, then the shaft practically remains in place when you try to turn it in one direction or another.
It's also worth noting that there is never any noise coming from the differential. When moving forward (in a straight line), the differential rotates as one unit and it turns out that there is simply nothing to make noise there.
The cause of noise from the rear axle gearbox when gas is added and the noise disappears after releasing gas is (almost 99.9%) wear of the teeth of the main pair. This is clearly visible on the removed gearbox. The forward side of the teeth has significant wear, while the reverse side shows little wear.
If, after disassembling and troubleshooting the parts of the main pair, wear of the teeth is detected, then no repair will help and it will simply be a waste of time and money. Only the main pair needs to be replaced.
Home-couple
The gears of the main pair are selected at the factory based on contact patch, noise and other parameters and are marked. For example, on the planetary gears it is stamped - VAZ 2103 (model), 10 41 (gear ratio), 4091 (pair number). The main pair number 4091 is also marked on the bevel gear.
After marking these parts, they became the “main pair” and are not installed one without the other, that is, “family”. “- 6” is also marked on the “tip”; this is an amendment for assembling the main pair in the gearbox. When troubleshooting a differential, its bearings are also checked for wear and, if necessary, replaced. Bearing wear is often caused by unprofessional replacement of the gearbox seal. For example, after replacing the oil seal, tighten the shank nut without observing the tightening torque (pull as much as possible) and the force is transferred not to the spacer sleeve, but to the differential bearings.
As a result, after a short run after replacing the shank oil seal, noise from the gearbox appears. Only in this case, the “hum” noise in the gearbox is constant and unlike the noise from worn teeth of the main gear. In this case, the hum is constant, regardless of whether gas is added or released.
Rear axle gearbox assembly video
During assembly, the gearbox is adjusted according to 4 parameters:
1. Selection of the adjusting ring
Parameters from 2.6 to 3.5. The ring serves to adjust the depth of engagement of the teeth of the “tip” and “planetary gear”, which is strictly specified. This is where the “correction -6” is needed for this main pair, which was mentioned above. Of course, this amendment will be individual for each main couple.
In this video, the main pair will be adjusted using a special device. It is clear that the vast majority of motorists do not have such a device and this is just a clear example of adjusting the engagement depth parameter. An option will also be given for adjustment without a “device”.
A “device” with a micrometer is also installed on the device, simulating the gear of the main pair. The indicator shows zero. Then the indicator leg is transferred to the bearing bed and in this case the indicator shows a value of 3.25, which is not good, since it should be within the range of 3.0. On the second landing plane it turned out to be 3.45. The arithmetic mean is 3.3. To adjust, we will use the correction at the “tip” - “-6”. In this case (– 3.3) + (-6) = 3.36. The thickness of the adjusting washer required is 3.36 mm. Using a micrometer, select the washer of the required thickness.
Note. When the shank bearing wears out, it begins to rotate on the “tip” body. As a result, the bearing end, adjusting washer and shank gear bodies wear out. It turns out that when replacing the shank oil seal, even with the correct tightening torque, the adjustment of the depth of engagement of the teeth of the gears of the main pair is lost and the “howl” of the pair is ensured, as is its early failure.
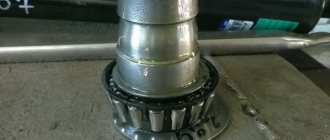
2. Adjusting the preload of the shank bearings
The shank bearing sits on the “tip” and a NEW spacer sleeve MUST be installed. The video clearly shows that the new bushing is smooth without any deformation, while the previously installed one is deformed. What happens is this: When the shank nut is tightened to the prescribed torque (from 12 to 26 kgf), the bushing takes on the tightening force and, when deformed, works like a spring, creating tension. The tightening force for the VAZ 2107 gearbox nut is significant and the shank must be secured against turning.
In the video we see what kind of “device” the master uses. It is necessary to tighten the shank nut until there is no play. When the nut is tightened correctly, the shank should rotate with a resistance force of 0.3-0.4 kg, therefore, the bearing preload is correct. This assembly rule applies to old (used) bearings.
The differential with bearings is installed and secured with covers (tightening torque is about 8 kgf) and the adjusting nuts of the differential bearings are tightened.
3 and 4. Simultaneous adjustment of the thermal clearance of the main pair and the preload of the differential bearings
For these purposes, another “device” with two indicators is needed. Using the adjusting nuts in the video and everything is shown well, we move the planetary gear towards the teeth of the “cone” to achieve the required clearance. Factory clearance adjustment data is from 0.08 to 0.12 mm. However, such a gap is provided for the new main pair (“tips” and “planets”). The gap is checked in 4 planes by turning the gear. The gap for the working main pair after adjustment is 0.13-0.14 mm.
After making the adjustment, the adjusting nuts are locked with special plates for this purpose, with one or two “antennae”. This completes the assembly and adjustment.
Video of adjusting the engagement depth of the main pair
Adjusting the rear axle gearbox with your own hands without using special devices (the VAZ 2107 gearbox is the same).
In this case, it is necessary to select the thickness of the adjusting washer.
So: Instead of the device, we install the “original” shank and tighten the nut until it stops lightly, leaving a gap. The differential with planetary gear assembly, bearing caps are installed and their mounting bolts are tightened.
When replacing the shank oil seal, a number of incorrect actions are allowed, which ultimately lead to premature failure of the gearbox. Before releasing the shank nut, according to the technology for performing the work of replacing the oil seal, it is necessary to remove the axle shafts (which is almost never done, since the amount of work will increase many times). Although according to the price list, the removal of the axle shafts will most likely be included in the list and a fee will be charged for this, since this is required by the plant’s technology for replacing the oil seal. This is a necessary condition, since the axle shaft will create resistance when tightened and correct adjustment will simply be impossible to achieve.
Before releasing the shank nut, it must be secured against turning and the tightening force of the nut must be checked with a torque wrench, around 12 kgf. Before installing the oil seal, if its outer surface is not rubberized, then you need to use a sealant to guarantee it. Thus, a mark of 0.15 mm on the gearbox stocking will be sufficient to pass oil through the outer surface of the oil seal.
The adjusting nuts are installed, and the gap on the main pair is pre-selected (the final working gap is 0.08 to 0.12 mm). Then paint is applied to the teeth of the planetary gear from an aerosol can and, using a shank, it is necessary to make several movements in different directions in order to fix the contact spots in the paint.
Now, having turned the planet gear back, you can clearly see the contact patch on its teeth with the teeth of the pin. The contact patch (in this case) shows that the adjusting washer on the shank is thicker than the required thickness. We slightly tighten the shank nut, thereby moving its bearing, which makes it possible to move the gear teeth towards each other, that is, as if “reducing” the thickness of the adjusting washer. Using the differential bearing adjusting nuts, we set the approximate gap (reducing it slightly).
Then we again apply paint to the teeth of the planetary gear and again begin to rotate the shank (or gear) in different directions to print the contact patch between the teeth. It can be seen that the contact patch has risen a little, but still not enough and it is necessary to tighten the shank nut a little again. Similar actions with paint and turning the gear must be carried out until the contact patch is located exactly in the middle of the teeth, and the sound of the turning teeth becomes quieter.
After correct (final) adjustment, the sound will be almost inaudible.
Remember to tighten the differential bearing adjusting nuts every time you tighten the shank nut. As a result, the contact patch was located exactly over the entire surface of the teeth. It should be noted that this is the condition for the location of the contact patch for old (working) pairs. For new main pairs, the contact patch, as mentioned above, should be located in the center of the teeth.
Further. The planetary gear mounting covers are released and the differential is removed. The shank nut is unscrewed and removed. Since the shank was installed only with a bearing without an adjusting washer, there was a gap between the bearing and the shank gear where the washer would fit. This gap is measured with a set of feeler gauges, thereby calculating the required thickness of the adjusting washer.
It turns out, as in the case of using instruments and accessories, the size for the required adjusting washer was also 3.36 mm. The shank bearing is removed, an adjusting washer (3.36mm) is installed, the bearing is put in place and the gearbox is assembled. The shank is installed, the shank nut is tightened, min. 12 kgf. The differential with planetary gear is installed, the covers and bolts are tightened, but not completely.
By the way, the lids should not be mixed up. The adjusting nuts of the differential bearings are installed and the gap on the main pair is pre-set. Then the differential cover bolts are finally tightened. The gap in the main pair is finally adjusted and the adjusting nuts are secured.