In this publication I want to talk about how to set the clock on a 2013 Lada Granta car, which does not have buttons on the steering column wiper switch lever. Such Lada Granta models usually do not have an on-board computer - this is the most minimal, basic configuration. Setting the clock on different trim levels is different.
If you do not have this model, scroll below, there you will find the clock setting using the buttons on the wiper switch lever on a Lada Granta with an on-board computer.
Setting up the 2012-2013 Lada Granta watch is very simple. To do this, use the button on the instrument panel to reset the daily mileage. All settings are made only with this button; you don’t need to press anywhere else.
Setting the watch Lada Granta 2013 is carried out in odometer mode. That is, the instrument panel should display the car’s mileage for the entire time, and not the daily mileage.
To set the time, press and hold the button until the clock flashes. As soon as the clock blinks, immediately press the same button briefly to scroll through the clock numbers to the desired time of day.
So, first of all, we set up the hour numbers, and to switch to the minute settings you don’t need to press anywhere, it will switch itself when inactive for 2-3 seconds. Just wait until the minute numbers start flashing. As soon as the minutes flash, in the same way, with short presses on the same button, scroll through to the desired number. Please note that you can only scroll in one direction.
To save the settings, again, we don’t touch anything, but just wait: everything will be saved automatically.
Setting the clock
- We turn on the side lights for better visibility of the LCD display indicators.
- We make sure that the LCD panel displays the total mileage of the car, and not the daily mileage. If necessary, by pressing the daily mileage reset button once, we achieve the desired result.
- We enter the clock setting mode. To do this, press and hold the daily mileage reset button until the clock numbers flash.
- By pressing the button on the wiper control lever, we set the correct time of day. The up button sets the correct hour, and the down button sets the correct minutes. If you “jumped” the desired number, then press the button on the lever forward again, there is no going back.
- After setting the exact time, you must press the daily mileage button once to exit the clock setting mode.
- Turn off the side lights.
With these simple manipulations, the clock in our car is installed.
I ran into a small problem. The clock on the on-board computer of the VAZ 2190 Lada Granta has gone wrong. I struggled with the problem for quite a long time until I had to look into the car’s operating book to solve it; it turned out to be very simple.
The most important thing to pay attention to when setting the clock is what mileage is displayed on the on-board computer.
There are several reasons why you will need information on how to set the time in the domestic Lada Granta. Often, when you buy a new car at a dealership, the clock shows the wrong time. Failures in the electronic system of a car also occur due to various unfavorable factors from the influence of the external environment, for example, in windy, excessively frosty, too snowy or even rainy weather.
On a domestic Lada Granta, the clock may suddenly start showing a completely different time; this is a factory defect, and you will have to figure out how to set the time in your car. Numerous owners of Grants write on various large forums that it is necessary to set the exact time on a model when it is in constant use quite often.
To change the incorrect time on the popular Lada Granta yourself, you don’t have to be a professional car service employee, and you don’t even have to be a car mechanic or an experienced car enthusiast. You can easily and simply do everything yourself, the main thing is to know how to set the clock on the device.
If you know how to set the time correctly on the Lada Granta model, then this procedure will take you very little time. When you set the clock to the actual time for the very first time, and use your knowledge to figure out how to set everything yourself, then from now on you will be able to quickly set the clock in absolutely any situation when it goes wrong, and sometimes this happens at the most inopportune moment.
It should also be noted here that when setting the clock directly in the Lada Granta, there is absolutely no difference what configuration of the model it is, whether it is “Lux” or “Standard”, the time will be set the same everywhere.
Automatic transmission diagnostics
Diagnostics of the gearbox is also possible, but limited by the Granta ECU itself. Yes, you can use professional, expensive car scanners, but we are talking about self-checking.
Using an adapter and an application on a smartphone, you can see errors in the transmission; if there are any, their decoding will indicate one or another malfunction of the box. Also, in real time, data from temperature sensors is taken from the box.
Automatic transmission errors:
P0720 “Output shaft speed sensor is faulty” P0717 “Turbine speed sensor” P0706 “Automatic transmission selector. No signal" P0705 "Automatic transmission selector. Several signals at the same time" P0974 "On-off solenoid. Open circuit" P0973 "On-off solenoid.
Circuit shorted to ground" P0963 "Pressure control solenoid. Open circuit" P0962 "Pressure control solenoid. Circuit shorted to ground" P0740 "LOCK UP SOL(Open)" P0743 "LOCK UP SOL(GND short)" P17AB "L/C SOL(Open)" P17AA "L/C SOL(GND short)" P17AE "2-4 /B SOL(Open)
" P17AD "2-4/B SOL(GND short)" P17B1 "H/C&L&R/B SOL(Open)" P17B0 "H/C&L&R/B SOL(GND short)" P1735 "INTER LOCK FUNCTION(1st)" P1736 " INTER LOCK FUNCTION(2nd)" P1737 "INTER LOCK FUNCTION(3rd)" P1738 "INTER LOCK FUNCTION(4th)" P0744 "LU CLUTCH(Lock-up)
» P1744 “LU CLUTCH (Slip Lock-up)” P0731 “Incorrect automatic transmission ratio in 1st gear” P0732 “Incorrect automatic transmission ratio in 2nd gear” P0733 “Incorrect automatic transmission ratio in 3rd gear” P0734 “Incorrect automatic transmission ratio in 4th gear” transmission" P17A1 "NEUTRAL FUNCTION(1st)
» P17A2 “NEUTRAL FUNCTION(2nd)” P17A3 “NEUTRAL FUNCTION(3rd)” P17A4 “NEUTRAL FUNCTION(4th)” P17A0 “NEUTRAL FUNCTION(Rev)” P0712 “Oil temperature sensor, low reading” P0713 “Oil temperature sensor, high reading » P0711 “Oil temperature sensor, frozen” P0863 “CAN bus connection (initialization)” P062F “BACKUP MEMORY” P1701 “Controller supply voltage”
What is required to set the time in Grant
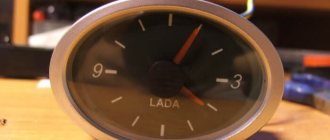
The clock in the Grant car we are considering today is located on a modern liquid crystal screen, respectively, on the instrument panel. All digits on this clock are significantly larger than any other digits or symbols on the rest of the screen. The display, in addition to the exact time, displays fuel consumption, total and daily mileage, and other information data.
Now you need to pay special attention if you want to know how to set the time with your own hands in a modern liftback from the AvtoVAZ automobile manufacturer. You must determine exactly where the following controls are located in your car:
- Button for self-control of the car dashboard display. This is the same button that resets the so-called daily mileage.
- A car ignition switch, or a size switch located on the instrument panel.
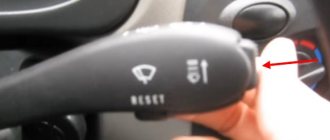
- The lever that controls the windshield wipers (this is the so-called steering column switch on the right). This lever performs various functions, including it always scrolls in a circle the modes of direct operation of that same display, thus displaying information about the current time, fuel consumption, and mileage.
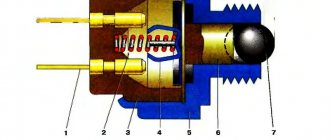
List of sensors and signal indicators on the panel
The diagram shows a detailed layout of the devices present.
The instrument cluster on this car, as the instructions show, has the following sensors:
- Tachometer (for instant recording of the crankshaft speed).
- Motor control module malfunction indicator.
- Signal lamp indicating left turn is on.
- Indication of low oil pressure in the engine.
- ABS indicator lamp.
- Signal indicator of a malfunction in the immobilizer assembly.
- Symbol for indicating increased coolant temperature in the engine cooling circuit.
- A lamp indicating an emergency condition of the brake system components.
- Right turn indicator indication.
- Battery charge level indicator symbol.
- Speedometer (speed controller).
- Indication of directional stability.
- Indicator that the transmission is not allowed to move to the next stage.
- High beam symbol.
- Stern fog light indicator.
- Activated low beam lamp.
- Indicator that the front fog lights are on.
- Button for resetting the daily distance traveled.
- Route controller display.
- A lamp signaling the need to close the doors.
- Low fuel level indicator.
- Symbol of lack of required tire pressure.
- Fault lamp in the electric power steering system.
- Seat belt indicator.
- Indicator of breakdowns in the motor unit (infrequently used).
- Airbag integrity and serviceability indicator.
The dashboard will definitely tell you the following:
If, after starting the engine, the engine status indicator does not “disappear,” then this implies a malfunction in one of the components of the unit or its attachments.
If the low oil pressure lamp in the Lada Granta engine continues to blink after starting it, then it becomes necessary to check the operation of the lubrication system components (pump, pressure reducing valve, etc.), as well as the condition of the cylinder-piston group.
The ABS indication, if this system is in good condition, should be deactivated after a couple of seconds from the moment the engine starts.
The lamp, indicating an excessively high coolant temperature in the engine cooling circuit, stops lighting 5 seconds after the engine starts. When this phenomenon is not observed, there is a likely risk of engine overheating. Here it is recommended to check all components that influence the maintenance of a “normal” (working) temperature indicator.
If the brake symbol is active when the engine is running, you should check the level of the corresponding fluid (reservoir under the hood) and top up if necessary.
The activated indication of the unit that provides directional stability “tells” that it is disabled.
A signal appeared from the fuel reserve lamp - it became necessary to replenish the tank with fuel.
If the status indicator of the electric power steering mechanism lights up, this fact confirms the presence of a malfunction in this unit.
When the pressure inside the LADA Granta tires reaches a minimum, the corresponding symbol informs about this moment.
When the engine is running, the lamp responsible for indicating the airbag cannot be illuminated.
From this it can be seen that the entire list of sensors and indicator symbols that the instrument cluster contains around the perimeter is endowed with a traditional character. They are informative and understandable even for customers who have touched the steering wheel of a Lada Grant for the first time.
How to set the time correctly in Grant
If you have found all the switches described above, then you can safely start changing the time. Now we will tell you how to set the clock on the device correctly. Let us immediately note that in LADA Granta the clock is set in several stages. Step-by-step setup is performed as follows:
- The first thing you should do is turn the ignition off or on, or simply turn on the side lights in the car. This manipulation is required so that the tidy display is highlighted, and in order to better see the time indicators and other data.
- After that, you need a display mode that displays the total mileage of the car. Therefore, before setting the correct time, be sure to ensure that the daily mileage is displayed on the screen.
- If necessary, reset your daily mileage. This can be done by quickly pressing the special button once. Then check that the screen is always in the mode in which the letters “ODO” are lit (that is, the flow meter or odometer).
- After that, press this button again and hold it for a couple of seconds until the clock starts flashing on the display. This is how you entered the car clock settings.
- Next we follow, and on the steering column switch on the right, which, as everyone knows, controls the operation of car wipers, you need to find a special small push-button switch that will help you adjust all the indicators on the LCD screen. It is thanks to this switch that you can set the exact time. Remember that the up button is used to adjust the hours, and the minutes can be set using the down button. It happens that you can skip the required number, you need to follow further and scroll the circle to the required designation, since you cannot go back.
- And now, you have set the time on the LADA Granta. And at the next stage you need to press the daily mileage reset button once without holding it down. When pressed, the display will exit the time setting mode.
- If you turned on the side lights before setting up, do not forget to turn them off.
Thus, setting the correct time on the domestic machine we are considering is completely completed.
The main reason
First, you should decide on the type of your radio, because... Some radios have a reset function when switched off when the engine is ignited. Thus, the radio tape recorder prevents malfunctions from occurring when the voltage drops. This problem can be solved by a simpler method, simply by turning off the radio before igniting the engine and before turning it off.
Setting up the radio
Radio wires
Yellow is responsible for power, and red, control, is located on the ignition switch, while the radio only works after this, when the ignition key is inserted and turned. In this situation, the problem may be acidification of the battery terminal, both on the side adjacent to the lead contacts and on the side of the wires.
Radio wires twisted together
To solve this dilemma you need to clean them and lubricate them, so to speak. Everyone knows that this method often applies to radio tape recorders, in which this problem was also not immediately noticed and the options began to get confused during use.
Let's sum it up
As you can see, there are no difficulties or obstacles to setting the time in the popular LADA Granta. The main thing is to follow the entire sequence of actions and you can easily set everything up in a matter of minutes. These setup instructions are also included in the user manual. Having done this procedure once, all subsequent times you will do without instructions, and in any place and time, you will make adjustments if necessary. Let us remind you that these setup instructions apply to all Grants, regardless of configuration.
Source
conclusions
There is no need to go to a dealership to set up your watch. The setup procedure is described in great detail in the vehicle's owner's manual. But we tried to describe everything in more detail, use it. Don't forget to say thank you in the form of a like!
The dashboard is always the object of increased attention from the driver. In the process of starting the engine, when moving, stopping, the owner systematically pays attention to indicator readings, color signals, and speed meters. Fortunately, technology has stepped far forward and now electrical devices are used instead of mechanical ones, which significantly increases accuracy and service life, reduces cost, and simplifies repairs.
What is needed to set up the time in the grant?
The clock in the Grant car we are considering today is located on a modern liquid crystal screen, respectively, on the instrument panel. All digits on this clock are significantly larger than any other digits or symbols on the rest of the screen. The display, in addition to the exact time, displays fuel consumption, total and daily mileage, and other information data. Kalina starter repair
Lada Kalina won't start reasons
Lada Kalina fuel consumption per 100 km
Now you need to pay special attention if you want to know how to set the time with your own hands in a modern liftback from the AvtoVAZ automobile manufacturer. You must determine exactly where the following controls are located in your car:
- Button for self-control of the car dashboard display. This is the same button that resets the so-called daily mileage.
- A car ignition switch, or a size switch located on the instrument panel.
- The lever that controls the windshield wipers (this is the so-called steering column switch on the right). This lever performs various functions, including it always scrolls in a circle the modes of direct operation of that same display, thus displaying information about the current time, fuel consumption, and mileage.
What are the advantages of the device?
Commercially available on-board controllers, adapted for Lada Grants, are equipped with displays and are endowed with a significant amount of information memory. This feature is very useful for owners with poor eyesight, and will also prove to be an indispensable assistant for female drivers who are unsure of the purpose of the information elements of the dashboard.
In view of the noted features, the on-board controller can contribute to more comfortable driving due to the efficiency and timeliness of providing the driver with route information. After all, it is capable of displaying information regarding the following points:
- travel time;
- fuel consumption during various driving modes;
- average speed and specific fuel consumption;
- remaining fuel equivalent to mileage;
- speed of the car at the start of movement;
- fixed motor temperature at a certain time, whose control avoids overheating of the unit;
- occurrence of malfunctions in Lada Granta units that have feedback from the control unit;
- timely heating and drying of candles;
- temperature inside the cabin and a similar parameter outside.
In addition to the indicated functions, the on-board computer is equipped with options, including:
- non-volatile storage device;
- the ability to generate a signal about emerging problems;
- supervisor: the option warns about the unauthorized start of the car (rollback), left lights and turn indicators on;
- “afterburner”: the function allows you to cancel memory data that implies the use of fuel of questionable quality, and during sudden acceleration, return to the original settings.
To activate this option, you must use 95 gasoline as fuel.
The on-board computer in the basic modification is marked “State X1 M” (“Multi-Set”). This is the highest priority option for the Lada model family. Thanks to its compact dimensions, it can be easily integrated into the seat on the panel. If you are inclined to purchase a “standard” device, you will find instructions and cabling in the kit.
The on-board computer “State X1 M” has a processor capable of processing the entire amount of information required by the driver regarding the operation and diagnosis of on-board systems.
The computer diagnostic tester is equipped with a plasma lamp, a digital tachometer, and a speedometer. The tester allows you to accurately determine the position of the throttle valve of the power system and monitor the condition of the electrical network on board. This useful option allows you to prevent a possible short circuit or fire in the cable network in the car.
How to set the clock on the Lada Granta step by step
There are several main reasons why you may need to adjust the clock in your Lada Granta (VAZ-2190). So, when you pick up a car from a dealer, the clock in the car usually shows the wrong time. The time also gets lost when the battery terminals are disconnected or the battery itself is removed. Quite often, failures occur in the car’s electrical system due to unfavorable environmental factors, for example, in heavily rainy, snowy, frosty or windy weather. In addition, the clock on the Lada Granta can suddenly “go crazy” and start showing incorrect time on its own - one of the manufacturer’s “jambs”. Unfortunately, when producing inexpensive domestic cars, no one is insured against factory defects. Car owners who have already purchased a VAZ-2190 write on forums that they have to set the time on the Lada Granta quite often during active use of the car.
In order to independently set the clock in the Lada Granta, you do not have to be an inveterate car enthusiast, a guru-auto mechanic or a professional car service worker. The entire process from start to finish can be done with your own hands. If you like to delve into the hardware and electronic “brains” of your car, you will be able to master such an easy process as setting the clock without much difficulty.
Setting the time on a Lada Granta car is a fairly simple matter, if, of course, you have the appropriate knowledge. It is enough to carry out this procedure just once, and you will, one way or another, understand all its nuances so much that from now on you will be able to set the clock on the dashboard yourself in any situation.
In this case, the vehicle’s equipment does not matter – be it standard or luxury, the time is set the same way in all Lada Granta cars.
Resynchronization of remote control codes
In cases where the remote control buttons are pressed outside the range of the radio channel, the “floating” code counter in the remote control goes out of synchronization with the counter in the system control unit. If the number of button presses outside the signal reception area of the system exceeds 1000, the system stops responding to remote control commands. In this case, the remote control training procedure should be repeated.
Updated August 01, 2022
Due to the increasing number of cases of lost training (master) keys for car owners of Kalina, Priora, Grant, Niva-Chevrolet, we are introducing a new type of service: registration of working keys in these cars, without a master key!
Usually in such cases, it is necessary to change a set of blocks: ECU (electronic engine control unit), APS unit, glass control unit, ignition switch complete with door cylinders and new keys, etc.
Now in our company you can register a working key with buttons without a training key, and for an additional fee you can receive a new training (red) key for your car. For this procedure, you need to come by car and leave it while the work is being carried out.
The work includes dismantling the necessary units (ECU, APS, etc.) from the car, programmatically changing data, installing units on the car and registering keys. We emphasize that a key registered in this way will cost more than registering a remote control yourself if you have a training key, but naturally cheaper than buying and replacing a set of blocks with new ones.
Update January 05, 2022
Attention! It is now possible to make a duplicate chip for autostart using a working key with remote control buttons! A master or training key is not required. The chip obtained in this way can be used both for installation in the immobilizer bypass unit to implement autostart, and for everyday use, starting the engine of Lada Kalina, Priora, Niva-Chevrolet cars.
Such a duplicate is more expensive than a regular chip, which can be registered using a master key, but this is a real solution in cases where the master (training) key is lost. To create a duplicate, you need a car, a working key with remote control buttons (and it doesn’t even matter if it is partially faulty, for example, the buttons don’t work, etc., the main thing is that the ignition key starts the engine). The entire copying procedure takes 10-15 minutes. Contact us by phone in contacts.
How to set the time correctly in Grant
If you have found all the switches described above, then you can safely start changing the time. Now we will tell you how to set the clock on the device correctly. Let us immediately note that in LADA Granta the clock is set in several stages. Step-by-step setup is performed as follows:
Read more: VAZ 2107 in Yandex taxi
- The first thing you should do is turn the ignition off or on, or simply turn on the side lights in the car. This manipulation is required so that the tidy display is highlighted, and in order to better see the time indicators and other data.
- After that, you need a display mode that displays the total mileage of the car. Therefore, before setting the correct time, be sure to ensure that the daily mileage is displayed on the screen.
- If necessary, reset your daily mileage. This can be done by quickly pressing the special button once. Then check that the screen is always in the mode in which the letters “ODO” are lit (that is, the flow meter or odometer).
- After that, press this button again and hold it for a couple of seconds until the clock starts flashing on the display. This is how you entered the car clock settings.
- Next we follow, and on the steering column switch on the right, which, as everyone knows, controls the operation of car wipers, you need to find a special small push-button switch that will help you adjust all the indicators on the LCD screen. It is thanks to this switch that you can set the exact time. Remember that the up button is used to adjust the hours, and the minutes can be set using the down button. It happens that you can skip the required number, you need to follow further and scroll the circle to the required designation, since you cannot go back.
- And now, you have set the time on the LADA Granta. And at the next stage you need to press the daily mileage reset button once without holding it down. When pressed, the display will exit the time setting mode.
- If you turned on the side lights before setting up, do not forget to turn them off.
Thus, setting the correct time on the domestic machine we are considering is completely completed.
Causes
To connect the head unit, an electrical wiring harness is used, containing 2 positive cables and an additional negative cord, which is led out to the car body. Positive wires are equipped with yellow and red insulation, allowing you to identify the purpose of the cables. If the wires are constantly switched to the positive terminal of the battery, the settings will not be reset, but the connection diagram leads to accelerated battery discharge.
To eliminate the negative effect, an ignition switch contact group is introduced into the power circuit. The yellow cord is attached to the line, which remains energized regardless of the position or presence of a key in the lock. Additional recharge is designed to maintain settings when the vehicle is turned off. A wire with a red insulator is passed through the contacts in the lock; after turning off the ignition, the voltage supply to the amplifier is automatically interrupted.
Resetting the settings occurs when the fuse link in the power circuit fails. On some Pioneer products, the defect occurs when the capacitors in the voltage regulator are destroyed. The owner can independently find out why the car radio settings are reset using a test device.
Are you a car driver?! Then you can take this simple test and find out. Go to test »
How to set it up
If all the above switches are successfully found, you can begin setting the time. The clock in the car of this model is adjusted in several stages, step by step. Here are the steps you will need to take:
- To begin, you should either turn the ignition on and off, or turn on the side lights. It is advisable to do this so that the liquid crystal display on the control panel begins to be better illuminated and the mileage and time indicators become more visible.
- For further actions, you will need a screen mode that displays the total mileage of the car, so before setting the time, you should make sure that the display does not show the daily mileage.
- If necessary, we reset the daily mileage by quickly pressing the corresponding button once. Check that the screen should be in the mode when the letters “ODO” (odometer or flow meter) are lit on it.
- Next, press the same button, but now it should be held for approximately two to three seconds - until the clock face on the liquid crystal display flashes. This allows you to enter directly into the time setting option.
- After this, on the right steering column switch, which controls the operation of the wipers, you need to find a push-button switch that regulates the indicators on the LCD screen. Use the switch to set the current time of day. It should not be forgotten that the “up” button is intended to adjust the hours, and the “down” button is used to set the minutes. If you accidentally skipped the number you need, you won’t be able to go back; you still need to press “forward” and scroll another circle to the required value.
- When the correct time is set, press (without holding) the daily mileage reset button again. When pressed, the LCD should exit time setting mode.
- If you turned on the side lights before setting the clock, turn them off.
Setting the exact time on the Lada Granta is complete.
As can be concluded from the above, setting the clock on the VAZ-2190 is not difficult. A step-by-step description of how this is done is also in the car's operating instructions, but it is very difficult to find it there.
Rules for driving a car with an injector
A car equipped with an injector is less susceptible to ambient temperatures. However, in severe frost, the injection Lada also experiences difficulty starting. Here it is worth using the on-board computer with the function of heating spark plugs. Every time the temperature drops below a certain value and the car is turned off, a special heating of the tips is carried out to ensure a stable engine start.
Also, the VAZ engine sometimes overheats, which can cause valve burnout and costly overhauls. However, this is possible if the cooling system is faulty. If necessary, you can activate the Tropic function for the on-board computer of the VAZ 2110.
Installing a computer on a VAZ 2110 will open up a lot of good options and has a huge number of advantages:
- the presence of a trip computer allows you to find out about the power reserve;
- the ability to combine a computer and a navigator;
- option for heating the spark plugs of a disabled vehicle;
- the ability to check errors and eliminate them immediately. Replacing the bearing that caused the malfunction significantly
- cheaper than subsequent extensive repairs.
How to set it up
The clock in the VAZ-2190 car is located on the liquid crystal display on the dashboard. The clock numbers are much larger than all the other numbers on the screen. In addition to the time, the display also displays the vehicle's daily and total mileage, fuel consumption and other data.
Read more: Scanner for Opel Zafira
So, how to set the clock on the Lada Granta? To correctly set the clock on the new VAZ liftback model, you must clearly know where the following controls are located in the car:
- ignition switch - or, alternatively, side light switch on the dashboard;
- display control button (daily mileage reset button);
- windshield wiper control lever (right steering column switch).
The right steering column switch, in addition to all other functions, should scroll through the display operating modes in a circle, displaying information about the car's mileage, fuel consumption and the current time.
To watch online, click on the video ⤵
Setting the Lada Grant clock 2022 Read more
How to set the clock on a Lada Granta Read more
Setting up the Lada Granta watch More details
LADA GRANTA LIFTBACK (setting the clock and other functions of the on-board computer) More details
Setting the clock and time zone on the Lada Granta Fla More details
Setting the clock on Kalina and Priora Read more
Lada Granta FL dashboard on-board computer Read more
Setting the clock on a VAZ - Lada Granta More details
Setting the clock on a VAZ - Lada Kalina 2 More details
Setting the clock and time zone LADA GRANTA FL LUXE (With cruise control) More details
Lada Granta Automatic Setting the Clock All Computer Secrets More details
NEW GRANT FL: THE MAIN SHOOT OF THE TRANSMISSION HOWL (lada granta FL 2020)! COMPARE WITH LADA VESTA? More details
Reconnecting the Datsun radio - operation without ignition. More details
NEW GRANT FL DO YOU NEED AN ALARM?? (lada granta FL 2022 how autostart works) More details
Resetting fuel consumption in the luxury Lada Granta FL 2020 with cruise control More details
Lada Granta (Lada Granta). Installation of radio and acoustics. Inexpensive version of the Chinese Soundmax. More details
MANDATORY IMPROVEMENTS FOR THE NEW LADA GRANT FL (lada granta FL sedan 2022 at a minimum) More details
Diagnostics of the dashboard Lada Granta Read more
✅KALINA CROSS ITS HIDDEN FUNCTIONS OR YOU DIDN’T KNOW ABOUT THEM Read more
Setting the clock
- We turn on the side lights for better visibility of the LCD display indicators.
- We make sure that the LCD panel displays the total mileage of the car, and not the daily mileage. If necessary, by pressing the daily mileage reset button once, we achieve the desired result.
- We enter the clock setting mode. To do this, press and hold the daily mileage reset button until the clock numbers flash.
By pressing the button on the wiper control lever, we set the correct time of day. The up button sets the correct hour, and the down button sets the correct minutes. If you “jumped” the desired number, then press the button on the lever forward again, there is no going back.
- After setting the exact time, you must press the daily mileage button once to exit the clock setting mode.
- Turn off the side lights.
With these simple manipulations, the clock in our car is installed.
Lada Granta liftback (2019). Guide - part 4
The transition to the time setting mode is made by long pressing the control button 20 (Fig. 29a) when the total mileage counter is displayed. In this case, the clock digits go into flashing mode. Further actions depend on the presence of control keys on the windshield wiper switch. If there are no control keys on the windshield wiper switch, the clock is set by pressing control button 20 (Fig. 29a). When you pause pressing for more than 5 seconds, you go to setting the minutes; setting the minutes is similar to setting the hours. The following pauses of pressing for more than 5 seconds switch to the time zone setting mode, and then to exiting the time setting mode. With a windshield wiper switch with 3 control keys (Fig. 29c), the readings are set using the and keys (item 2, Fig. .29c) . The “RESET” key (pos. 3, Fig. 29c) switches the adjusted parameters in the sequence “hours” - “minutes” - “time zone”. Exit from the time setting mode by pressing the control button 20 (Fig. 29a) or a pause in pressing any key for more than 60 seconds. With a windshield wiper switch with 6 control keys (Fig. 29d), the readings are set using the and keys (pos. 3 and 4, Fig. 29d), and switching the adjusted parameters using the and keys (pos. 1 and 2, Fig. 29d). Exit the time setting mode by pressing the “Menu/Exit” key (pos. 6, Fig. 29d) or pausing to press any key for more than 60 seconds.
Note. In the area of reliable reception of signals from GLONaSS/GPS systems, it is enough to set only the time zone; the hours (taking into account the time zone) and minutes will be set automatically.
Rice. 29th century Switch
with 3 control keys
Rice. 29 Switch
with 6 control keys
The functions of the on-board computer are indicated in field 3 (Fig. 29b). The list of functions and control of the display are determined by the presence of control keys on the windshield wiper switch. If there are no control keys on the windshield wiper switch, only “coolant temperature” is displayed in the field of the on-board computer. If there are control keys on the windshield wiper switch, switching the displayed function is carried out operated by the keys (pos. 2, fig. 29c) or (pos. 2, fig. 29d) in direct sequence and by the keys (pos. 2, fig. 29c) or (pos. 1, fig. 29d) in reverse order .Resetting (resetting) the route parameters (items 5–8 of the table) is carried out by long pressing the “RESET” key (pos. 3, fig. 29c) or “Menu/Exit” (pos. 6, fig. 29d) with -cations of any of the route parameters.
Source
How to set the clock?
There is a button on the dashboard behind the steering wheel to reset the daily mileage. To enter the clock settings, you need to hold it down for a few seconds. You need to hold it until the clock numbers start flashing. That's it, we went to setting the clock.
To set the correct time, press the buttons on the wiper lever (there are two buttons on the edge - they also serve to scroll through information from the display - hours/total mileage/consumption). The top button adjusts the hours, the bottom button controls the minutes. Press the button as many times as you need to set. If you have passed the desired number, you need to press until you come back to this number in a circle.
If for some reason you can’t set it up, or even enter the setup, try turning the ignition on and off.
This is a simple way to adjust the time on the Lada Granta.
It will also be interesting to read about “electrical circuits for the Lada Granta”
Almost every car owner who has become the proud owner of a Lada Granta car has probably encountered the problem of setting the clock on the instrument panel when leaving the car dealership. The clock is displayed at the top of the LCD panel, and these numbers are noticeably larger than the others. What would you like to advise in this situation? You can refer to the vehicle's operating instructions. This information is there, but it is difficult to find it there.
Recommendations
In my user manual, it is written about setting the time on page 51. And the note states: “In the area of reliable reception of GLONASS/GPS signals, it is enough to set only the time zone, the hours (taking into account the time zone) and minutes will be set automatically.”
...Personally, I have not tried to enter the time setting mode. )
Well, what, there is a Glonass era block. It is just integrated into the CAN bus interface. Well, it gives out coordinates and time, and probably also GPS speed, just in case. The tidy reads this.
So outwardly there are zero changes, but in fact a lot depends on the software.
Who is he giving it to? Not the Ministry of Emergency Situations, not the ambulance, not the cops - they don’t see your cows...
This is stupid satellite communication, so that you yourself can transmit your coordinates in the event of an accident, in which you, for example, lost consciousness :))).
New Lada: Fuel consumption on Granta Sport – Page 2 – Official Lada Granta Club
The driver of a car with the GLONASS system gets into an accident, the car calls itself, the operator answers: Hello, how can I help? Driver’s “corpse”: I got skidded here, on the highway, in the taiga, wrapped around a tree, can I send a hearse over such and such barks and let it go faster, it’s just that a bear is wandering around here, it will eat it and there will be nothing to bury...
What I mean is that in case of an accident, it is of ZERO use! Well, not really, for example, if you punctured a tire in the middle of the taiga and Siberia, there is no cell phone reception and you know what kilometer of the highway you are stuck on and the number of this road - then GLONAS will be useful (call for help before it freezes, or a hungry bear to go around did not leave his territory). In anything else, it is useless!
And I almost forgot, in case of a tire puncture, they will call the nearest dealer, calling a tow truck... The dealer will issue an invoice for the towing to the driver. And you can wait for a tow truck for a very long time, since dealers mainly live in large regions, and not in the taiga, only the tents of the Ministry of Emergency Situations are scattered in the forests - but no one will call them (you didn’t get into an accident, the wheel was just punctured :))) and don’t give a shit that a bear might eat you, you need a car from the Ministry of Emergency Situations - climb a tree and call 112, at least try :))) ).
source
Reviews from Lada Granta owners about the functionality of the dashboard
| № | Positive |
| 1. | Nikolay, 39 years old: in general, I am satisfied with the information content of the console, the display is bright. True, it shines a little in the sun, but this is not so significant. |
| 2. | Konstantin, 41 years old: I bought Grant a year ago in the “Lux” configuration with a new dashboard. I'm 100% satisfied. |
| 3. | Vitaly, 44 years old: I bought a Granta in 2013, the old instrument panel was good, but it was deformed after an accident, I replaced it with a new version from the “Lux” version. Identical in fastenings. |
| 4. | Dmitry, 37 years old: during a side collision with Renault, the dashboard and dashboard were damaged. I didn’t upgrade to a luxury one, I bought my original one. |
| 5. | Vladimir, 39 years old: he will buy Grant second-hand, he is happy with everything, the panel is good and informative. True, at night it is too bright, sometimes it strains the eyesight. |
| 6. | Kirill, 45 years old: I work as a taxi driver, I drive all the time, I’m happy with the panel, it’s informative. The on-board computer quickly displays all the necessary data. |
| 7. | Vladislav, 34 years old: after a major overhaul, friends recommended installing a new panel from the Luxury configuration, but he left the old one and is happy with everything. |
| Negative | |
| 1. | Vladlen, 44 years old: the old instrument panel is not very informative, often displays information and speedometer readings incorrectly. Installed from Lux configuration. Now there are no complaints. |
| 2. | Sergey, 33 years old: after the accident, I replaced the front console, including the panel, since the old version was unfinished and damp. |
| 3. | Vyacheslav, 39 years old: I drove the original device for a month and replaced it with a luxury version, it is much better and more informative. |
Description of the standard on-board computer Lada Vesta
The Vesta instrument cluster has a built-in trip computer (MK), which has a number of useful functions that are not found in the on-board computers (BC) of many cars (including those of competitors). For example, you can find out the voltage of the on-board network or the speed limiter. Read the instructions for using the bookmaker.
Functions of BC Lada Vesta
- Odometer
- Trip odometer
- Time
- Travel time
- average speed
- Shift Prompt
- On-board voltage
- Current fuel consumption
- Average fuel consumption
- Fuel consumption per train
- Power reserve
- AMT operation and gear shift numbers
- Ambient temperature
- Speed limit indication
- Cruise control speed display
- Enable/disable audible gear shift guidance
On-board computer control algorithm
1. Selection of on-board computer functions (carried out using the keys on the right steering column switch).
2. Selecting trip meters and switching between clock and temperature.
3. Enter parameter setting mode, select parameter.
3.1. Setting the time.
When you exit the time setting mode, the seconds counter is reset to zero (reset without rounding). If there are no button presses within 60 seconds, the time setting mode will exit automatically.
4. Display mode of parameters of the “Cruise control” or “Speed limiter” functions.
In the mode of displaying the parameters of the “Cruise control” or “Speed limiter” functions, it is possible to switch the displayed function of the on-board computer (point 1) and the total and daily mileage counters (point 2), the indication of outside air temperature and time is not available, parameter setting modes (point 3 ) are not available.
- “short” – press for less than 1.5 seconds, triggered when released.
- “long” – press for more than 1.5 seconds, triggered by time.
- yellow color – the segment is blinking (square wave, 1 Hz).
- When resetting the route parameters (clause 3(d)), the following parameters are reset to zero: average fuel consumption, fuel consumed, travel time, average speed.
Bookmaker settings are also shown in the video:
Changing the sound of the turn signals
The factory provides settings for the volume and tone of the direction indicators (it does not work on the instrument cluster), however, the car’s operating manual does not say anything about this possibility.
Procedure
:
- We enter the settings menu by pressing and holding both keys of the on-board computer for about 5 seconds.
- The SOUND menu appears.
- Setting “p1” - the volume of the sound of the turn signal turning on
- Setting “p2” is the volume of the switch off.
- Setting “d1” is the key that turns on.
- Setting “d2” is the tone of the switch off.
- Switching between settings is a short press of two keys.
- To exit the menu, press and hold two keys for about 5 seconds.
The easiest way to set up is with the emergency lights on.
Video instructions:
Are you satisfied with the functions of the Lada Vesta on-board computer? Let us remind you that other operating instructions for this vehicle can be found in this section.
Trip computer
Lada Granta instrument panel pinout Trip computer (MK), shown in Fig. 37, is installed in a variant version instead of a clock in VAZ 2110, VAZ 2111, VAZ 2112 cars. The MK has 15 functions, divided into 3 groups (see Table 2). The group is selected using buttons 1, 2 and 3.
In each group, functions are divided into basic and additional. The main functions are navigated through the ring using buttons 1, 2 and 3. Additional functions are navigated through button 5. When the ignition is turned off, the computer is always in the “Current Time” mode. When the battery is removed, the clock progress and all accumulated parameters are retained for at least 1 month.