Purpose and design of the carburetor
The main function of the unit is to ensure the preparation and dosage of the air-fuel mixture in all engine operating modes without the participation of electronic systems, as is implemented in more modern cars with an injector. The DAAZ 2105 carburetor, installed on the mounting flange of the intake manifold, solves the following problems:
- provides a cold start of the engine;
- supplies a limited amount of fuel for idling;
- mixes fuel with air and directs the resulting emulsion to the manifold at operating modes of the power unit;
- doses the amount of mixture depending on the opening angle of the throttle valves;
- organizes the injection of additional portions of gasoline during acceleration of the car and when the accelerator pedal is pressed “all the way” (both dampers are maximally open).
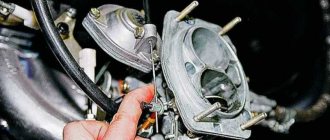
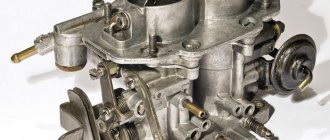
The carburetor consists of 3 parts - the cover, the main block and the throttle body. The lid contains a semi-automatic starting system, a strainer, a float with a needle valve and an econostat tube. The upper part is attached to the middle block with five M5 screws.
The structure of the main part of the carburetor is more complex and includes the following elements:
- float chamber;
- main metering system - fuel and air nozzles, large and small diffusers (shown in detail in the diagram);
- pump - accelerator, consisting of a membrane block, a shut-off ball valve and a sprayer for fuel injection;
- transition system and idle channels with jets;
- secondary chamber damper vacuum drive unit;
- channel for supplying gasoline to the econostat tube.
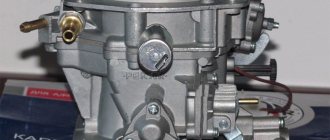
At the bottom of the unit there are axles with throttle valves and main adjusting screws for the quality and quantity of the air-fuel mixture. This block also contains the outputs of many channels: idle speed, transition and starting systems, crankcase ventilation and vacuum selection for the ignition distributor membrane. The lower part is attached to the main body with two M6 screws.
Video: device of DAAZ 2105 units
Carburetor design
1. Carburetor heating unit VAZ 2105; 2. Throttle valve of the first chamber; 3. Crankcase gas suction pipe; 4. Accelerator pump drive lever; 5. Accelerator pump drive cam; 6. Accelerator pump diaphragm; 7. Fuel jet for power mode economizer; 8. Carburetor body VAZ 2105; 9. Power mode economizer diaphragm; 10. Solenoid shut-off valve; 11. Idle fuel jet; 12. Carburetor cover VAZ 2105; 13. Fuel supply pipe; 14. Main air jet of the first chamber; 15. Air damper; 16. Accelerator pump nozzles with fuel supply valve; 17. Trigger diaphragm; 18. Adjusting screw of the starting device; 19. Adjusting screw for the amount of idle mixture; 20. Second chamber lock lever; 21. Vacuum supply pipe to the vacuum regulator of the ignition distributor VAZ 2105; 22. Idle mixture quality adjusting screw; 23. Throttle valve drive lever; 24. Adjusting screw for slightly opening the throttle valve of the first chamber; 25. Air damper control lever; 26. Starter rod; 27. Electrical wire for the idle speed economizer limit switch; 28. Choke lever; 29. Main air jet of the second chamber; 30. Emulsion tube of the second chamber; 31. Sprayer of the main dosing system of the second chamber; 32. Fuel filter VAZ 2105; 33. Needle valve of the float chamber of the VAZ 2105; 34. Throttle valve of the second chamber; 35. Second chamber throttle lever; 36. Main fuel jet of the second chamber; 37. Second chamber throttle drive lever; 38. Float.
The design of the VAZ-2105 (2106) carburetor provides a number of structural elements that provide the necessary characteristics of the combustible composition. The engine can operate in various modes: warming up, idling, medium speed and heavy load. Each of the above situations requires a certain consistency of the ingredients of the air-fuel mixture. The carburetor consists of more than fifty parts. Let's take a closer look at each element of the device. It is worth mentioning that all segments are important components of the device; their dismantling can have a negative impact on the operation of the power unit.
Work algorithm
Without a general understanding of the operating principle of a carburetor, it is difficult to repair and adjust it. Actions at random will not give a positive result or will cause more harm.
The principle of carburetion is based on the supply of fuel due to the vacuum created by the pistons of an atmospheric gasoline engine. Dosage is carried out by jets - parts with calibrated holes built inside the channels and capable of passing a certain amount of air and gasoline.
The operation of the DAAZ 2105 carburetor begins with a cold start:
- The air supply is shut off by a damper (the driver pulls the choke lever), and the throttle of the primary chamber is slightly opened by a telescopic rod.
- The engine draws the richest mixture from the float chamber through the main fuel jet and small diffuser, and then starts.
- To prevent the engine from “choking” with a large amount of gasoline, the starting system membrane is triggered by the vacuum, slightly opening the air damper of the primary chamber.
- After the engine warms up, the driver pushes the choke lever, and the idle speed system (IAC) begins to supply the fuel mixture to the cylinders.
On a car with a working power unit and carburetor, a cold start is performed without pressing the gas pedal with the choke lever fully extended.
At idle speed, the throttles of both chambers are tightly closed. The combustible mixture is sucked through a hole in the wall of the primary chamber, where the CXX channel exits. An important point: in addition to the dosing jets, inside this channel there are quantity and quality adjusting screws. Please note: these controls do not affect the operation of the main metering system, which operates when the gas pedal is pressed.
The further algorithm of the carburetor operation looks like this:
- After pressing the accelerator pedal, the throttle of the primary chamber opens. The engine begins to suck in fuel through a small diffuser and main jets. Note: The CXX is not turned off, it continues to operate in conjunction with the main fuel supply.
- When you sharply press the gas, the accelerator pump membrane is activated, injecting a portion of gasoline through the nozzle nozzle and the open throttle directly into the manifold. This eliminates “dips” in the process of accelerating the car.
- A further increase in crankshaft speed causes an increase in the vacuum in the manifold. The force of the vacuum begins to draw in a large membrane, which opens the secondary chamber with traction. The second diffuser with its own pair of jets comes into operation.
- When both dampers are fully open and the engine does not have enough fuel to develop maximum power, gasoline begins to be sucked directly from the float chamber through the econostat tube.
To prevent a “failure” from occurring when the secondary damper opens, a transition system is used in the carburetor. It is identical in structure to the CXX and is located on the other side of the unit. Only a small hole for fuel supply is made above the closed throttle valve of the secondary chamber.
What's the result?
Taking into account all of the above, it becomes clear that even with the relative simplicity of the design, the carburetor still needs timely additional care. To maintain the cleanliness and performance of the device, some experts recommend cleaning and adjusting the carburetor at least twice a year. It is recommended to do this in the off-season, that is, before the onset of severe frost or heat. This measure allows you to maintain fuel consumption at an optimal level.
If noticeable dips are noted when pressing the gas pedal, then, in parallel with cleaning the carburetor itself, remove the carburetor cover, after which you need to pay attention to the accelerator pump nozzle. This element should be thoroughly cleaned using a carbicleaner; additionally, you can blow it with air under pressure from a compressor.
In other situations, it is better to disassemble and clean the dosing device at the first opportunity. This statement is also true if the carburetor is very dirty for some reason or has never been cleaned before.
Various types of available carburetor cleaning products and compositions, advantages and disadvantages. How to properly clean a carburetor, which cleaner is better.
What does the color of carbon deposits on a spark plug indicate, and why does carbon deposits of one color or another form? How to clean spark plugs from carbon deposits with your own hands, tips.
Why do you need to clean the throttle valve periodically? How to clean the throttle valve, training and adaptation of the throttle valve after cleaning, useful tips.
Refinement and modernization of the carburetor. The main disadvantages of the carburetor injection system and how to eliminate them, settings. Intake manifold tuning.
The main reasons that lead to a lean mixture. A lean mixture on carburetor and injection internal combustion engines, as well as on engines with gas equipment. Diagnostics, repair.
Why is it necessary to clean the fuel pump mesh? When is it better to change and how to clean the fuel pump mesh? How to properly remove the fuel pump, subtleties and nuances.
Malfunctions and solutions
Adjusting the carburetor with screws does not help to get rid of problems and is done only once - during the setup process. Therefore, if a malfunction occurs, you cannot mindlessly turn the screws; the situation will only worsen. Find out the true cause of the breakdown, eliminate it, and then proceed to adjustment (if necessary).
Before you begin repairing the carburetor, make sure that the culprit of the problem is not the ignition system, the fuel pump, or weak compression in the engine cylinders. A common misconception: shots from a muffler or carburetor are often mistaken for a problem with the unit, although there is an ignition problem - the spark on the spark plug forms too late or early.
What malfunctions are directly related to the carburetor:
- the engine does not start - it seizes and immediately stalls;
- the engine does not idle;
- “dips” when sharply pressing the accelerator pedal;
- the power unit “does not pull” or functions unstable;
- increased gasoline consumption, accompanied by black smoke from the exhaust pipe and the formation of soot on the electrodes of the spark plugs.
The listed problems have several causes, so it is proposed to consider them separately.
Difficulty starting the engine
If the cylinder-piston group of the VAZ 2105 engine is in working condition, then sufficient vacuum is created in the manifold to suck in the combustible mixture. The following carburetor malfunctions can make starting difficult:
- When the engine starts and immediately stalls when cold, check the condition of the starter membrane. It does not open the air damper slightly and the power unit “chokes” from excess fuel.
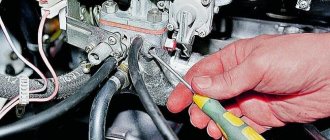
Checking the fuel in the float chamber is done without disassembling: remove the air filter cover and pull the primary throttle rod, simulating the gas pedal. If there is gasoline, the accelerator pump nozzle, located above the primary diffuser, should spray out in a dense stream.
When the level of gasoline in the carburetor chamber exceeds the permissible level, fuel may flow into the manifold spontaneously. A hot engine will not start - it first needs to throw excess fuel from the cylinders into the exhaust tract. To adjust the level, follow these steps:
- Remove the air filter housing and unscrew the 5 carburetor cover screws.
- Disconnect the fuel line from the fitting and remove the cover by disconnecting the telescopic rod.
- Shake out any remaining fuel from the element, turn it upside down and check the functionality of the needle valve. The simplest way is to suck air from the fitting with your mouth; a working “needle” will not allow this.
- By bending the brass tongue, adjust the height of the float above the plane of the lid.
With the needle valve closed, the distance between the float and the cardboard spacer should be 6.5 mm, and the stroke on the axis should be about 8 mm.
Video: adjusting the fuel level in the float chamber
No idle speed
If the engine stalls at idle, look for the problem in this order:
- The first step is to unscrew and bleed the idle fuel jet located on the right side of the middle part of the carburetor.
If the previous recommendations do not resolve the problem, try blowing aerosol fluid into the hole in the throttle body. To do this, dismantle the mixture quantity adjustment block together with the flange by unscrewing 2 M4 screws. Pour detergent into the opened hole, do not turn the quantity screw itself! If the result is negative, which happens quite rarely, contact a carburetor technician or completely disassemble the unit, which will be discussed below.
The culprit of unstable engine operation at idle speed is rarely the carburetor. In particularly advanced cases, air leaks into the manifold from under the “sole” of the unit, between sections of the housing, or through a crack that has formed. To detect and fix the problem, the carburetor must be disassembled.
How to get rid of "failures"
In the vast majority of cases, the culprit of “failures” when sharply pressing the accelerator pedal is the carburetor accelerator pump. To fix this annoying problem, follow these steps:
- Place a rag under the lever pressing the pump membrane, unscrew the 4 M4 screws and remove the flange. Remove the membrane and check its integrity, replace it with a new one if necessary.
In old, heavily worn carburetors, problems can be caused by a lever whose working surface has been significantly worn out and does not press the “penny” of the diaphragm. Such a lever should be changed or the worn end should be carefully unfastened.
Small jerks when pressing the accelerator “all the way” indicate contamination of the channels and jets of the transition system. Since its device is identical to CXX, fix the problem according to the instructions presented above.
Video: cleaning the accelerator pump ball valve
Drop in engine power and sluggish acceleration
There are 2 reasons why the engine loses power - lack of fuel and failure of the large membrane that opens the throttle of the secondary chamber. The last breakdown is easy to detect: unscrew the 3 M4 screws securing the vacuum drive cover and get to the rubber diaphragm. If it is cracked, install a new part and reassemble the drive.
In the vacuum drive flange there is an air channel outlet, sealed with a small rubber ring. When disassembling, pay attention to the condition of the seal and change it if necessary.
If the secondary throttle drive is working properly, look for the problem elsewhere:
- Using a 19 mm wrench, unscrew the plug on the cover (located near the fitting). Remove and clean the filter mesh.
- Remove the unit cover and unscrew all the main jets - fuel and air (do not mix them up). Using tweezers, remove the emulsion tubes from the wells and blow in the washing liquid.
The reason for the lack of fuel may be a low level of gasoline in the float chamber. How to adjust it correctly is described above in the corresponding section.
Problems with increased gas consumption
Supplying too rich a mixture to the cylinders is one of the most common problems. There is a way to make sure that it is the carburetor that is to blame: at idle engine speed, fully tighten the quality screw, counting the revolutions. If the engine does not stall, get ready for repairs - the power unit pulls fuel from the float chamber, bypassing the idle system.
To begin with, try to get by with a little blood: remove the cover, unscrew all the jets and generously treat the accessible holes with an aerosol. After a few minutes (precisely indicated on the can), blow out all channels with a compressor developing a pressure of 6-8 bar. Reassemble the carburetor and do a test run.
An over-enriched mixture makes itself felt by black soot on the spark plug electrodes. Before the test run, clean the spark plugs, and upon return, check the condition of the electrodes again.
If local flushing does not produce results, disassemble the carburetor in this order:
- Disconnect the fuel pipe, the gas pedal linkage, the starter cable and 2 tubes - crankcase ventilation and distributor vacuum.
The next task is to thoroughly wash all channels, chamber walls and diffusers. When directing the canister tube into the channel openings, make sure that the foam comes out from the other end. Perform the same operation with compressed air.
After blowing, hold the bottom part up to the light and make sure there are no gaps between the throttle valves and the chamber walls. If any are found, the dampers or lower block assembly will have to be replaced, since the engine draws fuel uncontrollably through the cracks. Entrust the operation of replacing chokes to a specialist.
When performing a complete disassembly of the DAAZ 2105 carburetor, it is recommended to perform the entire range of operations listed in the previous section: clean the jets, check and change the membranes, adjust the fuel level in the float chamber, and so on. Otherwise, you risk finding yourself in a situation where one breakdown endlessly replaces another.
As a rule, the lower plane of the middle block is arched due to heating. The flange must be ground in on a large grinding wheel, having previously pulled out the bronze bushings. The remaining surfaces should not be sanded. When assembling, use only new cardboard spacers. Reinstall the carburetor and proceed to setup.
Video: complete disassembly and repair of the Ozone carburetor
Troubleshooting
In order to understand the condition of the carburetor in a car, it is enough to carry out a little diagnostics.
Signs of a carburetor malfunction:
- the car began to consume more gasoline than it previously required;
- the engine begins to overheat quickly;
- Black smoke is pouring out of the muffler and popping, “sneezing” and “shooting” noises can be heard. These malfunctions appear when high-voltage wires are incorrectly connected, late ignition, incorrect operation of the distributor and ignition system switch, after unsuccessful repair of the timing belt, or with an inappropriate fuel mixture;
- the car began to noticeably lose power when driving;
- the car accelerates much more slowly;
- failures occur when, when you press the gas pedal, the car does not react instantly, but acceleration occurs gradually and with a delay;
- there are jerks - frequent and short dips;
- swaying occurs - several dips with insignificant intervals.
It is important to remember that before you begin to repair the carburetor, you should diagnose the entire engine power system and its technical condition.
Typical carburetor malfunctions:
- There is no fuel in the float chamber or the fuel mixture is too rich/lean. In this case, the car engine does not start at all or starts but immediately stalls.
- The idle passages or jets are clogged.
- The solenoid valve operates intermittently.
- Failures have appeared in the control unit or among the elements of the forced idle economizer (EFI).
- The rubber o-ring has started to work incorrectly or has melted.
- The fuel “overflows” and the level in the float chamber does not hold. The reason is the depressurization of the fuel valve.
Adjustment instructions
To set up a cleaned and functional carburetor, you should prepare the following tool:
- short flat screwdrivers with narrow and wide slots;
- open-end wrench size 10 mm;
- the same, size 8 mm;
- narrow pliers.
The primary adjustment consists of adjusting the trigger cable and the gas pedal linkage. The latter is easily adjusted: the plastic tip is positioned opposite the hinge on the carburetor axis by twisting it along the thread. Fixation is carried out with a nut for a 10 mm wrench size.
The choke cable is adjusted as follows:
- Push the lever in the cabin all the way, set the air damper in a vertical position.
- Pass the cable through the eye of the cover and insert the end into the hole in the latch.
- Hold the barrel with pliers and tighten the bolt with a wrench.
- By moving the choke lever, make sure that the damper opens and closes completely.
The next step is to check the opening of the secondary chamber throttle. The stroke of the membrane and the rod should be enough for the damper to open 90°, otherwise unscrew the nut on the rod and adjust its length.
It is important to clearly align the throttle valve support screws - they must support the levers when closed. The goal is to avoid friction between the edge of the shutter and the chamber wall. It is not permissible to adjust the idle speed using the support screw.
The accelerator pump does not require additional adjustment. Make sure that the lever wheel is adjacent to the rotating sector, and the end is adjacent to the “heel” of the membrane. If you want to improve acceleration dynamics, replace the standard nozzle marked “40” with an enlarged one “50”.
The idle speed is adjusted in the following order:
- Turn out the quality screw by 3-3.5 turns, the quantity screw by 6-7 turns. Using the starter, start the engine. If the crankshaft speed is too high, reduce it with the quantity screw.
- Let the engine warm up, remove the choke and adjust the crankshaft speed to 900 rpm using the quantitative screw, using the tachometer as a guide.
- After 5 minutes, turn off the engine and check the condition of the spark plug electrodes. If there is no soot, the adjustment is complete.
- If black deposits appear on the spark plug, clean the electrodes, start the engine and tighten the quality screw 0.5-1 turn. Set the tachometer reading to 900 rpm using the second screw. Let the engine run and check the spark plugs again.
The best way to set up a DAAZ 2105 carburetor is to connect a gas analyzer to the exhaust pipe that measures the CO level. To achieve optimal gasoline consumption, you need to achieve readings of 0.7-1.2 at idle and 0.8-2 at 2000 rpm. Remember, the adjusting screws do not affect gasoline consumption at high crankshaft speeds. If the gas analyzer readings exceed 2 CO units, then the size of the fuel nozzle of the primary chamber should be reduced.
Ozone carburetors of the DAAZ 2105 model are considered relatively easy to repair and adjust. The main problem is the considerable age of these units, produced since the times of the USSR. Some copies have reached the required service life, as evidenced by large play in the throttle valve axles. Severely worn carburetors cannot be adjusted, so they have to be replaced entirely.
The carburetor on any vehicle is one of the components of the fuel system of an internal combustion engine. It mixes air with fuel liquid, and this mixture is supplied to the cylinders of the internal combustion engine. As you can see, this automotive part plays a very important role in the functioning of the vehicle as a whole. Therefore, the carburetor must be adjusted periodically. You will learn how to do this correctly on a VAZ-2105 from this article.
Replacement instructions
For the procedure, you should use an overpass or inspection hole. To raise the car, you can use a jack, lifting the front end and placing it on supports. Replacement is carried out only on a cold machine.
Required Tools
Replacing a timing belt and chain is a complex and lengthy procedure. To complete it as quickly as possible, you need to properly prepare for it and prepare in advance:
- a set of keys;
- set of heads;
- knob;
- screwdriver
To make consumables last longer, you should buy originals.
Stages
- First, turn off the power to the car by removing the negative terminal from the battery.
- If protection is installed, it must be removed.
- Then you need to drain the coolant from the system.
- At the next stage, you need to dismantle the radiator, cooling system fan, and pump pulley.
- Then you need to remove the drive belts for the power steering, air conditioning compressor, and generator.
- Next, unscrew the spark plugs.
- Then we remove the distributor protection screen and disconnect the tube connecting it to the timing belt from the air collector sleeve.
- By turning the crankshaft by the bolt securing its pulley, you should set the marks. The mark on the timing belt pulley must coincide with the casting on the camshaft; accordingly, the installation mark on the crankshaft gear must align with the mark on the oil pump housing. In the video you can see how to set the tags correctly.
- Using a special tool, you need to unscrew the mounting bolt and remove the crankshaft pulley.
- Then you need to remove the lower and middle timing protection covers.
- By unscrewing the tensioner mounting bolt and turning it counterclockwise, we loosen the tension on the timing belt and remove the latter.
- Now you should change the roller and start tightening the VAZ 2105 timing belt.
Changing the tension roller
Before doing this, all parts should be cleaned of dirt.
- The belt should first be pulled onto the crankshaft pulley, then onto the oil pump drive pulley, and lastly onto the camshaft pulley.
Pulling the belt onto the camshaft pulley
- Having put the belt on the tensioner, you need to tighten the bracket and install the spring.
When installing the timing belt, do not rotate the camshaft and crankshaft so as not to knock off the marks.
- After turning the crankshaft two turns, you need to check that all installation marks match, tension the belt and tighten the tensioner bracket mounting bolts.
- Next, assembly is carried out in reverse order.
After the procedure for changing the timing belt or chain of the VAZ 2105, you should start the car and check the performance of the engine.
Nuances of the VAZ-2105 carburetor adjustment process
Experts immediately warn inexperienced car enthusiasts: if you don’t know where the carburetor is located in the car and what it consists of, then you shouldn’t even start adjusting. By incorrectly changing the parameters of the fuel system, the entire vehicle can be damaged. It is best to entrust this procedure to qualified auto mechanics from a service station.
So, to begin adjusting the carburetor of a certain vehicle model, you need to study its structure. Thus, the VAZ-2105 carburetor contains several important systems:
- dosing;
- starting and warming up the engine;
- maintaining an optimal level of fuel fluid;
- starting idle;
- econostat system;
- accelerator pump.
Three of all the listed systems are subject to standard adjustment:
- Starting and warming up the internal combustion engine (the starting device is configured).
- Maintaining the fuel fluid level (the float mechanism is adjusted).
- Idle speed (speed calibration is performed using a specific screw).
To set them up, it is absolutely not necessary to remove the carburetor device from the car.
The first stage is setting up the float mechanism of the VAZ-2105 carburetor
First of all, to adjust the carburetor float mechanism, the car should be allowed to idle. And only after that begin the adjustment procedure.
- The carburetor cover is removed.
- The current level of fuel fluid in the chamber of the float mechanism is checked (its digital indicator should ideally be 28 mm).
If the digital indicator of the fuel level in the float chamber corresponds to the norm, then nothing needs to be adjusted. Otherwise, you need to do the following:
- check the distance from the cover gasket and the float itself (this is done at the moment the needle valve ball comes into contact with it) - the norm is 6.5 mm (+- 0.25 mm);
- bend the tongue;
- check the maximum stroke of the valve needle - the norm is 8 mm;
- check the distance from the cover gasket to the maximum retracted float - the norm is 14 mm (+- 0.5 mm).
If the indicators do not meet standard standards, they can be adjusted using a bracket. If the optimal level of fuel fluid in the float chamber was not obtained after adjustment, the needle valve will have to be replaced.
The second stage - we adjust the starting device of the VAZ-2105 carburetor
At this stage, in a garage environment, a car enthusiast can perform the following steps to configure the carburetor system that starts and warms up the engine:
- close the air damper (this is done using the thrust handle located in the car interior);
- check the location of the rod shank, which must be at the end of the groove of the carburetor rod to start the system;
- measure the gap level from the edge of the valve to the chamber wall (measurements are taken when the rod is recessed) - the norm is 5-5.5 mm.
If the digital indicators differ from the established standards, they are adjusted by rotating a special adjusting screw (it is located on the carburetor trigger).
Third stage - idle speed adjustment
This stage is no less important than the previous two. To do this, the internal combustion engine is pre-started and warmed up. Only after this can the idle speed be adjusted.
- The motor is brought out using rotational movements of the mixture quantity screw - the norm is 850 rpm:
- to increase the speed, you need to rotate the mixture quality screw (to the maximum level);
- to reduce the speed you need to rotate the quantity screw (to the desired level of 850).
- Tighten the quality screw as far as it will go (rotational movements are performed until the motor stops shaking).
- Unscrew the same screw in the opposite direction three turns.
In this way, the VAZ-2105 carburetor is adjusted at idle. Auto mechanics call all of the above actions calibration of the crankshaft idle speed.
How to install the unit in place
You can assemble and reinstall the carburetor in the same way as you disassembled it, performing all the steps in reverse order.
- The carburetor is installed in its place, the mounting bolts are tightened.
- The pipes through which fuel is supplied are attached. The gas cable is connected to the throttle lever.
- The wiring is attached.
- A vacuum hose is connected to the ignition distributor, and the EPHH limit switches are combined.
- After installing the carburetor, it is adjusted.
Video: installing a carburetor on a VAZ
It is not so difficult to independently remove, disassemble, clean and reinstall the carburetor in the VAZ 2107 and 2106. The main thing is not to be intimidated by the huge number of hoses, valves, parts and dirt and strictly follow the instructions.
Didn't find the information you are looking for? on our forum.
Expert advice
After completing the procedure for adjusting the VAZ-2105 carburetor device, experienced auto mechanics recommend paying attention to the following critical points:
- Valve location - is in the retracted position, with the idle speed jet touching the seat in the carburetor body.
- Lubricating the rubber seal with special motor oil.
- The location of the air damper intended for cold passage is in a vertical plane, while the suction handle is lowered.
- The condition of the solenoid valve - the presence of damage and malfunctions is checked as follows:
- turn on the ignition;
- remove and put the connector on the valve;
- listen to the sounds coming from the solenoid valve.
If clicks are heard during the inspection process, the part is in full working order.
How to breathe life into old Zhiguli Zhiguli “five” were produced from 1980 to 1995. and enjoyed deserved popularity. The main power unit that was installed on cars of this model was a four-cylinder, four-stroke internal combustion engine with a displacement of 1.29 liters, 1.45 liters and 1.57 liters. To create a combustible mixture for the engine, domestically produced Ozone carburetors were used, as well as their modifications. We will look at adjusting the VAZ 2105 carburetor with our own hands in this article.
So, first, let's talk about the device itself, designed for mixing air and fuel in a certain proportion, supplying the resulting mixture into the engine cylinders and ensuring stable operation of the engine in various modes. This is a fairly accurate and complex unit. Therefore, the precise performance of its functions depends on strict maintenance of the parameters established during its production and configuration.
Preparatory activities
If a motorist is interested in adjusting the Solex VAZ-2107 carburetor with his own hands, he must first carry out a number of preparatory steps.
Initially, you need to warm up the power unit to operating condition (temperature 85–90 degrees).
In the next step, you need to squeeze the handle of the air damper drive mechanism all the way; people simply call it “choke.” After this, the damper should be in a position in which the air channel is completely free, i.e., located in the direction of air movement.
This video tells you how to install it
Today Nail Poroshin will tell and show the main nuances of the installation
53rd Carburetor
to the Classics! Everyone...
If there is a tachometer, the device must be connected to the engine being turned off. Otherwise, if there is no unit, the item should be skipped. The positive side of the device should go to the ignition coil, and the negative side should go to the “ground” of the vehicle (body, engine or battery negative). Before connecting the device, you should read the operating instructions.
The last action should be to start the engine, turn on the high beam optics and the heating device.
Basic mechanisms and systems
To perform its functions, the carburetor has the following systems and mechanisms:
- System for maintaining the required fuel level;
- System for starting and warming up a cold engine;
- Idle system;
- Main dosing system;
- Acceleration pump;
- Econostat system.
Good old VAZ: love for life The three systems listed first in the list are subject to configuration. The VAZ 2105 carburetor in question can be adjusted without removing it from the car. Since the units of cars of models 2105 and 2107 are identical in structure and differ only in the diameters of the holes of the fuel and air nozzles, in the same way it will not be difficult to make a similar adjustment for the VAZ 2107.
Which carburetor model to choose
For any VAZ car, starting from 2101 to 2107, only certain carburetor models are suitable
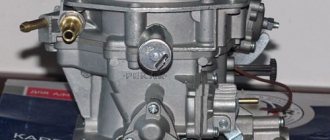
DAAZ carburetors
Carburetors DAAZ 2101, 2103, 2106. They were produced at the Dmitrov Automotive Unit Plant, which bought a license from the Italian company Weber, therefore these carburetors can be indicated under both names. The devices were not distinguished by the complexity of their design, but they could please their owners with the rapid acceleration of the car and good speed. One of the biggest problems in installing these models is their virtual absence on the market.
In addition to speed and simplicity, Weber carburetors also provided incredibly fast fuel consumption - these “monsters” consumed 10–14 liters per 100 km. fuel.
The powerful but resource-intensive Weber carburetor was produced by the Russian Dmitrov plant using Italian technology
Carburetors "Ozone"
More technologically advanced models, which were already installed in VAZ 2105 and 2107 cars, were also produced at the Dmitrov Automobile Unit Plant. However, they were not only more advanced and improved, but also more environmentally friendly. This is why they received the name “Ozone”. This carburetor made it possible to reduce fuel consumption to 7–10 liters. 100 km, while maintaining the dynamic characteristics of its predecessors. The downside of the device was the complexity of its assembly and constant contamination in one of the chambers, which led to the fact that the acceleration of the car noticeably deteriorated, the speed decreased and the engine began to act up.
“Ozone” is an environmentally friendly model of DAAZ carburetors
Solex
A little later, DAAZ 21053 carburetors appeared. They were produced under license from the French company Solex, hence the name of the models. These carburetors were not much similar to previous DAAZ models. The updated design with a fuel return system made it possible to save 400–500 ml of fuel per 100 km. These carburetors were distinguished by good power and low gasoline consumption. The disadvantage of the device was the narrow fuel and air channels, which very often became clogged.
The Solex carburetor successfully combines the power and environmental friendliness of its predecessors
Solex carburetors came in many variations with different auxiliary systems. In the CIS, the most popular option has become an electric idle air valve.
Custom carburetor Solex 21073
Often, inquisitive car enthusiasts resorted to replacing the carburetor on their own. One of the suitable models turned out to be Solex 21073, famous for its fairly wide jets and channels. Such a carburetor increased the car’s power, but at the same time increased fuel consumption - 9–12 liters. per 100 km.
Solex 21083
The second non-standard carburetor, which with some modifications fits the VAZ 2106 and 2107 models, is Solex 21083. After expanding the diffusers and installing jets, this device allows you to significantly increase the dynamics of the car without much fuel consumption. However, the process of upgrading a carburetor is very complex and time-consuming.
Now about the setup itself
Maintaining the required fuel level in this device is ensured by a float mechanism.
Setting the float mechanism
- Start the car engine and let it idle for 2-3 minutes;
- Remove the carburetor cover;
- Check the fuel level in the float chamber. It should be 28 mm.
In case of deviation, we perform the following actions:
- Measure and adjust the distance between the cover gasket and the float when the float tongue touches the needle valve ball. It should be 6.5±0.25 mm. Adjust by bending the tongue;
- Check the maximum valve needle travel. It should be 8 mm. To check, it is necessary to measure the distance between the cover gasket and the maximum retracted float. It should be 14±0.5 mm. The deviation is eliminated by acting on the bracket;
- Visually check that the tongue of the needle valve axis is perpendicular and that the float is parallel to the bottom plane of the cover. If there are any violations, correct them.
If all of the above steps fail to achieve a stable fuel level (28 mm) in the float chamber, then the needle valve must be replaced.
Adjusting the starting device of the VAZ 2105 carburetor
- Using the thrust handle located in the cabin, close the air damper;
- Check that the rod shank is at the end of the carburetor trigger rod groove. If there is a violation, correct it by bending the rod;
- Remove the cover and measure the gap between the edge of the air damper and the chamber wall with the starter rod recessed (we recess the rod using a screwdriver with the rod disconnected). It should be 5.0-5.5 mm. We adjust by rotating the adjusting screw of the starting device.
Idle adjustment
This type of work should be carried out on a warm engine.
- Use the mixture quantity screw to bring the engine to 850 rpm;
- Use the quality screw to bring the speed to the maximum level;
- Use the quantity screw to reduce the speed to 850;
- Use the quality screw to bring it to maximum again;
- Having thus achieved 850 rpm, tighten the quality screw until the engine “shakes”;
- By unscrewing the quality screw, achieve stable engine operation.
With proper adjustment of the VAZ 2105 carburetor, fuel consumption in the summer should not exceed:
- outside the city on the highway at a speed of 90 km/h – 7 – 7.5 liters per 100 km;
- during the urban driving cycle - 8.5 - 9 liters.
If you cannot do this work on your own, it is better not to torture yourself and the car, but contact the AvtoVAZ service center.
The VAZ 2105 “Ozone” carburetor is used to operate the engine of the “five” known to many Russians, which was produced in 1980–2010.
Carburetor VAZ 2105 - general information
On the fifth model Zhiguli we are interested in, the main power unit is a four-stroke four-cylinder internal combustion engine with a volume of 1.45, 1.29 and 1.57 liters.
Russian Ozons (DAAZ 2105) of several modifications are used to form the combustible composition for the “five” engine.
The most commonly installed models were 2105-1107010-20 and 2105-1107010-10. Their difference lies in the size of the cross section of the two elements:
- additional pipe;
- fuel main jet located in the primary chamber.
Carburetors of these modifications have five main mechanisms:
- econostat system;
- dosing main chamber;
- system for starting a cold engine and warming it up;
- accelerator pump;
- idle system;
- system responsible for maintaining the required level of gasoline.
The VAZ 2105 carburetor jets are marked as follows:
- 2105-1107010-10. Air jet: main system - 170 for the first and second chambers, idle speed - 170 and 70, respectively. Fuel: main system - 109 and 162, idle - 50 and 60. Accelerator pump: 40 (bypass and fuel).
- 2105-1107010-20. All markings are similar to the previous model, with the exception of the fuel cell of the main system - 107 (in 2105-1107010-10 marking 109).
In general, the “five” carburetor is a rather complex device that ensures stable operation of the car engine in different modes, mixes vehicle fuel and air in a given proportion, and then supplies the resulting combination to the cylinders of the power plant. Its correct setting guarantees economical fuel consumption and stable operation of the “heart” of the car.
How is the carburetor float device adjusted?
Experts say that it is possible to adjust the carburetor without necessarily removing it from the vehicle. A float mechanism is responsible for ensuring the required volume of fuel in the described device, which is adjusted as follows:
- the engine is started and it idles for several minutes;
- The carburetor cover is removed and the fuel level is measured, which should be 28 millimeters.
If these same 28 mm are not observed, perform:
- bending the float tongue touching the needle valve (more precisely, its ball) to a value of 6.2 to 6.75 mm;
- After visual inspection, align the parallelism of the float with respect to the lower level of the cover, as well as the perpendicularity of its tongue to the axis of the valve (needle);
- align the position of the bracket in situations where the distance between the float, allocated to the greatest length, and the cover gasket does not fall within the range of 13.5–14.5 mm.
How to adjust carburetor idle speed?
Idle speed is adjusted on a warm engine according to the following scheme:
- bring the internal combustion engine to 850 rpm using the quantity screw;
- then set the speed to maximum using the quality screw;
- reduce the speed to the previous level (up to 850) and raise it again to the maximum;
- turn the quality regulator at 850 rpm to the “motor shaking” position.
After all these operations, the quality screw is slowly unscrewed until the internal combustion engine operates stable.
If all the settings are made correctly, the “five” will not “eat” more than 9 liters of fuel when driving around the city, and on country highways the fuel consumption will be about 7.5 liters.