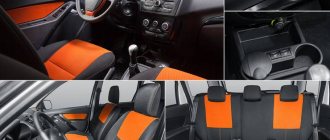
Many owners of Lada 2110, 2111, 2112, 2113, 2114 and Kalina cars have encountered the problem of failure to switch between the readings of the standard on-board computer or jumping arrows on the panel. There are three reasons for this malfunction in the “VDO” instrument panel.
Dashboard arrows stuck on Kalina
- Loss of ground contact on the bolt where the wires from all devices are attached.
- Wires are loose/broken in the steering column switch itself.
- Poor soldering quality of one of the two E6E resistors on the panel board.
If you experience malfunctions of the vdo panel and some indicators do not work, read the article, we will look at how to repair it.
The instrument panel backlight does not light up on the Lada Kalina - why and what to do
The instrument panel of any car is designed to inform the driver about the technical condition of the car. If in the daytime all sensors are clearly visible, then at night for their normal viewing it is necessary for the backlight to work. There are cases when the instrument lighting on the Lada Kalina stops functioning and in the dark it is difficult for the driver to control the readings. This not only creates inconvenience to control, but can also lead to dangerous situations when the driver is distracted to see the information on the dashboard.
Why does the instrument panel backlight on the Lada Kalina not light up?
During operation of the Lada Kalina, situations may arise when the dashboard backlight disappears. If this happens, then you need to find the cause of the breakdown as soon as possible and eliminate it. There are several reasons for the backlight to disappear, but they are all related to a malfunction of the car's electrical network.
If the dashboard backlight disappears, the problem must be corrected immediately
Removing the instrument panel
In most cases, before establishing the reason for the disappearance of the backlight on the Lada Kalina dashboard, you first need to dismantle it.
To remove the instrument panel you will need the following tools:
- a set of keys;
- Phillips and flathead screwdrivers of different lengths.
The procedure for dismantling the instrument panel on the Lada Kalina:
- Turn off the power to the car. To prevent a short circuit during work, you must first disconnect the negative terminal from the battery. If this is not done, there is a possibility of electrical equipment failure.
- Lower the steering column to its lowest position. This will allow you to gain easier access to the instrument panel.
- Unscrew the two screws securing the cover; this will require a short screwdriver. Then it is carefully pulled out, while it is necessary to overcome the resistance of the spring clamps. It is necessary to shake the lining and gradually pull it towards you. To remove the lining, unscrew two screws
- Unscrew the console mount. It is also secured with two screws located at the edges of the case. You must hold the screws, otherwise they may fall inside the panel. The console is attached in two places along the edges of the case
- Disconnect the plug with wires. To do this, tilt the instrument panel forward slightly and pull out the plug. To do this, you need to use a screwdriver to move the lock on the plug to the right side.
- Remove the dashboard. Now that the instrument panel is not holding anything, it can be carefully pulled out. Turn the shield a little and pull it to the side; it’s easier to do this to the left. After disconnecting the plug, the instrument panel can be easily removed
When the dashboard has been dismantled, you can proceed to diagnostics and search for the reasons that caused its malfunction.
Brightness adjustment lost
One of the very first actions to take when the instrument panel backlight disappears is to check the brightness adjustment. The driver himself or his passenger can change the setting. There is a wheel on the panel with which you can set the brightness of the instrument lighting. If it is turned to minimum, the backlight may glow very weakly or not glow at all. Just turn the wheel and adjust the brightness.
The brightness control for the instrument panel lighting is designed as a wheel.
Fuse problems
The next step in troubleshooting is to check the fuses. To do this, you need to use the technical documentation of the car and find where the fuse responsible for the instrument lighting is located. The fuse box is located on the left side under the cover with the light switches.
The fuse box is located on the left side under the cover with the light switches
Also, the purpose of the fuses is written on the cover and if you look closely, you can find where which one is located. It is enough to replace the required fuse and if the problem is there, the instrument lighting will start working. On the cover, the fuse responsible for the instrument lighting and interior lighting is designated F7.
The fuse corresponding to the instrument lighting and interior lighting is designated F7
In addition, the socket into which the fuse is inserted may become damaged, or a breakdown may occur inside the unit itself. To diagnose, you will have to completely remove the fuse box. If the mounting block fails, it must be replaced.
Wiring problems
One of the most unpleasant options is a malfunction in the car’s electrical wiring, which leads to failure of the instrument panel backlight. This may occur as a result of a broken wire. To identify it, you need to use a multimeter to check the wires responsible for powering the instrument backlight. They can be identified on the car's electrical diagram. Once the break is found, it is removed and isolated.
According to the diagram, they check the integrity of the wiring responsible for lighting the instrument panel
In addition, the reason may be oxidized contacts of the mounting block or wire blocks. In this case, disconnect the connector near the fuse box and on the dashboard. After this, inspect and, if necessary, clean the contacts.
Problems with light bulbs
It is possible that the instrument panel lighting has disappeared due to failed light bulbs. There are a total of 5 light bulbs on the Lada Kalina dashboard.
There are 5 light bulbs on the Lada Kalina dashboard
Replacing them yourself is easy:
- The dismantled instrument panel is turned over, since the light bulbs are located at the back.
- Take out the light bulbs and check their functionality using a multimeter. The cartridge is turned counterclockwise. If you have difficulty pulling the light bulb out of the socket with your hands, you can use pliers. Turn the socket counterclockwise and pull out the light bulb
- New light bulbs are being installed. If a burnt-out light bulb is detected, it is replaced with a new one.
The board burned out
In some cases, a problem with the dashboard lighting may be due to a faulty control board. Some craftsmen try to restore it with a soldering iron, but this is a complex process and only professionals can do it. Usually, when such an element fails, it is replaced with a new one.
If the control board fails, it must be replaced
Advice from car enthusiasts and recommendations from experts
If the instrument lighting on the Lada Kalina stops lighting, then you cannot delay fixing the problem. This must be done as soon as possible. In most cases, it will take a maximum of 30–50 minutes to fix the problem.
Advice from car enthusiasts and recommendations from experts
There may be a break in the backlight brightness adjustment circuit. The adjustment rheostat has a soldered spring - it tends to fall off. You can simply put a jumper, that is, bypass the rheostat, then the brightness will not be adjusted, or solder it back - you will need to remove the rheostat.
https://autolada.ru/viewtopic.php?t=100217
Lamp contacts often become loose, and they burn very quickly. I have already changed more than one.
compositor77
https://kalina-club.com.ua/forum/index.php?showtopic=6768
It is better to immediately install LED lighting bulbs for the instruments, they are not much more expensive, but on a cloudy day or when the sun sets, the instruments are readable with a bang. Moreover, no modifications are needed, the base is suitable...
https://kalina-club.com.ua/forum/index.php?showtopic=6768
You can do everything yourself, everyone basically does it, nothing complicated, the main thing is to unscrew everything and not break it, disconnect the connector. And check the bulbs to see if they are all intact, check the contacts. Maybe some of the light bulbs have burned out and it seems that the light is getting worse.
https://kalina-club.com.ua/forum/index.php?showtopic=6768
I also had this problem. The backlight inexplicably disappeared and then turned on again. It's all about the cigarette lighter illumination. The contact shorts and the brains turn off the backlight. I unscrewed the cover under the gearshift lever and wrapped the wires near the cigarette lighter with electrical tape. All OK.
Roman Didenko
https://otvet.mail.ru/question/93393860
There's a spinner there. Adjusting the brightness of the shield. You need to twist it, it won’t help, either replace it or remove it completely and do it directly.
https://otvet.mail.ru/question/93393860
If the instrument lighting on the Lada Kalina stops lighting, then you cannot delay fixing the problem. This must be done as soon as possible. In most cases, it will take a maximum of 30–50 minutes to fix the problem.
Kalina instrument panel does not work
Hello everyone, in general, the following accident happened on the Lada Kalina. I turn on the ignition, but the panel shows no signs of life. I'm starting the same thing. I tried to do a test of the instrument panel, also zero emotions.
In this situation, there are three options: either the instrument panel is dead, the panel chip may have come off, or the fuse has blown. That's where suspicion comes in. The panel is controlled by fuse F1.
The fact that the fuse has blown can be checked by turning on the turn signals with the ignition on, and if they also do not work, then it is definitely the fuse. In this case, you just need to replace fuse F1. Well, that's all for now everyone.
Instrument panel fuse on Kalina
The instrument panel fuse is very easy to find; it is located in the mounting block.
F1 - immobilizer control unit, hazard warning switch, instrument cluster
In case of replacement, do not forget to observe the amperage of the fuses.
about malfunctions of the instrument panel on a Lada Kalina car
In the last year, an unpleasant problem has emerged that many owners of first-generation viburnums face.
The Kalin dashboard has a standard on-board computer (not to be confused with the BC “State”), which is controlled by three buttons from the right steering column switch (at the end). One “RESET” button is for resetting, the other two (“up”, “down”) are for “scrolling” through the bookkeeping modes and for setting the clock.
— During the cold season, the dashboard stopped responding to the “down” button. — The response to the “up” button is not adequate: when you press the button, the mode seems to switch, but when you release the button, they return to the same mode where you started.
— and one more feature emerged: when we simultaneously pressed the “RESET” button and the “up” button, a quick change of modes occurred in a circle until we released the buttons.
Actually, so far I’ve been using it, a la “emergency operation mode” (such an accidentally discovered side effect) by abnormally pressing two buttons at the same time. Until I got tired of it.
1) I started with diagnosing the steering column switch. I took it apart, checked if there was anything unnecessary, and rang all the contacts. Conclusion: the steering column is 100% functional. So don’t immediately run and change the steering column switch
I know many people did exactly this. SO someone definitely has a spare steering column switch. I took photos of the insides of the switch, but they didn’t survive...
2) According to the electrical diagram, the wires from the switch go directly to the dashboard. On the Kalinoforum, this problem has long been diagnosed and solved. Here is the topic: www.lkforum.ru/showthread.php?t=23916
It is necessary to completely disassemble the instrument panel into parts and solder the 39 kOhm resistor assembly, which was placed crookedly on the board from the factory and was poorly soldered.
In the cold, microcracks formed and contact was lost. And in the summer everything worked fine.
Read also: Gray Lada Granta photo
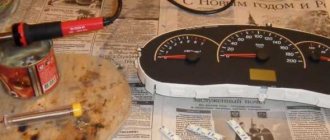
Let's sort it out. We repair - we collect
Took it apart. Four star bolts. To remove the shooter, he used a pair of forks.
There is an interesting pattern on the inside, it looks like it froze from the inside and revealed the pattern with dust
Arrived "ten" 1.6, 8 cells with "europanel.
Problem: devices do not work. All: tachometer, speedometer, temperature, fuel and computer screen.What was: closed the cigarette lighter (melted aluminum washer) fuse blown. Extinguished tape, cigarette lighter and … tidy. They are on the same fuse! After repairing the cigarette lighter and replacing the fuse tidy not come to life. The test fails (“Accidentally” at hand was tidy from the “priors.” Replaced - works. So the wiring is good, the problem is tidy.
I decided to open it. Disassembled, pulled arrows.
Connected on the table:19 output "-"
20 and 21 output "+"
All the best to all))
Recommendations
I have a similar problem, can you tell me what it could be? VDO tidy. After the coil of the second cylinder fired (a crack ran through the entire body), the instrumentation failed. I will describe the symptoms: when the ignition is turned off, the temperature and fuel level arrows do not drop, and the display on the BC does not turn off, you can even switch it with the paddle. The temperature gauge is at zero in the morning, when driving, which strangely shows the correct readings, it moves up and down in the operating parameters as it warms up.
The fuel gauge also shows the level during operation; it even decreases with consumption, but does not drop in the morning. When you remove fuse F10 while inserting it back, the arrows drop to zero and rise again. Resetting the terminal does not help, there are no errors at all. There is hope that the tidy processor has not died yet, because the BC regularly calculates gasoline costs and kilometers.
Yes, and one more thing - when you remove the key, after ten seconds the tidy emits five drawn-out squeaks and the average readings are reset (I noticed from the consumption readings that in the morning it starts counting from 20 liters). The device does not come up for testing.
I checked what masses I found.
Check the instrument errors first.
1. Ignition is off, battery is on.2. While holding down the daily mileage reset button, turn on the ignition. All segment positions should light up on the LCD, indicating the start of the self-test.3. Press any of the on-board computer control buttons. The program version (Ver 1.0 and higher) should appear on the LCD.4.
Press any of the control buttons again.
The following error codes (if any) will be displayed on the first and second lines of the LCD: 2 Overvoltage 3 Fuel level sensor error * 4 Coolant temperature sensor error * 5 Outside temperature sensor error ** 6 Engine overheating *** 7 Emergency oil pressure ** *8 Brake defect***9 Battery low***
E Recognizing an error in a data packet stored in EEPROM
Read also: Liquid moth owner reviews
5. If necessary, you can reset error information. To do this, press and hold down the daily mileage reset button for 3 seconds. 6. Press any of the control buttons again.
All segment positions should light up on the LCD - the system has returned to the state of step 2.
Sound alarm. errors.1. All acoustic indicators are displayed only when the ignition is turned on and if certain criteria are met. If several criteria are active in parallel, the alarms should be displayed in the sequence of their arrival one after another with a pause of 1.5 to 2.5 seconds.2. Engine overheating. Criteria: coolant temperature indication ≥ 115°C. Alarm: constant sound for 5 seconds. Stop: coolant temperature indicator needle drops to ≤ 110°C. Repetition: coolant temperature indicator needle drops to ≤ 110°C , then rises again to ≥ 115°C.3.
Emergency oil pressure. Criteria: engine speed ≥1000 rpm; "Oil pressure" input active for 10 sec. Signal: continuous sound for 5 sec. Stop: "Oil pressure" input not active or speed ≤ 900 rpm. Repetition: "Oil pressure" input active, speed decreased to ≤ 900 rpm, and then increased again within 10 sec. ≥ 1000 rpm.4. Brake defect (front brake pad wear indicator). Criteria: “brake defect” input active for 10 seconds. Signal: 0.5 sec on/0.5 sec off 5 repetitions. Abort: Brake defect input is not active.
Checking the cigarette lighter
Everything is quite simple, this work is unlikely to cause any difficulties even for a novice driver. First of all, you should turn off the power to the car. Then remove the cigarette lighter from the socket. This must be done carefully so as not to damage the contacts. When the mechanism is in your hands, visually inspect it, are there any traces of burning on it? If everything is fine with it, and there are no obvious problems, then you will have to eliminate the consequences of the short circuit. Since this is the only relevant problem in your case that prevents the normal functioning of the devices on the panel.
Owners of VAZ “dozens” have to deal with certain malfunctions during the operation of their iron horse. Some may take a few minutes to resolve, while others may take several days to resolve. It all depends on which part of the car has failed.
There are many problems, including with the instrument panel. Alas, the build quality of Russian cars is often far from ideal, and virtually any unit or component can suddenly fail.
The tachometer needle is not at zero on the Lada Kalina, treatment of the problem - Behind the wheel
The tachometer in a car is used to indicate the number of revolutions of the engine crankshaft. Let's look at why the tachometer doesn't work and how to find and eliminate the cause of the breakdown. We will definitely dwell on the device and principle of operation, which will help to find out why the tachometer stopped working, the needle twitches or behaves inappropriately.
Classification by operating principle
- Mechanical or electromechanical tachometers with direct drive. The revolutions are transmitted to the dial indicator through a flexible shaft, which, through a worm gear, receives rotation directly from the crankshaft or one of the transmission shafts. The operating principle of the indicator is based on the phenomenon of eddy current induction. The operation and design of a magnetic tachometer are extremely similar to the operating principle of a car speedometer. In modern cars, a similar tachometer design is not used.
- Electric machine. A distinctive feature is the connection to a generator. It is used primarily on diesel engines, but for the purpose of unification, a device of this type can also be used on gasoline engines.
- Electronic. The signal can be taken either from the ignition system or directly from the computer. Installed on gasoline and diesel internal combustion engines.
Design and principle of operation
Main components of electric machine and electronic tachometers:
- measuring unit, or signal converter. It can be based on elements of analog circuitry or built using special microcircuits;
- display unit with analogue or digital display of the number of revolutions;
- auxiliary elements.
The operation of electronic tachometers is based on the conversion of individual signals or pulses captured from the computer, ignition system or generator into a signal “understandable” for the display unit.
Connection diagram
When looking for the reason why the tachometer does not work, it is first of all important to understand the connection diagram and the type of signal. There are 3 typical connection schemes:
- to a contactless ignition system (the tachometer wire is connected to the primary circuit of the ignition coil). The operating principle is based on measuring the frequency of voltage surges in the primary circuit of the ignition system. Calculating the ignition angle is impossible without focusing on the number of crankshaft revolutions, therefore the sparking frequency directly depends on the crankshaft rotation speed. On 4-cylinder internal combustion engines, a full revolution of the crankshaft corresponds to 2 voltage pulses in the primary circuit. Accordingly, the higher the crankshaft rotation speed, the greater the frequency of voltage surges;
- connection to the contact ignition system. The operating principle and connection diagram are similar to the BSZ, but the design of the measuring unit will differ depending on the voltage of the input circuit;
- connection to the engine ECU. The principle of operation is still based on recording voltage pulses in the primary circuit of the ignition system, but the signal to the tachometer comes from the engine control unit;
- connection to the generator (the tachometer signal contact is connected to terminal W of the generator). The rotation of the generator pulley is carried out by a belt drive from the crankshaft, so the rotation speed of the generator rotor will always be proportional to the crankshaft speed. The change in the number of revolutions of the crankshaft can be calculated by constantly measuring the amount of EMF generated on the winding. By its operating principle, an electric machine tachometer resembles a conventional voltmeter.
Advertisements on NN.RU – Auto
The company offers you to upgrade the Fiat Ducato Fiat Ducato basic version for a solution.
Lengthen Gas 331043, 331063 Valdai-farmer for installation of a body 5.1/6.5 m. The chassis is lengthened by increasing the wheel size.
The broken-type towing platform produced in our company has a highly reliable design, which is confirmed by many years of use.
Re-equip, lengthen the frame, truck: Valdai Gas 33104, 33106; Valdai farmer 331043, 331063; Lawn Gas 3307, 3309;.
A video from a surveillance camera has appeared on the Internet, where you can see how a man enters the Bristol store in Dzerzhinsk and approaches.
Two more recycling collection points have been launched in the capital of the Volga region, the administration of Nizhny Novgorod reports. Total in the city now.
Already today, the most impressive starfall of 2022 can be observed in the sky of the Nizhny Novgorod region. Nizhegorodsky reports this.
Repair is a real challenge for a family. A hundred questions arise that have no answers, and a lot of problems that are urgently needed.
Source
Instrument cluster illumination does not work
The other day I encountered the following problem: one of the Kalina dashboard lamps (tachometer needle illumination) stopped lighting. Without hesitation, I decided to disassemble the instrument panel and find out why the backlight was not on. It turned out to be very simple - the light bulb burned out. Now about everything in more detail.
The Kalina instrument panel itself is quite easy to remove - you need to unscrew 4 screws in sequence. The first two attach the decorative trim, the remaining two - the tidy itself.
After unscrewing the bolts, you need to disconnect the wiring harness connected to the rear. Do not rush to pull, it is held on by a latch, first open the lock, then pull out the connector. The lock snaps upward, pull it on the left side.
Now you can pull out the tidy itself. It will be easier to pull it sideways to the left or right.
Replacing Kalina dashboard lamps
After the manipulations have been carried out, all that remains is to find and remove the burnt-out dashboard backlight lamp and put a new one in its place.
This is done quite easily - we turn the instrument illumination lamp counterclockwise and pull it out. We also insert a new dashboard backlight bulb ourselves, only we will screw it in clockwise. After replacement, we install everything in the reverse order, nothing complicated.
The instrument panel of any car is designed to inform the driver about the technical condition of the car. If in the daytime all sensors are clearly visible, then at night for their normal viewing it is necessary for the backlight to work. There are cases when the instrument lighting on the Lada Kalina stops functioning and in the dark it is difficult for the driver to control the readings. This not only creates inconvenience to control, but can also lead to dangerous situations when the driver is distracted to see the information on the dashboard.
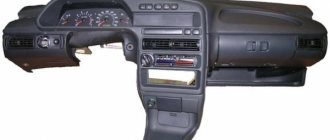
Dashboard
The panel consists of the following devices:
- speedometer;
- backlight bulbs;
- tachometer;
- fuel gauge;
- warning lamps;
- connecting blocks.
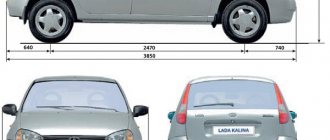
For the Lada tenth model, two types of instrument panels are used:
- old view - devices are located symmetrically;
- updated version - temperature and fuel level indicators are shifted to the right.
Instrument panel pinout - correct location of each wire. Before repairing, it is necessary to understand this issue in order to understand the essence of the system, the type of fuses and the purpose of each wiring.
The entire diagram can be found in the instruction manual or on the Internet; it will help you quickly understand the design and carry out repairs correctly, without special knowledge of electronics and extensive experience.
Troubleshooting methods
Now that all the causes have been identified, we can begin to consider troubleshooting. But, before we begin, it is worth noting that a car enthusiast needs to have an idea of the design features of the engine if he wants to fix the problem himself. Otherwise, go directly to a car service center, in order to avoid other problems that, due to lack of experience, car enthusiasts usually create for themselves.
Sensors
Often, the reason why the check light on Kalina may come on is the failure of one of the sensors. Possible ones that are worth checking right away include: mass air flow sensor, idle speed control, crankshaft position sensor, oxygen sensor and coolant temperature sensor.
You can determine the cause by going through each sensor separately and using a tester to check their functionality.
But, there is a simpler and more effective way to determine the malfunction of a particular sensor, namely connecting to the electronic engine control unit. Here you can look at the errors and, by deciphering them, determine where the problem is.
Throttle
A clogged throttle valve can often cause the check engine light to come on because not enough air is supplied to the power unit. The solution to the problem is cleaning. This process can be carried out using carburetor cleaning fluid or VD-40 fluid.
The part is removed from the car and cleaned, after which it is installed in place. It is also recommended to check the throttle position sensor, which may have failed.
Injectors
One of the common reasons for the “check” icon to appear on the dashboard is a malfunction of one or more injectors that do not spray the fuel mixture properly. So, it is worth dismantling all the elements and checking them using a special stand.
If there is none, then you can use the traditional method by pouring flushing fluid into the fuel supply pipes and activating the injectors using the battery. This way it will be clear which injector is not working well. But, experienced auto mechanics recommend cleaning and checking the nozzles on a stand, since the effectiveness of the procedure is higher.
Fuel pump and filter
Another cause of the malfunction may be a malfunction of the gasoline pump or its filter. Lack of power or contamination of the filter elements leads to the fact that an insufficient amount of fuel will enter the power unit to form an air-fuel mixture.
This can also cause such a well-known automotive effect as engine tripping.
The malfunction can be cured by checking the functionality of the gasoline pump, as well as by replacing the filter inside the gasoline pump. It is also worth looking at the fuel filter, which could become clogged when pouring low-quality gasoline.
Air filter
A clogged air filter can cause insufficient air in the combustion chambers. So, to check this element, it must be dismantled, which is done quite simply. By inspecting the filter element, you can find out how dirty it is and whether the product needs to be replaced. So, after replacement, the check signal from the dashboard may disappear.
Spark plugs and high voltage wires
Wiring is also often the reason why the check icon lights up on the panel. This happens when the spark plug is inoperative or there is a breakdown in one of the high-voltage wires.
It is recommended to check spark plugs on a special spark plug stand. But, if there is none, then you can use the generally accepted “old-fashioned” methods. But high-voltage wires are checked using a conventional multimeter, where the resistance along each wire should be about 5 ohms. If a broken part is found, it must be replaced.
Petrol
But, in addition to the above reasons, the problem may lie on the surface. Thus, ordinary low-quality gasoline can cause the “Check Engine” icon to appear on the car’s dashboard. To eliminate the breakdown, it is necessary to drain the low-quality fuel and flush the fuel supply system. But, if you drive for a long time on such fuel, the batteries may fail, which should also be checked when flushing.
The last reason is the accumulation of errors or “failed” firmware of the electronic engine control unit. To fix this problem, it is recommended to contact a professional car service center. Also, with the help of “brain” errors, you can determine why the check engine light came on. But where can I get the codes deciphered? Let's look at what code that means:
- 0102 Low signal level of the mass air flow sensor
- 0103 High signal level of the mass air flow sensor
- 0112 Low level of intake air temperature sensor
- 0113 Intake air temperature sensor high level
- 0115 Incorrect coolant temperature sensor signal
- 0116 Incorrect coolant temperature sensor signal
- 0117 Coolant temperature sensor signal low
- 0118 High signal level of the coolant temperature sensor
- 0122 Low signal level of the throttle position sensor
- 0123 Throttle position sensor signal high
- 0130 Incorrect signal from oxygen sensor 1
- 0131 Low signal level of oxygen sensor 1
- 0132 Crankshaft sensor 1 signal high
- 0133 Slow response of oxygen sensor 1
- 0134 No signal from oxygen sensor 1
- 0135 Oxygen sensor 1 heater fault
- 0136 Oxygen sensor 2 short to ground
- 0137 Low signal level of oxygen sensor 2
- 0138 High signal level of oxygen sensor 2
- 0140 Oxygen sensor 2 break
- 0141 Oxygen sensor 2 heater fault
- 0171 Mixture too lean
- 0172 Mixture too rich
- 0201 Open injector 1 control circuit
- 0202 Open injector 2 control circuit
- 0203 Open injector 3 control circuit
- 0204 Open injector 4 control circuit
- 0261 Short to ground injector 1 circuit
- 0264 Short to ground injector 2 circuit
- 0267 Short to ground in injector 3 circuit
- 0270 Short to ground in injector 4 circuit
- 0262 Short circuit to +12V injector 1 circuit
- 0265 Short to +12V injector 2 circuit
- 0268 Short to +12V injector 3 circuit
- 0271 Short circuit to +12V injector 4 circuit
- 0300 Many misfires
- 0301 Misfire in cylinder 1
- 0302 Misfire in cylinder 2
- 0303 Misfire in cylinder 3
- 0304 Misfire in cylinder 4
- 0325 Open circuit of the knock sensor
- 0327 Low signal level of the knock sensor
- 0328 High signal level of the knock sensor
- 0335 Incorrect crankshaft position sensor signal
- 0336 Crankshaft position sensor signal error
- 0340 Phase sensor error
- 0342 Low phase sensor signal
- 0343 Phase sensor signal high
- 0422 Low neutralizer efficiency
- 0443 Canister purge valve circuit malfunction
- 0444 Short circuit or break in the adsorber purge valve
- 0445 Short to ground of the canister purge valve
- 0480 Cooling fan 1 circuit malfunction
- 0500 Invalid speed sensor signal
- 0501 Invalid speed sensor signal
- 0503 Speed sensor signal interruption
- 0505 Idle air control error
- 0506 Low idle speed
- 0507 High idle speed
- 0560 Incorrect on-board voltage
- 0562 Low voltage on-board network
- 0563 High voltage on-board network
- 0601 ROM error
- 0603 External RAM error
- 0604 Internal RAM error
- 0607 Detonation channel malfunction
- 1102 Oxygen sensor heater resistance low
- 1115 Faulty oxygen sensor heating circuit
- 1123 Rich mixture at idle
- 1124 Lean mixture at idle
- 1127 Rich mixture in Partial Load mode
- 1128 Lean mixture in Partial Load mode
- 1135 Oxygen sensor heater circuit 1 open, short circuit
- 1136 Rich mixture in Light Load mode
- 1137 Lean mixture in Low Load mode
- 1140 Measured load differs from calculation
- 1171 Low level CO potentiometer
- 1172 High level CO potentiometer
- 1386 Detonation channel test error
- 1410 Canister purge valve control circuit short circuit to +12V
- 1425 Canister purge valve control circuit short circuit to ground
- 1426 Canister purge valve control circuit open
- 1500 Open circuit in the fuel pump relay control circuit
- 1501 Short circuit to ground of the fuel pump relay control circuit
- 1502 Short circuit to +12V fuel pump relay control circuit
- 1509 Overload of the idle speed regulator control circuit
- 1513 Idle air control circuit short circuit to ground
- 1514 Idle air control circuit short circuit to +12V, open
- 1541 Fuel pump relay control circuit open
- 1570 Invalid APS signal
- 1600 No connection with APS
- 1602 Loss of on-board voltage to the ECU
- 1603 EEPROM error
- 1606 Rough road sensor incorrect signal
- 1616 Rough road sensor low signal
- 1612 ECU reset error
- 1617 Rough road sensor high signal
- 1620 EPROM error
- 1621 RAM error
- 1622 EEPROM error
- 1640 EEPROM Test Error
- 1689 Invalid error codes
- 0337 Crankshaft position sensor, short to ground
- 0338 Crankshaft position sensor, open circuit
- 0441 Air flow through the valve is incorrect
- 0481 Cooling fan 2 circuit malfunction
- 0615 Starter relay circuit open
- 0616 Starter relay circuit short circuit to ground
- 0617 Starter relay circuit short circuit to +12V
- 1141 Faulty oxygen sensor heater 1 after the converter
- 230 Fuel pump relay circuit malfunction
- 263 Injector driver fault 1
- 266 Faulty injector driver 2
- 269 Injector 3 driver fault
- 272 Faulty injector driver 4
- 650 Check Engine Lamp Circuit Malfunction
The problem may be caused by a ground wire
Sometimes situations arise when the needles on instruments behave completely inappropriately, jumping sharply from the minimum to the maximum mark and vice versa. In the vast majority of cases, the cause of this malfunction is the lack of normal contact with ground. There is nothing difficult in fixing this problem. First of all, you should find the fastening of the ground wire connecting the instrument panel to the partition that separates the interior from the engine compartment. It can be detected by removing the car radio from its standard socket.
However, there is one caveat here. If an alarm was installed on the car, then the fastening of the mass wire could well be moved to some other place. However, as a rule, the car owner is warned about such actions. In most cases, the fastening of the mass wire is moved to the area where the driver’s left foot is located, placing it behind the interior trim.
By the way, a situation where the arrows on the instruments begin to “jump” can also arise after installing the radio. In order to do this, you need to unscrew the ground wire coming from the dashboard. It happens that it is then screwed in poorly, and subsequently, due to body vibration, the contact becomes unreliable. To solve the problem, just twist the wire normally. It is worth noting that doing this is not very convenient, so you will have to make some effort.
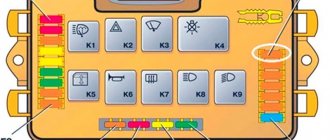
Relay location
The relays are located in the same block as the fuses.
K1 - headlight washers. If the washers stop working, but this relay is working properly, check their injectors. It happens that they become clogged or damaged.
K2 - electric windows. Check this relay together with fuse F2. See F2 for troubleshooting.
Short circuit - starter relay. If you turn the ignition key and the starter does not turn it, it could be due to this relay. Check its contacts and clean if necessary. Next, you need to check the battery terminals for reliable contact between them, and clean if necessary. Also check the contact group of the ignition switch; there may be no contact.
K4 - add rear window heating relay, heater switch, wiper and washer switch.
K5 - turn signal and hazard warning relay switch. If the turn signals or hazard warning group do not work, check this relay along with fuses F1 and F3.
K6 - windshield wiper relay. We check together with fuse F4.
K7 - high beam relay. Check together with fuses F14 and F15.
K8 - sound signal. We check together with fuse F6.
K9 - fog lights. Check together with fuses F16 and F17.
K10 - heated rear window. Also check relay K4 and fuses F4 and F8.
K11 - heated seats. Also check fuse F18.
K12 - reserve.
Possible faults
The following malfunctions are possible with the dashboard:
- Fuel level or temperature gauges do not work. The reason may be faulty sensors or damaged wiring.
- When the tank is full, the fuel level needle drops to the zero position.
- The arrow on the fuel level indicator moves abruptly and often drops to the zero position.
- The fuel reserve indicator does not go out.
- If any indicators on the device do not light up, the reason may be burnt out light bulbs, insufficient contact between the light bulb socket and the printed circuit board, oxidation of contacts, broken wires, or a malfunction of the indicator sensor.
- If the speedometer is not working, the reason may be in the flexible drive shaft of the device: the nuts are poorly tightened, a break, mechanical damage, etc. (video author - RasH19).
What does it take to do this kind of work?
This operation is not very difficult; any owner can do it. You need to prepare the necessary tools and new lamps in advance. In this work you will need two flat-blade screwdrivers, one of them should be short, and two Phillips-blade screwdrivers, long and short. It’s good if you have pliers and an eight-point wrench nearby.
They may be needed to remove individual light bulbs. They are installed in niches, so a problem may arise when trying to reach them with your fingers, so in this case, pliers or an eight-size wrench will help out. The work may be useless if there are no devices nearby to replace faulty products.
Broken ground contacts
This problem manifests itself on the panel by displaying incorrect information; the tachometer needle may drop below the current level. The needles of other instruments may also freeze, either permanently or for a short period of time. The panel backlight may also disappear, but the arrows will show the correct data.
Bolt for fixing ground wires from all devices
Through trial and error, it was found that these glitches can occur due to the fact that the ground contact is broken. Under the dashboard, near the driver’s right foot (near the gas pedal), there is a special mount to which ground wires from all instruments are fixed.
To solve such a malfunction in the operation of the VDO dashboard, you simply need to improve the contact. Unscrew the bolt at “8”, disconnect and clean all contacts suitable for it. To be safe, it is advisable to treat them with “electronic contact cleaner”. After this, all that remains is to connect the wires and screw the bolt back.
When some of the hands work and some don’t work at all, the reason is most likely in their drive motors. Then the panel can only be repaired by replacing the pointer drive motors.
Bottom line of the route display
If you have stopped switching the parameters that are displayed in the bottom line of the route display (under the total or daily mileage), then the problem lies in the steering column switch.
It is responsible for switching between the following options:
- current time;
- outside air temperature;
The buttons on the switch work every once in a while
- travel time (valid from the last reset);
- average fuel consumption;
- instantaneous fuel consumption (changes as the vehicle moves);
- average speed since reset;
- residual power reserve with the remaining fuel in the tank;
- amount of gasoline consumed since reset.
Diagnostic process
So, diagnostic operations using the dashboard are not complicated and almost every Kalina car owner is able to cope with this on their own. Following the step-by-step instructions described below, you can carry out diagnostics on any generation of VAZ 1117-1119.
Now let's move directly to the process of performing diagnostic operations:
- We reset the daily mileage indicator. For this purpose, there is a special button on the instrument cluster.
Using the daily mileage button we reset the indicator
Insert the key into the ignition and turn to position 1
Instrument arrows move from the beginning to the final control point
The instrument panel screen shows the software version (in this case UEr 3.0)
Errors received during the diagnostic process. There are 8 and 4 errors in photo 6.
Decoding instrument panel readings
2 — the on-board network voltage exceeds the norm; 3 - fuel level sensor error detected. Occurs if there is an open circuit in the sensor within 20 seconds. 4 - an error has occurred in the coolant temperature sensor. Appears if an open circuit is detected within 30 seconds. 5 - an error has been detected in the outside temperature sensor in the car. If there are no sensor readings within 20 seconds, “-C” appears); 6 — engine overheating detected; 7 — emergency oil pressure; 8 - error or malfunction of the brake system; 9 - low battery charge;
E - error detection in the data packet stored in the EEPROM.
Now all that remains is to compare all the errors that popped up on the screen with those listed above.
Start with the fuse
So, let's take a closer look at the situation when the instrument panel on a VAZ-2110 does not work (partially or completely), as well as possible causes and troubleshooting options. To do this, we first list the instruments and indicators available there:
- tachometer;
- speedometer;
- fuel level and coolant temperature indicators;
- 18 lamps – 6 panel lights and 12 control lamps;
- reserve socket for control lamp;
- 2 terminals for connecting wiring.
Regarding the latter, I would like to give a brief explanation on how to distinguish them on electrical circuits. In particular, the white block is designated as X1, the red block, respectively, as X2.
Another rather important point: VAZ-2110 cars can have one of two dashboard options. If it is an old model, then all devices are placed symmetrically. At the same time, the “Europanel”, in addition to the fact that it is more beautiful purely visually, is also distinguished by its coolant temperature and fuel level indicators shifted to the right.
If we talk about malfunctions of the VAZ instrument panel of the “tenth” series, then the most serious option is its complete failure, when neither the instruments, nor the indicator lamps, nor the backlight work. The first thing to do in such a situation is to check the 15-amp fuse located in the mounting block, marked F6.
If it turns out that it has burned out, it is best to immediately start looking for the root cause. Otherwise, the new fuse will most likely simply share the same fate as the old one. It can be damaged by a short circuit in the electrical circuit. If you lack the necessary skills, it is better not to waste time, but to hand the car over to a specialist who can not only detect the problem, but also fix it.