The car drives and pleases me with its abilities, namely starting from traffic lights in slushy snow. If on Dvenashka it was a pitiful attempt to ride, then Nivka drives without asking, as if there was asphalt under her. But that's not the point.
When cleaning and rebuilding the carburetor, due to the problem of dips when sharply pressing the gas pedal, I also changed the jets, because I was confused by what they were like.
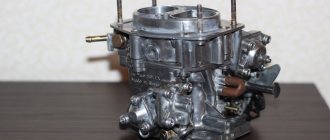
So, the starting data: - engine 2130 - engine capacity 1.8 liters - Solex carburetor 21073 - diffusers of the first chamber 24/8 and the second chamber 24/7 - fuel nozzles 107.5 and 95 - air nozzles 165 and 135
According to the manual, the Solex 21073 carburetor should have the first chamber: fuel 107.5, air 150; second chamber: fuel 117.5, air 135, but the small diffuser of the second chamber should also be 8, but I have 7.
After reading various forums and watching a number of videos, namely Travnikov’s video where he assembled a 1.8 Niva engine, it was noticed that he installed fuel jets 117 and 122.5, and air jets 150 and 125.
As a result, I installed 115 and 107.5 fuel jets from what was available, and left the air jets as they were, i.e. slightly enriched the mixture in both chambers.
Now I started reading forums again and came across the entry “Motor 2130 1.8 carburetor 073 first chamber: fuel 107.5 air 150; second chamber: fuel 117.5 air 135.”
Attention, question: What jets should be installed?
The main power supply device of your combat Niva - the carburetor - is difficult to evaluate unambiguously. But even in the best case, the rating is no higher than a “three”, such is the capricious nature of factory-assembled carburetors. The spread of operational parameters and the quality of the prepared mixture reaches 12-15%. Indeed, a successful carburetor that does not require tuning is one in a hundred. Most drivers do not see the difference between a faulty carburetor and just a bad carburetor, and therefore are calm about, for example, the fact that before turning on the starter, you need to press the gas pedal a certain number of times, then pull out the air damper to a strictly certain length, and after setting, press it again some magical actions with a convulsing engine. And they are also phlegmatic about the fact that the car is “dumb” and the fuel consumption does not allow you to move far from the gas station.
An old carburetor mechanic disassembled the carburetor and a huge dead cockroach fell out of it. “Huh! Your driver is dead!”
To achieve maximum power, the carburetor must have minimal intake resistance (as they say in everyday life, have a “big hole”), otherwise it is difficult to achieve acceptable mixture quality and filling the cylinders at medium and high speeds. But here’s the problem - when the throttle valve is opened sharply, the speed of the passing flow drops, the vacuum in the diffuser decreases, less fuel is sucked in - the mixture becomes leaner. This leads to a sharp drop in power at low speeds, and the larger the diameter of the main ones. diffusers - the more noticeable this phenomenon is. The reason for this is the combination of sharp power and torque characteristics with a primitive carburetor. The plant took a simple route - it reduced the diameter of the main diffusers to a minimum (SOLEX-21073-1107010 DAAZ: first chamber - 24 mm, second chamber - also 24 mm), achieving tolerable filling at low speeds, but losing significantly (3-4 sec) at This elasticity of movement is at medium and high levels. As the professionals say, the motor was “squeezed.”
Theory
The engine sucks air through the diffuser, and a certain amount of gasoline through the fuel nozzle. The volume of air and fuel sucked in depends on the volume of the engine. Therefore, the trend is to install a small jet for a larger engine volume. And if you have to install a similar Solex 21073 carburetor on a small engine (for example, 1.5), then the standard jets are poor (that is, they give an unsaturated mixture).
Therefore, we can say that it all starts with the fuel nozzle - its selection and settings. Afterwards, for the second time, you need to pick up an air one for it. Start strictly with the first camera until you have set it up; it is not recommended to work on the second one under any circumstances.
Solex carburetor 073 — logbook Lada 2107 Lada 1500i 2003 on DRIVE2
There were a lot of problems with the old carburetor (DAAZ OZONE), failure when opening the damper of the second chamber (it opens there with a vacuum), there was no draft at all, it was filled with oil through crankcase gases and it did not want to be adjusted. Therefore, the thought of buying a Solex has long been on my mind, but only 21073 .
It so happened that a friend (from whom I bought the seven) also had problems with the carbure in the field, he bought a new one, also Solex 21073, but DAAZ, and gave the old one to me. The problem is that he’s PEKAR-ovsky) but I’m still glad)
It was very dirty on the outside and had a bit of oil on it. First of all, I took it apart, I thought I would see all sorts of dirt and oil there. and it was even very clean, I was delighted, put it back together) installed new red diaphragms (they have such a distinctive feature in appearance)), Evgeniy Travnikov reviewed them on YouTube. Next, we cleaned the outside with carburetor cleaner.
a friend is cleaning, and I’m sitting there taking pictures))
all the dirt and oil is now on the box)
Previously, this 7 had a Solex, so the choke cable from the 8 was already there, I installed long rods, since the throttle drive is on the other side, and a return hose with a valve.
return with valve and tee
I lowered the crankcase gas hoses (both large and small) downwards, which is not very environmentally friendly, but now the carb won’t be all in the oil)
After installation, noticeable traction appeared, there was no failure when opening the second chamber, in general, I got what I wanted) but still, this is a BAKER, so when starting off you can either stall or move off very slowly)) but it’s better than it was. And in the future I will also install a DAAZ Solex)
73rd Solex, because large diffusers (24x24, like), large jets that are not so sensitive to bad gasoline (they almost won’t clog), and the air jet of the second chamber, made together with the emulsion tube, is designed to work on a longitudinally mounted engine .
I will be glad if this information is useful to someone :)
www.drive2.ru
Selection Basics
If we install, for example, Solex 21041 (volume 1.8) on a 1.5 engine. This carburetor has a 24x26 diffuser, fuel volume is 102.5, which is not enough for a 1.5 engine. We are looking for a match between the chambers and the diffuser. We find the closest option: Solex 21073. It has a 24x24 diffuser and a TJ - 107.5. And the first cameras are almost identical. By the way, if the diffusers are almost the same, and the engine volume is smaller, then the intake of gasoline will be less (the jet is rather poor). This means that we need fuel jets (fuel jets) from 110. Let’s get a few.
Next you need to decide
, what do you want to get: economical slowness or costly acceleration. Depending on the decision, we also select a fuel mixture: to adjust the enrichment or leanness of the air-fuel mixture (a lean mixture will lead to gasoline savings, but will affect the acceleration dynamics of the car).
Replacement in every detail
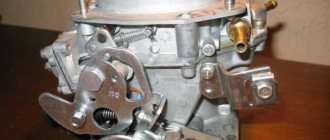
Adjusting screws for the Solex carburetor 2108
Having selected the Solex carburetor jets by numbers, you can begin to replace them; unlike boring, it is quite possible to carry out this operation yourself at home. By the way, the reason is not always an incorrectly selected element; very often during operation, these parts wear out and become clogged, which leads to a change in the diameter and composition of the mixture with all the ensuing consequences. In addition, car owners in this way increase the power of their “iron horse” or, conversely, reduce gasoline consumption. In general, replacing jets is quite suitable in the category of vehicle tuning.
To remove the Solex jets, you will have to dismantle the engine and, of course, disassemble it. Before removing the power unit, be sure to disconnect the negative cable from the battery, and then remove the air filter housing. Prepare a clean rag and a solvent, such as white spirit, in advance to clean the surface of the motor from dirt. Now you need to find the place where the drive cable is attached to the air damper and slightly loosen the screw securing these parts. Do the same with the bolt securing the cable sheath. An open-end wrench is perfect for this purpose. After disconnecting the cable from the carburetor, remove the crankcase gas supply hose from the pipe.
Removing jets from Solex
To disconnect the fuel hose from the fitting, in addition to a wrench, you will also need a Phillips screwdriver. First, loosen the fastening clamp, then remove the hose and use an M8 bolt to plug the hole in the latter. It is necessary to remove the vacuum regulator hose. The wire terminal is also disconnected from the solenoid valve terminal. We take a flat-head screwdriver and use it to press out the end of the throttle linkage, and then remove it. Now it is possible to remove the return spring.
To remove the carburetor you need to prepare a spanner and open-end wrench set to “13”. The first to unscrew are 3 nuts, through which the part is attached to the inlet pipeline, and the second is the fastening nut. Take this opportunity to inspect the carburetor gasket; perhaps it could use replacement. If the unit will be removed for a long time, be sure to plug the inlet pipe with a rag. To replace the jets in the carburetor, it remains to remove the cover from it. Take a flathead screwdriver and unscrew these parts. First we remove the fuel jets, then the air jets. In the rings of the last parts you will find emulsion tubes; to pull them out, you should pry them off with a file.
Replacing the carburetor gasket
The main fuel element of the secondary chamber is designated by the letter “A”, and the primary one by “B”. Then we proceed to removing the air jets, marked “B” and “D” for the secondary and primary chambers, respectively.
Replacement should not be done blindly. Visually assess the condition of the jets. The presence of marks, scratches and irregularities on their inner surface is unacceptable, since these defects reduce throughput. Contamination of parts with resins also has a negative impact. Before installing new jets, it is advisable to check them on a special stand, so you can see how well the specified throughput of the elements corresponds to real indicators.
Installation of new Solex parts
If you have already started disassembling the carburetor, then it would be a good idea to study the condition of its other parts; perhaps replacing the jets is not the only need for this unit. We unscrew the accelerator pump screw and remove the latter along with the valve and o-rings. Then we remove the rings and diffusers of both chambers from their original location. To remove the channel from the accelerator pump, you need to unscrew the fixing screw.
Next, remove the fuel nozzle along with the housing and take it out. You can dismantle the diaphragm after you open its cover and remove the spring. Having unscrewed the bolted connections, we disconnect the carburetor body and the throttle valve. Now you have access to the thermal insulation element and cardboard spacers. Remove the cover along with the adjusting screw, then remove the latter with the sealing ring. All parts with defects must be replaced; the remaining parts are thoroughly washed in a special product. We blow out the jets and other holes with compressed air. Reassemble in reverse order.
Additional Information
In general, in addition to the selection of jets, there are a lot of useful and interesting nuances of setting up the Solex, so that it works correctly and is combined with the engine of your carburetor car.
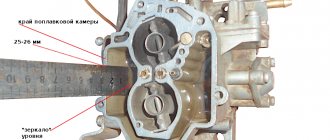
You should always start by setting the levels in the chambers. They are installed manually according to the positions of the floats themselves, depending on the unit cover (everything is done using special templates). And in vain you think, like many gullible Solex users, that everything is already on display from the factory. To avoid overflow and stress on the needle, we make the appropriate adjustments by bending the float tongues.
After setting the levels, you can start idling. It depends on the position of the screws for the quality and quantity of the mixture (torsion should be performed with the suction removed).
Purpose and design of Solex carburetors
The production of licensed Solex carburetors began with the entry of front-wheel drive small cars into the domestic market.
On turns, steep climbs and maximum accelerations, previous models could not provide an engine located perpendicular to the direction of travel with a fuel-air mixture.
Features of Solex carburetors
Carburetors of the Solex family are not interchangeable with other models of DAAZ carburetors.
But within the family, various modifications are very similar to each other, differing slightly in the size of the metering elements and the shape of the control levers.
Various Solex modifications differ in the size of the dosing elements and the shape of the control levers
Thus, carburetors 21083 engines with a volume of 1.5 liters differ from carburetors 21081 engines with a volume of 1.1 liters, the diameters of the starting gaps of the dampers are increased by fractions of a millimeter.
In addition, some 21083 models have additional components and functions.
Table: features of various carburetor models
| Carburetor model | Peculiarities | Automobile model | Engine capacity, l |
| DAAZ 2108–1107010 |
| 1,3 | |
| DAAZ-21081–1107010 |
| 1,1 | |
| DAAZ-21083–1107010 |
| 1,5 | |
| DAAZ-21083–1107010–31 | semi-automatic starting device |
| 1,5 |
| DAAZ-21083–1107010–35 | two-stage starting device |
| 1,5 |
| DAAZ-21083–1107010–62 | electronic fuel mixture control |
| 1,5 |
| DAAZ-21083–1107010–05 | for engines with microprocessor ignition | VAZ-2109 | 1,5 |
| DAAZ-21412–1107010 | without drain fitting | AZLK-2141–01 | 1,5 |
| DAAZ-21412–1107010–30 | without drain fitting, for engines with microprocessor ignition | AZLK-2141–23 | 1,8 |
| DAAZ-1111–1107010 | inertial mixture enricher |
|
|
| DAAZ-21051–1107010 | traction drive of throttle valves, without drain fitting |
|
|
| DAAZ-21053–1107010 | traction drive of throttle valves, without drain fitting |
| 1,6 |
| DAAZ-21051–1107010–30 | traction drive of throttle valves, without drain fitting |
| 1,5 |
| DAAZ-21053–110701–62 | semi-automatic air damper drive |
|
|
| DAAZ-21073–1107010 | one accelerator pump nozzle |
|
|
Design and operating principle
A carburetor is an attachment that mixes air with gasoline in the optimal proportion for efficient engine operation.
Carburetor malfunctions make it difficult to start the engine, increase fuel consumption, reduce power and worsen vehicle dynamics.
Air and gasoline are mixed in a special chamber. Solex carburetors have two such chambers.
Usually only the first is used, and the second is connected only at high speeds.
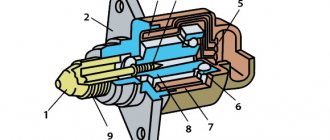
The fuel pump delivers fuel to the float chamber through a needle valve.
If there is excess fuel, the floats rise, press the tongue on the needle and stop the flow of gasoline.
Excess fuel is returned to the tank through the return fitting.
The fuel is then mixed with air. To prevent excessive enrichment of the mixture, the fuel flow is slowed down by jets and emulsion tubes.
All these elements - a float with a needle valve, air and fuel nozzles, emulsion tubes and mixing chambers with dampers - form the main metering system.
In the carburetor, air is mixed with gasoline in the optimal proportion for efficient engine operation.
In addition to it, the carburetor includes:
- starting device;
- idle system;
- forced idle economizer (EFH);
- transition systems of mixing chambers;
- accelerator pump;
- power mode economizer (EMR);
- econostat;
- locking mechanism.
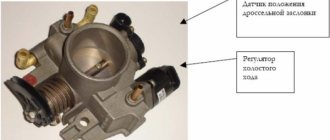
Wire screw quantity
The surprise of many car enthusiasts is the wire with a connector protruding from the carburetor.
This wire belongs to the forced idle economizer.
If the engine is standing without load, a signal from the carburetor is sent through this wire, and the EPHH shuts off the fuel supply.
A signal from the carburetor is received through the quantity screw wire and the EPHH stops the supply of gasoline
This system works as follows. When the driver releases the accelerator pedal, the flap blocks the air flow, the control lever returns to its original position and rests against the quantity adjusting screw.
The wire is connected to this screw. Touching the propeller lever is the signal sent to the EPH to stop the fuel supply.
Results
Of course, it is clear that there is no limit to improvements. Sometimes they can even go to excess: drilling, for example, a throttle valve, polishing an MD, soldering epulsion tubes on a carburetor. But, as they say, what is in excess is unhealthy. But such a procedure, fascinating in its own way, like selecting the types of jets for a Solex 21073 carburetor, for example, is something quite necessary for the correct setup of the unit and its complete compatibility with the engine compartment. As a result, you get an economical car that responds well to gas.
Installing a Solex 21053 carburetor on a classic
Now we can begin the process of replacing the original carburetor of the car with Solex modification 21053 1107010 20. On VAZs, the old carburetor is usually Ozone, produced on the basis of DAAZ. Its main problem is that it is not nearly as reliable as we would like. In addition, its fuel consumption is slightly higher than that of the Solex. That is why one is replaced by another. In addition, in order to simply install Solex 21053 on a classic, it is advisable to configure it correctly.
The procedure for installing the Solex 21053 carburetor on a classic is no different from installing other models of this device on it. Solex 21053 for classics can easily be placed in any rear-wheel drive VAZ engine. So, first you need to eliminate any possibility of foreign particles getting into the intake manifold. We achieve this goal by cleaning the engine compartment from dirt. There is no need to achieve perfect shine. Just wash it.
Now disconnect the ozone carburetor from whatever is holding it in the car. Be careful when disconnecting the hoses from the heating system and fuel hoses. Having done this, you need to remove the cable from the air damper. It is attached to a bracket, which must be removed first. Then you can take out the old carburetor. For the same purpose for which you washed the engine compartment, you should also clean the area where Ozone stood. If during the process you find any cracks, holes or irregularities on the surface, you must cover them with sealant.
Now it’s time to create thermal insulation for Solex 21053 1107010 20. Insulating gaskets will help achieve this. They should be stacked on top of each other, alternating thin and denser ones. Install carburetor 21053 1107010 20 on top. For greater comfort in the future, you should install Solex 21053 on the classic without the top cover. In this case, the throttle valve drive should not be located behind. On the side of the upper part of the cylinder head, you need to place the drive linkage from the primary and secondary chambers. The task of the rocker is to regulate the throttle valve. On the old Ozone you will find simple plastic traction tips; you can remove them and install them instead of the tips on the Solex.
Now you need to adjust the length of the cable from the throttle valve drive. If it turns out to be slightly longer than the distance to the carburetor, it needs to be trimmed. Having made these changes, you can close the cover on the carburetor. The old gasket should not be used. Having closed the carburetor with a lid, you should begin connecting it to everything that you disconnected from Ozone. Connect the carburetor tee to the cooling system. Now you need to extend the hoses from the ignition system distributor. Then install a tee at the fine filter. It should be placed on the fuel line. Connect the wire leading to the carburetor float chamber to the tee. This must be done using a check valve. Now all that remains is to attach the return spring back, and for the first time (for safety) you can also install an additional one, attaching it to the top of the block.
Equipment adjustment
Before adjusting the carburetor, you must set the ignition to make sure the system is in full working order. It often happens that it is the incorrect operation of the unit that causes many breakdowns.
So, final modification of the carburetor is possible when the ignition is normal, the engine is warmed up to the minimum permissible temperature of 40 degrees, the high-voltage wires and braids are intact and in good working order.
- turn the mixture quality screw counterclockwise until the power unit reaches maximum speed;
- We also add the mixture quantity screw until the engine reaches the maximum speed mark;
- Now we are fine-tuning the quality of the mixture, but at the same time keeping the speed indicator at no more than 800 - 850 rpm.
This completes the idle speed adjustment. Experienced craftsmen can determine the speed by ear.
The next stage: adjusting the dampers and their drive.
Float mechanism
The Solex 21073 carburetor, installed on the Niva, has a float chamber of two sections. They are located on both sides of the main cameras of the device. The system consists of two ebonite floats, which are mounted on a lever.
The latter swings on an axis pressed into the bosses of the device cover. There is a tongue on the bracket. The element presses the needle valve needle through a special ball. The float mechanism serves to adjust the level of fuel required for normal operation of the carburetor. The needle valve is a non-separable type. It is not being repaired. The valve body is mounted on a thread in the carburetor cap. The ball protects the needle from shock when the machine moves. If the chamber is empty (for example, if the driver is using LPG), then the floats will knock.
Double jet nozzle
Now let’s look at a drainless ramp, conventionally called a new type ramp. The injectors that are installed from the factory have numbers 0280158022 and 028158017. The designers did not bother themselves much with the choice.....and therefore installed “Prior” injectors. Static performance, still the same 132 cubes. An additional “joy” is that the RTD is “hidden” in the tank, apparently for ease of repair, and there is no way to play with it. The only option today is to install Siemens 735 injectors, the so-called “double-flare”. They have a specific nozzle configuration and spray not on the valve plate, but on its sides when the valve is open. The real effect is quite noticeable.
Air damper
A malfunction of this section of the system will lead to a systematic loss of speed, and the engine will stall for no reason. To adjust, you will need a flat-tip screwdriver and an “8” open-end wrench. We push the suction rod all the way. Unscrew the rod clamp bolt as much as possible, insert the spring, and tighten the screw. We test equipment for performance.
The air damper drive must be adjusted with a partner. For convenience, you will need an open-end wrench set to “8”, a lighting fixture, and a caliper. We turn the choke all the way, the accelerator pedal also goes to the floor. At the same time, the throttle valve must be fully open. When the accelerator pedal is fully released, the flap completely closes the primary chamber. There should be no gaps at all. The rod length does not exceed 80 mm.
Idle system
This unit is necessary in order to supply the combustion chambers with a combustible mixture at the lowest speeds. Thanks to this system, the power unit will not stall when there is no load. Fuel will enter the system through the main jet into the first chamber. Through the XX jet, where it is then mixed with oxygen, the fuel enters the system through the air valve. This mechanism allows you to ensure stable engine operation at idle speed without load.
Next, the combustible mixture will enter the first chamber through a special channel located under the throttle valve. The fuel mechanism leading to the XX exhaust port is closed with a quality screw. This is an adjusting screw that can be used to adjust and change the characteristics of the carburetor. The operation of the engine in idle mode on the Solex 21073 mechanism is also adjusted with this element. Due to it, the gap value of the throttle valve of the first chamber in XX mode is determined.
Completion of diagnostics. Cleaning. Washing. Blowing
Final inspection of all parts and components. Detection of defects, damage, replacement with new ones from the repair kit.
The stage of washing and cleaning begins. For convenience, you can use special chemicals and aerosol cans. If you can’t purchase it, pour a little gasoline or kerosene into the container, this will be quite enough. All components are thoroughly washed, the cavities are cleaned of foreign debris, carbon deposits, and metal oxides. Cleaning proceeds to the drying stage and the beginning of assembly.
Be sure to blow through the following elements:
- idle jet;
- fuel nozzle channels of the first and second chambers;
- transition system channels;
- selection of crankcase gases;
- seat for the emulsion pipe;
- secondary chamber opening mechanism;
- trigger channel;
- accelerator pump mechanism.
During assembly, we check the clearances of the float chamber. The float should close at 6.3 mm. An increase or decrease in this indicator indicates level violations. This is when we are talking about this type of carburetor device. Before landing in a regular place, be sure to replace the asbestos gasket of the exhaust manifold with a new one. It is not recommended to install the old one back, since the exhaust site is already actually present, which means that the tightness and tightness of the fit are not guaranteed.
Folk method of adjusting the fuel level in the chambers:
The design of the carburetor provides for a protrusion inward at an angle of 45 degrees. Ideally, half of the above protrusion should be covered with gasoline. The desired level is achieved by pressing the tongue at the end of the float.
This is interesting: Emergency brake fluid change
The fastening nuts are tightened with a force of no more than 2.5 kg; exceeding this threshold leads to the so-called “licking” of the thread. Even though it has a fine pitch, especially for strong force, it is still susceptible to deformation.
Operating principle
Solex carburetor float chamber ventilation system
Solex 21073 works as follows. Gasoline will enter the float chamber using the inlet fitting - the fuel also passes through the filter mesh, where it is cleaned, and goes through the needle valve. The chamber with the float is two-sectional, and the sections are connected to each other. They will contain the same amount of gasoline. This design makes it possible to significantly reduce the effect of body tilt on the fuel level in this chamber.
This ensures more stable engine operation. As the chamber fills, the float, pressing part of the needle valve, blocks the access of fuel to the chamber. This maintains a constant level of gasoline in the mechanism. Next, from the float chamber, gasoline flows through the jets into the mixing wells. Air enters these same wells through special holes in the emulsion tubes or air jets. Next, gasoline and air are mixed in them. As a result, a fuel mixture is formed. It will get into the small as well as large diffusers of the device. This is the main dosing chamber. Depending on the operating mode of the engine, certain mechanisms and systems can be started in the carburetor. When the owner tries to start the engine “cold” in order to enrich the fuel mixture, the starting device comes into play. The driver starts it from the passenger compartment - this is a choke.
When the handle is pulled out to its maximum, the air damper of the first chamber is completely closed. At the same time, the throttle valve in the first chamber opens to the distance of the starting gap. It is adjusted using the adjusting screw on the Solex carburetor. Adjusting the gap will allow you to adjust the idle speed.