Functionality check
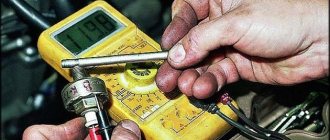
Many VAZ-2112 owners ask how to check the lambda probe (oxygen sensor) themselves. To do this you will need to do the following:
- It is necessary to turn off the engine and allow it to cool.
- After this, open the hood of the car and disconnect all contacts leading to the oxygen sensor.
- Take a multimeter and connect the end probes to the lambda probe.
- Then use the “Resistance” mode on the multimeter. If the arrow goes to infinity, then the device is working correctly and the readings are being transmitted correctly.
- In a situation where the arrow shows a value near zero, the measuring device is faulty and needs to be replaced.
How to reset the error?
You can delete the error code from the memory of the VAZ control unit by disconnecting the terminal from the battery.
The reset procedure is performed as follows:
- The vehicle's ignition system is activated, but the power unit does not start.
- The engine compartment of the vehicle opens. Using a wrench, loosen the screw that secures the terminal clamp on the negative output of the battery.
- After about one minute the contact is reconnected.
- The engine compartment of the car is closed, the ignition system in the car is turned off.
- The car engine is starting. If the “Check” indicator remains lit on the dashboard, it should disappear on its own after a few kilometers.
Coolant temperature indicator
Antifreeze or coolant is used to cool the engine. To ensure proper operation of the power unit, the coolant also has its own controller. In its functionality, this regulator is vaguely reminiscent of the choke that is equipped with 8- and 16-valve carburetor engines of the “ten” and other vehicles. The sensor itself is designed to monitor the temperature of the consumable.
Installing a new antifreeze sensor
In fact, this device also provides fuel regulation. If the power unit is running cold and has not yet warmed up, it will receive more gasoline for normal operation. Readings about the coolant temperature are displayed on the control panel in the vehicle interior. In accordance with these indicators, the driver will always be able to find out about the overheating of the unit by the way the sensor arrow on the dashboard begins to move into the red zone.
The antifreeze temperature sensor periodically fails; it is characterized by the following malfunctions:
- Loss of electrical contact inside the controller, resulting in its inoperability.
- The device is installed in such a way that it may be exposed to moving elements, particularly the accelerator pedal cable. It would be even more correct to say that the cable does not act on the sensor itself, but on its wires, which in fact can lose insulation as a result of long-term use.
- Often the regulator breaks down if the ventilation device starts to function on an engine that is not warmed up.
- If the motor is overheated, it may be difficult to start.
- If the fuel temperature controller fails, it can lead to increased gas mileage. If you encounter one of these problems, then to ensure normal operation of the car engine, you need to replace the controller. Detailed replacement instructions are presented in the video below (author - REPAIR VAZ 2110, 2111, 2112).
How to determine a faulty oxygen sensor
There are a number of methods for checking the condition of the lambda sensor and its power/signal circuits. BOSCH specialists advise checking the corresponding sensor every 30 thousand kilometers, or when the malfunctions described above are detected.
- It is necessary to evaluate the amount of soot on the probe tube. If there is too much of it, the sensor will not work correctly.
- Determine the color of the deposits. If there are white or gray deposits on the sensor element, this means that fuel or oil additives are being used. They negatively affect the operation of the lambda probe. If there are shiny deposits on the probe tube, this indicates that there is a lot of lead in the fuel used, and it is better to refuse to use such gasoline, and accordingly, change the brand of gas station.
- You can try to clean the soot, but this is not always possible.
- Check the integrity of the wiring with a multimeter. Depending on the model of a particular sensor, it may have from two to five wires. One of them will be a signal one, and the rest will be a supply one, including for powering the heating elements. To perform the test procedure, you will need a digital multimeter that can measure DC voltage and resistance.
- It makes sense to check the resistance of the sensor heater. In different lambda probe models it will range from 2 to 14 ohms. The supply voltage should be about 10.5...12 Volts. During the verification process, it is also necessary to check the integrity of all wires approaching the sensor, as well as the value of their insulation resistance (both in pairs and each to ground).
How to check a lambda probe video Please note that normal operation of the oxygen sensor is only possible at its normal operating temperature of +300°C...+400°C. This is due to the fact that only under such conditions does the zirconium electrolyte deposited on the sensitive element of the sensor become a conductor of electric current
Also, at this temperature, the difference between atmospheric oxygen and oxygen in the exhaust pipe will cause an electric current to appear on the sensor electrodes, which will be transmitted to the electronic engine control unit. Since checking the oxygen sensor in many cases involves removal/installation, it is worth considering the following nuances:
- Lambda devices are very fragile, so during testing they should not be subjected to mechanical stress and/or shock.
- The sensor thread must be treated with special thermal paste. In this case, you need to make sure that the paste does not get on its sensitive element, as this will lead to its incorrect operation.
- When tightening, it is necessary to observe the torque value and use a torque wrench for this purpose.
Varieties
This car model has gone through several modifications and this has affected the internal engine systems, some external design details and fuel consumption figures.
1.5i (79 hp petrol) 5-mech
1.6 (80 hp petrol) 5-mech
1.6i (89 hp, 131 Nm, petrol) 5-mech
1.5i (92 hp, petrol) 5-mech
There are different types of VAZs:
:
- 8-valve with 1.5 l engine (carburetor);
- 8-valve injector with 1.5 engine;
- 16-valve 1.5 engine injector;
- 8-valve 1.6 l engine injector;
- 16-valve engine with a volume of 1.6 liters and injector.
Each version of the VAZ has its own advantages and disadvantages, especially regarding fuel consumption. But after the release of cars with a different fuel supply system, the weaknesses of the first VAZ model became clearly visible. One of them is the fuel consumption of the 2110 injector, which has decreased significantly due to this modification of the fuel system.
Elimination methods
The mass air flow sensor (MAF) is considered a target device for detecting fuel loss. A machine with the sensor disabled may perform well. This agility is the beginning of the end of the mass air flow sensor. The device is turned out and the voltage is checked with a tester (the ignition is on).
Checking the mass air flow sensor
Based on the individuality of each car, the voltage should not exceed 1.03 V. Otherwise, the sensor is replaced. A VAZ-2110 with a volume of 1.6 liters and a speed of, for example, 2000 requires about 25 kg of air. Therefore, as this value increases, gasoline consumption increases. Hence the priority of diagnosing the air flow sensor.
- A faulty fuel system simultaneously increases the level of harmful emissions into the atmosphere, reduces power, and turns off the engine when idling. The situation requires checking the fuel pressure supplied to the injectors using a pressure gauge (preferably with a 7-fold division range).
- The gasoline filter is dirty and needs to be replaced. A clogged air filter increases consumption by almost a third of the standard.
- Weak compression, the elimination of which will lead to disassembling the engine, replacing the piston rings, crank - connecting rod mechanism, checking spark plugs, breakdowns of high-voltage wires. Incorrect ignition angle setting also negatively affects gasoline consumption.
Overspending is accompanied by:
- Coolant temperature. A defect in this sensor results in a “lean” or “rich” fuel mixture.
- A malfunctioning throttle clamp sensor directly affects the idle speed and throttle response of the vehicle.
- A defect in the forced air device negatively affects the balance of the mixture (air - gasoline).
- A vacuum and air flow sensor monitors mixture formation.
- Oxygen sensor giving incorrect mixture ratio.
- Reduced fuel pressure leads to a decrease in power and a deterioration in the acceleration qualities of the car. This factor indicates that the fuel pump is worn out or the filter mesh is clogged.
- Dirty injectors and carbon deposits on them lead to distortion of the flame contour and, as a result, poor atomization. This fact of poor-quality mixture formation increases fuel consumption, reducing the vehicle's throttle response.
- Malfunction of the ignition circuit (coil, spark distributor, GDP).
- A dirty air filter cannot produce the correct proportion of incoming air.
Why does the consumption exceed the passport values?
Consumption exceeding the passport figures is fraught with reasons, often interrelated. This automobile disease can be identified by diagnosing its operational parameters, technical condition, and external factors:
- Dark exhaust, loud pops from the muffler.
Dark exhaust - Jerking, loss of power when driving.
- The VAZ-2110 car engine is unstable at low speeds.
- It works stably, but the engine stalls.
- The instrument panel lamp comes on.
Based on 100 km of travel, additional losses are also tied to engine displacement and the number of valves.
Sequence of diagnostic work
Before intending to bring consumption to factory values, it is advisable to narrow the range of reasons, starting with electronic, fuel systems, sensors, filters.
The sequence of inspection stages for the VAZ-2110 includes:
- Removing and cleaning the fuel pump diaphragm.
Clean the fuel pump diaphragm and change the mesh - Replacement of gasoline and air filters. Changing the fuel filter Changing the air filter
- Cleaning the injector nozzles from deposits.
Cleaning the injector nozzles - Ignition timing adjustment.
Adjusting the thermal clearance of the valves - Checking the speed device.
Checking the speed device - Replacement of the oxygen sensor (cannot be repaired).
Changing the oxygen sensor - Checking other components and fuel system devices.
Sources of increased consumption on the VAZ-2110
The source of increased flow is often:
- Air filter, integrity of high-voltage wires, weak spark plug.
- Clogged injectors.
- Malfunction of spark plugs, air consumption sensor, excess pressure in the fuel system.
- Defective camshaft fixation sensor.
- Malfunction of the regulator (idle speed).
- Defect (burnout) of one of the exhaust valves or several.
Fuel consumption may increase due to exhaust valve burnout - Defects in high-voltage wires and ignition coils (see “checking the ignition coil”).
- No or low compression (much repair work will be required)
Low compression can cause increased fuel consumption - Air leakage into the intake manifold (see “replacing the intake manifold gasket”).
- The throttle valve is malfunctioning.
The cause may be problems associated with external operating factors, for example:
- Cabin air conditioning, the consumption of which within the city is 10÷20% of total consumption.
- Frequent gear changes.
- Low tire pressure (negatively affects the handling of the car), wide-profile tires, spoilers, low-beam headlights, external trunk, interior audio system. Audio system External trunk Low tire pressure Spoiler on the trunk increases fuel consumption Low beam
- Loss of 10% of gasoline when driving with low beam headlights on
- Higher gasoline consumption for AI 92 than for AI 95, as with automatic transmission versus manual transmission.
- Wheel bearings that are over-tightened (prevent the car from coasting).
- Loss of 10% of fuel for every 100 kg of transported cargo, and with a trailer another 60%.
The trailer helps increase fuel consumption by 10% - Driving with a cold engine costs 12%.
- Using wheels of larger diameter (accompanied by the application of additional force to maneuver them).
To eliminate the causes of increased gasoline consumption, it is more economically feasible to trust a specialized service.
Doesn't show fuel level AT ALL
When the arrow points to “0” with a full tank, then attention should be paid to all contacts and connections:
- First of all, this concerns the bolts located on the back side of the instrument panel, since they are the ones who create contact by fixing on the indicators.
- It is possible that the fuel level needle has lost its position and needs to be adjusted.
- The instrument panel itself may also be faulty. Since its mechanical parts are very susceptible to wear.
- We test all the “negative” wires, especially the one located near the handbrake. Because often it is he who is promoted.
- The float or the FLS itself is jammed.
Please note that if you have an on-board computer (not older models - approx.), it is possible to control the fuel level electronically. It is enough just to enter the readings, after each refueling of the car and the faulty FLS arrow will no longer bother you
Welcome! Fuel level sensor - thanks to it, you can find out at any time how much fuel you have left in the gas tank; if you didn’t have it or if it had become unusable, then checking the fuel in the tank becomes much more difficult and inconvenient; you would have to live without it you would have to unscrew the cap of the gas tank and poke some kind of stick into it to find out how much gasoline is left in it, but on modern cars the gas tank generally goes to the very bottom (all front-wheel drive cars do this) and gasoline is poured into it through a tube that comes from the top and connects to the tank.
Note! In order to replace the fuel level sensor, you will need tools, namely: Wrenches to unscrew the nuts securing the fuel pipes, you will also need a screwdriver, and we also recommend stocking up with a rag to wipe off gasoline that gets on you and we do not recommend that you smoke while working or use fire (a lighter, for example)!
- Replacing the fuel level sensor and checking it
- Additional video clip
Where is the fuel level sensor located? It is located in the gas tank itself, or rather, it is one piece with the gas pumps and therefore you won’t be able to see it so easily, let’s start first with the fact that, as we said earlier, the gas tank is located at the bottom, it is located on front-wheel drive cars immediately under the rear airbag seats, so in order for you to be able to see the fuel pump inside of which the sensor itself is located, you will have to first fold back the rear seat cushion and only after that unscrew the two screws that secure the cover (This cover will be discussed in another article to which a link will be given as you read) you will see the location of the fuel pump (It is circled in red), and you will need to remove it.
When do you need to change the fuel level sensor? It must be replaced when the fuel level readings become incorrect, that is, if the fuel level arrow does not show (Although there is gasoline in the tank), and also if the arrow shows completely incorrect readings (Although this can be corrected, in this case the sensor is most likely bent the lever that holds the sensor float is in the wrong direction) and even if ringing the wiring does not give you anything (we will tell you how to test the sensor wiring in the same article, so stock up on ohmmeters in advance) then the sensor also needs to be replaced.
Oxygen sensor VAZ 2112
The lambda probe is installed in the exhaust system. Sensors are divided into two types: two-point and broadband.
The two-point sensor consists of ceramics, the elements of which are coated with zirconium dioxide on both sides. Installed in front of or behind the catalytic converter. The principle of operation is to measure the level of oxygen concentration in the environment and exhaust gases. If the level changes and becomes different, a voltage is created at the ends of the sensor elements, from low to high. Low voltage is created if there is excess oxygen in the system. Otherwise, if the system does not have the required level of oxygen, high voltage will be created. These signals are sent to the engine control unit, which distinguishes them by current strength.
How to check
Connect the adapter and run the engine at 2000 rpm. To ensure that the oxygen sensor remains hot throughout the entire measurement cycle. Do not disconnect the sensor connector to avoid disrupting the full feedback cycle in the fuel injection system. Connect an oscilloscope to the oxygen sensor signal lead. Be careful, there are heated sensors (three or four wires). In this case, you need to connect to the signal wire. An oscilloscope will show you waveforms of your sensor's performance and give you an idea of the signal levels in the signal chain.
Before taking measurements, check the scale marked on the measuring tool. It must be correct. A properly working oxygen sensor will show you a signal,
Malfunctions
A modern lambda probe installed on a VAZ has 4 outputs: ground, signal output and two for the heater.
The lambda probe readings are best read with special software by connecting to the diagnostic bus of your car. This is the only way to know the waveform it produces and the rate of change of these signals. First of all, when diagnosing the sensor, remove the connector from it and use a multimeter to check the presence of voltage on the signal wire from the ECU; it should be 0.45 volts. By the way, if this voltage deviates from the given value, most often in the direction of increase. This can be cured by installing an additional resistor. You can calculate the required resistor value as follows:
1) take an adjustable resistor, such as for volume control
2) We connect it in series to the lambda signal power circuit.
3) connect the tester and twist the resistor until the voltage reaches 0.45-0.46 volts.
4) start the car, check, if everything is OK, measure the resistance on it and select a regular resistor of the appropriate value. By the way, the resistor will not heat up; there is no high load.
1) First, remove the “-” terminal from the battery, using a wrench to loosen the nut that holds this terminal. (How to loosen the nut and then remove the terminal from the battery, read the article: “Replacing the battery”, in the “first” paragraph)
2) Next, find the second end of the wiring harness, which comes from the oxygen sensor and connects to the block, and after finding it, disconnect them from each other.
Note! To make it easier for you to find the second tip of the wiring harness and block, in this case, start your search from the first tip, which is installed in the exhaust pipe of the car!
3) After disconnecting the second tip, move to the first, which is located in the exhaust pipe of the car, and then, using a wrench, completely unscrew the nut that secures it.
Unscrewing the sensor nut using a wrench
4) And after unscrewing, remove the sensor from the car.
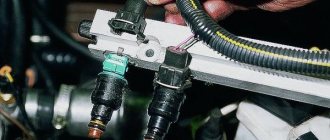
1) First, install the first tip of the new oxygen sensor in its place, and after installation, tighten the nut securing it until it stops.
2) Then connect the second end of the wire harness to the block.
3) And at the end of the operation, using the same article on “Replacing the battery”, install the “-” terminal on it in the reverse order of removal.
Important! When replacing the sensor, if the car's engine is hot, then try to work with thick gloves, or wait until the engine cools down to a cold temperature, because when the engine is very hot, the exhaust pipe and the oxygen sensor itself become very hot, their temperature rises to about 360 °C, and therefore when replacing the sensor, protect yourself and your hands from burns!
How to repair a fuel level sensor with your own hands
Repairing the fuel level sensor is quite affordable for the average car enthusiast. Parts of the device can be freely purchased at an automobile parts store. It is necessary to remove the sensor from the tank and study its characteristics. The marking is located on the front side of the plate directly above the rheostat scale.
If the float is broken, then this is the least of the problems. They change simply. Usually, this is a plastic barrel filled with air; it is simply removed from the holder socket and a new one is inserted. Sometimes this is a porous element and can be replaced in two ways. Remove the locking washer and put on a new one, securing it. Or change the float assembly with the rod, which is much simpler.
If the rheostat scale strips are dirty, you just need to clean them.
Attention! The record should only be cleaned with a soft cloth or cotton wool soaked in alcohol. Hard matter or any other object can damage the thin layer of the scale and the rheostat can be thrown away. Unsoldered or torn wires can be carefully soldered in place or soldered at the fracture site, but a cracked, broken plate can only be replaced with a new one
Unsoldered or torn wires can be carefully soldered into place or soldered at the fracture site, but a cracked, broken plate can only be replaced with a new one
Unsoldered or torn wires can be carefully soldered into place or soldered at the fracture site, but a cracked, broken plate can only be replaced with a new one.
In most cases, no one suffers from this now. A non-working device is replaced and that’s it. Fortunately, their price is low. Moreover, on cars of recent years, the rheostat plate, and all other parts of the device, are secured with latches.
Inaccurate indicator readings can be deceived by adjusting the angle on the rod holding the float. By bending it in different directions you can ultimately achieve more accurate readings.
First of all, we can mention the electronic display for the instrument panel. It is installed together with a standard dial fuel level indicator on a panel in a free cell or directly on the torpedo. Three wires are output, “+”, “-” and “D”. The latter is connected to the sensor along with the standard device. On the sensor removed from the tank, the level readings are adjusted in digital format, from “empty” to “full tank”. This does not add any particular accuracy to the readings, but it does give a stylish look to the instrument panel and warms the owner’s soul. Signs are used in various shapes and it is quite possible to choose a sign to match the interior design of your car.
A completely different matter is the novelty in this matter (relative) - ultrasonic fuel level sensors. Here, as in most devices, the principle of receiving and transmitting ultrasonic waves is used. The sensor can be installed in the tank without violating its integrity. The signal can be transferred to a digital monitor on the instrument panel and even output to a computer or laptop via the GLONASS system. Today this is the most accurate way to obtain data on fuel level. However, this is still a rather expensive procedure, which also requires special knowledge and skills to calibrate the ultrasound emitter and specialized programming equipment. However, everything suggests that meters of this type will be widely used in the future.
In the video below you can see the replacement of the fuel control sensor on a VAZ Priora car:
Adjusting the XX mode
Many experts agree that idle speed control is very important for injection systems. In particular, this will eliminate the floating speed, its spontaneous increase or decrease, which will ultimately normalize fuel consumption. As a rule, problems with engine speed in idle mode arise due to excessive air intake. The regulator’s task is to check the regulator, or make changes to the computer, which takes into account the readings of a number of sensors and opens the valve for a certain time, or check the sensors themselves.
This is how the XX adjustment is usually carried out. To begin with, the car's power supply system is de-energized. Then work is carried out with the regulator, which is embedded in the throttle. It is he who is responsible for uniform heating and stable operation of the engine. This is an electric motor with a needle that produces the recommended amount of incoming air, without turning on the throttle.
- The regulator is removed by unscrewing the mounting screws. The latter may not be removable. In this case, you won’t be able to unscrew them; you will have to remove the throttle body.
- Next, the regulator’s tasks include cleaning the regulator channel. It can be washed and then thoroughly blown with compressed air.
- Then you need to disassemble the regulator to get to the guide sleeve.
It is important to know that the regulator should be disassembled extremely carefully. Accuracy is needed primarily because of the sensitive winding of the regulator. It can be easily damaged.
Next you need to do the following.
- Check how the cone needle rotates. If it is loose, then this means only one thing - the bushing needs to be replaced, as there is play. In addition, the cone needle should not show signs of damage or abrasion.
- Then you need to test the integrity of the pressure spring.
- You need to check the contacts and integrity of the winding.
- After assembling the regulator, it must be installed on the car, but before that, measure the distance to the needle. The length should be exactly 23 mm.
- After installing the regulator, you need to connect the control plug to it, and then turn on the power. Having started the engine, you can analyze its functioning at idle and in other modes.
Causes of a lean mixture
The error shows that the mixture is lean
How to determine the problem of the occurrence of a lean mixture effect in the engine cylinders? There are several reasons why this process may occur. So, let's look at all the possible options:
- The reason lies in the electronic control unit.
- Sensors and electrical equipment.
- Fuel system.
- Throttle valve and air filter.
- Ignition system.
Now that all the reasons have been considered, you can move directly to elimination methods.
Making a poor mixture into a good one!
To eliminate the causes of a lean mixture, you will have to work hard, since there are quite a lot of components in which a malfunction could occur. It is worth considering the sequence of actions to find the problem area and eliminate the cause.
Problems in the ECU
The first place you need to look is the electronic control unit of the engine and its systems. Thus, the accumulation of errors in the ECU can lead not only to changes in the mixture, but also to other malfunctions. In order to eliminate the cause, you need to connect to the unit using a USB-Auto cable and look for any faults. Often, this is where the initial answer to the question lies. This or that error will show which node caused the malfunction. As practice shows, this may be one of the sensors.
Diagnostics of the ECU for errors
If, however, a large number of errors are detected during connection, then a reset is necessary. If it does not help, and the sensors are all working, then motorists recommend reinstalling the car software. It depends on the type of control unit that is installed on the vehicle.
Sensors and electronics
Failure of one of the sensors can result in a lean mixture. So, exactly what indicators need to be checked for performance in engines:
Mass air flow sensor
The IAC sensor is located on the throttle valve
Throttle position sensor
It is also recommended to check the wires that go to the sensors for breakdowns. If necessary, damaged elements must be replaced and the error reset procedure repeated.
Fuel system
One of the main systems that leads to a lean mixture is the fuel system. The main reason is insufficient pressure in the fuel rail. This may be due to several reasons:
Why fuel consumption on the VAZ 2110 is increasing, reasons
Up Diagram of the VAZ 2110 power system High fuel consumption on the top ten can be caused by a variety of reasons, and in addition, by a whole range of malfunctions and shortcomings in maintenance. Diagnosing the reasons for the increase in gasoline consumption is not so easy. This is explained by the fact that each car has its own mileage and quality of service. However, there are several clues from the car that, combined with high consumption, can lead to a trace of a malfunction.
Signs of high fuel consumption
Up Here are just some signs by which you can determine the reasons for excessive consumption of gasoline on a VAZ 2110, regardless of engine type:
- black exhaust;
- pops in the muffler;
- a sharp drop in power;
- poor response to the gas pedal;
- unstable idle;
- smell of gasoline in the cabin.
With the last one, everything seems to be clear. If the fuel line is leaking or there is no seal in the fuel pump tubes, then a smell will appear and the pressure in the fuel rail will drop. The rest needs to be dealt with separately.
Location and service life of the controller
On a VAZ-2112 with engines with 16 valves, the measuring device is located at the exhaust pipe, between the exhaust manifold and the coupling. To replace the device, you must gain access to the underbody of the vehicle body. For the best convenience, you need to drive the car into a garage with a pit or drive onto an overpass located near the highway.
The service life of the oxygen sensor may vary. If a motorist uses a high-quality fuel mixture, the service life will be up to 110 thousand kilometers. In the case when a low-quality mixture is used, the service life is reduced to 85 thousand kilometers.
Oxygen sensor
For some reason, it is quite difficult to find code 0525 in the decoding tables, but this is simply an error in the oxygen sensor, otherwise called a lambda probe. And if you see 0525 on the display again, it means that not everything is in order with the oxygen content in the exhaust.
This sensor is not installed on all VAZ models; it sends a signal to the engine regarding how much oxygen should be in the fuel system. That this sensor does not cope with its duties is evidenced by:
- increased fuel consumption;
- unstable work at XX;
- loss of power, lack of "response".
New Bosch lambda probe
In principle, the lambda probe should be changed after about 60 thousand mileage, but this can happen earlier, especially considering the quality of our gasoline. Therefore, it may display 0525, warning that it is time to replace the oxygen sensor.
conclusions
- Check actual costs with the on-board computer readings. Make a full refuel, record the mileage data.
- Regular diagnostics of malfunctions will promptly identify the cause of the defect that affects increased gasoline consumption.
- Don’t delay, don’t save, because the consequences will definitely lead to serious, expensive repairs.
–> VAZ Masters / Engine power system / Fuel consumption
VAZ 2110