What is a handbrake
The parking brake (in other words, the handbrake) is used to stop the car for a long time. It is used in parking lots, stops, on slopes and when maneuvering sharp turns. Such a car part can protect passengers and prevent accidents.
The hand brake is a safety system against unwanted movement. The operating principle is similar to a hydraulic system. In emergency situations, it is this type of vehicle design that ensures a complete stop of traffic.
How to use the handbrake correctly
Before starting to drive, you should check the position of the handbrake. If it is active, you cannot drive. This increases wear and causes problems with overheating of brake pads and discs. It is also not recommended to leave the handbrake active in winter. Due to the presence of dirt and snow on the asphalt, freezing of the above parts may occur. The car will not budge, and if force is applied, its individual mechanisms may break.
Parking brake design
Before deciding how to tension the cables and put them into operation, let’s consider the structural features of this system. There are two main elements of the handbrake:
- a lever that activates the brake;
- cables that work on the main braking system and slow down the movement.
There may be several cables in a car. Their number varies from one to three. The quantity depends on the Priora model. The most common option is with three cables. They are placed two at the back and one at the front. The “pair” is attached to the brake mechanism, and the third element is connected to the lever.
The connection of the cables is ensured by lugs that are adjustable. The design is also complemented by nuts placed at the ends of the “wires”. They are designed to change the length of the drive. The return spring ensures that the vehicle returns to its original position. It is located on the front cable and on the brake mechanism itself.
System operation process
- Move the brake lever to a vertical position until a locking sound appears.
- The cables move into a tensioned position.
- Locking the rear wheels for braking.
- Removing the handbrake to loosen the cables.
- Making the transition to driving mode.
Raising the handbrake on a Priora
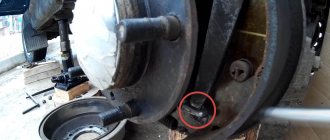
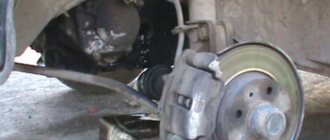
It is not difficult to tighten this element of the brake system. Adjustment of the system requires the presence of only two keys for 13. It is desirable if they are open-end type. The process of self-repair is not difficult. For convenience, the repair process is carried out in a pit or using a lift - this makes it easier to get to the system. The photo shows a mechanism that requires intervention.
There is no need to lift the hatchback, just look under the car. The following workflow will look like this:
- Removing the heat shield.
- Loosening the lock nut.
- The first one needs to be tightened to the maximum level.
- Open cables are stretched.
- The nuts are tightened and the screen is installed in place.
Causes of malfunction and their elimination
As a rule, the reasons why the handbrake does not work are quite simple and do not require long or expensive repairs:
- torn cable. One of the common causes is a broken cable on the handbrake or under the car. The problem is solved by simply replacing the cable;
- jammed cable. Due to damage to the sheath in which the cable moves, it may become jammed, preventing you from using the handbrake. And the cable itself consists of many steel strands, which, if damaged, can also prevent proper operation. The solution is to replace the cable;
- dirty brakes. If dust, dirt, ice or reagents that are sprinkled on roads in winter get on the pads, this can cause the brakes to not work properly. The solution is to press the brake pedal several times smoothly while the car is moving. Thanks to friction, the pads will be cleaned;
- incorrect adjustment. It may happen that the cable system is not adjusted properly, the bolt is not tightened correctly, or the length of the cables is incorrectly selected. The solution is to adjust the system and correct tension of the cables;
- pad wear. The pads are subject to abrasion during operation. Every time you apply the brakes, the pads gradually become unusable. The solution is to replace the pads;
- oil in the pads. Oil or brake fluid leaks can cause the car to not hold up with the handbrake. The most important thing in this case is to identify the cause of the leak - it could be the rear axle seal or the brake cylinder. The solution is to eliminate the leak and clean the pads. If the pads are very oily, replace them.
Replacing parking brake cables on Lada Priora
You will need: a 10mm wrench, two 13mm wrenches, a large flat blade screwdriver.
1. Lower the parking brake lever all the way down.
2. On a car with ABS, remove the rear wheel speed sensor (see “Replacing wheel speed sensors”).
3. Remove the brake drum of the corresponding wheel (see “Removing and installing the rear wheel brake drum”) and the ABS impulse disc (on a vehicle with ABS).
4. Remove the muffler from the rubber suspension cushions of the exhaust system and the additional muffler from the rear cushion (see “Replacing the suspension cushions of the exhaust system”).
5. Remove the cable equalizer (see “Removing, installing the parking brake lever and replacing its drive rod”).
6. Remove the end of the cable sheath from the bracket on the body.
7. Bend the two cable fastening brackets.
8. Insert a screwdriver between the block and the parking brake lever, move the lever to the forward position and disconnect the cable end from the lever.
9. Loosen the nut securing the cable holder on the rear suspension beam and remove the cable from the holder.
10. Remove the cable from the bracket on the body.
11. Remove the cable from the brake shield.
12. Install the cable and all parts in the reverse order of removal. After installation, adjust the parking brake (see “Checking and adjusting the parking brake drive”).
Replacing the handbrake cable on a Priora with your own hands
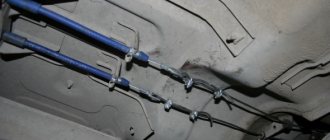
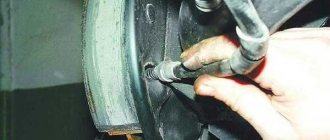
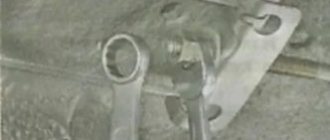
All work must be performed with the rear of the car raised, using a jack, or carried out in an inspection pit. First, unscrew the nuts securing the protective heat shield and remove it as shown in the photo below:
Now, using a 13 mm socket and an extension, unscrew the nuts of the handbrake adjustment rod.
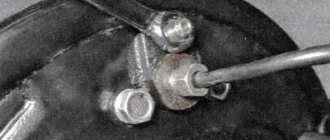
Then we remove the cables from the bar:
Now you need to pull the cable out of its seat, the one that needs to be replaced:
Next, you need to release the cable from the clamps at all points where it is attached to the Priora body.
And in other places where there are these brackets:
As a result, we should get something like the following picture:
Next, we proceed to release the cable from the wheel side. To do this, it is not necessary to remove the pads; you just need to remove the lower spring, and then use a flat-head screwdriver to move the cable drive lever to the side and remove the cable itself:
And now we remove the cable from the opening in the casing. If there are any difficulties with this, first apply a penetrating lubricant:
And slightly loosening the cable in its seat, remove it from the hole:
Installation occurs in reverse order. The price of a new cable for a Priora is from 200 rubles apiece, and you can buy this part in almost any car store or market.
The parking brake cable on a Lada Priora must be replaced in the following cases: difficult movement inside the shell, unraveling of steel threads, breakage of tips. Before replacing, you can try to restore the cable’s functionality by pouring engine oil into the casing and letting it soak for a few minutes to develop the core. If this step does not help, then change it to a new one. It is most convenient to carry out repair work in an inspection hole, overpass, or by driving the car onto lifts. To perform dismantling work, prepare a standard set of tools and perform the following sequence of actions:
- Lower the handbrake drive lever all the way down to unlock the pads.
- Raise the rear of the car by loosening the wheel bolts and then removing the wheels themselves.
- Dismantle the brake drums.
Next, under the car, loosen the lock nut and completely unscrew it and the cable tension adjusting nut, and remove the tip from the equalizer.
- Next, remove the ends of the cable sheath from the brackets on the body on both sides.
- Then we unbend the brackets that press the shell to the body rails.
- Now we need to disconnect the cable ends from the drive levers with the pads. For ease of work, it is recommended to insert a screwdriver between the lever and the brake flap body and move the lever slightly to the side and remove the tip from it. Do the same on the opposite side.
- There is a holder on the rear axle beam that holds the cable sheath. Loosen its nut.
- Now you can remove the cable sheath from the bracket on the body and rear axle beam.
- Then remove it from the brake flap.
At this point, the repair work on removing the parking brake cable on the Lada Priora car has been completed. Replace it, and then perform the installation in the reverse order. It is also recommended to pour a little engine oil into the new cable. As a piece of advice: the misconception of drivers is that they do not want to use the handbrake frequently in order to increase its service life, which leads to the opposite effect - corrosion of the cable surface, sticking to the sheath, etc. The parking brake should be used as often as possible in order for it to give you maximum service.
Basic faults
According to the law, a malfunction of the handbrake is accepted in two cases:
- If, at a 16% slope, the handbrake does not hold the equipped car (without cargo and passengers, but with a full tank of gasoline, the driver’s weight is taken to be 75 kg).
- If, on a 23% incline, the handbrake does not hold the vehicle at full load (the maximum permissible vehicle weight has been reached).
In reality, more often than not, a malfunction of this brake mechanism of the Lada Priora is noticed not by measuring the steepness of the slope, but by clicks. When another click of the handbrake is added to the usual “set of sounds” when leaving the car, every car enthusiast understands that it’s time to tighten the cable.
But the problems don't end there. For the parking brake system they can be as follows:
- The cable has stretched too far. Over time, it undergoes deformation. It can be tightened, but to a certain extent.
- The cable broke. When the “limit” is reached, the mechanical device will have to be replaced.
- The handbrake indicator on the dashboard does not light up or go off. This is due to the sensors.
- The lever button is stuck.
Parking brake lever repair
You will need: two 13mm wrenches, a 13mm socket wrench (head), a Phillips screwdriver, and pliers.
Operations performed when repairing the parking brake lever on a VAZ 2170 2171 2172 Lada Priora
The parking brake lever is a brake system and not only the operation of the brake system during parking, but also your safe movement depends on its serviceability. So, in particular, the rear brake pads are set using the hand brake; in the event of a malfunction of the hand brake system, the rear brakes may not be sufficiently effective.
You will need: two 13mm wrenches, a 13mm socket wrench (head), a Phillips screwdriver, and pliers.
First adjustment steps
To begin adjusting the handbrake, you need to make sure that one of three elements is present and accessible: a lift, an inspection hole or an overpass.
An overpass is a type of engineering structure that is intended to lay a road or communications above the ground.
Homemade overpass for adjusting the handbrake on a VAZ 2110
At home, most often only the inspection hole is accessible. If you cannot take advantage of any of the above conditions, then you can make do with a kind of support trestles, which are a rigid structure installed under the rear part of the body after it has been lifted with a jack. In addition, you need to prepare two wrenches size “13”, as well as pliers.
- lower the parking brake lever to its lowest position;
One of the adjustment stages is to lower the handbrake lever
- using one key set to “13” you need to loosen the lock nut, while holding the adjusting nut with the second key;
Loosen the locknut and loosen the adjusting nut
That's not all, as there are a few steps left to complete the complete handbrake setup.
Removing elements of the parking brake system
We replace the parking brake cables when they are broken, pulled out, or stuck inside the sheaths, when adjusting the parking brake fails to keep the car stationary on a slope - up to 25% inclusive. We remove the parking brake lever to replace it or to replace the lever rod. The cables should be replaced simultaneously - left and right. We show the replacement of the left cable. Move the parking brake lever to its lowest position. We unscrew the locknut and the adjusting nut from the parking brake lever rod (see “Adjusting the parking brake”).
Remove the cable equalizer from the parking brake lever rod.
We take out the front cable ends from the equalizer and remove the equalizer.
Remove the end of the left cable sheath from the bracket.
The cables cross in front of the bracket.
Using a socket or a 10mm wrench, unscrew, not completely, the nut securing the bracket to the rear suspension beam... ...and remove the cable sheath from it.
We remove the cable sheath from the holder on the rear suspension beam mounting bracket.
Use a screwdriver to bend the bracket... ...and remove the cable from the holder on the body.
We remove the cable from the second holder located on the body in front of the fuel tank. Disconnect the rear end of the left cable from the parking brake drive lever (see “Replacing the rear wheel brake pads”).
We remove the cable tip from the hole in the brake shield... ...and remove the left cable. Similarly, remove the right parking cable cable. We install the cables in the reverse order. After replacing the cables, we adjust the parking brake (see “Adjusting the parking brake”). To remove the parking brake lever, unscrew the locknut and the adjusting nut from the parking brake lever rod (see “Adjusting the parking brake”). Remove the cable equalizer from the parking brake lever rod (see above). Remove the floor tunnel lining (see “Removing the floor tunnel lining”).
Using a 10mm socket, unscrew the four bolts securing the parking brake lever bracket to the floor tunnel.
Remove the parking brake lever with bracket and rod assembly, pulling the rod through the rubber sealing boot in the bottom of the body.
Using pliers, we straighten the cotter pin... ...and remove it from the finger.
Remove the washer, axle and rod from the parking brake lever. Install the parking brake lever in reverse order. We adjust the parking brake (see “Adjusting the parking brake”).
The manual or parking brake cable is the working part of the manual locking system for the rear wheels of a car. Cables connect the handbrake lever next to the driver and the brake elements of the rear wheels. Manual braking is used when parking with the engine turned off for more than 6 minutes or during emergency emergency braking on the road. The design of the hand brake is extremely simple and does not contain hydraulics.
The brake pads are actuated by cables twisted from individual steel wires. All this, lubricated with a special lubricant, is located in a shell, otherwise called a jacket. There are three cables in total: one central and two going to the rear wheels. According to the regulations, the cables last approximately 3 years. Over time, the cables stretch and, if adjustment does not help, you need to replace the Lada Priora parking brake cables.
Disassembling the parking brake mechanism
Experienced drivers will not argue, a handbrake is necessary. Yes, it should not be used in the off-season, when the thermometer can be equally likely to be above or below zero. But, for example, if the service brake system fails, all hope, first of all, falls on the parking brake and only then on engine braking. If both systems fail in particularly emergency situations, you should not neglect such “means” of braking as a snowdrift or bushes.
As the rear brake pads wear, the effectiveness of the handbrake decreases. This is exactly it, since the service brakes do not lose their ability. On the contrary, the pedal becomes more informative, and the braking itself is smoother. The solution is simple - find out how to properly space the brake pads on a Gazelle, and then tighten the handbrake cable.
This operation is not complicated, and any driver can perform it. If you are not confident in your actions, then you need to turn to specialists.
It is more convenient to work on an inspection ditch.
Lower the parking brake lever all the way down.
Unscrew and remove the equalizer axis.
Using two 24mm wrenches, loosen the rear fastening nuts of the central cable sheath and completely unscrew the outer nut.
Using a 10mm wrench, unscrew the bolt securing the cable to the cross member bracket.
Disconnect the cable from the main bracket
Disconnect the cable from the additional bracket.
Using a 24mm wrench, unscrew the nut of the front fastening of the central cable 2-3 turns.
Raise the edge of the mat and use a 10mm wrench to unscrew the six nuts securing the mechanism to the floor
Remove the connector from the parking brake warning switch
Remove the cable bracket.
Unsplint the lever axis
How to change the handbrake on a Priora - step-by-step guide
Replacing the handbrake cable is needed when a regular tightening is no longer an option; you will have to change the cable or drive. In order to replace the cable on a Priora car, prepare a Phillips screwdriver and a set of keys.
Replacing the cable is carried out as follows:
- Place the car in the pit, lower the handbrake, and engage the gear.
- Jack up the rear of the car, put supports on it, and remove the wheels. Further actions will be described on one side, they will need to be repeated on the other side.
- Loosen the main muffler and hang it up. Do the same with the resonator.
- Slightly loosen the handbrake rod locknut. Remove the cable equalizer.
- Remove the cable end by pulling it through the special bracket.
- Remove the brackets that hold the cable in place.
- Using a screwdriver, press down on the actuator lever to move it further away from the brake pad. The lever should move to the forward position. After this, you can disconnect the cable tip from the brake lever.
- Loosen the nut on the rear beam that holds the cable, and then pull it towards you.
- Pull the cable through the bracket that is attached to the body, then through the brake shield.
- Check the parking brake and make adjustments. If necessary, tighten the nut more.
In order to change the Priora handbrake lever, you will need a set of keys, pliers, and a Phillips screwdriver.
Carry out replacement work according to the following instructions:
- Drive the car into the pit. Remove the negative terminal from the battery.
- Remove the lining of the central tunnel in the cabin.
- At the bottom, remove the metal plate that covers the parking brake rod. Loosen the locknut and then remove the equalizer.
- Remove the protective cover from the hole in the floor.
- While in the cabin, unscrew the screw that secures the tidy handbrake indicator switch. This screw holds the indicator switch ground.
- Using a wrench, unscrew the bolts securing the handle under the casing.
- Pull the lever assembly towards you - up, then pull the rod behind it.
- The rod can be replaced; to do this, remove the cotter pin and washer. The rod will be free and can be replaced.
- Disconnect the rod and axle.
- Reassemble the handbrake drive in the reverse order of removal. After assembling the system, adjust the cable, achieving 2-4 clicks to fix the machine.
How to remove the handbrake lever. General leadership
1). Parking Brake Components.
2) . Remove the top panel of the console . Using a screwdriver, release the 4 latches and remove the top panel of the console. Remove the rear end panel of the console. Remove the glove box on the console. Remove the cover.
3) . Glove box mounting bolts . Remove the 4 bolts and remove the glove box.
4) . Remove the parking brake lever . Unscrew the locknut and the adjusting nut. Remove the 2 bolts and remove the parking brake lever. Raise the lock. Disconnect the parking brake cable from the lever. We unscrew the screw and remove the parking brake sensor assembly.
How to remove the hand brake lever on a VAZ 2114
1). Set the lever (1) to its lowest position.
2). Disconnect the cable ends (10) from the levers (13) of the manual drive of the shoes and from the equalizer (6). To do this, unscrew the lock nut (9) and the adjusting nut (8) from the rod (5).
3). Then remove the washer (7) and equalizer (6).
4). Having taken out the cotter pin and axle (12), remove the washer (14), lever (13) and release bar (15) of the pads.
How to tighten the handbrake on a Lada Priora step by step instructions
The handbrake is the most important element of any car, ensuring its stability while parked. But after some time it weakens, this is due to the deterioration of the cable tension. Therefore, the parking brake must be tightened from time to time. Lada Priora is available in hatchback, sedan and station wagon bodies; there are no fundamental differences in the procedure for different cars. The same applies to cars with ABS. Some virtuosos manage to perform a lift without a pit, from the salon, but we will consider standard methods. Today we’ll talk about how to tighten the handbrake on a Priora and what you will need for this.
Progress
So, initially you will need to prepare the necessary tool. Fortunately, tightening the cable does not require a lot of tools; you can get by with two 13-size open-end wrenches. Before starting work, you need to drive the car onto an overpass or pit, this will be much more convenient for you
It is important to know that according to regulatory documents, the handbrake must hold the car on a slope of up to 25%
So, if you have installed the car, you will need to engage first gear and lower the lever to the down position. The next step-by-step instructions are as follows:
Remove the heat shield. It is secured with 4 fasteners, which will need to be removed, then the cover should be removed and set aside. Under the cover there is a special rubber stand, which is attached to the additional muffler. After you remove the heat shield, nuts will open in front of you, which allow you to adjust the handbrake
You will need to look for the one that allows you to set the position of the tip. The end nut is additionally secured with a lock nut, which should be loosened
There is no point in removing it, just twist it a couple of turns. Make sure there is nothing obstructing the nut. Experts recommend loosening both nuts at once, because in this case the cable will immediately tighten. The locknut must be returned to its original position and tightened tightly, because the safety of your car depends on it.
When everything is ready, you can perform a control test. Return to the driver's seat, engage neutral and set the brake to park.
When fixing the lever, you need to count the number of clicks. With an average pressing force, their number will not exceed 5 times.
Second test. By lowering the handbrake to its extreme position, you need to check whether the rear wheels are spinning well. If everything is good, then they will spin easily, without any significant effort. If something interferes with them, then you will have to loosen the nut again and tighten it. Next, the devices are installed in the reverse order. If any points remain unclear to you, you can watch the video on our website.
What to do if there is no result
Sometimes motorists are faced with situations in which tightening the cable does not improve the quality of the handbrake. In this case, it is necessary to deal directly with the brakes. The main culprit is the brake pads. They can:
- wear out;
- “get stiff” and not respond to handbrake commands.
Installing new brake pads will help achieve normal results. Experts recommend dismantling the brake drums and checking the movement of the brake pads. If they don't move, it means they're stiff. If there is still movement, the problem must be looked for in other nodes. The primary culprit may be a stretched handbrake cable. If all else fails, it is best to turn to professionals.
Replacement of hand brake cables! — Lada Priora Hatchback, 1.6 l., 2011 on DRIVE2
Good day, citizens reading!) After the handbrake was raised and removed, the car began to behave inappropriately! namely:
-the rear of the car squatted; -behaves dullly at the start and during acceleration;
-in neutral from the hill I just stood there.
To determine it, I had to lift the rear wheels off the ground (with a jack) and try to spin them... in response there was stiff resistance.
The solution to this problem was obviously worth looking at the condition of the handbrake cables. So we go to the store and for 500 rubles we take 2 cables leading to the wheels. because I don't think it makes sense to change just one.
Work process: 1- you need an overpass or, as in my case, a repair. pit 2 - lift the rear part with jacks in order to free the two rear wheels. 3 - remove the wheels and drums. (remove the drums with a puller or 2 bolts) 4- it is necessary to remove the cables from the pads. This can be done with pliers. 5- We climb to the bottom. yes, this is where the most interesting thing will happen... 5.1 — remove the 2 rubber bands that hold the muffler. 5.2 — unscrew the muffler connection at the rear left wheel. and lower the muffler (it will otherwise interfere) 5.3 - remove the cable protection (there are 4 bolts underneath it for fastening the cables and a connecting bracket for tension) 5.4 - disconnect the cables from the adapter strip and using a flat screwdriver, prying them from different sides one by one, pull them out of the fastener.5.5 - the cable itself is then attached to the mounting loops (you can simply bend it and remove it) 5.6 - using a 13mm wrench, remove the lock nut and the main cable tensioner nut. (where the connecting strip is) 6.- remove the old cables and install new ones (it is advisable to install 2 cables at once) 7. after installation, attach them to the blocks (pull them with pliers and attach them to the block) 8. insert the cables under the car into the cable fasteners and put them on the connecting bar bar.9 - Next, you need to pull the cables with the bar onto the common cable stud and tighten the nut and locknut.
10- install the cables into the fastenings and assemble everything in the reverse order!
Issue price: 520 ₽
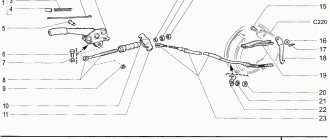
Handbrake diagram for VAZ-2112
1 - button that fixes the handbrake lever; 2 — hand brake lever; 3 — protective cover; 4 — handbrake rod; 5 — cable equalizer; 6 — adjusting nut; 7 - lock nut; 8 - cable; 9 — protective sheath of the cable.
In this scheme we need element number 6. It is he, and only him!
What is required for adjustment?
In order to adjust the handbrake you need a platform or lift. If there are no such devices, then you can simply hang the rear wheels on the “goats”. They can be installed under the car using a jack. It’s also worth taking two “13” keys and pliers.
Start:
- The car is installed on an overpass or “goats”.
- The lever position is set to the lowest possible position.
- Use a wrench to loosen the locknut.
- The second wrench holds the adjusting nut.
- The adjusting nut should be tightened until the cable is tensioned. It must be remembered that the rod should be held with pliers when tensioning the cable.
- After this, you should make sure that the full stroke of the handbrake lever is no more than 4 and no less than 2 clicks.
- When the stroke check is completed, the locknut is tightened. The adjustment is held with another key.
- If necessary, change the mechanism to a new one.
- After releasing the adjusted lever down, you should spin the rear wheels. When the lever is in its lowest position, the wheels should spin freely.
If you cannot tighten the cable, then it should be replaced with a new one.
Adjusting the handbrake after tensioning
After adjusting the brakes, you need to check them again. To do this, the car should be placed on a road with a slope of at least 23%. The car should be in neutral gear in this area and with the handbrake pulled up. If the handbrake brakes hold the car in this area, then the handbrake is adjusted correctly.
What to do when adjustment does not work
There are also cases when the above actions are not enough to adjust the handbrake. This can happen, for example, when the handbrake cable is broken. This happens on the VAZ-2112, although rarely. In such situations, the cable must be replaced. The cable also needs to be replaced when:
- The tips are loose.
- The cable itself begins to stretch, which will lead to its breakage during operation.
- Physical wear (scuffs and cracks) of the handbrake cables.
- It is quite difficult for the cable to move in the casing even after lubrication.
This replacement procedure does not require contacting a service station. Although this will require some time and skills from the driver, such work can be done independently.
It should also be remembered that when replacing the cable, certain conditions must be observed. To do this, the driver will need an assistant who will pull the cable.
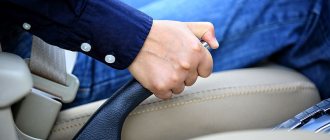
Why do you tighten the handbrake?
The cable acts here as a drive. If the driver pulls the handbrake lever, then at the same time he uses the cable, which spreads the pads in the rear wheel.
If the handbrake is faulty, you just need to tighten the cable or replace it with a new one. On a VAZ-2112 it’s quite easy to do this with your own hands.
Adjustment
The handbrake adjustment must be carried out in the inspection hole.
To work you will need:
- two keys for "13"
- Special lubricant type “WD - 40”
Adjustment process
- Using two keys set to “13” you need to unlock the two nuts of the handbrake cable. Pre-lubricate them with WD-40.
- Next, use the far nut to tighten the handbrake.
- Then we hang up the rear wheels and check for rotation. The wheels should rotate freely when the handbrake is released.
- The handbrake should stop and hold the car for 3-4 clicks of the ratchet mechanism.
- If, when tensioning the cable, one wheel rotates and the other does not, then it is necessary to separately tension the cable going to the wheel that is rotating.
- After the handbrake is adjusted again with two keys to “13”, we lock the two nuts.
The adjustment process is complete.
How to tighten the handbrake on a Priora: design and features
In the article we will talk about the handbrake system and describe how to tighten the handbrake on a Priora. This will help the owners of this car to limit themselves to independent work, without having to pay for the services of a service center. Knowing the design of the system, regulation will not take much time.
What is a handbrake
The parking brake (in other words, the handbrake) is used to stop the car for a long time. It is used in parking lots, stops, on slopes and when maneuvering sharp turns. Such a car part can protect passengers and prevent accidents.
The hand brake is a safety system against unwanted movement. The operating principle is similar to a hydraulic system. In emergency situations, it is this type of vehicle design that ensures a complete stop of traffic.
How to use the handbrake correctly
Before starting to drive, you should check the position of the handbrake. If it is active, you cannot drive. This increases wear and causes problems with overheating of brake pads and discs.
It is also not recommended to leave the handbrake active in winter. Due to the presence of dirt and snow on the asphalt, freezing of the above parts may occur.
The car will not budge, and if force is applied, its individual mechanisms may break.
Parking brake design
Before deciding how to tension the cables and put them into operation, let’s consider the structural features of this system. There are two main elements of the handbrake:
- a lever that activates the brake;
- cables that work on the main braking system and slow down the movement.
There may be several cables in a car. Their number varies from one to three. The quantity depends on the Priora model. The most common option is with three cables. They are placed two at the back and one at the front. The “pair” is attached to the brake mechanism, and the third element is connected to the lever.
The connection of the cables is ensured by lugs that are adjustable. The design is also complemented by nuts placed at the ends of the “wires”. They are designed to change the length of the drive. The return spring ensures that the vehicle returns to its original position. It is located on the front cable and on the brake mechanism itself.
System operation process
- Move the brake lever to a vertical position until a locking sound appears.
- The cables move into a tensioned position.
- Locking the rear wheels for braking.
- Removing the handbrake to loosen the cables.
- Making the transition to driving mode.
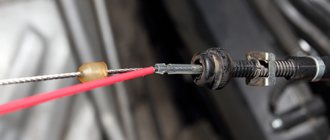
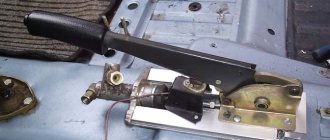
Raising the handbrake on a Priora
It is not difficult to tighten this element of the brake system. Adjustment of the system requires the presence of only two keys for 13. It is desirable if they are open-end type.
The process of self-repair is not difficult. For convenience, the repair process is carried out in a pit or using a lift - this makes it easier to get to the system.
The photo shows a mechanism that requires intervention.
There is no need to lift the hatchback, just look under the car. The following workflow will look like this:
- Removing the heat shield.
- Loosening the lock nut.
- The first one needs to be tightened to the maximum level.
- Open cables are stretched.
- The nuts are tightened and the screen is installed in place.
Do not tighten the cables too much - this leads to improper operation of the entire system. Otherwise, a full repair of the handbrake at a service station will be required.
How the handbrake works
Before talking about why the parking brake does not work, it is worth understanding the general principle of its operation. It is quite simple, so understanding how the handbrake works is not difficult.
The hand or parking brake looks like a special handle in the interior. It is located next to the driver's seat. Sometimes the parking brake can also be a foot brake. When the lever is lifted, the internal cable, coupled to the bar by means of an adjusting bolt, is tensioned. At the edges of the bar there are two more cables that go towards the rear wheels. When they are tensioned, the brackets inside the drums are unclenched and the pads are moved apart. This is how the wheels are locked.
How to Adjust the Parking Brake Safety and Comfort
Lada Priora Sedan Logbook Preparing for winter. Starter
- The lever rises by 2-3 clicks, the number depends on the model;
- We jack up the car. It is most convenient to carry out work in the inspection hole;
- Then, loosen the tightening nut of the adjusting unit. By rotating the other nut, tighten the cable until braking force appears on the suspended wheel;
- Let go of the lever, the wheel should spin without much interference. Raise the lever again to its maximum position. The wheel should stop spinning. This is repeated several times;
- Once you are sure that the settings are correct, you should tighten the locknut.
How does the handbrake work?
When the driver activates the handbrake, either by pulling the handle between the front seats (3) or by pressing the parking brake pedal under the dashboard, a cable (12) running to the rear of the car is pulled, applying tension to the brake pads. When the driver lowers the handle, the return spring (11) helps return the brake system to its normal configuration.
The system itself is quite simple and banal - the parking brake handle is connected to a cable in a special plastic sheath, in which it can move freely. This cable goes to the adjusting bolt, which can be loosened or tightened. Then it splits into two cables that go to the brakes on the rear wheels.
In simple words, by activating the handbrake, the cable tightens and brings the pads together, which then secure the car.
How to remove the hand brake lever on a Niva Chevrolet?
1). Disconnect the rear cable from the guide from the tip of the front cable.
2). Remove the floor tunnel lining.
3). We unscrew the 2 bolts securing the lever bracket to the floor and remove the lever.
4). Remove the locking ring of the lever axle.
5). We take out the lever axis.
6). We pull the cable inside the cabin.
7). Install the new cable and lever in the reverse order of removal.
Brief conclusions
Adjusting the handbrake is a simple process. It should be carried out regularly so that the car does not fail while driving. Many people turn to service centers to carry out such work. It is better to perform the adjustment at home to be sure of the result.
Wear on the rear brake pads is inevitable, which is why the handbrake cable has to be tightened over time in order for the parking brake to work effectively. On the Priora, as well as on other front-wheel drive cars of domestic production, the adjustment is performed in the same way, and to perform it you will only need two 13-size keys, preferably open-end ones.
To see all this work clearly, I recorded a video lesson that will show this process in as much detail as possible.
Sources
- https://maslo-5w30.ru/avto/kak-pomenyat-tros-ruchnika-na-priore-o-regulirovke-i-remonte-uzlov-legkovyh-avtomobilej
- https://zamanuha66.ru/zamena-trosika-ruchnika-priora/
- https://delis-avto.ru/avto-lada-drugoe/zamena-trosov-ruchnika-priora.html
- https://AlanSpb.ru/drugoe/zamena-trosika-ruchnika-priora.html
- https://avtonomnaya-gazifikaciya.ru/kalina/trosik-ruchnika-priora.html
- https://TrueScooters.ru/tehservis/regulirovka-ruchnogo-tormoza-priora.html