Hi all! Any extraneous knocks or sounds when the car is operating should alert the driver. Regardless of the nature and origin, there should not be any unnecessary sounds during normal operation of the machine. Today I propose to talk about how the camshaft knocks, whether it can knock, why this happens and what to do in this situation.
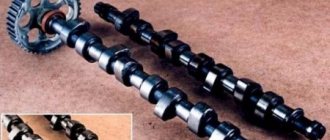
The job of the camshaft or simply the camshaft is to control the opening and closing of the internal combustion engine valves. With its help, engine strokes are synchronized. As you know, valve knocking is also possible. We have already talked about them.
You should find out why such symptoms occur, what actions the car owner needs to take, and what consequences you should be prepared for if you do nothing.
Eliminate camshaft knock (axial runout) with your own hands
Many already know that the VAZ 2111 injection engines have the following disease: “Axial camshaft runout”.
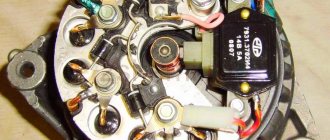
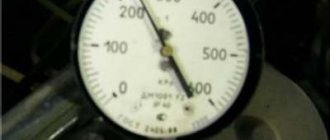
This disease does not progress and does not cause damage to other timing components, but it manifests itself in the form of an unpleasant camshaft knock. It just so happened that the developers of the 2111 engine missed this point. Where carburetor engines used to have a fuel pump and distributor, injection engines have a regular plug into which the camshaft rests. The camshaft axial play set by the manufacturer should not exceed 0.15-0.20mm. Over time, as the camshaft pastel wears out, the axial play increases, and a distinct knock begins to be heard from under the valve cover. Of course, you can continue to drive with this knock and not worry, but not every car enthusiast will be pleased.
I am sure that almost any auto repair shop will tell you: “Either ignore this knock, or change the entire head!” But there is one simple and absolutely free way to eliminate this annoying knocking noise by placing a washer between the camshaft and its side cover! Below is a detailed description and photo report of the work done.
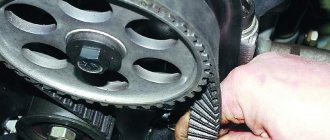
Checking the camshaft axial play.
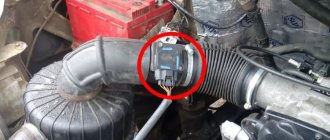
Remove the timing belt cover and start the engine. Then, with the engine running, press the handle of a screwdriver into the camshaft gear bolt. If the knock disappears when pressed, the reason is: Axial runout of the camshaft.
VAZ and GAZ specialists answer
VAZ and GAZ specialists answer
1. There is not a word in the VAZ 2110 service book that the injectors need to be washed periodically. However, the service center, referring to certain VAZ instructions, recommends doing this after 20–30 thousand km. Who to believe?
The factory instructions do not provide for cleaning the injectors. Similar work may be required if a decrease in fuel flow through the injectors is detected. The most likely reason for this is the use of low-quality gasoline.
2. Why, when adjusting the gaps on a VAZ 2110 engine, does the camshaft, after aligning the marks, still need to be turned in the same direction (clockwise) by about three teeth? Why don't they measure the clearance with the cam in a vertical position?
The text of the Repair Manual for the VAZ 2110 does not indicate the direction of turning, which is incorrect. It is desirable to turn it counterclockwise - in this case, the back of the cam of a constant radius is more reliably oriented towards the center of the adjusting washer compared to the position of the aligned marks. The step-by-step algorithm for adjusting valve clearances described in the Manual is designed for a person with minimal experience. In general, the valve clearance can be measured at any position of the camshaft, if the back of the cam with a constant radius is located opposite the center of the washer. The middle of the back of the cam is preferred, when its top is as far away from the washer as possible.
3. How to distinguish a timing cover with an antiphon from a regular one? Are these produced?
The cylinder head cover made of antiphon material is equipped with engines of 1.45 and 1.6 liters of “classic” cars equipped with an ECM, as well as 1.7-liter engines with an ECM on all-wheel drive VAZ 21214 and VAZ 2123. You can distinguish such a cover according to the following characteristics:
— a dull sound when tapping on the lid;
— when examining the edges of the cover from below, two layers of metal are visible, and the layer of plastic separating them is thin and practically invisible. In addition, engine covers VAZ 2104, 21067 and 2123 are distinguished by a threaded oil filler neck.
4. When repairing engines 2108, 2110, I more than once encountered axial play of the camshaft of 0.7 mm or even more. Does the plant regulate this value?
The tolerance for camshaft axial play for new engines of the 21081, 2108, 21083, 2110, 2111, 21114 family ranges from 0.15 to 0.53 mm. Since the interface “camshaft housing - camshaft - housing of auxiliary units”, which determines the axial clearance, wears out slightly, the repair documentation does not specify a maximum permissible value for it. Excessive play can be considered when an extraneous knock is heard, irregular but loud. Typically, the threshold for knocking is a play of 0.8–1.0 mm.
1. Should the release bearing rotate when the Volga engine is running?
Since 1979, Volga cars have been equipped with a backlash-free clutch release drive using a radial release bearing. This was done to reduce travel and pedal effort. When the engine is running, the release bearing, regardless of the position of the clutch pedal, rotates at the same speed as the crankshaft. This design is used on GAZ vehicles with ZMZ-402, 406, 405 engines.
Remove the camshaft cover.
To begin with, using a powerful old-fashioned key of 17, we set the camshaft gear to the mark. This is necessary so that the “pin” that is on the camshaft does not interfere with removing the cover.
Then, using a 10mm wrench, unscrew the cover (2 nuts and one bolt with a rubber ring).
Only 2 are visible in the photo, the third from the back:
Here you can see how this pin passes through the slot in the cover:
We make a washer.
For the material for the washer, I took a piece of galvanized sheet about 0.5mm thick and secured it to a piece of MDF panel with four self-tapping screws (so it wouldn’t fidget).
I drew 2 circles with a marker (inner diameter 25mm, outer 35mm) and hollowed out the inner diameter with a chisel.
I cut out the outer diameter with metal scissors, and I ended up with a curve like this, with the washer blank all covered in burrs:
I processed the inner diameter of the washer with a round file, and sharpened the sharp corners on the outer one:
Install the washer.
We put the washer on the camshaft (it should fit freely, if not, then adjust the dimensions).
I entered freely:
Put the cover back and tighten it.
Attention! Be sure to check if the camshaft is jammed.
To do this, take a key set to 17 and try to rotate the camshaft.
It should turn with the same force as before installing the washer.
If the camshaft becomes very difficult to turn, or is completely jammed, then remove the cover again, take out the washer and grind it to thickness:
Shutdown.
After the washer is adjusted, the cap is tightened and the camshaft rotates freely - start the engine and enjoy the silence of its operation!
If you find an error, please select a piece of text and press Ctrl+Enter.
Source
What to do
Drivers had to deal with the fact that occasionally after the start an incomprehensible knocking sound began to appear, but when accelerating and warming up the engine it disappeared. As we have already figured out, most likely the camshaft on the engine has failed.
Now another question. What to do in such a situation? If the camshaft starts knocking, you should be prepared to spend a considerable amount of money. But this is not a 100% probability, since sometimes hydraulic compensators begin to knock, or knocking noises are made by worn gears and bearings. Not all situations solve the problem by replacing the entire camshaft. If you suspect a knocking noise from this unit, it is better to immediately go for diagnostics. Due diligence can help you find out where the source of the problem is and what needs to be done about it.
It’s definitely not worth delaying diagnostics. If the compensators fail, and the problem was in them, then the chain reaction will lead to the breakdown of the shaft itself. And these are completely different expenses. So it would definitely be a good idea to check the hydraulic compensators.
As you can see, delaying the check is definitely not in your interests.
How to diagnose camshaft knocking
To determine the knocking of the camshaft, you need to start the engine cold, when the lubricant has dropped down and the camshaft remains almost dry:
- the noise is heard only when the engine is cold, after warming up it decreases due to the fact that the bed begins to lubricate;
- the camshaft makes a dull sound, the crankshaft has a louder sound, especially when picking up speed;
- When the speed increases, the camshaft noise remains at the same level.
When the knocking noise occurs due to longitudinal play, another test can be performed. To do this, remove the timing belt cover and start the engine. After this, use the handle of a screwdriver or other convenient tool to press on the bolt holding the camshaft gear. If the knocking noise disappears, the reason is longitudinal play, which needs to be eliminated.
You can drive with a knocking sound from the camshaft for a long time, but if you do not solve the problem, it will lead to destruction of the shaft, engine failure and major repairs. Therefore, the problem must be solved immediately after it is identified.
If the VAZ 2110-2114 camshaft is deformed or mechanically damaged, the supports are broken or the journal is broken, this part must be replaced. The same is done in cases where the cams exhaust their service life, become deformed, and do not ensure proper operation of the valves. In this case, the knocking will be especially intense and will not go away when the engine warms up. Therefore, when you hear the camshaft knocking in the valve area, you need to be especially careful. But most often the reason is play as a result of the wear of the seats and the camshaft bed.
Description of the procedure for replacing the timing belt VAZ 2110, (2112) 16 valves
Former flagship of the Russian automobile industry VAZ 2110 with a 1.5 16 valve engine. Scheduled replacement of the timing belt 30,000 km after the last replacement. The autopsy showed that if they had not changed it today, then tomorrow there would have been more work for our mechanic. In general, we recommend that all customers check the condition of the belt at least once every 5,000, or once a year. But knowing the quality of our spare parts, more often is better. On this engine, if the belt breaks, almost all the valves bend. The article is also relevant for VAZ 2112))
We look, remember and don’t let it get to that point.
The patient became five millimeters narrower and generally looked very bad. We send him to the honor board.
And here is the hero of the occasion himself.
We remove the absorber and power steering reservoir so that they do not interfere in the future.
We loosen the bolt by seventeen, the tension roller of the service belt and remove the last one. It will not be possible to remove it completely because the engine mount is in the way. If the belt requires replacement, you will have to unscrew the engine mount.
Remove the tension roller. We unscrew the bolts securing the upper protective cover; they are hexagonal.
Remove the right wheel, plastic mudguard and drain the antifreeze.
We see the crankshaft pulley. Using its bolt, clockwise, rotate the crankshaft until the marks on the camshaft pulleys and the timing belt protective cover match.
Markings on the left exhaust camshaft. The mark on the protective cover is highlighted in red.
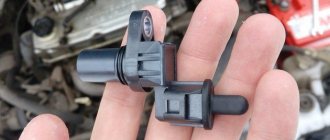
Likewise for the intake camshaft. He's on the right. Its pulley has an inner ring for the phase sensor, so it is very difficult to mix up the pulleys.
Remove the crankshaft pulley. Let's lock the crankshaft with the help of a friend. We put him in the car and force him to turn on fifth gear and press the brake all the way. And at this time, with a slight movement of your hand, unscrew the crankshaft pulley bolt. Remove it and the lower protective cover.
We see that the mark on the sprockets and the slot on the ebb of the crankshaft cover coincide.
Loosen the seventeen bolts of the tension and idler pulleys and remove the timing belt. Then the videos themselves. We change them anyway.
We lock and unscrew the camshaft pulleys and remove them. Remember that the right camshaft has a pulley with an inner ring for the phase sensor. The picture should look like this.
We unscrew everything that holds the protective plastic cover and remove the latter. Unscrew the three bolts holding the pump. They are hexagonal.
The pump for a sixteen valve engine is slightly different from the usual for an eight valve engine. It has a small threaded ear for attaching the protective casing.
Lubricate the gasket with a thin layer of sealant and put the pump in place. Tighten the fastening bolts. We put the protective cover in place. We make sure that he sits in his place, otherwise he will rub the belt. If everything is in order, tighten everything that holds it and install the camshaft pulleys and new rollers.
We check that the marks on the camshafts and crankshaft match. We install a new timing belt. If there are no directional arrows, put it so that the inscription is read from left to right.
Eliminating camshaft knock on an 8 valve engine
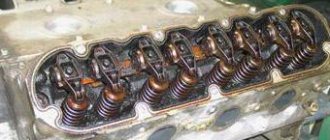
Before starting work, you need to remove the engine valve cover, remove the cover of the right support cushion and pull out the valve tappets. This will free up access to the camshaft and, if necessary, allow it to be rotated to determine the play, since the shaft is completely unloaded.
When the camshaft of a VAZ-2114 or another model from this series knocks, two types of play are observed - longitudinal and transverse, and each of them has its own method of elimination.
Elimination of lateral play
The lateral play is determined by loosening the camshaft up and down, for which one of the covers of the support cushions is removed. This play appears when the camshaft journals and the shaft bed support pads against which they rest are worn.
First, we dismantle both camshaft cushion covers and remove excess metal using an emery stone with a fine-grained abrasive. Its surface must be perfectly flat so as not to disturb the geometry of the part. An alternative is fine-grained sandpaper glued to smooth glass.
The pad cover is ground with an abrasive to reduce its depth, causing it to hold the shaft more tightly. To prevent the emery from clogging, it is recommended to periodically water it with water. After 1-1.5 minutes of processing, the cover must be replaced and tightened, checking for play. It is important not to remove too much metal as the camshaft will stop turning. After installation, it should move without play with a slight, so-called “velvety” force.
Next, the operation is repeated with the second cover of the support cushion, while the cover that was processed earlier must be removed so that it does not interfere with determining the degree of camshaft play. After the backlash is completely eliminated, both covers are installed and the engine is assembled. After starting the engine, the knocking should stop completely.
Video: A simple way to eliminate camshaft knocking on VAZ 2108, 2109, 21099, 2110, 2112, 2113, 2114, 2115.
Step-by-step guide to changing the camshaft on a VAZ 2110
- The camshaft is installed at the end of the compression stroke of the fourth cylinder.
- Using a size 13 wrench, the chain tensioner is released, then when the mounting rests on the tensioner shoe, you need to tighten the tensioner rod, after which it is fixed using the chain tensioner nut.
Note! If the process cannot be completed, you need to completely dismantle the tensioner.
- Using a flat-head screwdriver, carefully bend the lock washer of the camshaft sprocket mounting bolt.
- Fourth gear is activated, in this case the camshaft is fixed. This way it won't turn.
- The sprocket mounting bolts can only be unscrewed with a 17th key.
- The camshaft “bed” is disassembled by unscrewing 9 nuts with a 17th key.
- Now you can safely dismantle the camshaft along with the “bed”, removing it from the mounting pins.
- Using the 10th key, unscrew the two bolts for fastening the thrust flange; such measures allow you to easily remove the flange.
- To prevent the springs from pressing, you need to lift the cam, which is also dismantled.
- At the final stage, the camshaft is removed from the “bed”.
- The cam spring is removed.
Disassembly is completely completed, now all that remains is to replace the camshaft and reassemble all the parts in the reverse order of disassembly.
Note! Tightening of the fastening nuts “bed” must be carried out in strict accordance with the diagram.