The VAZ 2106 was produced for about 30 years and was the most popular sedan from the classic family of cars produced by the AvtoVAZ concern. The injector on the VAZ 2106 was installed only in the last 4 years of production - from 2002 to 2006, when the model in question was produced on the IzhAvto assembly line.
On the secondary market, this modification is quite rare and is unfamiliar to most fans of “sixes”. Many owners of classic cars with a carburetor power system want to install injectors on their cars. There are many reasons for this, including:
- eliminating the need to clean and adjust the carburetor every six months;
- no engine shaking at idle;
- easier and faster engine starting in cold weather and after long periods of inactivity;
- and what is also important is a reduction in fuel consumption after installing the injector by 10-15% with better dynamics.
Installing an injector on a classic Lada is a costly affair, but the costs incurred will pay off after 50,000 km or 1.5-2 years of intensive use of the car. Moreover, the cost of such modernization can be reduced if the work is performed without the help of specialists.
Features of the injector, list of equipment for replacement
Before installing the injector yourself, you should first of all turn to theory. The vast majority of VAZ 2106 cars (modifications 21060, 21061, 21064, 21065) were equipped with carburetor naturally-aspirated engines of 1.45 and 1.6 liters with the same cylinder head (cylinder head) - 2101.
This cylinder head is not suitable for installing an injector on it, since it has inlet holes of inappropriate shape and does not have studs for attaching the intake manifold to the receiver. Of course, you can remake it for cost-saving reasons, but if you do not have special knowledge, then it is better to purchase a ready-made cylinder head assembly from the modernized Niva - 21214.
The Niva's engine is not much different from the 2106 engine, so its cylinder head is ideally suited to the design characteristics.
In case of financial problems, you can purchase an empty cylinder head and replace the valves and other things from the old head into it. But again, this requires knowledge and experience. In addition to the cylinder head, you will need to purchase the following equipment from the VAZ 21214.
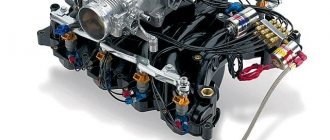
- The ramp is assembled with nozzles and pressure regulator.
- The receiver is complete with a throttle assembly and idle air control.
- Intake manifold.
- Gasket for intake and exhaust manifolds.
- Receiver gasket.
- Front engine cover with a hole for the crankshaft position sensor (CPS).
- Crankshaft pulley with space for DPKV.
- DPKV.
- Throttle position sensor (TPS).
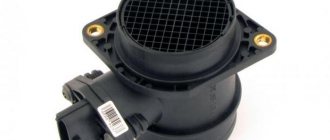
- Instant air flow sensor (MAF).
- Antifreeze temperature sensor.
- Speed sensor.
- Knock sensor (DS).
- Accelerator pedal with drive cable.
Compressor or turbine for the “six”
You can increase engine power by installing a compressor or turbine, but first you need to understand what is needed for this. First of all, you need to understand that it is possible to install a turbine on a carburetor engine due to its design features, but this is quite problematic. The nuances include both large material and time costs. The most important points to consider when equipping a car with a turbine:
- Mandatory installation of an intercooler. This part is a kind of radiator, only it cools the air. Because the turbine generates high pressure and the air is heated, it must be cooled to achieve the installation effect. If you don't use an intercooler, there will be an effect, but much less.
If you are not an avid racing driver, you should take a closer look at the compressor, which has the following differences from the turbine:
- Does not cause high blood pressure.
- There is no need to install an intercooler.
- You can equip the VAZ engine with a carburetor.
To equip a VAZ 2106 with the unit in question, you will need a compressor kit, a kit that includes everything necessary for converting the engine (pipes, fasteners, compressor, etc.).
The product is installed in accordance with the manufacturer's instructions.
Video: installing a compressor using the “five” as an example
Preparing for installation
After purchasing all the necessary spare parts, you can begin upgrading. First you need to dismantle unnecessary equipment, in particular:
- loosen and remove the generator belt;
- remove the crankshaft pulley and camshaft drive cover;
- dismantle the distributor, fuel pump and switch;
- remove the carburetor and air filter;
- dismantle the old cylinder head along with the manifolds;
- unscrew the exhaust manifold and coolant distributor tee from the cylinder head (located in front of the manifolds in the direction of travel of the car);
- dismantle the accelerator drive rods, the gas pedal and unnecessary wires (to the coolant sensor, ECXX, distributor);
- remove the gas tank (if it will be replaced).
Next, preparatory activities should be carried out.
- Drill a hole on the ebb of the coolant distributor tee, screw a new antifreeze temperature sensor into it and install the tee on the new cylinder head.
- Secure the TPS in its proper place in the throttle valve assembly.
- Close the holes in the block left after removing the mechanical fuel pump and distributor with plugs.
- Extend the return line to the fuel tank, if there is none.
- Attach the electric fuel pump mounting bracket in the trunk or under the bottom and embed the fuel pump into the fuel supply hose.
Soviet cars
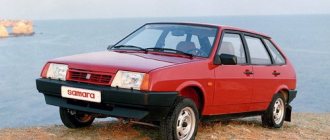
Years of production: 1976-2006 Dimensions (l x w x h, mm): 4116x1611x1446 Layout: front engine Drive wheels: rear Body: sedan Engine: VAZ-2106 Number of cylinders: 4 Displacement: 1.57 l Number of valves: 8 Location : top Power, hp/kW: 80/58.8 at 5400 rpm Transmission: five-speed manual Brakes front: disc Brakes rear: drum Electrical equipment: 12 V Tire size: 175/70R13
History of creation
VAZ 2106
- Soviet passenger car developed at the VAZ plant. Serially produced from 1976 to 2006. The Six is based on the Italian model FIAT 124 Speciale from 1972. VAZ 2106 has become one of the most popular VAZ models throughout its production history. The first car of the new model rolled off the assembly line on February 21, 1976. In fact, the VAZ 2106 was a luxury version of the VAZ 2103, with a more powerful engine and different trim. The car was one of the most prestigious models of the late 1970s. The standard equipment was extremely rich: it included new seats with headrests and an instrument panel with a tachometer and clock. The cars were famous for their excellent dynamics and good build quality. Early models were distinguished by good sound insulation.
In the late 1970s, VAZ expanded its model range by releasing less powerful versions of the VAZ 2106. They were equipped with engines from models 21011 and 2103. Although these modifications lost the inherent dynamics of the model, they were quite popular due to the general shortage of VAZ 2106 in the market. domestic market. In 1982, the first serious modernization of the model was carried out: it began to be equipped with a new, 75-horsepower engine, interior trim elements changed, and reflectors disappeared from the rear wings. Since 1990, VAZ launched the production of a “luxury” modification, which received the index 21065. The car was distinguished by a contactless ignition system, a new carburetor, different headlights and new upholstery.
Installation of the injection system
After completing the preparation, you can begin installing the injector.
- First you need to install the cylinder head from the VAZ 21214 on the cylinder block.
- Then you need to install a new front block cover, a new crankshaft pulley and secure the DPKV.
- Place the gasket on the cylinder head intake and exhaust ports and screw the new intake and old exhaust manifolds into place.
- Place the spacer over the triangular mounting area where the 2 studs are located and a simple spacer over the manifold inlet ports.
- Insert the fuel rail with injectors into the exhaust pipes and secure it with 2 screws.
- Screw the receiver assembly with throttles and idle air control into its proper place.
- Secure the DD to the screw securing the distributor plug.
- Hook the speed sensor onto the speedometer drive gearbox.
- Attach the ignition module to the engine shield next to the brake reservoir.
- Secure the gas pedal to the right studs of the VUT.
- Attach the gas cable with one end to the pedal, the other end to the throttle assembly and secure it to the receiver bracket so that it sags slightly.
- Finally, you need to attach the fuel supply hose and the return hose to the injector.
After this, all that remains is to install the control unit, connect sensors and the rest of the machine’s wiring to it according to the presented diagram. The average cost of installing an injection is about 20,000 rubles, but it is reduced several times when using used spare parts.
The operation of a carburetor engine is accompanied by several problems (failures). After all, the carburetor needs to be adjusted periodically, the idle speed often fluctuates, and in severe frost there can be problems starting the engine. In addition, in order to prepare the fuel-air mixture (FA) with the correct ratio, you need to carefully adjust the position of the mixture quality and quantity screw. In addition, the level in the float chamber affects fuel consumption. In addition to these nuances, problems arise with ignition and the accuracy of its installation. Therefore, car owners remake carburetor engines and install an injector with their own hands.
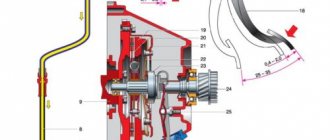
How it works
Diagram 2107 VAZ injector shows in general terms the mechanism of the design of the “brains” of the car engine. The control action system process consists of three stages:
- all collection of necessary information;
- its subsequent processing;
- corresponding performance of functions.
Information is collected using various sensors. Typically these are devices that measure the quantity and temperature of incoming air, the exact distribution shaft position, rotation speed and other processing. information indicators are carried out by the control module using help. The processor engine analyzes the information that comes from the sensors. It is compared with a specially created mathematical model stored in memory at a rate of once per second. If discrepancies are detected, appropriate commands are issued to the mechanisms to correct the process. The executors of these commands are the injectors that supply fuel in the appropriate amount at precisely measured intervals of time. The candles are lit at the interval specified in the fuel.
Engine malfunctions VAZ injector 2107 and subsequent ways to eliminate them
Many domestic car owners, in particular Lada cars, tune the VAZ 2107 engine to increase power and efficiency. An important factor, without which it is not possible to improve efficiency, is clean injectors. In many ways, they provide high performance of the car, fuel economy and are considered a guarantee of clean emissions. Malfunctions of the VAZ injector 2107 engine in the form of contaminants reduce the injected volume of fuel and disrupt the shape of the atomized air-fuel mixture. Electronic car systems can effectively reduce the clogging of injectors, but this is a treatment of “only symptoms”, while the main cause of the disease remains unchanged.
Many photos and videos on the Internet of contaminated injectors give a visual idea of what it is, what it is and what harm it does. They should be cleaned by the engine immediately after the first signs of clogging appear: uneven engine operation, uncertain ignition, loss of power. Sometimes the engine stalls or stalls, there have been cases where it is not easy to start. In such a situation, you should immediately repair the VAZ 2107 engine injector, since the car will not last long. Of course, you can try to carry out repairs yourself, but if you are not confident in your own abilities, it is better to turn to specialists. Many experts recommend unscrewing and or even cleaning spark plugs after immediately cleaning the injectors.
This is explained by the fact that during the cleaning process a large amount of unbound particles of harmful soot is formed. easily They settle on the spark plugs and significantly impair their performance. You can also replace the filters and oil, since if the solvent gets through the rings into the filled oil, it will somewhat reduce its quality
It is important to always monitor the condition of your car and then you will be able to eliminate any faults in a timely manner.
Concept
Operating principle of the injector
The word injector comes from Lat. injicio, which means to throw away. In practice, an injector is a pump that releases liquid or gas under pressure.
The VAZ injector is an injector controlled by an electronic unit (ECU).
In order to supply the required amount of fuel assembly to the combustion chamber of each cylinder, it is necessary to know the mass of air and fuel. For this purpose, appropriate sensors are installed on the car, the signal from which comes to the ECU.
Features of the updated model
The car is equipped with a 1.6-liter engine, with a fuel injection complex and a catalytic-type converter installed in the exhaust gas system. It meets the requirements for toxicity standards that meet the parameters of the Euro 2 standard.
To determine from what year the VAZ 2106 injector was produced, you need to know that the production of such cars was established at the Izhevsk Automobile Plant in the period from 2002 to 2006, when it became economically unprofitable for VAZ to use the production line for the production of cars, the demand for which had become significantly less. As an innovation, the installation of an injector significantly improved the dynamic characteristics of the car, and the number of failures and defects associated with the operation of the power plant significantly decreased.
If we talk about the configuration, it must be stated that in the latest carburetor generation of the “six”, in connection with the replacement of the engine, certain changes have occurred in the configuration of the remaining vehicle control systems.
The Izhevsk-made VAZ 21067 lacks a distributor-distributor, a mechanical fuel pump with a pumping lever and a carburetor device. The elements of the fuel system for the injector are similar to the components of the fuel supply system of VAZ models produced with front-wheel drive. The on-board control system has the “January 5.1” codification, calibrated for a given model.
Designers and engineers of the AvtoVAZ enterprise carried out the unification of filters for purifying air masses and fuel, as well as the electronic module of the vehicle ignition system. The receiver for this model is used from a VAZ 21214 Niva car with an injection power plant.
The speed sensor is positioned on a manual transmission in the cable connection socket for the speed measuring device, and the speedometer is directly integrated into the system through an adapter device, similar to the placement in the Nivov model. The exhaust system of exhaust gases in this modification has also undergone some changes, but the catalytic converter and absorber comply with Level II European standards, both in terms of the degree of CO content in the exhaust gases and in terms of the fuel volatility coefficient. The compression ratio of the engine has not changed, which means that the fuel used has not either.
The device of a simple injector
The simplest car injector includes:
- Sensors;
- Electric fuel pump;
- Controller (ECU);
- Pressure regulator;
- The actual injector (nozzle).
Sensors are needed to measure parameters such as:
- Air mass;
- Throttle position;
- Air temperature;
- Fuel consumption;
- Crankshaft position.
The ECU is the brain of the fuel injection system. It controls the injectors according to a certain algorithm, processes signals from sensors, and makes the necessary calculations.
The electric fuel pump forces gasoline to the pressure regulator, which maintains constant pressure in the system.
The injector is a solenoid valve that is activated when control voltage is supplied from the ECU. The opening moment of the injector determines the amount of fuel and air supplied to the combustion chamber. The fuel assembly supply channel of the injector is designed in such a way as to ensure effective atomization and distribution of the mixture in the cylinder.
Conclusion
No matter how much debate there is about the “good old” reliability of the carburetor or the progressiveness and efficiency of the injector, in any case, of course, the choice is yours. In order to properly re-equip your machine, at all stages, follow the operating instructions and technical data sheet for each component and unit. Remember that a car is an object of increased danger and thoroughly check every action you take.
Perhaps you have experience converting a VAZ-2109 from a carburetor to an injector? Share your experience with our readers in the comments. Any information and, of course, your personal opinion will be very useful.
Carburetor engines have been obsolete for quite some time. But today on our roads it is not difficult to find cars equipped with this type of engine. The VAZ 2109 model is no exception.
Nine engine
Having a nine carburetor at your disposal, you can even convert it into an injection car on your own.
Before you decide to take such a step, be sure to study the strengths and weaknesses of each engine type, and also determine in which mode you use your car most actively. Your final decision largely depends on this.
How to install an injector on a VAZ 2106
Installing an injector on a VAZ is accompanied, first of all, by purchasing the necessary parts. There are special kits for sale for the VAZ 2106. You just buy and install. A description of the installation process is usually included in the kit. This installation is the simplest option for the VAZ 2106. However, buying the entire kit will be quite expensive. In this case, of course, you won’t have to rack your brains over what, how and where to put it.
Another option is to purchase all the parts separately.
Preparation
Installation of the injector is carried out after preparing the VAZ 2106:
- Removing the carburetor;
- Remove the carburetor wires;
- Ignition coil;
- Switch (if any);
- Drain the coolant;
- Disconnect the intake and exhaust manifold;
- We change the forced cooling of the radiator to electric;
- We change the gas tank to another with an electric fuel pump;
- Remove the distributor and fuel pump;
- We install the plugs in their place.
Before you buy all the equipment, you need to decide which controller will be installed on the car. Depending on this, we purchase everything else.
Equipment installation
Installing a crankshaft position sensor (CPS) requires replacing the VAZ 2106 engine cover with a new one with a shimmer. To do this, you will first need to remove the crankshaft pulley. When a new cover is installed, all the sealing parts are changed. The engine head will need to be bored out or replaced with a new one from the injection Niva, since the carburetor has smaller inlet ports than the injection one. In addition, it will be necessary to provide for mounting the receiver.
Next, we fix the receiver, the ramp with injectors, and the exhaust manifold. Don't forget about gaskets between connections. We screw the throttle assembly to the receiver. You also need to install an ignition module and a knock sensor (DS). On some engine models, installing the latter can be difficult because it needs to be positioned as close to the cylinders as possible.
A fuel filter must be inserted into the rupture of the supply tube. We select it from those available for sale. It all depends on your preference.
The speed sensor is located between the gearbox and the speedometer cable input. It will be most convenient to extend the pipe for reverse drainage of fuel along the bottom of the VAZ 2106 car.
Difficulties in reworking
Since the work is quite labor-intensive and takes a lot of time, we recommend performing the steps in stages. The quality of components and their assembly play an important role during work. Beginners may have difficulty securing some elements, so it is better to call for help from a familiar car service specialist or a person who has replaced a carburetor with an injector before.
Replacing a carburetor with an injector will require you to be careful and careful. You will need to replace a lot of parts, and this is quite difficult for a beginner to do. But if you wish and strictly follow the instructions, you can perform a really serious modernization of your car and save a lot on car service costs.
Sources
- https://auto-gl.ru/peredelka-karbyuratora-na-inzhektor-na-vaz-2109/
- https://autodont.ru/dvigatel/injector/ustanovka-2
- https://expertVAZ.ru/2106/inzhektor-ustanovka.html
- https://vsepoedem.com/story/zamena-karbyuratora-na-inzhektor-i-naoborot
- https://KrutiMotor.ru/kak-peredelat-inzhektornyj-dvigatel-v-karbyuratornyj-i-naoborot/
- https://scart-avto.ru/remont/kak-peredelat-karbyurator-na-inzhektor-plyusy-i-minusy-vse/
- https://auto-garazh.mirtesen.ru/blog/43854473792/Zamena-karbyuratora-na-inzhektor-na-avtomobilnom-motore.-Stoit-l
Carburetor vs injector
An injector malfunction is much more difficult to resolve than a carburetor malfunction. You need to connect to the controller, and for this you have a special program. Otherwise, you will have to contact a car service, and you have to pay for it. The injector has more parts distributed under the hood. Moreover, the quality of the fuel also plays a big role. A large number of sensors requires a lot of wiring. The injectors sometimes become clogged, or the electromagnet winding burns out. Interference and interference affecting the wiring distorts the signals, so the location of its installation plays an important role.
Undoubtedly, the injector accurately doses the mixture into the combustion chambers and prepares it with the required composition. Fuel economy in this case is natural. In addition, in winter the car starts better; idle speed does not need to be adjusted frequently. The car becomes more responsive and powerful.
The carburetor can be repaired almost on the knee. It is easy to remove, disassemble and assemble. If there is no source of compressed air nearby, you can blow it out with your mouth using a tube. Adjusting it will not be difficult if you have the appropriate knowledge.
It's up to you to install an injector or leave a carburetor!
Carburetor. Advantages and disadvantages
Let's start with the negative points. These include:
- Such engines have not been installed on production cars for a long time. In Europe, due to environmental requirements, carburetors are blacklisted. That is, they are prohibited because they heavily pollute the atmosphere;
- At high speeds, the engine's capabilities drop significantly. Torque does not reach the desired levels. But at low speeds it is effective and allows you to accelerate well from zero to hundreds;
- When overtaking, the carburetor is a pain. It is problematic to overtake cars normally and confidently. Especially considering the power of the carburetor nines;
- High fuel consumption when compared with injection engines. On average, a nine with a carburetor in normal mode consumes about 8.5-9 liters of fuel per 100 kilometers;
- The air damper is controlled manually. The exception is some versions of the latest samples, where automatic devices have been installed. Some motorists claim that manually controlling the throttle in winter has its advantages, as it allows you to feel the engine. But only experienced drivers can understand this.
Nine carburetor
But let's not just talk about the bad. The VAZ 2109 with a carburetor also has positive qualities:
- The cost of a carburetor is much cheaper than an injection engine;
- Engine maintenance costs less, and the work itself is easier to perform if you repair it yourself;
- Fans of carburetors claim that the absence of control units and microcontrollers is an undeniable advantage. Although one can argue with him;
- If the engine fails even 100 kilometers from the nearest settlement or service station, it is not a problem for experienced drivers, since repairs can be carried out even in the field. But this will require the availability of appropriate tools and passenger assistance.
Swapping a couple of armored pipes and doing a purge is a simple option for quickly repairing a carburetor yourself. The injection engine does not understand such tricks.
Injector. Advantages and disadvantages
In short, all the advantages of the injector are the disadvantages of the carburetor, and all the disadvantages are the advantages of the carburetor.
Injection nine
The key features of injection engines include:
- Injectors are more environmentally friendly and meet the requirements for emissions of harmful substances;
- Although the torque is insufficient at low speeds, it makes overtaking easier at high speeds. The engine seems to get a second wind;
- Injector maintenance costs are higher;
- For normal operation of such an engine, clean fuel is needed. The carburetor “feeds” on everything;
- To check faults, it is necessary to perform diagnostics, which is time-consuming and expensive;
- The injector consumes less fuel. The average is 6-7 liters per 100 kilometers;
- Almost all systems function through computer control, therefore, when working correctly, the engine operates as efficiently and economically as possible;
- It is possible to install HBO on the injector. But with a carburetor, such a step is fraught with a number of difficulties.
How to install an updated system
To install the plug to the block system head, based on the injection mechanism, install the positive wire. Install the manifold and injectors located on the in-line rack, the receiver and the throttle component. The throttle cable is taken as an elongated sample.
The fuel structure in the new model is placed at the bottom of the body, after which pipes and purifiers are installed. Next, install a new tank and connect the product to the system. To check the operation of the nozzles and their condition in relation to leakage and damage to the integrity of the material, blow out the internal plane with a pump. Then install the ramp, sensors and all the equipment based on electrical and high-voltage activity, the starting module, to the collector.
When the installation of the air filter is completed and all operations go perfectly, the car is started. The modernization can be considered successful if the VAZ-2109 starts immediately, on the first try.
Perhaps you shouldn’t install a carburetor on a fuel-injected car
If your car has a fuel injection system, then you own a more modern vehicle, and installing a carburetor will take you one step back in the evolution of cars. Of course, the carburetor system also has its advantages, but they are rather fragile. Moreover, the quality of current gasoline is designed specifically for fuel injection. Let's look at certain disadvantages of replacing an injector with a carburetor:
- if you decide to carry out such a process, your car may begin to consume more gasoline;
- the carburetor risks reducing the car’s power by 5-7 percent of its original potential;
- the unit can be configured exclusively for direct injection, some of the fuel can fly out into the pipe;
- you will have to abandon the use of normal fuel filters, placing cheap barrels under the hood;
- You will also have to spend a lot - buying a carburetor, as well as other spare parts for the implementation of the process, will cost a lot of money.
In terms of maintenance, carburetors are no cheaper or easier than injectors. Today, cleaning the injector system nozzles is inexpensive, since every service station has special equipment to perform these tasks. You may think of an injector as an inefficient, delicate, and over-designed component in your car, but the global auto industry doesn't think so. This unit saves fuel and allows you to slightly increase the engine potential
Information is out of date. Archive.
©Mishka_GTI (aka Mikhail_Novoshakhtinsk, aka Marc, aka Bomj)
If you are the owner of a carburetor car.....and dream of an injector... This is real. Here we describe the modification of the power system yourself and provide approximate prices for components.
Many car owners are interested in the issue of reworking the power system of their favorite car. Someone, having suffered with an injector, dreams of a carburetor. And someone, tired of cleaning the carburetor and selecting jets, sees in a dream an almost trouble-free injector. Having set out to remake the car, and having achieved certain results, I hasten to share my experience in this matter. The reverse conversion is much easier.....
So, the source material for the work is an ordinary VAZ 21083, date of birth - December 1999. Let's start with choosing an injection system and selecting the necessary spare parts. I’ll estimate their approximate cost (the most painful question!), I decided to settle on an injection system based on the “Bosch” M 1.5.4 controller without an oxygen sensor and neutralizer, which meets Russian requirements for toxicity standards R‑83. Moreover, there are many versions of the “Sport” PROM for this controller floating around Russia, there will be room for experimentation.
I will say right away that the power system was assembled from factory spare parts, without making changes to the design provided by the manufacturer (for example, it was possible not to change the gas tank and fuel line, but to install an external electric fuel pump, for example from Volga, and all fuel connections were made on clamps, as on most foreign cars. Accordingly, the funds were spent to the maximum. Although, on the other hand, spare parts from General Motors (GM), famous not only for their reliability, but also for their price, were not used.
First of all, we purchase spare parts that practically do not fail on production cars, that is: receiver, intake manifold, fuel line, gas tank, air filter housing, etc. (an accident doesn’t count!) The rest of the little things are “consumables”; stores and markets are filled with them.
Successful, in my opinion, was the purchase in Togliatti of a kit consisting of mounted cylinder head units (receiver, manifold, throttle pipe, fuel rail with injectors, gaskets, fasteners, etc.), especially at a very low cost. A full report on the cost of spare parts is given at the end of the article.
Before starting work, I offer my favorite little car... Cleaning both the outside and the engine compartment makes working much more pleasant. Next, you can perform some work before disassembling the old system. For example, rinse a new gas tank, dry it and install an electric fuel pump in it. Don’t forget to align the arrows on the tank and the fuel pump body, and also check that the fuel level sensor float moves easily. In addition, I recommend covering the gas tank with anti-corrosion mastic such as “Cordon”.
We begin the work by drilling two holes in the cylinder block: the first for the knock sensor, the second for mounting the ignition module bracket, and cutting the internal thread. Carefully inspect the cylinder block; these holes may have already been drilled at the factory; otherwise, special castings have been made for them. Drill carefully, otherwise you will sew through the block. The depth of the hole for the knock sensor is 16 mm, for the bolt securing the upper point of the ignition module bracket - 20 mm. Naturally, for this operation you need to drain the antifreeze and remove the radiator, as well as the bumper and the queen. I didn’t dare drill holes myself; I entrusted this operation to a master from a body shop. The knock sensor has a tapered thread, so we tighten it until it stops...
In the meantime, we change the coolant outlet pipe (the temperature sensor is screwed into it). You can also replace the temperature sensor in the radiator with a plug, or you can leave it (just in case). It’s even better to replace the original thermostat with a 21082 thermostat... more reliable, especially since it combines both a pipe and a thermostat. I chose the second option... but in addition to the 21082 thermostat, I needed a tee from the VAZ 2110 cooling system... usually it is sold with two hoses pressed onto it. We cut off one hose and clean the outlet of the tee; in addition, we shorten the stove hose. A tee is required to connect the expansion tank. In addition, a gasket will be required (the old one becomes unusable when the outlet pipe is dismantled.
The next stage is to drain the oil, remove the pan, timing belt, toothed pulley and change the oil pump (it differs from the usual one in the casting for attaching the HF position sensor) and immediately change the regular generator pulley to a damping one with a ring gear. This replacement requires switching to a V-belt and replacing the generator, especially since the injection electronics consume more energy than a conventional ignition system. A new generator requires new fasteners, but nothing else needs to be drilled.
By the way, I don’t recommend saving on the generator; simply replacing the pulley on the generator will not solve the problem, it will only ruin the generator (believe me from my bitter experience).
If the car is new, then it is better to leave the original gaskets for the oil pump and pan; it is difficult to purchase new ones and, most importantly, high-quality ones.
These operations did not take much time, so I performed them in the evenings and rode during the day as if nothing had happened.
Now we roll out the gasoline (to make the tank lighter...) and disassemble the original power supply and ignition system.
We remove the battery (first of all!), distributor, fuel pump with housing of auxiliary units, air filter with housing, carburetor with manifold, throttle cable (longer on the injection version!), choke control cable, underhood wiring of the ignition system, coil, switch , EPHH control unit, fuel pipes, gas tank, vacuum booster hose (replaced with a longer one from classic VAZ models). In addition, we disassemble the dashboard. It is necessary to make a harness consisting of two wires: +12V (switchable) from terminal 15 of the ignition switch, tachometer input. We draw a separate wire for the “CHECK ENGINE” lamp. If you plan to install a trip computer, add two more: a fuel consumption signal and a speedometer signal.
We use an eight-pin “MALE” connector on one side and a four-pin “MALE” connector on the other. We push the ignition harness from the engine compartment into the passenger compartment, secure it with standard fasteners, and connect it to the manufactured harness. We connect two separate wires of the injection harness (blue and blue with a black stripe) to the mounting block. In place of the fan relay, we place a jumper or connect the wires that go to the fan switch sensor in the carburetor version. We attach the controller, relays and fuses in the designated places. If desired, we install the immobilizer block and connect it to the harness, placing the peephole on the front side of the panel. Oh, I almost forgot, you still need to add a couple of wires connecting the instrument panel (fuel gauge) to the fuel pump harness.
We remove the original harness going to the fuel level sensor and lay a new one with a connector for the fuel pump (located on the floor of the body under the sound insulation.
A plug is installed on the right side of the block head, and the ground wires of the injection harness are attached to it. Installs the manifold, fuel rail with injectors, receiver, throttle pipe. We change the throttle cable.
The most labor-intensive operation (in my opinion) was laying the fuel line along the bottom of the body. The difficulty was in pushing the return line under the steering mechanism. I did this: I took a pry bar and asked my neighbor to press the steering rack away from the body, having first unscrewed the mechanism fastening on one side. We lay a fuel line along the bottom of the body and secure it with clamps. We screw on the fuel hoses and attach the fuel filter. The latter is mounted on a bracket to the bottom of the body (welded bolts are provided).
We install a new gas tank, secure it with clamps and connect the fuel line. Before lowering the injectors into the sockets, I advise you to create pressure in the system and check the injectors for leaks. If everything is normal, we attach the ramp to the manifold, install the remaining sensors, the ignition module, and high-voltage wires. Check the reliability of fastening of the “GROUND” points, using clamps, secure the wiring and hoses. This will save you a lot of money in the future. We install the air filter, pipe hose, connect the crankcase ventilation and throttle pipe heating hoses. Well, to great joy, almost everything.
The car, with an injector assembled from serviceable spare parts, starts immediately. We connect the DST-2 and the gas analyzer (if there is one, of course), reset the errors, and adjust the composition of the mixture at idle.
And now subjective impressions……. The car has become completely different, more torquey, faster, it seemed to me, it accelerates to 100 km/h faster. Now you can start designing the back door... I mean add the letter “i”.....
The work used books on servicing VAZ cars and a spare parts catalog from the publishing houses “Third Rome” and “Livre”.
Special thanks to the masters from the body shop Vaska and Uncle Pasha, I also thank private entrepreneurs: Victor (pavilion No. 20) and V.B. Vasilevsky. (wholesale distributor), working at the Fortuna car market, Rostov-on-Don for the delivery of components from Togliatti.
By the way, time passed, and I had to do the reverse modification, only on the client’s machine. Therefore, the spare parts removed from my car (carburetor, distributor, etc.) came at the right time and there is now another set of injectors in stock.
Thank you for attention.
Send questions and comments to the author…… In the future, the conversion of the 2111 engine (injector, 8 valves) into the 2112 engine (injector, 16 valves)….. accordingly, it is planned to describe all this right there……..
Now how much does all this cost…..just don’t faint……
| the name of detail | Catalog number | Price | |
| 1 | Oil pump (with DPKV mount) | 2112 – 1011052(01) | 420 |
| 2 | Ignition module bracket | 2111 – 3705410 | 100 |
| 3 | Plug with gasket (installed in place of the distributor) | 2111 – 1003288 | 150 |
| 4 | Crankshaft pulley damping | 2110 – 1005058 | 160 |
| 5 | Thermostat + tee | 21082 | 280 |
| 6 | Upper generator mount | 21082 – 3701635 | 230 |
| 7 | Bottom generator mount | 21082 – 3701720 | 300 |
| 8 | Generator | 2112 – 3701010 | 850 |
| 9 | Alternator belt (V-belt) | 21082 – 3701720 | 70 |
| 10 | Air semi-hull upper filter "Bosch" | 2112 – 1109016 | 75 |
| 11 | Air semi-hull bottom filter "Bosch" | 21082 – 1109013 | 75 |
| 12 | Air filter element | 2112 – 1109080 | 75 |
| 13 | Fuel filter element | 2112 – 1117010 | 75 |
| 14 | Throttle pipe gasket | 21082 – 1148015 | 30 |
| 15 | Air filter support (2 pieces) | 2112 – 1109249 | 20 |
| 16 | Throttle pipe assembly | 2112 – 1148010-31 | |
| 17 | Receiver "Bosch" | 2111 – 1008027-10 | |
| 18 | Intake manifold | 2111 – 1008081 | |
| 19 | Fuel pressure control | 2112 – 1160010 | |
| 20 | Bosch injector (4 pcs) | 2111 – 1132010 | |
| 21 | Intake manifold gasket | 2110 – 1008055 | |
| 22 | Injector ramp | 2111 – 1144020 | |
| 23 | Receiver and air filter mounting kit | 2500 | |
| 24 | Supply hose | 2112 – 1104218 | |
| 25 | Drain hose | 2112 – 1104218 | |
| 26 | Gas tank fuel supply hose | 21082 – 1104226 | |
| 27 | Rear drain hose | 2112 – 1104208 | |
| 28 | Fuel filter hose | 2112 – 1104222 | |
| 29 | Drain tube | 21082 – 1104054 | |
| 30 | Ram feed tube | 21082 – 1104013 | 180 |
| 31 | Feed tube | 21082 – 1104054 | |
| 32 | Drain tube | 21082 – 1104013 | 350 |
| 33 | Throttle cable | 21082 – 1108054 | 150 |
| 34 | Fuel filter mount | 21082 – 1117020 | 15 |
| 35 | Hose | 2111 – 1148035-10 | |
| 36 | Gas tank | 21082 – 1101007-10 | 800 |
| 37 | Pressure ring | 21082 – 1101178 | 50 |
| 38 | Electric fuel pump assembly “Bosch” | 21082 – 1139009 | 2200 |
| 39 | Controller "Bosch" M 1.5.4 | 2111 – 1411020 | 500 |
| 40 | High voltage harness | 2111 – 3707080-01 | 170 |
| 41 | Fuel pump wiring harness | 21082 – 3724037 | 95 |
| 42 | Ignition system wiring harness | 2112 – 3724026-50 | 800 |
| 43 | Injector wiring harness | 2111 – 3724036 | |
| 44 | Knock sensor | 2112 – 3855010 | 120 |
| 45 | HF position sensor | 2112 – 3847010 | 80 |
| 46 | Air flow sensor "Bosch" | 21083 – 1130010-01 | 200 |
| 47 | Ignition module | 2112 – 3705010 | 1000 |
| 48 | CO potentiometer | 2112 – 1431120 | 60 |
| 48 | Speed sensor | 2110 – 3843010 | 50 |
| 50 | temperature sensor | 2112 – 3851010 | 40 |
| TOTAL | 12500 | ||
That's it...
PS Material from 2000. All prices are based on this date.
The original of this article was located here https://novshah.donpac.ru/~lio/peredelka.htm and was reprinted countless times on the Internet. This text is reproduced here with the consent and approval of the author.
VAZ 2109-injection engine: rework
VAZ 2109 injection engine
The VAZ 2109 injection engine is not new. Since 1994, such units have been installed on cars of the Lada family. As you know, there have always been supporters and opponents of both carburetor and injection options. On the VAZ 2109, injection engine starting means less harmful emissions into the environment, better dynamics at high speeds and much more. From this publication you will learn not only the difference between both types of engine, but also receive valuable tips on how to change a carburetor unit to an injection unit with your own hands. So, both units have more than enough advantages. Before choosing which engine to choose for your “nine”, it is recommended to decide in what mode the car is operated most of the time. All this is of considerable importance.