Installing a Europanel on a VAZ 2109 injector wiring
- Registration
- Entrance
- To the beginning of the forum
- Forum Rules
- Old design
- FAQ
- Search
- Users
- List of forums AUTOLADA.RU
- Family "Samara"
- 1
- 2
- 3
- 31
- 32
- 33
- >
The idea to install a Europanel arose during a conversation on the AUTOLADA.RU forum.
What happened: a VP whose left mount to the body was broken, the visor mounts for the tidy were also broken, the right beard mount was broken, the glove compartment lid was broken (the left hinge and the lid itself were cracked) . All this created an awesome noise when moving. In addition, it was not possible to regulate the air flow of the stove. The nozzle valves and levers that allow the flow to be regulated were also broken. The windshield and side windows fogged up all the time in wet or cold weather. The stove had to be turned on at MAX to prevent the glass from fogging up. Due to the fact that the left fastening was missing, the panel kept falling forward, pulling the windshield seal, which led to water leaking from the interior. Yes and more. I bought the Comfort X15 MK, but I can’t see the top line, and I have to bend down to look at the bottom line. It was also annoying that the engine temperature gauge always showed 120, although according to the computer it was 90.
In short, I decided to install a Europanel. Wandering around the car market, I accidentally came across a very good seller. He promised to bring me a COMPLETE panel from Togliatti. He said that 5% of the cost of the panel was his and that before buying the panel he would call me and tell me the price. That's what they decided on. On Saturday I made an advance payment of 4000 rubles, and on Wednesday the panel was in front of me. Everything cost me 9000 rubles. (also on the market, but there is not a complete set there). The kit included: 1. the panel itself, VDO tidy, two windows. 2. wiring harness. 3. steering column casing. 4. overlay for the floor tunnel, ashtray for it. 5.two plastic covers (on the sides of the stove). 6.decorative stuff for the gearshift lever. This is the type of skin. I don't know what it's called. 7.hazard warning button.
What I immediately liked: 1. the metal base of the panel and attachment to the body.
Happy, I put the panel on the back seat, a bag with spare parts. parts into the trunk and went after the girl (so as not to be distracted from the installation process and not go to the city) and we went with her to the dacha.
By the way, I almost forgot. I removed the windshield and put it on sealant.
Along the way, in the evenings there was a process of comparing wiring, circuits, experiments with a tester, etc. It turned out that the ignition switch does not fit, but the other connectors match. I went to the car market and bought a new lock 2109. I arrived and checked it with a tester. Fuck you. I went to the car market and bought a lock 2110. It fit perfectly. I removed the old lock and installed a new one. I had to suffer because the heads of the bolts were cut off. I unscrewed it with a chisel and hammer.
INSTALLATION OF EUROPANELS. 1. I laid out the wiring harness, having previously allocated which pads went where. 2. I removed the trim (which contains the BSK, buttons, ashtray, etc.) 3. I brought the panel into the car through the right front door 4. I sat in the back seat and admired it
In the area of the steering column on the panel there are fastenings to it, so the question arose: should they be under the steering column or above the steering column? At first I did it above the steering column, then I realized that it was wrong and I had to pull out the panel again and install it so that these pieces of iron were under the steering column. https://photofile.ru/photo/serg22/618361/large/12907279.jpg
5.Tightened two screws on the right and two on the left. 6.Proceeded to connecting the wires. There were some problems here: some wires did not reach and had to be extended (the wire to the backlight bulb for the heater levers and to the backlight bulb for the headlight hydrocorrector). Everything else connected fine. 7. I checked all sorts of turn signals, headlights, dimensions, etc. Everything works correctly. Only the heater and the cigarette lighter and heated rear window do not work. I'm in the scheme. I found out from the diagram that an ignition system relay is needed. And I thought, why do I need this relay? I don’t have a carb and I don’t have an ignition system. I stuck the connector somewhere behind the panel and that’s it. I had to pull out this connector and install a relay. Everything worked. 8.I decided to try to start the engine. I inserted the key into the lock, turned it: the BSK and fuel pump turned on. The sound of a running fuel pump just makes your soul feel good. I'm waiting for it to work. Key to start and silence. Once again and again silence. What the hell. The thought comes about the alarm. I inspect the wires coming from the signaling unit and find that several wires go into the engine compartment. I thought it was a siren, but I checked and it turned out that one wire goes to the starter relay. I pulled it out of the relay block and inserted the standard wire hanging nearby. (the installers are freaks, no secrecy, everything is in plain sight). Key to start? HURRAY started up. I just noticed new problems 1. The CE lamp does not light up when turned on. The ignition is on, but the engine is not started. 2. The fuel gauge does not work 3. The door open sensor signals that the doors are open when the doors are closed (does not respond to doors)
At some point, I installed the front seats, which I later regretted for a long time, and cursed.
A detailed study of the diagram revealed: 1.V 2114 FLS is connected to the panel directly, bypassing the CN (CHYa - black box, mounting block) 2.V 2109 FLS is connected to the panel through the CN block: X9 contacts 5,6 then go into the block X2 contacts 11,12. The pink wire is the FLS itself, and the blue-red one is used to turn on the fuel reserve light (not used in the Europanel) 3.B 2114 through contacts 5,6 of block X9 and, accordingly, 11,12 on X2, the door limit switches with BSK are connected. Those. It turns out that my FLS is connected to the BSK, that’s why it beeps that the doors are open. :beer And the fuel gauge is not connected to anything at all. That's why it doesn't work. And I was still wondering why one block with a pink wire in the harness was left unconnected. This is just the fuel gauge. I connected it directly to the pink wire coming from the FLS. https://photofile.ru/photo/serg22/618361/large/12907278.jpg (The green wire goes to the MK) The blue-red wire was cut off. The fuel gauge is all working. I read that there may be problems with the correctness of the readings, but so far everything is showing correctly. So I can’t say anything about this.
I proceeded with the limit switches and BSK as follows: To the cut off blue-red wire on block X9, contact 5, I placed a jumper on the wire coming from the limit switches. https://photofile.ru/photo/serg22/618361/large/12907276.jpg Is everything correct next? the signal just arrives at the BSK. I opened the door, the BSK beeps and the light comes on. I also want to connect the trunk here.
With CE light: It is necessary to install a jumper in the connection block to the injection system harness. https://photofile.ru/photo/serg22/618361/large/12907275.jpg
Electrical diagrams: https://photofile.ru/photo/serg22/618361/large/12907947.jpg -VP diagram https://photofile.ru/photo/serg22/618361/large/12907948.jpg -continued https:// photofile.ru/photo/serg22/618361/large/12907949.jpg -European panel diagram https://photofile.ru/photo/serg22/618361/large/12907952.jpg -continued https://photofile.ru/photo/serg22 /618361/large/12907954.jpg -ECD diagram January 5.1 Electrical everything seems to be fine. All that remains is to connect the alarm and radio. I will install the signaling according to my own scheme + some other jokes. Fuck then you’ll just start it.
I also had to tinker with the heater cables. Some are a little short and don't reach the levers. As a result, I installed all the cables except the cable on the stove tap. I decided that if necessary, I would open it myself. Moreover, as I understand, many do not close it at all.
Then I installed all sorts of overlays, cladding, etc. I hid the controller here: https://photofile.ru/photo/serg22/618361/large/12907281.jpg I had to go to the city. Got it started and warmed it up a little. While I was driving through the garden and forest in 1st gear, it was beautiful, quiet, nothing rattled. As soon as you got on the road and put it in second gear? jamb. The floor tunnel pad pushes out second and naturally fourth gears. So I drove holding it. When I returned to the dacha, I took everything apart and discovered that there was some kind of rubber garbage on the gearshift lever, which just touched the lining. Did you throw it away, reassemble it, check it? doesn't affect anything.
PROS: 1. Appearance 2. Does not rattle, does not fall off, does not fall apart, etc. 3. I really liked the air ducts. If you block all the nozzles, then it blows very strongly on the windshield and side windows even at the first speed of the fan. It got hot, I opened the nozzle and pointed it at my face. I got tired of it, closed it and that’s it, it doesn’t blow. Beauty. 4. I get behind the wheel and it’s like I’m in a new car. 5. You can see all the instruments, they are accurate, you can also see the computer and you don’t have to bend over, you just need to shift your gaze. 6. It’s probably more convenient to control the radio (I can’t say yet) 7. There is a reason to install speakers in the doors (there are no regular places for installing speakers in the Europanel)
MINUSES: 1. Price 2. I had to tinker, but in principle, if you don’t do anticorrosion and noise protection, and don’t disassemble the interior, you can get it done in a day or two without any problems.
COSTS: 1. Europanel ? 9000r 2. Ignition switch 2110? 320r
Car on-board computer BK-16
PURPOSE
The device can also be connected to cars equipped with an injection engine with an electronic control unit, without installation in a standard location:
- VAZ families: Classic, Niva, 2110-2112;
- Chevrolet Niva, Kalina, Priora;
- GAS: Gazelle, Barguzin, Sobol;
- UAZ: classic, Hunter, Patriot;
- IZH (ODA); ZAZ (Slavuta); DAEWOO (Sens);
- DAEWWO Lanos, Nexia, CHEVROLET Lanos until 2008.
BK-16 is installed on domestic and foreign cars equipped with a carburetor, injection or diesel engine (without error codes), the device is connected to the car's sensors.
Installation and connection
- Installed in a regular place
- Remote temperature sensor
- Non-volatile memory
Information display
- Liquid crystal matrix display
- Status bar at the top of the display
- Display up to 4 parameters simultaneously
- Pointer clock, pointer speedometer
- Russian-language interface and convenient navigation system
- Bright multi-color backlight with several levels of brightness adjustment
- Normal or inverse display
Control:
- Quickly call your favorite function with a “Hot button”
- Indication of parameters out of range
- Possibility of adjusting measured values
- Configuring alerts (as desired by the user)
- “Fine” personal tuning of any parameters
Basic modes
* Availability of the mode depends on the type of vehicle ECU
Technical characteristics of BC - 10
- Supply voltage: 7.5 -18 V
- Current consumption: In operating mode, no more than 0.2A
- In standby mode, no more than 0.02A
Discreteness of information presentation
- Fuel consumption: 0.1 l
- Travel speed: 1 km/h
- Temperature: 1°C
- On-board voltage: 0.1V
- Speed indication: 1 rpm.
- Mileage: up to 100 km: 0.1 km
- over 100 km: 1 km
Table of supported ECUs
Equipment
- Packing box: 1 pc.
- Instruction manual: 1 pc.
- Fault code table: 1 pc.
- On-board computer: 1 pc.
- Flex cable with connectors and temperature sensor: 1 pc.
Software. Current versions
Characteristics
| Barcode: | 4607154780244 |
| Vendor code: | 3024 |
| Model: | BK-16 |
| Manufacturer: | LLC "NPP "ORION SPB" |
| Display type: | matrix |
| Backlight: | RGB |
| On-board voltage: | 12 V |
| Diagnostic protocols: | Bosch 1.5.4, Bosch M(E) 17.9.7 doors ZMZ-409, Bosch M7.9.7, Bosch ME 17.9.7 VAZ, Bosch MP7.0 HFM, Daewoo ALDL 1, Daewoo ALDL 2, Daewoo ALDL 3, ISO 14230, ISO 9141, Mikas 11 (GAZ), Renault Logan, VS8 ITELMA, VAZ (protocol group), Mikaz 10.3, door. UMZ-4216, Mikas 12 (GAZ), ZMZ-405, Mikas 12 (UAZ), ZMZ-409, Mikas 12.3, Mikas 5.4, 7.1, 7.2, Mikas 7.6, January 5.1.1, ISO 9141 / ISO 14230 |
| Engine's type: | injection, carburetor |
| Compatibility: | VAZ 2108, VAZ 2109, VAZ 21099, VAZ 2115, VAZ 2120 |
| Installation location: | VAZ 2115 (standard) |
| Gross weight: | 390 gr. |
| Dimensions: | 250x80x60 mm |
| Guarantee: | 12 months |
Advantages: the most widespread network in Russia, delivers to any corner of the country, including remote ones. Flaws:
- high cost of delivery of heavy or large parcels, as well as the weight of one parcel should not exceed 20 kg;
- long delivery times and queues in large cities for receipt.
To send your order by Russian Post:
- Place an order in our online store by phone or on the website (registration is not necessary);
- After we receive it, our manager will contact you by phone to clarify the cost, delivery time and your wishes. Next, we will pack your order carefully and then send it to you;
- You will receive the tracking number of the shipment via SMS from us and from the Russian Post; the message will indicate the full cost of the purchase, including delivery to your locality (that is, the cost of your order plus the cost of delivery by cash on delivery). You can control the status of the order coming to you using our tracking service, as well as independently, on the Russian Post website using the track number;
- To the Post Office, you will only have to pay the cost, including delivery.
Delivery time may vary depending on how far your locality is from Togliatti and usually ranges from 5 to 14 days.
The cost of delivery is calculated based on the volume, weight of the selected product and the distance to the recipient's settlement.
Required for sending:
- indicate full name recipient;
- Your mailing address;
- Your phone number (contact);
- Post office code.
Russian Post commission for cash on delivery service:
- purchase price up to 1,000 rubles. – 70 rubles + 5% of the amount;
- purchase price from 1,000 to 5,000 rubles. – 80 rubles + 4% of the amount;
- purchase price from 5,000 to 20,000 rubles. – 180 rubles + 2% of the amount;
- purchase price from 20,000 to 500,000 rubles. – 280 rubles + 1.5% of the amount.
Installing a VAZ 2114 panel on a VAZ 2109
I was looking for this torpedo for a long time, because... Our city is small and it’s difficult to find. As a result, I bought it in Yaroslavl for 2000 rubles assembled
I brought it home and the next day the installation process began. First I brought the frame itself into the salon
and screwed it on, it is attached with 4 bolts, in my opinion (I liked the fact that the fastenings there are metal, unlike the VP)
I screwed it on and tried to “shake” it, it sat as if nailed down). The brain itself attached it like this
This is what it looked like installed =)
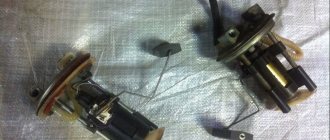
Then I started to figure out the wiring, I’ll say right away that I didn’t have much experience before this. First I stuck everything into the CY, everything fit there with no problems, then all sorts of buttons and all that. The process went on without stopping, I was already looking forward to starting it up))) I don’t remember exactly right away or not, I bought a new ignition switch from a VAZ 2110 (I couldn’t attach the old one)). I installed everything, turn the key in the lock... the fuel pump does not turn on, I understand that most likely I did not connect the wiring to the brain, I see that it is. I started looking in the wiring for the connector going to the controller, found something similar (from the diagrams I figured out where it should come from), but for some reason it didn’t fit mine, later it turned out that this is the torpedo wiring from a car with Bosch 7.9.7 (right now I definitely don’t remember). This was the connector from the old wiring
and this one from new
Ryskaya found a diagram on the internet on how to cross these 2 wires) Here is the actual diagram itself (added)
and here is the pinout diagram of my old block and the new one
I tried it and the fuel pump “buzzed”))) The key to start... the starter does not turn. I thought about it for a long time and didn’t understand why, so I gave up) Having arrived home, I started rummaging around on the Internet to solve this problem, as it later turned out there was some kind of problem with the relays, if you plug in the relay from the VAZ 2109, it doesn’t turn and I had to short-circuit the wires directly (right now That's how I go.) the stove connector also didn’t fit, but I easily redid it (I think no one would have any questions HOW when he saw the difference). Another problem was that the color of some wires in the diagram did not match reality (so it’s better to count all the wires, the numbers are the same for all). During the installation I learned to understand more or less electrical issues and use a tester)))
Experts' opinion
Alexander. It is recommended to abandon GPS navigators with external installation: there is no need to mount them on glass, as the view from the driver’s seat is significantly reduced. If the navigator is really needed, then you can create a special niche for it in the dashboard. The VAZ torpedo is quite simple and has a large amount of free space to accommodate various control units and multimedia systems.
Alexei. I installed a new torpedo from another car - a difficult job that required patience, precision and a lot of free time. I’ll say right away that you need to be well versed in the placement of important elements of your car: wiring, air ducts, and so on. Dismantling must be carried out carefully, since the original torpedo may still be needed.
Instrument panel from 2114 to 2109 carb
I present to you my version of fitting a European torpedo into a carburetor nine.
The entire process of installing a torpedo can be divided into two parts: 1. Mechanical - that is, everything that concerns gluing, assembly, fastening, etc. 2. Electrical - in other words, connecting all the electrical components of the panel.
So, we have a VAZ 21093 with a carburetor and a low panel. Based on an ad, I found a used panel 2114 almost complete. The kit included: 1. Torpedo (2 glove compartments)
;
2. Panel shield; 3. Panel shield plug; 4. Box for small items + ashtray; 5. Instrument panel (2 windows)
;
6. BSK (squeaker)
;
7. Console screens (left and right)
;
8. Mounting crossbars (4 pieces)
;
9. Floor tunnel cover; 10. Rear ashtray; 11. Air ducts (3 pieces in the panel + interior)
;
12. Small things (twists, buttons, light guides, screws, staples, etc.)
;
I paid 7 thousand rubles for such a set. Additionally I bought: 1. Steering column 2114 - 3 thousand rubles; 2. Steering column cover 2114 - 300 rubles; 3. Front seat belts 2114 - 500 rubles, used; 4. Torpedo wiring - 1 thousand rubles (for a carb tag)
;
5. Mounting block 2115 - 2.5 thousand rubles; 6. Ignition switch 2110 - 500 rubles; 7. Small things (relays, wires, terminals, contacts, etc.)
- about 200 rubles.
The total purchase estimate is 15 thousand rubles. If you take not a used one, but a new instrument panel 2114, then add about 5 thousand more rubles.
So, let's start the assembly from point 1. First, we thoroughly wash everything. We start by gluing the air ducts both inside the panel and in the cabin. After all, it’s no secret that they are joined and fastened in such a miraculous way that it blows and siphons where it is not needed at all. I used foam rubber and Moment adhesive tape. I glued the foam rubber with a slight tolerance over the edges of the parts for better compaction, and then rewound everything on top with tape in several layers.
To change the torpedo trim, it is not necessary to remove it completely!
So let's get started, let's look at the panel overlays, which are divided into:
Euro-1, another name is “Caprice” and has an index of 21104. The features of this lining are that it does not have a passenger shelf.
Euro-2, index 2110L, cover but already comes with a passenger shelf.
Euro-3, a cover without a shelf, but under the instrument panel of Kalina, Priora, and has a climate control module with 3 knobs and an emergency stop button.
There are also exclusive panel overlays that make the interior of the VAZ 2110 similar to the Nissan Primera, where the instrument panel is in the center.
In addition to these Euro-overlays, there are overlays that are installed on top of them. For example, the overlay of the Chestnut panel.
It is not difficult to install the Kashtan overlay on the dashboard, so we will not dwell on this, but changing the old panel overlay to the Euro one is already more difficult.
The euro overlay for the panel consists of:
- The pad itself
- Inserts for buttons (small insert 2110L-2120031, large 2110L-2120032)
- Air ducts (2114-81080623)
- Device panel trim (2110L-5325124)
- Double button for turning on the headlights and low beam
- Key for turning on the rear fog lights (with fixation)
- Rear window heating switch (latching)
- Key pads - 2 pcs.
- Plugs instead of keys - 6 pcs.
- Wiring harness for connecting the dual side position switch and low beam headlights
- Block
- Device panel fastenings
- It may be necessary to purchase separately different keys for the VAZ-2114 and pads for them.
The cover gives the impression of a high quality product. It is softer than the old pad and, as the developers say, is more injury-proof. They also promise improved air flow to the side windows.
Now we are moving towards installation, and here we can distinguish 2 methods, each of which has its own advantages and disadvantages:
Installation of Euro panel VAZ 2109
I had been thinking about changing the panel for a long time, on 2109 they put different Opel and BMW panels, the panels themselves were all less noisy than the high VAZ panel, but I didn’t like the fact that panels from old foreign cars are very difficult to find in excellent condition, and if you buy a panel that is not assembled, then there are leftovers I’ll have to look for it in the analysis, it didn’t suit me... Even now there is a fashion (sort of) for the panel from the Priora... also a very interesting option and spare parts for it can be found in almost any store, but with my height there would be room for me in the cabin after such a panel very little) The choice fell on the Europanel VAZ 2114-2115... the search began, I probably searched for 2 months. The options weren’t very good for me: either screws in the panel, or extra holes, or all sorts of cracks ((In the end, I found the panel assembled in 2011 with everything (panel, wiring, tidy, metal body, air ducts) price 7,500... well, it seems to be the norm , I went to look (the panel was in Polysayevo, 60 km had to be rolled). I came and looked, well, everything seems to be there, everything is fine, you can see that the panel is fresh, I started loading the panel, I loaded everything, I paid, I just got into the car, I’m wondering where the tidy is (I missed it in a hurry it happens)…I go out and say that there’s not enough tidy, the seller will look for it for 10 minutes, it’s not there and it turns out he says I’ve already sold it)) super 2 thousand, return it, ok gives it back, total 5,500. In the end, I found a car device for two windows for 800 rubles. Well, everything seems to be going home, once again I looked at everything well and noticed that there was also something missing under the steering casing ((okay, we’ll come up with something...
Photo of the panel, as you can see there is one faded place, apparently some kind of crap was constantly carried on the panel.
If you want to tune your nine and exchange a VAZ 2109 torpedo for a euro from a VAZ 2114, then you will encounter some nuances during the replacement. At a minimum, you will need help or advice from an electrician. Installing a Europanel from a VAZ 2114 is half the battle, but the main task is to properly connect the electrical system so that everything works. This publication will tell you how to exchange a VAZ 2109 torpedo for euros.
In order to exchange a VAZ torpedo for a Euro, you need to acquire the following parts and accessories:
- firstly, you need to purchase the Europanel itself from the VAZ 2114 along with the dashboard;
— you will need the appropriate wires, various fasteners and buttons;
— center console and air vents;
— special linings that are attached to the sides of the stove;
— cables for operating the stove;
— vibration-isolating materials, some bitoplast and special splen;
- paper tape.
Before replacing a VAZ 2109 torpedo with a Euro one, you need to degrease the engine compartment and then seal it with vibration insulation. After the vibration isolation layer, we apply another layer of splen. It is also necessary to glue all the plastic in the panel itself. Apply bitoplast to the joints. Then route the wires.
When installing a Europanel from a VAZ 2114, the middle console should not interfere with the scenes when changing speed. Otherwise, you will have to install a short link. If the backstage boot gets in the way, you can do without it.
Car dashboard cover
Another way to get rid of low-quality plastic in the car interior is to cover the dashboard. As a rule, leather or a high-quality substitute is used for this. It is quite difficult to do the covering yourself; the plastic, which was previously part of the interior design, will serve as the basis.
Sidebar: Important: It is recommended to carry out the covering only after creating all the necessary niches for installing additional equipment. Otherwise, costs increase significantly
When choosing a material, you need to abandon fabric, since the front panel is constantly exposed to direct sunlight and is often exposed to greater impact than other upholstery elements. When choosing a color, you need to give preference to not bright shades that will not be very noticeable. Quite often you can find examples of tuning that use bright fabric: red, blue and other colors. Note that this option looks quite attractive, but during a long trip the driver and passengers will be very tired.
We replace the old instrument panel with a Europanel on a VAZ 2109 car with our own hands
In any car, the dashboard must be in working order, since every driver must at least know how fast he is traveling. The instrument panel of the VAZ 2109 includes many indicators and sensors, the purpose of which must be understood. This material will allow you to find out a description of the device, as well as possible malfunctions and replacing the PCB yourself.
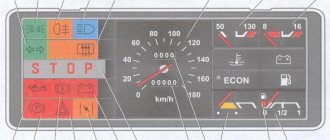
Description and location of indicators and instruments on the panel
To begin with, we suggest that you familiarize yourself with the description and designations of the icons on the dashboard of the VAZ 21099 and 21093 carburetor or injector:
- A speedometer that allows you to find out at what speed the vehicle is traveling.
- Coolant temperature controller. If the indicator needle enters the red zone, this indicates engine overheating, sometimes this may be due to failure of the sensor itself. Overheating of the power unit can cause serious malfunctions, so it is necessary to diagnose the engine radiator fan.
- One of the features of VAZ cars is that the dashboard diagram involves the use of a voltage sensor in the car’s electrical network. According to the indicators of this controller, it is possible to determine the battery discharge when the indicator arrow is located in the left red zone. If it falls into the right red zone, then this means that an overcharge has been detected in the network. In case of such a problem, the generator device should be diagnosed.
- Gasoline volume sensor in the fuel tank.
- The symbol is in the form of a gas station; its appearance indicates that there are no more than 6.5 liters of fuel left in the tank.
- Another feature of VAZs is a fuel economy sensor. With its help, the driver can determine the optimal ratio of the number of crankshaft revolutions to fuel consumption. If the indicator needle is in the yellow zone, this means that there is excessive consumption of gasoline in the system; if it is in the white zone, then fuel consumption is economical.
- Daily mileage odometer.
- General odometer.
- If the word “STOP” appears on the instrument cluster while driving, the driver is warned to stop driving. Usually its appearance is associated with a decrease in the level of engine fluid pressure in the power unit. It can also appear due to a lack of brake fluid or when the parking brake lever is raised.
- The symbol in the form of a battery always blinks when the power unit starts. If it lights up after the engine has been started, then most likely the drive belt of the generator set has broken or the unit has failed. It also makes sense to check the charging circuit for damage and breaks.
- The choke icon indicates that the air damper is closed.
- An indicator in the form of a triangle indicates that the light alarm is on.
- An exclamation mark icon appears when there is insufficient brake fluid and the volume needs to be replenished.
- This symbol indicates that the vehicle's handbrake has been applied.
- The engine fluid icon informs the driver that the pressure in the engine lubrication system has decreased; first of all, you should check the fluid level and, if necessary, add oil.
- An icon in the form of arrows pointing in different directions indicates that the turning lights are turned on.
- Side light activation symbol.
- Indicator that the rear fog lights are on, if equipped.
- Symbol for activating high beam lights.
- This icon indicates that the rear window heating system is turned on.
Peculiarities
VAZ 2114 cars have many innovations compared to 2109, in particular, this concerns electrical wiring.
Whether it is an injector or a carburetor, the wiring diagram for the VAZ 2114 is located in:
- vehicle interior;
- in the engine compartment;
- behind the car body.
It should be noted that carburetor VAZ 2114 were produced only from 1997 to 2000, then they were equipped with carburetors from the VAZ 2108.
But new engines have a more powerful ignition system; accordingly, the electrical control circuit is also characterized by certain features, for example:
- There is a new harness for connecting to the ignition module terminal. This component sends signals to the spark plugs through high-voltage wires.
- Another harness was added to allow mounting of the switch.
- Additional wiring has appeared to connect the adsorber valve to the injection system controller.
Wiring and equipment diagram 2114
Many VAZ 2114 car owners mistakenly believe that thanks to the ignition module, they don’t have to use a coil. In fact, this device is equipped with two coils and two switches. One of the coils transmits the signal to the first and fourth cylinders, and the second - to the second and third.
The equipment system of VAZ 2114 cars with an injector engine has undergone certain innovations not only due to the addition of new electrical equipment, but also as a result of modernization of the car as a whole:
- it is possible to install a heated side mirror device;
- you can connect the front seat heating system;
- VAZ 2114 car owners can install PTF, etc.
Engine compartment
So that a VAZ 2114 with an injector engine can operate on a lean combustible mixture, the car is equipped with:
- forced gasoline injection system into each individual cylinder;
- connecting an improved ignition system characterized by higher power;
- added ECM - injection engine control system.
BC display on a car dashboard
As is known, to ignite a lean combustible mixture there must be a more powerful spark transmitted through high-voltage explosive wires. A spark is transmitted through the explosives of the VAZ 2114 injector when the piston is located at top dead center. This control and connection scheme via high-voltage wires was implemented thanks to the installation of the module.
The operating principle of the device is as follows:
- a generator is used to generate alternating electric current;
- the current passes to the control unit, where it is converted into direct current;
- further, the current flows to the windings of the coils in accordance with the control circuit;
- the secondary winding begins to generate high voltage for transmission through high-voltage explosive wires;
- then, through the same high-voltage explosive wires, the voltage passes to the spark plugs.
Salon
As for the interior, the manufacturer replaced the center console in the VAZ 2114, which has certain differences:
- there is no longer a glove compartment in the upper part, it is installed lower;
- the dashboard was replaced;
- an on-board computer appeared in the VAZ 2114.
Diagnostics of resistance with a multimeter
As a result of such changes and the replacement of old elements with new ones in the VAZ 2114 with an injector engine, the control circuit and wiring connections have also changed:
- another harness appeared for connecting the on-board computer;
- a sensor for monitoring the temperature level outside the window has been added, which is mounted in front of the radiator;
- A voltmeter relay has been added.
In addition, another block of wires was added to the control circuit to control the power windows.
Possible malfunctions and ways to eliminate them
What problems can a car owner encounter:
- The shield works fine, all sensors function, but there is no backlight. As you know, the backlight on the tidy appears only when the side lights are turned on. Therefore, if there is no light on the dashboard, you need to check whether the side light, license plate light and lamps in the engine compartment are working, since one fuse is responsible for all these elements. We are talking about a 7.5 ampere fuse device F10. If it is burnt out, the device needs to be replaced. Sometimes the reason lies in the inoperability of the backlight control located under the tidy.
- The speedometer does not work, in some cases the needle rises and falls, and it moves jerkily. If the speedometer stops functioning, then first of all you need to check the cable connecting it to the gearbox. Older versions used a mechanical cable, the ends of which wore out over time, causing the speedometers to not work. You need to replace the cable itself or try to restore its functionality by winding a piece of food foil around the end connected to the speedometer. If we are talking about an electronic sensor, then you need to remove it, clean the contacts and reconnect it; if this does not help, then the controller must be replaced.
- The economy sensor does not function. There can be many reasons for its inoperability, ranging from failure of the device itself to damage to the electrical circuit. In practice, this sensor breaks down in many cars; this is considered a “disease” of the Nines.
- The engine temperature controller does not work. If the needle does not rise at all, then you need to diagnose the sensor itself, located in the exhaust line of the cylinder head, next to the thermostat. You should also check the quality of the controller connection, make sure that the power circuit is intact, and diagnose the connector. It may happen that the needle rises sharply and goes beyond the red zone, while the engine has not even warmed up. Most likely, there is a short circuit problem; you will have to use a tester to diagnose car wiring or seek the help of a specialist.
- The indicators on the dashboard or part of the backlight do not work. In case of such a malfunction, the cause should be sought in burnt-out lighting sources. You need to remove the tidy and check the light bulbs; if they are really burnt out, then they will have to be changed (the video was shot by Semyon Pedan).
Modification of the rear of the car
Tuning the trunk of a VAZ 2109 includes the following work:
- making your own shelves;
- lighting.
To make a shelf, you will need plywood, cardboard, upholstery, glue, 2 furniture hinges, handles. We first determine the location of the shelf. Then we make holes. On the template of the future design we mark the moving part. We attach the model to the plywood. We first cut out the lifting part of the structure. We connect it to the stationary part of the shelf (hinges).
Then the structure is installed. We use any material for its upholstery. The shelf is covered with PVA glue in 2 layers. We carefully place the upholstery on top of the structure. To secure the fabric at the edges, use double-sided tape. If the glue has dried, install LED lighting in the trunk. Similar tuning can be done in the VAZ 21099 model. The electrical circuit of the vehicle is first studied. To illuminate the luggage compartment you will need an indicator, 5 m of two-core wire, pliers, electrical tape, a pipe, and a 5A fuse.
We install a button with an on/off indicator in the shelf for the rear speakers. To make a hole, use a drill. An LED strip is glued to the trunk threshold. An additional wire is laid under the floor covering; it is connected through a fuse to the power supply. The ground of the limit switch is connected to the backlight. The advantages of such tuning include:
- Multiple sources ensure uniform illumination of the luggage compartment.
- The light turns on only after pressing the corresponding button.
- Saves battery charging.
Tuning the trunk on the VAZ 21099 involves reworking the floor. For this, plywood, piano hinges, an electric jigsaw, and glue are used. The trunk is pre-lined with fiber (2 mm thick). Then we cut the plywood to the size of the carpet and the hatch for the spare tire. The next stage is making a frame from 20x30 mm bars. The resulting structure is fixed to the trunk floor. Then splen and soundproofing material are laid. Sheathing is being installed.
The downside of this modernization is the accumulation of condensation inside the optics. This is due to the low quality of the material and lack of tightness. At the same time, black headlights, unlike their standard counterparts, are less efficient (by 30%). To partially solve this problem, we install more powerful light bulbs in the tuned headlights of the VAZ 2109. High power lamps should not be used. Otherwise, the lights will overheat or begin to melt. You can make your own optics. But such tuning is recommended for the rear lights (to reduce the risk of accidents).
Instructions for installing a new panel
If you want to replace a low tidy with a more advanced, high one, then in any case you will have to change the entire center console.
Removal and installation instructions look like this:
- First, you need to turn off the power to the on-board network; to do this, disconnect the battery, remove the steering wheel, as well as the steering column switches and the ignition switch. You will also need to disconnect the ignition relay.
- Next, unscrew the two bolts that secure the control panel visor and remove it.
- Now you need to compress the spring and remove the shield itself from the center console. Disconnect all wires and connectors connected to the dash, including the speedometer cable, the econometer hose, and the odometer cable. After this, the tidy can be moved to the side.
- Then remove the regulator from the hydrocorrector of the optics light, the tidy light switch knob, as well as the interior heater and fan regulators. To do this, pull the controls towards you.
- After this, unscrew the two bolts securing the center panel trim on the sides; the trim itself can be moved towards you. Then you need to disconnect the connectors.
- Now the key in the lock should be turned to position “0”, this will disable the anti-theft system. A connector with wires is connected to the lock itself; it must be disconnected. Next, unscrew the two nuts and two bolts, after which you can remove the steering column pipe with the switch.
- Remove the choke handle located under the instrument panel. Pull it towards you so that you can feel the pull. You need to unscrew the two bolts that secure the damper guide rod, after which the choke can be removed.
- Now you can unscrew four more screws that secure the heater control panel in the car. Unscrew the bolts located on the side of the shield on both sides. Also unscrew the lower console mounting bolts with nuts that secure the control panel lighting switch and the optics hydraulic corrector. To do this you will need a 22mm socket wrench, it must be high.
- After completing these steps, you need to unscrew the bolt that secures the center console in the glove compartment. Then all you have to do is unscrew one bolt at a time on each side securing the center console. The console itself can then be dismantled.
- As for installing a new high panel with tidy, this process does not present any particular difficulties. All dimensions at the mounting points on the body are the same, but this procedure also has its own characteristics. To install your new console, you will need the appropriate wiring harness. If you use an existing harness, then you will need to rearrange the terminals in it, taking into account the connection diagram. In addition, it will be necessary to change the cables leading to the heater to longer ones, the same applies to the speedometer cable. If you are installing a new console, you will also need other roof pillar side trims, these must be installed before you install the console. Since the new dashboard will not use a flow meter, the tube from it will need to be plugged. In addition, the signal to the tachometer will need to be supplied from wire K on the coil, which is connected to the speed sensor cable bracket.
- Immediately before installation, you should reassemble the new console, and wrap the connection points of the blowers with electrical tape and, preferably, glue them with foam rubber or anti-creaking agent. It is also necessary to change the foam rubber of the heater, since the old one will no longer be able to perform its functions. Also make sure that the choke can close completely and remember that the cable from the new speedometer should be installed before you install the console. The assembly procedure begins with laying a new wiring harness and connecting all connectors. Before you finally assemble everything, turn on the dashboard and check how all the indicators and gauges work. After this, the console can be put back in place.
Internal revision
Tuning the VAZ 2109 interior includes upgrading the dashboard and installing new upholstery. If necessary, we equip the car with more comfortable heated seats. To aesthetically modify the VAZ 2109 torpedo, it is recommended to use various inserts. Functional modernization of the panel means the installation of additional devices.
You can install an electronic tachometer yourself. To carry out such tuning of the interior, you will need screwdrivers and 3 wires. Then you need to make power wiring to the electronic device. The third wire is connected to the ignition coil.
To easily find out fuel consumption, an on-board computer is installed. This type of dashboard tuning is provided by the manufacturer. Therefore, we find an opening on the dashboard, closed with a plug. To install the BC you will need wires. If the car is equipped with a high panel, then the block with 4 wires is installed under the factory plug.
If there is no block, use the cigarette lighter or ignition switch. Before tuning the interior of the 2109, you will need to remove the negative terminal from the power supply. If the on-board computer is connected, study the operating instructions. Then we configure the device parameters and check its functionality. It is recommended to carry out work on upgrading the dashboard after studying the diagram of instrument combinations.
To create comfort inside the car, we use high-quality upholstery (carpet, velor). To tune the interior of the 2109 you will also need glue and sealant. To ensure that the upholstery sticks without wrinkles, we use a steam generator. Covering the interior with carpet is a labor-intensive procedure. But such material burns out quickly, so it is not recommended to use it.
To cover a ceiling with carpet yourself (it is not exposed to sunlight), you will need:
- remove nozzles, handles, visors and old ceiling;
- treat the surface with glue, after 5 minutes the procedure is repeated;
- press the carpet;
- After 24 hours we make holes in the structure.