Reasons for installing fog lights
There are two main reasons why car owners install fog lights:
From a functional point of view, fog lights on the VAZ 2109 increase the safety of vehicle operation, and this is always a worthwhile endeavor. This increase is achieved by improving visibility in difficult road conditions. The fog lights of the VAZ 2109 perfectly complement the main headlights. When driving in fog, a situation often occurs when the lower boundary of the fog is above the fog lights, but below the main headlights. In these cases, PTFs are the only means of illuminating the roadway.
In the dark, PTFs located closer to the road perfectly illuminate the side of the road. This helps keep the car on the main part of the road surface, preventing skidding during emergency braking. Finally, simply increasing the luminous flux by switching on additional lighting fixtures improves driving comfort, especially when driving in conditions of heavy snow with blizzards or heavy rain.
The aesthetic reason is less significant. Due to the installation of PTF it is difficult to stand out from the crowd - many people have such headlights. Unless it will be some kind of exclusive fog lights, which then it makes sense to install at a service station. It’s difficult to make a twenty-year-old car look sharply fashionable with the help of PTFs, but installing them certainly won’t make things any worse.
Detailed instructions for installing fog lights
If you decide to install fog lights on a VAZ, then first you should purchase the optics kit itself. As mentioned above, xenon can be installed in VAZ 2109 headlights with lenses; if you want to install it and connect it right away, then buy the appropriate kit. There is a huge variety of lens headlights on the market, so when buying lenses, pay attention to their build quality. They must be as durable and reliable as possible so that their operation does not cause problems later.
Replacement procedure
How to install and connect fog lights on a VAZ 2109?
The procedure is described using the example of a car with a high panel:
- First you need to mount and connect the foglight control button. If your “nine” is equipped with a high center console, then it already has space for mounting the corresponding button. If the panel is low, then this is also not a problem - it also has a corresponding place, to the right of the button for turning on the low beam and dimensions. Remove the grille located to the left of the steering wheel, after which you will gain access to the connector for turning on the PTF. The plug from the center console can be removed, and instead you need to install an optics control button that connects to the on-board network. Having done this, put the grille in place.
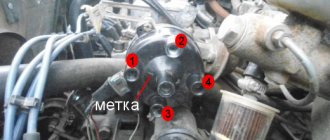
- Now you need to open the engine compartment and unscrew the mounting block. You need to bring the wiring from the PTF to it and connect it to the appropriate connectors. In addition, the wiring must go from the place where the relay will be installed to the block. Please note that the ground wire should not be touched.
- It is necessary to disconnect pins Ш7 and Ш8 from the block, which are located in close proximity to each other. It is necessary to install pre-prepared terminals into these connectors, using the diagram below. If you do not have fog lights, then these terminals should be free.
- Next, the block is put in place and the relay is installed; it can be installed on the car body. Mass is carried under the bolt. It should also be noted that before installation, the place where the contact will be must be thoroughly cleaned of paintwork, otherwise there will be no “ground”.
- After completing these steps, the power wires must be connected to the fog optics. The ground is connected, that is, the wire to the body, and it is desirable that the ground be as close as possible to the PTF, in a convenient and dry place. If the contact of the optics with the vehicle body is unreliable, this may lead to malfunctions of the headlights, and their overall functioning will be unstable.
- Now you need to install the fog lights themselves; to do this, you need to make the appropriate holes in the front bumper. It is best to drill near the bumper mounting screws. If there is a place in the bumper specially designated for these purposes, then PTFs are placed there. Ensure the best possible fixation of the optics on the bumper to prevent vibration and shaking. After everything is ready, all you have to do is adjust the light output.
1. Select a location to install the PTF control button.
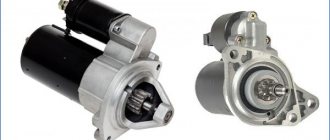
2. Install the fog light relay in the engine compartment.
3. Connect the fog lights in accordance with the diagram.
We recommend: How to check the oil level in an automatic transmission?
Installation kit
To implement the project you will need:
- two fog lights with mounting brackets;
- normally open relay for connecting lighting devices;
- button for turning on fog lights;
- single-core wire with a cross-section of 1 sq. mm, approximately 4 meters long;
- fuse 16A;
- connection diagram;
- contact blocks - if they are not included in the kit with headlights and relays.
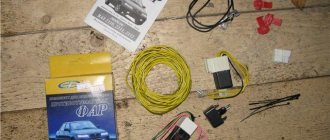
If you already have something from this set, purchase the rest. And if you have to buy everything, then consider purchasing the entire boxed set. It includes everything you need, and there are also detailed installation instructions.
Connecting fog lights on a VAZ 2109 will require certain tools. You will need a 10 mm wrench, a screwdriver, side cutters, a shoemaker's knife for stripping wires and electrical tape. This is the minimum set. It is sufficient if twisting technology is used to connect wires.
Another option for connecting PTF, which most experts recommend, is soldering all connections and using heat-shrinkable materials for insulation.
What you need to buy
If you are installing fog lights (VAZ 2114, you can watch the video in the article), then first of all, of course, you will need lighting equipment. You need to select according to the characteristics of the car. For example, in VAZ models such as 2110, 2112, 2114 and 2115, there are plugged technological holes in the bumper, and accordingly it makes sense to purchase lights based on their shape.
But the classics 2108 and 2109 do not have such holes, and you need to take equipment with mounting posts. When you install fog lights on a VAZ yourself, you need a standard coil of wire 5 meters long. General purpose relay with 4 contacts. Power button suitable for the type of instrument panel. Male and female connectors for wires. Ring terminals for the “ground” and “plus” of the battery.
Two remote fuse housings. And of course a roll of good electrical tape. Nowadays, the electrical tape from professionals is considered the best. This set is quite enough to install fog lights on a VAZ 2115, 2114.
Installation of headlights and wiring
The standard bumpers of the VAZ 2109 provide special places for mounting fog lights. If your car still has its original bumpers, it is best to fix the headlights in their original places. If they were changed, consider fixing the fog light brackets not to the bumper, but to the car body. Attaching to a bumper, especially a non-standard one, increases the risk of misalignment. This may result in blinding oncoming drivers and the risk of losing lights. Do not forget about the requirement to place the PTF no lower than 25 cm from the road surface and no further than 40 cm from the vehicle’s overall dimensions.
Even if your car has never had fog lights, the VAZ 2109 PTF connection is provided for by the design. The fuse box has standard fuse locations. Moreover, the factory equipment of the “nine” includes installed wiring that allows you to connect the PTF. If it is preserved, you can use it. If not, you will have to lay it again.
Start with the right fog light. Connect the wire to the harness running under the radiator. Connect the left headlight and route the wire to the relay. Run a wire from the relay through the fuse box to the button in the passenger compartment. Power the second wire of the button from the ignition switch so that the PTFs do not light up when the ignition is turned off, even when the button to turn them on is pressed.
Installation operations
Xenon fog lights VAZ 2109
As you know, there are two installation methods.
First way
There is a popular way to install such lamps in a standard PTF: this is when the entire kit is mounted. For example, a kit from Sho-Me or something like that. Below are instructions on how to do this, without any modifications:
- Remove the front wheel fender liners;
- We place ignition blocks inside behind the bumper.
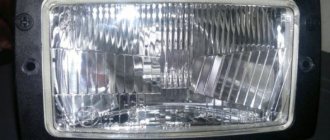
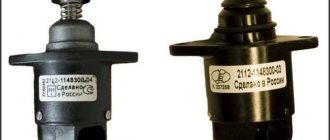
Note. Note that in the Kirzhach PTF there will be enough space to install a set of xenon lamps, but in Bosch type headlights, on the contrary, there will not be enough space.
Xenon VAZ 2109
Thus, if you install xenon in a Bosch PTF, the focusing will be disrupted, since the H3 lamp does not have a fixed light source. As a result, Bosch cannot cope with a specific type of lamp and a new light source; it produces periodic reflections, which, in turn, blinds oncoming and even passing drivers.
Note. An incorrectly installed xenon kit will lose its ability to provide normal visibility and lighting in poor weather conditions.
Second way
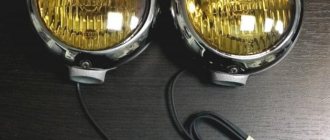
- Yellow PTFs with xenon are installed;
- In this case, H3 lamps are first placed in a regular bottle cap, and only then in the headlight of a vase and fixed with sealant.
Xenon VAZ 21093
Note. As for the difference between installing xenon in Kirzhach and Bosch headlights, everything is the same here. In the first case, the beam of light will have smooth outlines, which will even make it possible to legalize the installation of xenon in accordance with all traffic rules. In the second case, the absence of lenses in Bosch headlights will play a cruel joke: there will be light shining beyond the permissible limits, which will again lead to blinding oncoming drivers.
PTF power button
The choice of installation location for the fog lamp switch depends on whether your car has a high or low dashboard. If it’s high, you’re lucky, your option has a standard place for the PTF switch on the VAZ 2109. It is located to the left of the steering column between the rear fog lamp switch button and the rear window heating switch button. This place is closed with a plug. To install the button, remove the decorative panel covering the left speaker of the audio system and remove the speaker itself. This will give you access behind the dashboard necessary to install the button. Connect the PTF activation block and the indicator block for this activation, and then install the button in place.
Headlight adjustment
Adjusting foglights is a responsible matter. If the headlights are not adjusted correctly, there is a risk of causing inconvenience to other road users and creating a safety hazard. Rough adjustment of the PTF can be done independently. To do this, select a horizontal area near a white vertical wall. The verticality of the wall can be checked by eye, but it is better to verify the horizontality of the site using tools. A two-meter building or water level is suitable for this. Having found a suitable place, place the front of the car against a white wall at a distance of 4-5 meters from it. It will be good if direct rays of bright sunlight do not fall on this wall. Measure the distance from the center of the headlight to the ground. Turn on the fog lights. Measure the distance from the center of the light spot to the ground. The center of the spot should be located 2-3 centimeters below the center of the headlight.
This adjustment is quite rough. For more accurate results, you need a specialized stand at a service station. If you order the installation of a PTF at a service station, the adjustment will be included in the price automatically and will be carried out without fail.
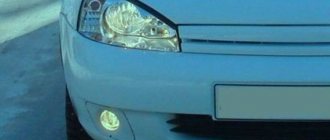
Appearance of fog lights on a VAZ 2109:
Installing fog lights on a VAZ 2109 is not difficult if you know how to read simple diagrams and have basic installation skills. The connection diagram is standard, and if you look closely, you will even see the wiring that lies in the engine compartment, goes to the button in the cabin and to the fuse box.
But don’t be happy, these wires do not always allow you to connect the fog lights - the age of the car and outside interference in the wires laid at the factory have an effect. As a result, installation in this way becomes impossible, and we have to resort to extreme measures. So, let’s look at the process of installing fog lights on a VAZ 2109, 21099 and 2108 car in order.
Need for installation
It’s good when on the latest model cars everything is initially provided for these lighting devices. All that remains is to buy equipment that corresponds to the technological description, and without further ado, insert it into standard niches, connecting the wires provided by the manufacturer.
What if there is none of this? You can go to the nearest car service center and pay the technician to wait for the results of the work. Well, after reading this article, you can do it yourself. The main thing is to have at least some skills in working with the tool.
Installation materials and requirements
So, first you need to stock up on the following tools and materials:
- Directly fog lights.
- About three meters of single-core wire (red) with a cross-section of 0.75 squares.
- Relay with normally open contacts, a metal plate for fastening and a block with wires.
- Button (most likely, it is already installed next to the heated rear window switch).
- At least five screws.
- Screwdriver, 10mm wrench, utility knife and pliers.
- Heat shrink insulation and electrical tape.
- 16 Amp fuse and socket for it.
Before you begin, you should decide on the mounting location for the VAZ 2109 fog lights themselves; pay attention to the lower part of the bumper. If you look closely, you will find places for fastening there.
There is just one drawback - on older cars it is sometimes difficult to install them in these places; you have to contrive and screw them directly to the bumper. You just need to take into account some of the requirements of GOST, which has been in force since 1975 to this day:
- The distance from the side surfaces of the car body to the nearest edge of the fog lamp should be a maximum of 40 cm.
- The height of the fog lights (from the ground surface to the bottom edge) is from 25 cm.
To avoid problems with law enforcement agencies (read traffic police inspectors), you need to adhere to these requirements. But the “attention” of inspectors is not so dangerous, much worse is the incorrect dispersion of light as a result of incorrect installation. Fog lights will either blind oncoming drivers or be ineffective in poor visibility conditions.
Features and design of PTF
Conventional headlights on the VAZ 21099 in bad weather work in such a way that they reflect light from raindrops or grains of snow, as a result of which the rays fall directly into the driver’s eyes. This, in turn, contributes to the deterioration of the visibility of the road surface. If we talk about PTFs, their design is somewhat different. Fog lights on the VAZ 2109, in accordance with the diagram, should be located close to the road surface, since fog does not fall on the asphalt. As a result, it turns out that the fog lights of the VAZ 2109 shine as if under fog, forming a flat beam of illumination, thus illuminating exactly the required section of the road.
PTF kit for domestic nine
Fog lights on the VAZ 2109 with or without xenon are placed in a symmetrical manner, necessarily below the main optics. That is, the headlights on the VAZ 2109 should be higher in any case. The distance of the PTF from the road surface should be 25 cm, and from the dimensions and turns the distance should be at least 40 cm. If you decide to install lensed PTF with or without xenon, these requirements should be taken into account. According to some car enthusiasts, installing xenon in the lenses of daytime running lights will replace fog lights, but this is a wrong opinion.
In order for PTFs with lenses to shine normally, they must be correctly adjusted. Please note that if the angle of the lights is too small, their use will be pointless. Moreover, such an adjustment can cause inconvenience to drivers of oncoming cars. As for lighting, it should be either yellow or white, which is why many car owners install xenon in their lenses. The use of red, green or blue light bulbs in PTF is not allowed, since their efficiency is minimal (the author of the video is the Kakto SO channel).
How to install fog lights on a VAZ 2109?
So, the installation begins. To carry it out, you must first install the headlights in the intended location. After this, take the wire and connect it to the right fog lamp (positive terminal). Lead the wire into the engine compartment and connect it to the harness running under the radiator. Bring this to the left fog lamp of the VAZ 2109, and then make a connection with its lamp. Insulate all bare areas; for this it is best to use heat shrink.
Connection to standard mounting block 2109
Next, the wire must be brought to the installation site of the electromagnetic relay, whose normally open contacts serve to supply voltage to the fog lights of the VAZ 2109. The plus from the battery comes to one terminal through a 16 Ampere fuse, from the second it will be removed and go to the fog lights connected in parallel.
Carrying out the process
If you have a VAZ 2106, installation of fog lights can be carried out in a short time. First you need to install the lights themselves on the car. Here everything depends on the imagination of the car owner. Some people attach them near the radiator grille, some hang them under the front bumper, and some hang them on the bumper. This is a personal matter.
The main thing is to securely fasten it, this is what installing fog lights (VAZ 2114) with your own hands is all about. Now installation of electrical wiring. You need to secure the relay in the engine compartment to turn it on. And there are no special restrictions here, the main thing is that wires can be connected to it, and away from the exhaust manifold and radiator. That's all the requirements. And now attention is the most important thing! The main trick here is to connect the button and relay correctly.
If you purchase VAZ 2115 fog lights, you can install such equipment yourself. A standard general purpose relay has four legs numbered - 85, 86, 87 and 30. Regarding the relay, any car enthusiast should know that contacts 85 and 86 are an electromagnetic coil.
Current is supplied to it, the core acquires the properties of a magnet and closes contacts 30 and 87. Therefore, you need to fasten it to ground from contact 85 and from 85, run the wire into the interior to the button. Apply “+” to pin 30 with the battery. And already from the 87th contact, bring out two wires, cutting in the fuses. When a VAZ 2110 is available, do-it-yourself installation of fog lights can be done in the shortest possible time.
Connect the button as follows: one contact goes to the relay - pin 86, connect the second to the “+” of the ignition switch, having previously called it with a test lamp. Carefully insulate the joints and you're done. You can use it. Any car enthusiast can easily install fog lights on a VAZ 2109. The main thing is to use the prescribed technology.
The importance of fog lights cannot be denied - they allow you to illuminate the roadway in poor visibility conditions, which directly affects the safety of movement. Not all domestic cars, in particular “nines”, are equipped with PTF, so many car owners have to install them themselves. You can learn more about how to install fog lights on a VAZ 2109 and what is needed for this from this material.
Tools and materials
According to the current traffic regulations, fog lights can act as an alternative to low beams when used during the day.
If you install and adjust the PTF correctly, they will be able to additionally illuminate the side of the road. So, if visibility is poor, you will notice pedestrians and animals suddenly jumping out in time.
To carry out the work, you will need a certain set of devices.
Especially for the VAZ 2109, you can purchase a fully assembled, ready-made kit for connecting the PTF. Its estimated cost, which may vary slightly depending on the region and store, is 1,500 rubles.
If you buy it, there will be no problems