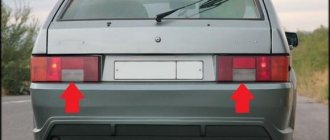
The reverse sensor (RDS) on the VAZ 2114 ensures that the white spectrum lights turn on when the vehicle moves backwards. For the system to work correctly, a sensor is required. The signal it sends to the white lights notifies other road users that you have moved backwards. That is, the reverse sensor 2114 is necessary and useful to the owner of the vehicle on which it is installed, and to other motorists for the purposes of safety and accident-free movement. You need to ensure that the device works correctly, detect problems with it in a timely manner and take action.
Diagnosis of problems
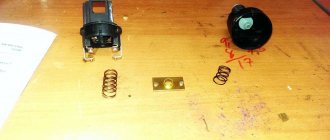
The reverse sensor on the VAZ 2114 may fail over time as a result of non-compliance with the operating rules of the vehicle. To diagnose its condition, perform the following actions:
- turn the wheels to the left;
- looking for contact protection;
- remove protection;
- consider the device itself and a pair of contacts going to it;
- perform a “frog” closure;
- engage gear (fourteenth).
If there are no problems with the wiring, contacts and light bulbs (the performance of all these elements is important), the white lights will light up. When there is no switching on, the tester measures the voltage of the red wiring and ground. If there is voltage, check the board. When there is no light, the contact of the sensor or safety valves has probably broken, it is necessary to test the entire unit. The DZH should be located and checked using appropriate equipment.
The main reasons for sensor failure:
- the contact points of the lights at the rear have oxidized;
- the sensor itself is loose, it should be screwed in as deeply and tightly as possible;
- there is no normal contact with the wiring on the car box;
- there is no proper contact between the safety block and the plug device;
- The fuse burned out and damaged the contacts.
In theory, any fuse in the chain can blow out, which will negatively affect all contacts.
Location
First you need to understand where exactly the device is located.
You can go two ways:
- Fly under the bottom and look up at the suspension. The desired object on the VAZ 2114 is located on the gearbox. There are only two sensors - speed and reverse.
- If you don’t want to crawl under the car or can’t, try getting to the device through the engine compartment by opening the lid. Although the first option is objectively more convenient.
Device location
What to do based on the cause of the breakdown
The procedure for restoring the VAZ 2114 reverse sensor will depend on the general picture of the malfunction:
- Oxidized wiring contacts must be thoroughly cleaned and then returned to their place. The negative terminal of the battery will need to be disconnected first.
- The loose sensor is screwed into place as tightly as possible.
- They test the wires, clean the problem parts or install new, serviceable elements instead of the problem ones - when there is no contact with the box.
- If there are problems connecting the plug to the block, check the contacts, clean them or change the wiring.
If a fuse blows, only replacing it will help.
Check the light bulbs themselves - they may be the reason for the lack of light if the wiring and contacts are intact. Faulty light bulbs are replaced.
Reverse sensor VAZ 2114
As we have already found out, this device is responsible for turning on the rear lights on the car. If the white light does not appear when the driver backs up, then a pressing problem arises. It is necessary to determine the cause of the malfunction.
Not only the sensor could break, but something else as well. For example, a fuse or some kind of cable.
And without a rear light, driving in the dark is not very pleasant. It is simply difficult to inform other road users about your intentions to move back. In addition, they illuminate the path for the driver himself.
Even if this malfunction does not seem critical (like, for example, a breakdown of the knock sensor), it still needs to be corrected. And you can do this as follows.
Self-replacement
You can repair or replace the signal sensor yourself or at a service station. The second option is simple but expensive. Drivers independently perform VAZ maintenance on a pit or a lift; if they cannot be used, they climb under the car from below. You need to act carefully, as there is a risk of being splashed with oil from the gearbox.
Procedure:
- Place the car on an overpass, a hole, or climb under it from below.
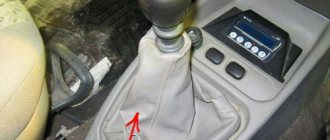
- Engage the handbrake and put the gearbox in first gear - this will prevent the vehicle from accidentally rolling away.
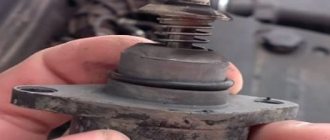
- Remove the protection from the contacts and disconnect the contacts themselves.
- Place a container to drain the oil after unscrewing the reverse sensor.
- Remove the sensor - unscrew it manually or with a 22 mm diameter head.
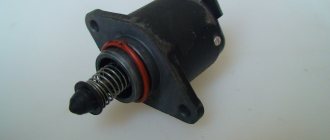
- Remove the broken device and install a new, working one in its place. Another option is to diagnose the dismantled sensor, perform repair work and return it to its original place.
- Remove oil from the crankcase with a dry cloth, as drips reduce the efficiency of the unit.
- Return the previously removed contacts to their place.
- Wear protection.
If a lot of lubricant has leaked out of the gearbox, top it up. Be sure to use fresh oil, since used oil has a changed aroma, color, and incorrect characteristics. You can check the lubricant content in the system using a dipstick. When the volume is below the minimum level, urgent topping up is required.
After completing the service, check the system's functionality. To do this, turn the key in the ignition system, do not turn on the engine. Then put the car in reverse and see if the lights come on. If they burn, everything is fine.
Location and performance check of the DZH
You can easily find out where the reverse sensor is located by looking up at the suspension of the fourteenth. It is located on the gearbox; there are two meters in total: the one we need and the one that signals the speed of movement. If it is not possible to get under the bottom of the car, you can get to the reverse sensor by opening the hood. But the first option is more convenient.
Performance diagnostics:
- To make sure that the auxiliary gearbox is faulty, you need to turn the wheels to the left, looking from the driver’s side: on the side of the gearbox there is a protection with contacts inside.
- We remove the protection, look at the device and the two contacts that go to it, close them on the frog and start the fourteenth, putting it in reverse gear. If everything is fine with wires, contacts and lamps, then the white lights light up.
- The lights do not light up - with a tester we measure the voltage on the ground and the wire (orange) leading from the frog; if there is voltage, then you should check the board of the white lights and the contacts to it. There is a possibility that the contact between the fuse block and the sensor contacts has failed; you should find it and measure the voltage in it.
Reasons for refusal:
- Oxidation of rear light contacts
- The sensor may become loose, it needs to be screwed in deeper
- No contact with transmission wiring
- No contact between plug and fuse box
- Any fuse can blow and disrupt the contact circuit.
It also happens that the DZH is normal, and the contacts are safe and sound, but the reversing lights do not light up. The lamps themselves may become covered (elementally burn out), or the contact may be lost (for the same lamps).
Self-repair price
The cost of a new reverse sensor depends on the manufacturer. The average price of a part is around 300 rubles; you can find options three times cheaper. Please note that the less a spare part costs, the lower its quality and, accordingly, reliability and service life. It is advisable to place orders in trusted stores.
Replacement will also require contact cleaner such as WD40. Many additionally replace wiring if it is deformed, kinked, or otherwise damaged. We do not recommend working with wires without proper experience; it would be better to contact a specialist.
Sensor bulbs cost up to 50 rubles apiece. It's easy to unscrew the old ones and screw in the new ones yourself.
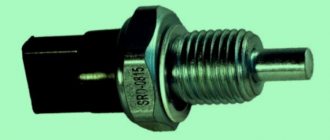
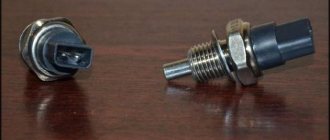
Types of sensors
- Rod or rod: a movable element in the form of a pin with a large range of movement.
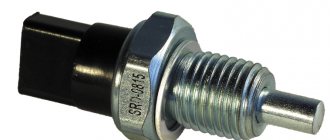
Such an element does not require high mechanical precision, but takes up a lot of space in the gearbox. In addition, it is necessary to ensure tightness: for example, a seal around the rod. - Ball-type: a pressure mechanism in the form of a spring-loaded steel ball.
Small stroke (2–5 mm), high precision required. But the sensor takes up little space and is sealed in design.
- opening pin or knife type contacts;
- closed standard connector with casing for protection against oxidation;
- bayonet swivel connector;
- screw terminals for fastening wires without a connector.
The way the wires are connected is fundamentally unimportant. All types of connections, except open ones, are quite reliable and sealed.
Sensor failure
The faulty element is identified immediately: the reversing lights and other related devices stop turning on. This problem can also occur due to a broken wiring. How to check the sensor for serviceability?
- Remove the connector, connect the multimeter in dial mode, and engage reverse gear.
- The next step is to unscrew the sensor, connect the device, and press the rod (ball) manually.
Important! When dismantling the sensor, it is necessary to prepare a screw plug to quickly block the hole. Otherwise, oil may leak from the gearbox housing.
Repairing the reverse sensor is not practical. The case is sealed; after opening it and putting the contact group in order, it will be impossible to restore the structure to its factory condition. The unit is inexpensive, especially on domestically produced cars. Therefore, replacement will not be too expensive.
Important! There is no point in experimenting with selecting sensors from other car models. If the mechanical part is larger than standard, the gearbox may be damaged.
Replacement requires no special tools: just a wrench.
Possible faults
Repairing the reverse sensor is perhaps exactly what no one is immune from. It happens that a unit needs to be replaced only because it simply does not work. How to act in such a situation? First of all, it is important to understand why the sensor is faulty or not working correctly.
Today it is customary to identify the following possible unit malfunctions:
- oxidation of contacts occurred at some point in the electronic circuit;
- the sensor has become “loose” or has failed;
- there was a “breakdown” in the electrical circuit of the identifier;
- contact between the sensor and the mounting block is broken;
- its fuse is blown;
- The rear headlight bulbs ("stopari") have burned out.
The symptoms of a malfunction of the reverse sensor are probably clear to everyone - the corresponding headlights are inoperative or function extremely incorrectly. It is simply unacceptable to operate a car in this condition, so the first thing you should think about when a problem with a unit arises is where the reverse sensor is located and how to repair it correctly. We'll talk about this in more detail below.
Sensor repair: replacement and fault diagnosis
Complete replacement of the reverse sensor is definitely not what should be done first if the brakes are not working properly. Before dismantling the old unit and installing a new one, it is important to exclude the possibility of manual repair of the chain and only then resort to replacement. In a typical version, the procedure for repairing a sensor looks like this:
- First, you need to directly check the reverse sensor for functionality and the taillights. Anticipating a number of questions from our readers regarding these procedures, we will immediately give several express answers:
- How to remove the sensor? – It’s very simple, find it on the gearbox and unscrew it like a regular spark plug;
- How to check the sensor for functionality? – Remove it from the car, install it in another electrical circuit and check its functionality by pressing the plug. During normal operation, the circuit should close and, for example, the light bulb at its end should light up. Otherwise, the sensor is faulty;
- How to check headlight bulbs? – Also remove them from the car and install them in another electrical circuit. During normal operation, they should naturally light up. Otherwise, the bulbs are burnt out and require replacement.
- Let's say the sensor and headlight bulbs are normal. What to do next? First of all, you should pay attention to the reverse sensor fuse. It is individual for each car model, so you can find out about its number specifically in your case using the relevant technical documentation. The fuse should not be blown, which is not surprising. If the “protector” is burned out, then it should be disconnected from the circuit and replaced with a new one;
- Still no results? All that remains is to ring the entire sensor circuit, detect the presence of a breakdown and install serviceable parts instead of faulty ones.
Note that in most cases, repair of a car's reverse sensor ends either in the first or in the second repair step. Considering the absolute simplicity of repair measures, you just have to carry them out correctly and to the proper extent, then problems with the unit will certainly not cause discomfort.
Perhaps the most important information on the issue under consideration has come to an end. We hope today’s material answered your questions. Good luck on the roads and in repairs!
Source