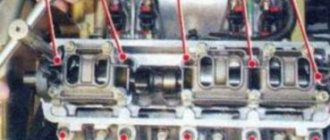
The VAZ 2110 engine with 16 valves is the most powerful and dynamic engine of the “ten”, at the same time making a car with such a power unit quite difficult to repair and maintain.
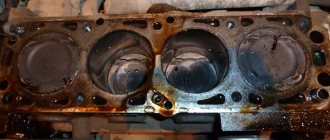
Gasoline injection engines VAZ 2110 16 cl. two, one with a working volume of 1.5 liters (VAZ-2112) and the second with a volume of 1.6 liters (VAZ-21124). The VAZ-2112 engine has one significant problem. When the timing belt breaks, the valves hit the piston. Actually, the cross-sectional image of this 16-valve engine gives a clear idea of the actual lack of sufficient clearance between the valve plates and the piston crown. That is, when the belt breaks and the piston moves to the top point by inertia, the valve can be opened and an inevitable blow occurs. Usually, when this happens, the valves bend . And in the worst case, they break, turning the combustion chamber and piston bottom into metal crumbs.
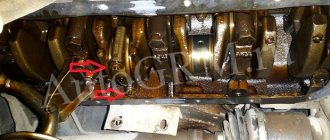
Actually, in the 1.6 liter engine (VAZ-2112) this problem no longer exists. The valves don't bend there . This was achieved by using new pistons with a special bottom shape, which has recesses in case the timing belt breaks. Let's look at photos of similar pistons below.
Below are detailed characteristics of VAZ 2110 16 valve engines.
Engine VAZ 2110 1.5 l. 16-valve injector
- Working volume – 1499 cm3
- Number of cylinders – 4
- Number of valves – 16
- Cylinder diameter – 82 mm
- Piston stroke – 71 mm
- Power – 93 hp (68 kW) at 5600 rpm
- Torque – 128 Nm at 3800 rpm
- Compression ratio – 10.5
- Power system - distributed injection
- Acceleration to 100 km/h – 12.5 seconds
- Maximum speed – 180 kilometers per hour
- Average fuel consumption – 7.2 liters
Replacing Kalina valve stem seals
Tool:
Knob attachment 10 mm
Parts and consumables:
- Engine oil
- Valve stem seals
1. We install the crankshaft to the TDC position of the pistons of the 1st and 4th cylinders, as described here. In this position of the shaft, we change the oil seals of the valves of the 1st and 4th cylinders. Remove the camshaft as described here. We remove the pusher with the adjusting washer from the cylinder head socket.
2. We unscrew the spark plug of the 1st cylinder and through the spark plug hole insert a soft metal rod (about 8 mm in diameter) between the piston bottom and the valve plate, on which we change the cap.
3. We install the valve strip on the cylinder head studs and fasten it with nuts to the outer studs.
4. We install the valve depressurizer. We rest the heel of the desiccant against the valve plate, and insert the hook lever into the groove located on the back side of the bar.
5. We press the desiccant lever and compress the springs.
6. Then remove the crackers with tweezers.
7. We take out the plate with springs.
8. Using special pliers (or a device for removing caps), remove the oil deflector cap from the valve guide.
9. Remove the cap from the tongs.
Note:
We carry out the operation of dismantling the oil seal carefully so as not to damage the fragile valve guide sleeve.
10. Apply a thin layer of engine oil to the working edge of the new cap and install the cap on the valve stem.
11. Using a mandrel, press the cap onto the valve guide. As a mandrel, you can use a high “12” head. We assemble the valve mechanism in the reverse order. Remove the rod from the spark plug hole.
12. After assembling the valve mechanism, we apply a light blow to the end of the valve with a hammer through a soft metal mandrel so that the crackers are securely fixed in the grooves of the valve stem.
13. Lubricate the valve pusher and adjusting washer with engine oil and install it into the cylinder head socket.
14. Then we repeat these operations for the other valve of the 1st cylinder and then for both valves of the 4th cylinder. Then, turning the crankshaft 180° (TDC of the pistons of the 2nd and 3rd cylinders), similarly change the oil seals of the valves of the 2nd and 3rd cylinders. Reassembling the valve mechanism in reverse order
The article is missing:
- Photo of the instrument
- Photos of parts and consumables
- High-quality photos of repairs
Engine VAZ 2110 1.6 l. 16-valve injector
- Working volume – 1596 cm3
- Number of cylinders – 4
- Number of valves – 16
- Cylinder diameter – 82 mm
- Piston stroke – 75.6 mm
- Power 16 cl. – 89 hp (65.5 kW) at 5600 rpm
- Torque 16 cl. – 131 Nm at 3800 rpm
- Compression ratio – 10.3
- Power system - distributed injection
- Acceleration to 100 km/h – 12 seconds
- Maximum speed – 185 kilometers per hour
- Average fuel consumption – 7.2 liters
It is worth noting that today Avtovaz mainly produces 1.6-liter engines, and 1.5-liter units are no longer installed on Lada models, but they are quite common on “tens”.
Replacement process
The replacement process itself on the Kalina 8 cl unit is simple and can be carried out under normal conditions, in the most ordinary garage with good lighting. When dismantling, place all removed parts in some previously prepared container so as not to lose anything. If the car has high mileage, you may need to purchase new bolts for tightening. But it will be possible to say more definitely after dismantling the head.
Required Tools
One type of torque wrench
- a set of keys;
- set of heads;
- hexagon;
- durable screwdriver.
- Place the vehicle on a level surface.
Allow the engine to cool.
- Next, you need to completely unscrew the cylinder head mounting bolts.
- They are removed along with the washers.
- We remove the cylinder head.
- It is worth knowing that during long-term operation, the bolts with which the cylinder head is secured increase in length. Therefore, it is better not to save money, but to install new ones.
- Before installing new bolts, they must be lubricated with oil.
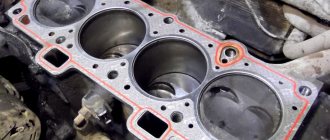
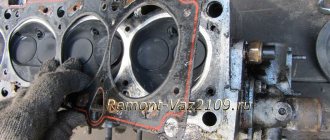
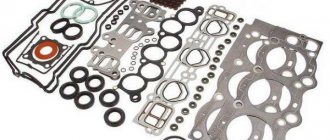
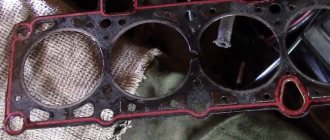
- We remove the Kalina cylinder head gasket.
- The place where it was installed must be cleaned. This is done not mechanically, but using a special liquid. If you use a file or a wire brush, there is a high risk of scratching the surfaces. As a consequence, loss of tightness with all the ensuing consequences. The surface was polished with an abrasive tool. Scratches are noticeable. Install a new gasket. New part installed
- We install the cylinder head. Make sure the crankshaft and camshaft are at top dead center. This is a very important condition.
- We insert bolts into all holes and tighten them in a certain sequence: Diagram for tightening the bolts.
- First, we walk around the first circle and pull, applying a force of 20 N•m (2 kgf•m);
- Then we go around the second circle and pull, applying a force of 69.4-85.7 N•m (7.1-8.7 kgf•m);
- Next, use a wrench to turn the bolts 90 degrees;
- We go through it again and turn it 90 degrees again.
- Next, you need to connect all the removed wires and pipes. Many car enthusiasts, performing this work for the first time, mark the parts or take photos.
Powerplant Be sure to strictly adhere to this diagram when loosening the bolts
Engine VAZ 2110 16 valves timing device
We offer a detailed timing diagram for a 16-valve “tens” engine. Replacing the timing belt on an engine with two camshafts is much more difficult than on a conventional 8-valve engine. The timing device adds another camshaft pulley, an additional timing roller. When replacing a belt on a 16-valve engine, you need to install the belt in such a way that the marks of the camshaft pulleys align with the mark of the crankshaft pulley. The most interesting thing is that the tension roller, which you need to install correctly to ensure normal belt tension, can shift the marks when tensioned. Therefore, if you do not have experience installing a belt on a 16-valve VAZ-2110 engine, it may take quite a lot of time to understand how it works.
Before installing the timing belt guard, you must make sure that the tension roller has sufficiently tightened the belt and that the marks match exactly. If you are not sure that the marks completely match, it is better not to assemble the timing belt further, it is better to check everything again. After all, if the marks do not match, at least by one tooth of the timing belt, the engine is unlikely to operate normally, since the gas distribution mechanism will be unbalanced.
Today, modifications of the VAZ 2110 engine with 16 valves and a volume of 1.6 liters are installed on almost all new models of Lada Kalina, Priora and Grant. Accordingly, the design of these motors is very similar.
Quality
Kalina has become a testing ground for testing new engineering solutions, the shortcomings of which the car plant engineers can take decades to correct. Somehow:
- Power steering
- Electronic gas pedal.
- Safety airbags.
On the twelfth hatchback, innovations were less sophisticated.
Perhaps innovations, new technologies, improve technology. This is undoubtedly true, but not in Russia, where engineering problems may not be corrected for decades. In the budget line, reliability is valued, first of all, and new, untested technologies, in Russian conditions, significantly reduce reliability.
The build quality and materials of both Kalina and VAZ 2112 leave much to be desired. There is no difference between them here.
Add a comment Cancel reply
You must be logged in to post a comment.
On Lada Granta and Lada Kalina cars, we check the condition of the timing belt of a 16-valve engine according to the maintenance regulations on a cold engine (15–35 °C) - every 15 thousand km. The work of replacing the timing belt within the mileage determined by the regulations is not provided, but if defects are found during the inspection, then the operation can be performed using our step-by-step instructions.
LADA > Granta
LADA > Kalina
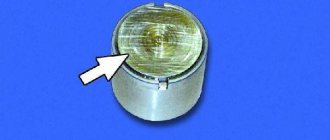
We check the condition and adjust the tension of the timing belt on a cold engine (15–35 °C). To inspect the belt, remove the top drive cover. In this case, for convenience, it is better to remove the glass washer reservoir.
Removing and replacing the catalyst on Kalina 8 valves
Replacing the catalyst on Kalina 8 valves involves work both in the engine compartment and under the bottom of the car.
- Initially, we provide ourselves with access to the exhaust manifold housing, move the high-voltage wires to the sides, and remove the plastic cover covering the motor at the top. Our collector itself is located at the front of the engine, if you look at it while standing in front of the car. When carrying out dismantling work, there is no need to drain the coolant.
- Using socket wrenches, unscrew the fastenings of the catalyst body. We do not remove it from its seat.
- At this stage, the work in the engine compartment is completed; it is necessary to lift the car on an electric lift for further dismantling.
- We need to unscrew the flange connections at the junction of the corrugated pipe and the back of the catalyst.
- Carry out a similar procedure in the resonator area.
- Now, piece by piece, remove the products from under the car and place them on the work surface for repairs.
Replacing the Lada Kalina catalyst begins with the fact that the owner of the technical device needs to decide on the further choice of part: a new standard catalyst or a “spider”. Considering the short lifespan of factory equipment, the second option would be the most practical. The catalyst is also often replaced with a flame arrester; Kalina accepts this alternative well. But in this article we will not consider this issue.
89888zhzh
The surface of the toothed part of the belt should not have folds, cracks, undercuts of teeth and detachments of rubber from the fabric frame. The reverse side of the belt should not have wear, exposing the cord threads, or signs of burning. There should be no delamination or fraying on the end surfaces of the belt. If defects are detected or there is a significant discrepancy between the belt tension control elements (see below), the belt must be replaced. You should also change the belt if traces of engine oil are found on it (before installing a new belt, you need to eliminate the cause of oil getting on the belt), when replacing one of the rollers or the coolant pump.
Attention! If the timing belt fails (if the teeth are broken or cut off), contact of the valves with the pistons may occur due to a mismatch in the relative angular position of the crankshaft and camshafts. As a result, this leads to expensive engine repairs.
Check the belt tension. To do this, turn the crankshaft (see above) clockwise...
Electrical equipment
Any modern car, and the Lada Kalina 2 is no exception, is equipped with a large amount of electrical equipment, the failure of which can lead to the failure of a number of systems, and sometimes to the breakdown of their parts.
Let's take a Kalina 8 generator (VAZ 11183-50/11186) and 16 valves (VAZ 21126-21127). It ensures the operation of a number of systems and recharges the battery. If the generator fails, for example, such a part as the brushes of the Kalina generator, replacement of the unit or its parts is inevitable. Since the battery cannot be recharged, the sensors, engine ECU, interior lighting elements, rear and head optics, fuel pump, Lada Kalina heater fan (heater motor), Kalina cooling fan, Kalina 2 starter and other equipment will no longer work. The reason that the Kalina 8 and 16 valve generator does not work may also be the Lada Kalina2 generator belt. Therefore, restoration is so necessary, and if this is not possible, replacement of the Lada Kalina 16 or 8 valve generator; in case of damage or significant wear, replacement of the Kalina 2 generator belt .
When the Kalina 2 starter does not spin, the starting system cannot work, the engine simply will not start (you can, of course, use alternative methods on versions with manual transmission, but this is an exception to the rule). The causes of breakdowns due to which the Kalina starter does not work can be different. For example, a bendix breaks, then you need to buy a bendix in our store and replace it.
In the ignition system, faulty spark plugs of the Lada Kalina also make it impossible to start the engine; therefore, replacement of the Lada Kalina 2 spark plugs is required.
oooooooh
To tighten the belt, turn the tension roller counterclockwise, and to loosen it, turn it clockwise. To do this, insert a special key in the form of two Ø4 mm rods attached to the base of the key (the distance between the rods is 18 mm) into the grooves of the outer disk of the roller. This key is used to adjust the timing belt mechanism of all front-wheel drive VAZ vehicles.
We tighten the belt until the cutout of the outer disk coincides with the rectangular protrusion of its inner sleeve and tighten the roller mounting bolt to a torque of 34–41 Nm.
Attention! Excessive belt tension reduces the service life of both the belt itself and the bearings of the coolant pump, tensioner and guide rollers. Insufficient belt tension also leads to its premature failure, which can cause a violation of the valve timing and, as a result, lead to contact of the pistons with the valves and expensive engine repairs.
We turn the crankshaft two turns until the marks on the camshaft sprockets align with the cutouts on the rear timing cover and check that the cutout of the outer disk of the tension roller coincides with the rectangular protrusion of its inner sleeve. If necessary, repeat adjusting the belt tension. If belt defects are detected or if there is a significant discrepancy between the position of the cutout of the outer disk of the tension roller relative to the rectangular protrusion of its inner bushing (by more than half the width of the protrusion), the belt should be replaced.
Remove the accessory drive belt. We leave the height-adjustable stop installed under the engine oil pan to hold the weight of this part of the power unit.
Using a Torx T-30 wrench, unscrew the two screws securing the lower timing cover (see above for the location of the screws).
Engine repair | Lada Kalina 2
This section clearly outlines the process of repairing the cylinder block, piston and crank groups, which are identical for all engines.
Let's analyze the engine of Lada Kalina 2
Take keys “10”, “8”, “13”, “17”, Allen keys “5”, TORX E10, pliers, wrench, pliers, micrometers, bore gauge, oil filter puller, dial indicator type with indicator stand, torque wrench.
If you did not drain the oil from the crankcase when removing the power unit, then secure the clean motor on a stand for disassembly and get rid of the oil.
We advise you to carry out work on a rotary stand, as this is much more practical.
1. Take out the motor
2. Secure the engine to a strong support.
3. Disconnect the motor and gearbox.
4. Disconnect the cylinder head.
5. Unscrew the 3 fastening bolts of the console of the right suspension support of the power unit.
6. Disconnect the console.
7. Remove the oil filter.
8. Unscrew the 2 fastening bolts of the water pump supply pipe.
9. Pull out the pipe,
10. as well as a sealing gasket.
When assembling the Lada Kalina 2 motor, purchase a new sealing gasket.
11. Disconnect the water pump and sealing gasket.
12. For an engine coupled with a manual transmission, unscrew the 6 fastening bolts.
13. Remove the clutch.
14. Mark the relative positions of the crankshaft and flywheel.
15. Unscrew the 6 bolts holding the flywheel together.
16. Disconnect the flywheel.
The drive disk of the torque converter of a motor coupled with an automatic transmission is disconnected in the same way.
17. Unscrew the 16 oil sump fastening bolts,
18. Remove it and the sealing gasket.
When assembling the motor fret viburnum 2, change the sealing gasket. The aluminum oil sump is removed in the same way.
19. Unscrew the 3 bolts holding the oil receiver together,
20. disconnect it.
A rubber sealing ring is fixed in the groove of the receiver pipe. If the ring shows any defects, replace it.
21. Take the 2nd screwdrivers and
22. Disconnect the toothed pulley from the crankshaft toe.
23. Remove the key from the groove on the crankshaft toe.
24. Unscrew the 6 fastening bolts of the oil pump and disconnect it.
25. Unscrew the 6 fastening bolts of the crankshaft rear oil seal holder,
ntrllr
Attention! A spacer washer is installed on the reverse side of the tensioner rod (shown by an arrow). Don't lose her!
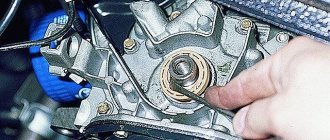
Using the “17” socket, we unscrew the bolt securing the auxiliary drive pulley, while you can secure the crankshaft from turning on a car with a manual transmission in two ways - ask an assistant to engage fifth gear and press the brake pedal or secure the engine flywheel by removing the starter. How to remove the starter from a Lada Granta is shown in the article “Replacing Coolant”.
For a car with an automatic transmission, only the second option is possible. The pulley mounting bolt is tightened with a large torque (105–110 Nm), so when unscrewing you should use a lever.
Tools and materials
Before starting work, you need to find a room for the replacement and check the availability of the necessary tools and equipment.
The minimum set of tools and spare parts is as follows:
- new cylinder head gasket;
- 10 bolts for cylinder head with size M12 (article 026707, for motor 11183) and M10 (article 256632, for engine 11186);
- gasket for the junction of the catalytic converter and resonator housings;
- torque wrench up to 100 Nm;
- a set of hex keys and sockets (at least sizes 10, 13, 17 and 19);
- pliers;
- screwdrivers with different types of blades;
- rags for wiping;
- container for draining coolant.
It is not recommended to use old cylinder head bolts.
8988kkkk8
Use a 15mm spanner to loosen the bolt securing the tension roller...
Replacing the timing belt VAZ 2112 1.6 16 cl.
1. Remove the timing belt protection. The timing belt guard is secured with six bolts. Remove the chip from the crankshaft sensor, unscrew one bolt and remove the sensor.
2. One tooth is missing on the pulley, this is not without reason, this allows the crankshaft sensor to determine the top dead center, and also allows you to block the crankshaft in order to unscrew and tighten the pulley mounting bolt.
3. This is done like this: the pulley is aligned with the hole for the crankshaft sensor and through the hole for the sensor, a suitable size tube or other suitable object is inserted, in my case it is a hexagon, the pulley is blocked, and then unscrewed and removed.
4. Loosen the tension roller nut and remove the old timing belt.
5. Install a new belt, the belt can be installed by turning the right camshaft with a wrench, or you can remove the tension roller, whichever is more convenient for you.
6. Tighten the pulley mounting bolt back and align the timing belt drive gear according to the marks. If there are no marks on the oil pump housing, put marks on the flywheel and, using a chisel, make a mark on the oil pump, this will be more convenient.
7. Align the marks of the camshaft pulleys so that the timing belt drive gear does not go astray
8. Using a special wrench, tighten the belt with a tension roller. If there is no key, don’t be upset, you can tighten it with two nails and a screwdriver between them, or you can take a steel fork, remove the two middle teeth completely, and shorten the two outer ones in half and bend them. Be sure to remember to tighten the tension pulley nut. (To tighten the belt, turn the tension roller counterclockwise (about 10–15°); to loosen it, turn it clockwise)
9. Turn the crankshaft two full turns and check the marks; if all three marks match, put the pulley in place, do not forget about the generator belt and crankshaft sensor, then the belt protection and you can start the engine.
Timing belt tension
1. Check the belt tension. A correctly tensioned belt should rotate 90° from finger force (1.5–2 kgf) in the middle between the crankshaft and camshaft pulleys.
2. I take it with two fingers between the camshafts and up and down. 5-6 mm fluctuates back and forth, then I leave it.
3. Adjust the timing belt tension using a special device. The most correct belt tension is 2 kGs. Having achieved this result, fasten the fastening nut.
4. In the "Manual", the manual verification method is described in detail. It involves checking the tension of the toothed belt in the middle part of the branch between the camshaft pulleys. It should be such that under the action of an object 3 mm wide with a force of 10 kg, the belt deflection is 5.4 mm. Deviations in any direction are allowed no more than 0.2 mm. The engine must be at “room” temperature (+15-30°C). An overtightened belt breaks - the strength of the cord threads is limited. And the tighter the belt is, the faster the threads will break. A loose belt will also not last long, because... when entering the pulley, the belt teeth do not fall into the cavities of the pulley teeth - undercutting occurs and the subsequent separation of the teeth from the base.
An important step is removing the knot
The cooling radiator and related components are unscrewed using the following tools:
- socket wrench 10;
- pliers with cylindrical thin ends;
- Phillips screwdriver;
- when carrying out work on Kalina with air conditioning, use a set of TOPEX internal socket wrenches (star-shaped).
To dismantle the radiator, you must first remove the engine cooling fan, having first disconnected the power connector from it. The fan is attached to the radiator with 4 bolts. The bolts are unscrewed with a 10 mm socket wrench, after which the fan is removed through the top.
The next step is to remove the rubber pipes from the radiator: upper, lower and coming from the expansion tank. The pipe clamps are loosened using pliers or a screwdriver. Next, use the same key to unscrew the 2 nuts securing the unit. The cooler can now be tilted towards the engine and pulled out.
When working with an air conditioned Kalina, you will have to deal with an additional cooling device attached to the main radiator. To separate them, you need to unscrew 4 bolts with a star key.
When removing the radiator, pay attention to the lower support pads; they can be removed along with the unit or remain in the body holes. It is better to remove the pillows to examine them for functionality. The same applies to rubber-metal bushings installed on the cooler body. If necessary, these parts must also be replaced.
A radiator malfunction can be localized by plugging its large pipes, immersing it in a container of water and supplying air at a pressure of no higher than 1 bar through a small fitting. If there are many places where air breaks through, then the unit is replaced with a new one.
If you have 1-2 small fistulas, try to negotiate a repair at a service station; you should not undertake this yourself. The design of the aluminum radiator is such that careless movements can easily cause even more damage.
The new cooler is installed together with the cushions in place and screwed with nuts. Further assembly is carried out in the reverse order, and attention should be paid to the condition of the rubber pipes and clamps. It might be better to replace them too.
The system is filled with antifreeze until it flows from the small pipe going to the throttle valve.
Lada 2112 2007, 89 l. With. - with your own hands
Cars for sale
Lada 2112, 2008
Lada 2112, 2008
Lada 2112, 2007
Replacing the catalyst on Kalina: what do you need to know about the spider?
Let's look at how the Kalina car, replacing the catalyst and a device called a “spider” are connected below. Many owners of technical equipment often complain that the stock version of the engine, tuned for Euro 3 firmware, by default “eats” 10-12% of the total power of the power unit. Part of the power is taken away by the exhaust gas removal system. This is not to the liking of many owners. You can restore justice by returning the required 10% of power by installing the so-called “spider” - a modified version of the exhaust manifold.
The design provides for a separate system of exhaust gases from each cylinder when exiting the combustion chamber. Thanks to this shape, each cylinder is better ventilated due to pressure differences in the exhaust system. To achieve the desired effect, it is necessary to use metal pipes of the required length. The pipes themselves are attached to the cylinder head and are installed according to the strokes of the engine.
What can you fix on your own?
An experienced driver is able to independently cope with the following problems:
In any type of repair work, it is necessary to use good tools, special equipment, and follow the operating instructions for the vehicle.
Most often, the ignition system module, diode bridge, bearings fail, and the window lift cable on the driver's door breaks. When the ignition coils spark, two of the four cylinders stop working. A break in the glass lift cable is possible due to its interweaving with the guide elements. Cracking in CV joints appears due to poor lubrication; grenades have to be replaced as a result of their significant wear.
Source
How to reset errors?
To delete information about trouble codes, you need to go to the service mode of the dashboard. To do this, press and hold the daily mileage reset button. After entering the code menu, click it again and hold it for three seconds. Then all information about problems will be deleted from memory. When this happens, the display will show “——”.
If a computer is connected to the diagnostic connector, Kalina error codes can be cleared using the program.
Can you diagnose your car yourself?