Refinement of the car improves its performance and comfort, this is a good incentive for the use of design ideas. A creative approach gives birth to new devices and accessories. The subframe created by the designers of the Avtoproduct company for the Lada Priora car is a vivid example of achieving good results along this path. It will add qualities to the weight that were not there before. Autoproduct makes spare parts not only for the Priora, but for the modification of the entire line of VAZ cars.
Such modernization attracts both athletes and urban fans of fast driving, but also ordinary owners interested in improving dynamic characteristics and making the Priora car solid. If the vehicle is used on a good road, the part will last a long time.
Main purpose of the accessory:
The subframe on the Priora is not installed standardly, but the benefits of its use are undoubted, she adds the following:
- improving overall controllability;
- protection of the power unit from impacts;
- strengthening body rigidity;
- improved road stability;
- increase in base, Caster angle.
Malfunctions - what can happen to the subframe on a Lada Priora car
The entire structure is rigid and reliable. The strength of the supporting frame, welded and threaded connections is designed taking into account maximum loads to prevent dirt and foreign objects from entering the engine compartment and protection is provided.
According to reviews from owners, after modernization, Priora’s “pothole resistance” increases. The car easily overcomes collisions with small asphalt bumps, bumps, and curb parking. But beware of areas where the uneven surfaces exceed the vehicle's ground clearance. For example, in winter or when driving on country roads, the depth of the ruts can significantly exceed the vehicle's seating position.
The main malfunctions of the car frame are reduced to the appearance of scratches, chips, dents, wear of silent blocks, and engine mounts. Corrosion may gradually appear due to damage to the paintwork. During long-term use, cracks and deformations of the metal structure due to metal fatigue under heavy loads are also possible.
Manufacturers prices
Judging by the reviews, tuning products from Avtoproduct have gained the most popularity. The subframe on the Priora and its components are presented in various configuration options (price in rubles):
- separately frame (5000 – 7570);
- plus levers (10000);
- with additional support and protection (11340);
- complete set (15640).
Also sold separately: levers – 6,000 rubles, SA support – 1,000 rubles, protection (aluminum) – 3,000 rubles, silent block – 550 rubles.
The product is patented and tested under extreme loads in racing conditions.
In addition to Autoproduct, the following manufacturers of accessories for Priora (cruciform) are also known:
- Technoressor (6840 – 7800);
- Clubturbo (7500 – 8150);
- ForMash (6600);
- 33s (6500);
- GTStech, Turbotema (4000).
Subframe for Priora - price, manufacturers, purpose
- We drive into a pit or lift the car on a lift. If you have a hole, jack up the front end and start disassembling it. We remove the wheels to provide access to the levers.
Note: To avoid problems during assembly, I recommend taking measurements of the control points (between the levers) and writing them down on paper. This will avoid confusion with setting gaps, castor and camber.
- In order for the fastening nuts to unscrew without problems, we treat the threaded connections with WD-40 penetrating fluid or an equivalent.
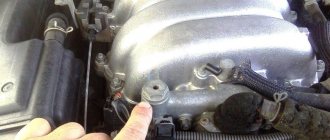
- One by one, unscrew the nuts securing the lever (ball, stabilizer link, etc.), marked in the photo.
- Once the lever has been successfully removed, assembly can begin.
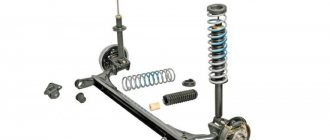
Installation of wishbones on Lada Priora
- If the ball is “live”, you can fill it with new grease and install it in place; if not, be sure to replace it.
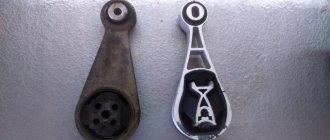
- We install the new lever in the following sequence: “halve” the lever (separate the two halves of the lever), install the part that acts as a stretcher, then into the beam, after that we assemble the lever, and at the end we insert the lever into the ear of the body.
- The right lever is more difficult to install, since the wheel drive interferes. In addition, installing the lever bolt required the help of a jack, which had to be used to jack up the steering knuckle.
- Many people have great problems installing stabilizer links, there are problems with the bolts, which is why I initially indicated that new longer bolts would be required. Also, often, due to the design of the levers, the bolts in the lever mount are skewed; a slight distortion is allowed, but if it is too large, you will have to think about something (adjust, add washers, etc.).
- Before tightening, all bolts must be lubricated with copper grease, “Litol”, or preferably worked off, this will simplify the disassembly process in the future. After everything is assembled, we check the distances between the control points with a tape measure, as you remember, we first took measurements. If everything matches everywhere, then most likely you won’t even have to do a wheel alignment. We tighten all the bolts and check that nothing is loose anywhere.
Now you can check the operation of the levers in practice. We go out onto the road, preferably where there are fewer cars, and enjoy the work done.
Results: the car responds better to the steering wheel, you can now take turns at a higher speed than before, and overall stability and controllability have improved.
Let's sum it up
Does it make sense to install a subframe on a VAZ for everyday driving? The issue is controversial, especially when it comes to installing a subframe without rigid arms. Many car tuning enthusiasts believe that to improve handling it is enough to install only wishbones. And separately, the subframe acts more like a body reinforcement, reducing its deformation. In addition, it is unknown how the subframe will influence in the event of an accident, whether it will better contain the impact or, conversely, in the case of a side impact, it will pull the other side along with it.
What do you think, is it necessary to install a subframe without levers or will it be enough to install a strut brace or a front end reinforcement (engine shield, rack)?
Which subframe is better to install on a VAZ for everyday driving?
Is it necessary to install a subframe without levers on a VAZ for everyday driving?
Your opinion on the need to install wishbones on the VAZ 2110:
Does anyone have an Autoproduct subframe with rigid levers installed?
Me and Yklon
In general, were there any real precedents for subframe destruction? like with triangular levers, destruction due to micro cracks in the welding area.
Added after 1 minute For me and yklon, how did it get up normally? Did it fit or was it filed?
Added after 2 minutes and what is the mileage on it? and is the arrival real or bordering on self-hypnosis?
If the car is driven a lot and on bad roads, a subframe cannot be installed. The body will be covered in 2 years (120,000 km). so here in more detail? I just always thought it was the other way around
yklon, reveal all the secrets of your subframe
Won't the rigid levers themselves from the autoproduct subframe fall apart? something like a dubious welded design of them
yklon, reveal all the secrets of your subframe
Won't the rigid levers themselves from the autoproduct subframe fall apart? something like a dubious welded design of them
What can I say, everything works. Doesn't break. The only negative is that it would be easier to adjust the castor using a threaded coupling and not washers. Survived one accident in the face, replaced all the headlights, fender, hood for repair, survived three broken bumpers on all sorts of snowdrifts and other bumps. All is good.
MISHKA498, think in advance whether you need to change anything in the gearbox, then removal and installation of the subframe will be added to the work on the gearbox.
Added after 14 seconds Installation of a subframe (if adjustment and modification is required) with rigid levers in Ryazan costs 2600-3000. The installation angles are 800. These are the prices.
Somewhere this is true.
In the future, access to the subframe for the gearbox will cost 1600-1800. In this case, the thread can quickly end in the end.
There is a type of subframe that is designed a little differently, but I haven’t seen it on sale for a long time
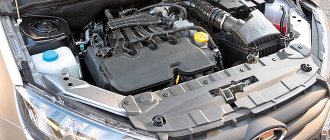
Replacement
To replace the thermostat, you need to purchase consumables. You will need the following:
- Granta thermostat with gasket included.
- Stainless steel studs 85 mm long, 10 mm in diameter - 2 pieces.
- Set of steel clamps.
- Plastic or metal tee for pipes.
- Pipe for connecting the lower “bathtub” of the radiator from Lada Granta.
- Silicone sealant with a temperature threshold of destruction of up to 200–300 degrees.
- Container for draining antifreeze.
- Set of tools.
Next, you need to wait until the power unit cools down completely, then proceed with replacement. It is done as follows:
- It is necessary to open the radiator tap and wait for the antifreeze to drain (approximately 3–4 liters).
- Remove the air purification filter housing.
- Loosen the clamps of the thermostat pipes and remove them.
- Using a “13” wrench, unscrew the nuts securing the thermostat and remove it.
- Screw 2 nuts onto each thermostat mounting stud and carefully unscrew the studs.
- Clean the thermostat seat from any remaining sealants and gaskets.
- Screw the previously purchased studs into place.
- Lubricate the thermostat seat, install the gasket, and cover it with a layer of sealant.
- Install the thermostat and secure it. There is no need to tighten the nuts all the way, and the sealant must harden a little, otherwise it will squeeze out into the system. The nuts can be fully tightened after 30 minutes.
- Connect the “saxophone” of the engine and the lower “bath” of the radiator with a pipe from Granta.
- Lubricate all pipes with sealant in the places where they contact the thermostat tubes, put them on the seats, and tighten them with clamps.
- Using a tee, connect the radiator drain to the expansion tank drain.
- Turn off the throttle heating with an M10 bolt and 2 clamps. If the car is equipped with an electronic throttle, then you do not need to touch it.
- Fill the cooling system with the missing amount of antifreeze.
- Reinstall the air purification filter.
You can check the operation of the upgraded cooling system an hour after installing all the elements. It is necessary to allow time for the sealing compound to harden.
Important! After purchasing a new thermostat, you need to check its response threshold. You need to pay attention to the temperature response threshold indicated on the packaging and body of the device. For more efficient heating, it is better to purchase thermostats with a temperature threshold of 92 degrees.
Experienced 4x4 in an old body
There was one Kalino owner in Tolyatti who did not want to wait for the completion of the project and ordered all-wheel drive for his car right now, immediately. This minute. I saw the final work on this Kalina, the units were already mounted and adjusted, all that remained was to disassemble it all, paint it with protective paint and assemble it completely.
As you can see, the amount of alterations is not that small. I had to completely sacrifice the spare wheel niche:
Convert the gas tank to the rear driveshaft:
Naturally, the configuration of the exhaust system has also changed:
The shafts are original, but the CV joints are serial, “eight” and “Nivov”.
The clutch here is interlocked with the rear gearbox:
The unit itself is taken from a Volkswagen Golf 4 Syncro. The next cars, apparently, will also be built on other units.
Here's what the assembled rear suspension looks like (without wheel drives for now):
When can I expect a test drive? For mono-drive – soon. Baburin bought a Kalina in a new body and is waiting for the installation of custom suspensions. And this will be a “finished” design, suitable for displays and test drives. Showcase car. Vitaly Ivanov is currently changing the design. When it is completed, the economics of the project will become clear: what is the cost, how many of these vehicle kits can be made by Avtoprodukt, and how much they will sell. The front-wheel drive CUV promises to be relatively inexpensive, despite a significant number of custom parts. At the same time, the car will not only receive increased ground clearance, but also improve handling. It should, in any case. We will find out how this will actually happen in the near future. I’ll make a special trip to Togliatti to ride Baburina’s Kalina. And Cross 4WD…. She'll be there later. For about six months. But clearly earlier than VAZ itself.
COMMENTS (40)
Very interesting, thanks for the article. At one time I was very interested in the fate of the viburnum 4x4. I'm glad that a car like this will probably become a production car. I wish there was a more powerful engine for all-wheel drive.
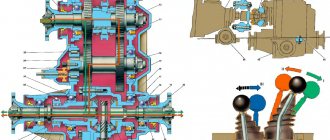
Design features
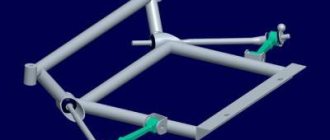
The subframe is a massive welded piece made of high-strength steel, but some models can be made of aluminum. The subframe is attached to the side members of the body, thereby forming a kind of metal skeleton. There can be several subframes:
- One at the front of the car;
- One at the front and one at the rear (anterior and posterior respectively);
- One each in the front, middle and rear of the car.
The middle and rear subframes act as a power support for the transmission unit - gearbox, rear axle gearbox. This part should not be confused with the beam, which is an indispensable part of the design of a car with a monocoque body . In this case, the beam acts as an additional support point for automobile units and does not in any way affect the vehicle’s handling or the rigidity of its body.
Subframe with rigid levers. Everything you need to know (Autoproduct, VAZ Priora)
Postcontoret
2021-10-11 00:56:35
I'll add my two cents of constructive criticism. 1. Weight transfer does not depend in any way on the dive during braking and roll during turns, it depends only on the height of the center of gravity and the length of the wheelbase during acceleration and braking, as well as the track width when turning, which is absolutely irrelevant.
2. Lifting of the muzzle, dive during braking and roll can be perfectly treated by increasing the stiffness of the springs, and this method is generally more effective than any other, since the suspension geometry is an unstable and changeable thing in its moves. On racing suspensions, as a rule, it is possible to adjust both anti-squat and anti-dive, this was done for a reason, everything has pros and cons. I won’t say more precisely about the anti-squat geometry, but the anti-squat is large, preventing the rear from squatting, and greatly affects the handling for the WORSE when you play with it on a Zhiguli, for example. That is, I can’t say right now exactly why anti-peck is bad, but I can’t presume to say that it is an unambiguous benefit, I have too little knowledge.
3. The display “here I am bending the standard lever with my hand” is meaningless. It is not loaded in such a plane. To understand the real rigidity of the structure, you need to put a lever with a “saber” on the car and try to push back and forth, in the direction of travel and against it, at the attachment point of the ball joint. This is where it becomes clear how much of a fallacy this phrase was.
4. Comparison with the figure eight is incorrect and here's why. First, unlike the non-deformable (in the sense that it does not bend plastically, but either breaks or remains intact and rigid) brace bracket 2108, the cross member of the front suspension 2110-2170 is soft. I quote the creator of chassis 2108, 2110 and Oka, Vyacheslav Vereshchagin: “At my request, at VAZ, in the body testing department (old connections), static tests of the serial cross member were carried out. As a result, when a force of about 500 kg is applied along the hinge axis (the front end of the extension, simulating braking), the total displacement (conventionally the front end of the extension) was about 10 mm (4.5 mm – hinge, about 4 mm – deformation of the bracket, about 1. 5 mm - pipe twist)" That is, 5.5 mm compliance of the cross member and 4.5 mm of the soft silent block (the front silent block is also a relative problem, but on new foreign cars the silent blocks are much softer and there it is much more difficult to cope with it, but on the family Polo Sedan we suffer, even silent blocks from Audi TT - cotton wool). Due to the design of the eight, the “crab” is correctly profiled for loads, the total compliance is almost half as low as that of the 2110-2170, this is the first thing. Secondly, the original “saber” itself had a square cross-section and - I quote Vereshchagin again - “When we talk about “total displacement”, we mean the design load: 2 ... 2.5 static loads on the wheel, multiplied by the tire adhesion coefficient (0, 7 ... 0.73) = 350*2.5*0.73 ~ 650kg. Initially (on the VAZ 2108) the brace was made by forging from 40KhGNM alloy steel, so deformation under such a load is minimal.”, that is, again by the way, the brace in its original form does not deform, this is what the test engineer who created it says. As for the “daisies” - if we assume that they are compressed all the way - then this is a maximum of 1 mm, because there is just 1 mm of rubber layer until the washer stops in the metal of the daisy. In reality, you won’t get even 0.5mm, which, against the backdrop of 10mm of overall compliance, you must agree, is a completely ridiculous indicator.
5. I tried subframes, wishbones, a thicker stabilizer, a cross member instead of crabs, a rear beam with camber and toe and viburnum, tried various combinations on different VAZ front-wheel drive. The final configuration for the front suspension, which ensures the best handling, on the 2108 turned out to be defiantly simple - “crabs” on the silent blocks of the Niva levers (I just “spied” on Vereshchagin), original levers and square early “sabers”, but the transverse silent blocks are floating, and the “daisies” » - hard polyurethane 80 SHOR. Lower arm spacer. Upper strut brace. Rear beam - Kalina-1. And the suspension - struts assembled with supports and springs - custom made by Leonid Kalinovik, for ice racing on a 4.5mm spike. Here in the video - 0PSQTM6M64E & LIST = UUXM_HIMRB4UG68SGBMT5VA & Index = 7 0PSQTM6M64E & LIST = UUXM_HIMRB4UG68SGBMTT5VA & INDEX = 7, the machine is completely stocking for all elastic bands, all the old, not a single sprout. Tuning only racks in the collection of the above and the back beam of Kalina-1. It corners beautifully, holds a straight line, doesn’t feel boggy—amazing.
Why do silent blocks creak?
Creaking in the suspension can occur both in worn parts and in new ones. Even if it seems to you that the old silent blocks did not come off as much, this does not mean that they did not fail. But it happens that the new silent block creaks - then you need to figure it out. Creaking often occurs during the cold season - autumn or winter. This may be due to the fact that more moisture begins to enter the structure of silent blocks (especially floating ones), and due to the low temperature it does not evaporate and begins its destructive effect. The creaking is clearly noticeable when driving over uneven surfaces, such as speed bumps.
The reason for the creaking of the rear silent block of the front lever. How to find out
Physically, this happens because the rubber part begins to move relative to the metal one. But there are 7 reasons why this happens.
Wear of old silent blocks
If the “old” silent blocks begin to make sounds, then most likely they will need replacement. And it doesn’t matter if they have only traveled 10 or 15 thousand kilometers - you definitely need to check them. We lift the car or drive it into a pit and visually check for wear, separation of the rubber part from the metal part, destruction, displacement at the attachment point, loss of elasticity (when the “rubber has become stiff”).
Damage that may cause silent block squeaks
If the parts visually look good, you can try lubricating them. Find out how exactly to lubricate silent blocks below. This step is especially relevant when floating silent blocks creak - their operation, due to the presence of a ball joint inside, is very dependent on the presence of lubricant. If lubrication does not help, then only replacement will save you.
Insufficient fastening torque
Silent blocks can be a problem if the fastenings are not tightened enough. Often it is for this reason that the silent blocks of the suspension arms creak. Moreover, this effect occurs in both new and old parts if the fastenings have become loose for some reason.
However, what matters is not how much force you applied, but what position the car is in. Often, car owners simply install and attract them incorrectly.
Incorrect installation
Marks on the silent block. There should also be at least one on the lever
After replacement, silent blocks creak if they were initially installed incorrectly. Even service station workers are not always able to do this correctly. Sometimes they can disrupt the integrity of the part or install it out of alignment. This is especially likely if it is necessary to press silent blocks into the lever. But most often, when replacing them in a lever, such a nuance as direction is missed. There may be one or 3 marks that should look at the ball, front silent and arrow parallel to the lever. It is also very important to clean the seat from dirt and rust.
If the part was not damaged, then you can try to correct the situation. If the silent block is damaged, it will have to be replaced.
Another common mistake is tightening the fasteners on a car with hanging wheels. Remember - you need to tighten the fasteners when the levers are under load, that is, the car is on the ground! It’s better to apply additional load.
Why can’t you tighten the silent blocks of the levers on suspended wheels? Because in this case, under load, the levers take their working position, and the silent blocks are simply twisted or even pulled out. Before this happens, the ride with incorrectly tightened bushings will be very harsh because they restrict the suspension travel.
Lack or lack of lubrication
Lubricating the polyurethane silent block with lithol before installation
Initially, good silent blocks do not need lubrication; it is even recommended to press them in not with lubrication, but with a soap solution. An exception may be composite polyurethane ones, which are sometimes used instead of the original. But, as they wear out, despite the lack of manufacturers’ recommendations for lubrication of silent blocks, practice proves that some silent blocks require lubrication to avoid squeaking. This does not affect the operation of the part, but it eliminates squeaks with a high degree of probability. Most often, this problem manifests itself in silent blocks of the middle and cheap segments.
Removing and installing the subframe
Installing a subframe on a Priora:
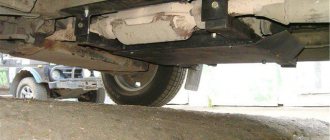
- Before installing it, it is necessary to dismantle the standard protection.
- Then unscrew the bolts at the suspension mounting points.
- Remove the beam, levers, braces, lower support (guitar).
To install the subframe follow this sequence:
- We do an approximate fitting. If the guitar mounting brackets are in the way, cut them off with a grinder.
- We try on the subframe again and check the alignment of the mounting holes for the suspension mounts. If there is no exact alignment, we bore them until the final fit.
- We secure the accessory with bolts. To facilitate the installation of pins into the holes of the rear brackets, it is convenient to press the rigid lever mechanisms with a thrust stand.
- We screw on the new support from the kit. It is bolted to the cylinder cover.
- We install engine protection.
To remove the metal frame, you need to do all the operations in reverse order. Reinstallation will require much less time and effort.
To adjust the caster angle, the kit contains eccentric washers of different thicknesses, from 1 to 5 numbers. It is necessary to install identical washers on each side. By shifting the center, they align the angle to the sides.
The castor is adjusted by changing the position of the front part of the rotating mechanism.
The increase of 1.5 degrees declared by the manufacturer is achieved by installing number 5 washers. Castor can be from 2.5 to 3.5 degrees and higher. When castor is more than 1.5, it is recommended to install strut support reinforcements.
The final step is to perform the usual camber adjustment procedure. With the difference that the camber, based on the manufacturer’s recommendations, is set to -30 minutes, and the toe remains standard for Priora.
Result
Is it worth soundproofing the doors? According to the results of a survey among VKontakte users, about 70% of car enthusiasts noticed a positive effect. About 16% saw little benefit from the intervention, and 14% noticed no difference at all.
The same ratio of votes can be seen in the poll on the website Lada2111.rf.
According to the results of popular research, the effect of soundproofing doors will reduce wheel noise by only 1-2 dB (depending on the car). The only noticeable difference will be in the sound of the acoustics.
To reduce the noise level in the cabin by 2-4 dB (a difference of 1 dB is barely noticeable or not noticeable at all), it is necessary to take a comprehensive approach to car sound insulation, work on all parts of the body (floor, doors, roof, trunk, etc.). ), wheel arches and fender liners. It would also be useful to install additional door seals on LADA cars (instructions for XRAY, Vesta, Granta/Kalina/Priora, Largus and Lada 4x4).
What do you think about the soundproofing of doors on the Lada? Help us also evaluate the standard sound insulation of the Lada Granta or Lada Largus.
Keywords: Lada Granta doors | Lada Priora doors | Lada Kalina doors | Lada Largus doors | doors 4x4 | soundproofing of Lada Granta | sound insulation of Lada Priora | sound insulation of Lada Kalina | sound insulation of Lada Largus | soundproofing 4x4 | Lada Vesta doors | sound insulation of Lada Vesta | doors lada xray | sound insulation lada xray | Niva doors | soundproofing Niva | universal article
Share on social networks:
Found an error? Select it and press Ctrl+Enter..
Reviews (0)
Purpose: increasing the rigidity of the body as a whole and the suspension mounting points. Improved SA suspension. Protection of the power unit from impacts from below. Improved controllability, stabilization, anti-dive effect. Increase castor by 1.5 degrees. Increasing the vehicle base by 15 mm. It is possible to install aluminum (4 mm), galvanized steel (2 mm) protection. Additional support is not included and can be purchased separately.
Manufacturer: AutoProduct Purpose: Tuning part Applicability:
- Lada Priora 2 hatchback (VAZ 21724)
- Lada Priora 2 sedan (VAZ 21704)
- Lada Priora station wagon (VAZ 2171)
- Lada Priora hatchback (VAZ 2172)
- Lada Priora sedan (VAZ 2170)
Weight, kg: 20.15 Dimensions, cm: 105 x 82 x 23 Volume, m3: 0.19803
Licota ATC-2286
The set of silent block pullers is equipped with mandrels and cups of the most popular sizes, which are excellent for working with parts of domestic and foreign production.
Before using the puller, you only need to select a mandrel of the required size, install it on the element to be removed and perform dismantling by rotating the nut. Using the kit, the entire silent block removal process is quick and easy.
Characteristics:
- It is used for both pressing out and pressing in silent blocks.
- Internal mandrels: 34, 36, 38 – 70, 72, 75, 80 mm.
- Outer mandrels: 44, 46, 48 – 80, 82, 85, 90 mm.
- Pins: M10, M12, M14, M16, M18.
- Type: universal puller.
- Weight: 17 kg.
Materials for printing on canvas. Part two. Subframes
What, how and why we stretch canvas
So, we chose a canvas for our work, printed our image on it, and what next... Canvas is a natural material, so it must be protected from humidity, dust, drafts and other troubles, but we will write about this in detail a little later. And today we’ll talk about how to prepare a canvas for framing or otherwise give the work a presentable look. To begin with, the canvas is stretched onto a wooden stretcher. The word stretcher itself speaks about the purpose of this item - with its help, the canvas is prepared to be inserted into a baguette frame. Although, as practice shows, a frame for a picture painted or printed on canvas is not at all a necessary detail.
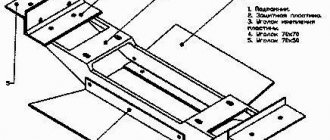
The material for stretchers is most often pine. Like any tree, pine has knots and other defects. When making a lath, which will later become a subframe, pieces of wood without knots or hitches are spliced together into a single piece (approximately this way, see picture).
As a result, we can be sure that the stretcher will not crack when the canvas is stretched in the place where the knot was.
If you purchase a stretcher yourself, be sure to pay attention to the presence of knots, and if there are any, do not buy such a stretcher - there is a risk of ruining your work.
Types of subframes
Hard or dull
The slats that make up such a subframe are tightly fastened with staples in the workshops and factories where they are produced. The advantage of such subframes is their price. But it is worth paying attention to the disadvantages. And they are as follows: if you stretch the canvas onto such a stretcher, then you will no longer be able to adjust the degree of tension.
Most often, this type of stretcher is used by artists, since after stretching the canvas is necessarily primed, and thanks to the primer, which slightly tightens the canvas, the weakening of the canvas tension is reduced.
Modular or gallery
Such subframes are sold in pairs of strips with grooves at the ends.