The chassis of a car is a very important element. And with any intervention, it is necessary to re-set the wheel angle. If these procedures are not carried out, then the car on the road may not behave very well, cornering will be worse, all this will affect braking and acceleration, and much more. Of course, today many in such cases resort to specialists who carry out such work. And that is why it is necessary to carry out the wheel alignment yourself on the VAZ 2110; now it’s worth figuring out whether this procedure can be done with your own hands.
Wheel alignment - what is it?
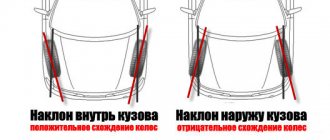
Wheel camber is the angle between the center plane and the plane of the road, all of which will affect traction, as well as the ability to control the car. Of course, if everything is configured correctly, then the car will perform maneuvers correctly.
Wheel alignment - what is it?
Alignment is the difference between the points of the rear and front wheels, most often measured in degrees or millimeters. The wear of the tires will depend on this parameter, and if it is not there, the tires will wear out quickly.
That is why they carry out the do-it-yourself wheel alignment procedure on a VAZ 2110, that is, adjusting all the presented parameters so that the car has good handling. Most often today, wheel alignment is carried out on special stands.
How and what to measure
Caster angle cannot be measured. Decreasing it leads to the inability to take a turn at speed, and increasing it leads to a “heavier” steering wheel. Usually 2-3 degrees is considered a “sporty” option. This is what we need to build on.
To measure toe and camber angles, it is enough to place a thread and a weight. Zero camber corresponds to the fact that the values of A and B are equal (Fig. 52).
Measuring with a thread
“Zero toe” is also easy to check: measure distance B (Fig. 51), knowing that the track of the front and rear wheels differs by 30 mm. The rear wheel is “recessed” inward compared to the front.
To accurately measure the toe angle, you will need equipment: a sliding ruler or a chain with a dynamometer. Only one thing is used.
Measuring the toe angle
The “measuring device” itself is brought in front and behind, then the obtained values are compared. For zero degrees, the two digits should not be different.
The car must be placed on a surface whose inclination angle is zero! In practice, to take measurements, plates are placed under the wheels. The steering wheel must be turned to the “0 degrees” position - this is also important.
Multiple ways to set corners
In general, it is not recommended to change the factory settings on a car, but you need to set the wheels to a certain position, and there are several options.
- In the first case, if the castor is negative, then the car becomes too sensitive. And in this case, the car will seem to float and not hold its position when turning.
- In the second case, the castor is positive, but the camber angle is at zero, and the steering wheel will be too heavy. But the car becomes more obedient on the road.
- In the third case, they make it sporty, that is, they set it to both minus and plus, and the steering wheel will remain the same, but the handling will improve.
Why do they do a wheel alignment on a VAZ 2110?
In order for everything to function correctly, this procedure must be carried out every 30 thousand km; this is the recommendation of specialists for foreign-made cars.
But wheel alignment is often carried out in unforeseen situations:
- When the disk is compressed, this happens when you fly into a large hole at high speed.
- After repairing the chassis.
- When the car's clearance changed.
- In some cases, the car drifts to the side while driving.
- Heavy wear on the tires on the car.
- The steering wheel does not turn when cornering.
What are the benefits of undergoing this procedure?
- The car has good handling. This occurs when driving on a straight road, that is, there is no displacement.
- The rubber will not wear out much and thus fuel consumption can be reduced.
Making a wheel alignment for a VAZ 2110 with your own hands
If you carry out car repairs yourself, then in this case you can save not only money, but also carry out high-quality repair work. And you can even do a wheel alignment of a VAZ 2110 with your own hands, the main thing is to have ideas and a certain set of tools.
Since the concepts of alignment and camber have already been discussed, it is now worth considering what castor is. When a car moves, it is strongly affected by the castor - this is the angle between the represented plane and the rotation of the wheels when the steering wheel is turned. The castor can be either positive or negative; it will determine how the drive axle will immediately return to its place. That is, with such values, the car should move in a normal position. Thus, the camber and toe angles should be checked periodically, but the caster is set by the manufacturers at the factory, and is not changed in the future. Now it’s worth figuring out how to do a wheel alignment on a VAZ 2110 yourself.
Tools for work
In order to make a wheel alignment yourself in your garage, you will need a small set of tools that I have listed below.
| A set of keys | Level | Roulette |
| Ruler | Plumb | Special ruler for determining angles |
Adjusting the camber angle of the VAZ 2110
So we have come close to the question of how to set the wheel alignment yourself on a VAZ 2110.
Most often, data on angle degrees is indicated in the operating instructions for the VAZ 2110 car, and they are presented in 0 degrees.
Before you do the wheel alignment yourself on a VAZ 2110, you need to wet all the fasteners in advance, this is necessary so that all the nuts can be easily unscrewed. To measure the angle of inclination, use a building level.
Camber adjustment:
- On the wheel rim, using chalk, place two marks on the top and bottom.
- The plumb line is fixed on the car fender, and then the distance between the marks is measured; the readings should not differ by more than 1 mm.
- Ideally, the wheel geometry is not accurate; in this case, the car is rolled back so that the risks move 90 degrees, and readings are taken again.
- After this, the wheels are turned again, but by 180° and measured again.
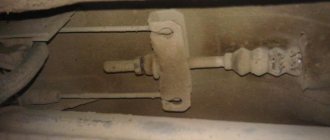
- Now remove one of the wheels using a wheel wrench, then unscrew the bracket on the shock absorber a little.
- then the steering knuckle is moved to the required distance, all this will help make more accurate camber measurements.
- Now you can put the wheel in place and rock the car a little with a little pressure on the wheel and take measurements again.
- All these procedures are carried out until the desired measurement figure is reached.
If we talk about the VAZ 2110, then the readings should have a difference of 1 mm.
Toe adjustment
Most often, ordinary threads are used to carry out such measurements, but in some cases a special ruler is used. To carry out such work, it is necessary to drive the car into a pit and set the steering wheel straight.
And now carry out the work in a certain sequence:
- Draw two marks on the tires next to the rims.
- Next, the ruler is installed so that its ends coincide with the marked marks.
- You can also use special equipment with a scale here; it should be set to 0. If such equipment is used, then several measurements should be taken with a ruler.
- The car is moved forward a little so that the marks move and the ruler moves along with the wheel.
- and at this time monitor the readings of the ruler.
- The readings on the rear and front wheels may be different, although this should not be the case. In this case, it will be necessary to adjust the steering rods.
- The locking nuts are unscrewed using a 27 wrench.
- then use a 24 key to change the length of the steering rod; work is carried out only with the coupling.
- Next, the scale of the ruler must be set so that you can adjust the toe to 0 and you will have to move the car a little back.
- if the readings agree with the desired value, then the alignment is complete, but it is better to double-check and again move the car forward a little.
- It is also worth paying attention to the steering wheel; if it is misaligned, it will immediately be clear that the traction is not set correctly. In this case, you need to check which traction is broken, and it will have to be increased.
Adjusting camber and toe without visiting a car service center
Preparation
Prepare the following items:
- telescopic ruler for checking wheel alignment;
- chalk;
- cord with a plumb line;
- standard set of motorist keys.
Ruler for measuring toe. Once upon a time, every car was equipped with it. Work should be performed on a site without uneven surfaces. It is advisable that there is a lift on it, but a pit will do.
First you need to determine how accurate the existing wheel alignment indicator is. To do this, we put the car on a flat area, turn the steering wheel in one direction until it hits an obstacle, and make a chalk mark in the middle of it. Then we rotate the steering wheel in the opposite direction (also as much as possible), counting the number of revolutions and circles required for this.
Divide the result by 2 and turn the steering wheel back to the resulting number of revolutions. If, as a result, the steering wheel is set to your usual position, everything is in order. If not, you will have to start adjusting the rack.
Adjusting the steering rack yourself
- Remove the steering wheel by unscrewing the nut.
- Fix the control element in the previously determined optimal position.
- Locate the nuts on the tie rod ends and loosen them. Unscrew one of them a little, counting the number of revolutions needed for this. Then tighten the second nut the same number of turns.
That's it, the car is ready for wheel alignment adjustment.
Convergence
- The car must be parked on a level surface. The wheels are pointing forward. It is best to do the work in a pit.
- Place a mark on the inside of the left and right wheels - they should be located next to the discs.
- Create a pre-tension in the ruler. Place it between the wheels so that the measuring device rests on the marks, but does not touch other parts of the car.
- Shake the ruler. Align the pointer with the division “0” (zero).
- Leaving the ruler on the wheels, roll the car forward a little. The measuring device must turn together with the wheels without contacting the body and suspension elements.
- Look at the line. Have the readings changed? If not or have changed slightly (up to 1 division), then the toe-in is fine. If the difference is greater, adjustment is needed.
- Loosen the locknuts on the tie rods. Turn the clutch to change the length of the pull.
- Tighten the locknut and take the reading again. Repeat until you get the desired result (i.e. zero to ±1).
Rotate the locknut to set the optimal toe-in.
How to change castor - useful tips
Many specialists increase castor by several degrees. All this work can be done with your own hands; it will not cause difficulties even for renovation beginners. That is, the adjusting washers are removed from the elements and are located on the front suspension. As a result, the racks move slightly to the side, and thus, if there is a large caster angle, the more convenient it will be to turn the steering wheel when cornering. But there are advantages and disadvantages here.
How to change castor on a VAZ 2110
Advantages:
- The stability of the car at high speeds, and if the camber has not been done before, the car holds the road.
- Due to the fact that the angle between the wheel force and the rack axis when hitting a hole, the racks will not react.
- The front wheels will not touch the car's fenders; this is important for those who install low-profile tires on the car.
Disadvantages of this method:
- The steering wheel will be too heavy, to do this you need to unscrew the nuts on both sides of the hub, then unscrew the ball and screw on the lever.
- After this, the levers and braces are dismantled.
- And then remove a few washers, and then the suspension is reassembled in reverse order.
Any driver can perform wheel alignment on a VAZ 2110 with his own hands. But in order to take accurate measurements, you should use modern tools and equipment; specialists now use special stands. If you do not take measurements and set angles, and also carry out repairs incorrectly, you can end up in an emergency on the road. Also, the tires will wear out very quickly, which is why periodically check and do a wheel alignment on the car.
Step-by-step traction adjustment
After adjusting the camber, you must make sure that the distance between the wheels is normal. If this indicator is less or, on the contrary, greater, it is necessary to adjust the steering rods:
- using a size 21 wrench, loosen the locknut clamp holding the steering rods;
- using a size 24 key, you need to start rotating the clutch to change the incorrect distance;
- when rotating the clutch, you should carefully ensure that the steering wheel spoke is positioned strictly in a horizontal position;
- Having slightly rolled the car back, check the distance between the wheels using a ruler with a moving scale;
- If during the test the measuring device gives an indicator that can vary from -1 mm to +1 mm, the process of adjusting the toe angle can be completed.
As you can see for yourself, it is quite simple to perform a wheel alignment on a VAZ-2110, and not so many tools are required. The most important thing is to believe in your strength and success and not to forget about the recommendations that were previously discussed in the article. If difficulties do arise, video instructions from the virtual world will always come to the rescue, which professionals in their field offer to everyone to familiarize themselves with.
vote
Article rating