The rear window of the VAZ-2114 car has a length of 1210 (mm) and a width of 656 (mm).
Standard dimensions of the rear window of the VAZ-2114:
Dimensions are given in length/width format.
- 1210x656 (mm).
- The glass thickness is 3 (mm).
VAZ-2114 (LADA Samara) is a five-door hatchback, produced at the Volzhsky Automobile Plant, an improved version of the VAZ-2109, the unofficial name is “Samara-2”.
Important: in the production of the rear window on the VAZ-2114, “triplex” technology was used; the product consists of several layers glued together.
| General view of the rear windows |
| General parameters of VAZ 2114 rear windows | |||
| Drawing General schematic drawing of rear windows | Length min (mm) Minimum length of the rear window for different modifications of VAZ 2114. | ||
The measurement is taken along the widest bottom part of the glass, on the outside.
The measurement is taken along the widest bottom part of the glass, on the outside.
| Length max (mm) Maximum length of the rear window for different modifications of VAZ 2114. | Modifications Number of modifications of the model in our database |
| Parameters of rear windows VAZ 2114 | |
| Parameter Rear window parameter | |
Caution: in data after which a letter designation is indicated in brackets (for example: Upper length (AB)) indicate the size of the glass opening, in all other cases the data refers to the glass dimensions.
The windshield on a VAZ 2114 cracks twice as often as the rear one, as it is more susceptible to mechanical stress. Replacing it does not require Herculean efforts or special education. You can do this yourself without contacting a service station.
Design and dimensions
Consumables that do not match in size are one of the reasons for rapid breakdown. To prevent troubles, take the choice of a new part more seriously.
Head-on
The dimensions of the windshield of the VAZ 2115 are 1400×662 mm. The dimensions of the windshield on the VAZ 2114 and 2113 have the same dimensions, which makes it easier to find a new spare part.
It is multi-component: two glass layers and a film between them, the so-called triplex. This structure prevents fragments from scattering when damaged.
Rear
Cracks or chips on parts are rare. The size of the rear window of the VAZ 2114 is 1210x656 mm.
The parameters need to be known if the driver wants to tint the car.
Lateral
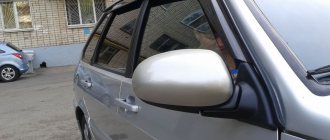
The front left side glass is 858 mm wide and 528 mm long. Consult with a salesperson at your auto store before purchasing.
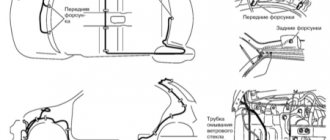
Possible washer malfunctions
In order for the wipers to work properly, a constant supply of water is necessary. To automate this process, a washer was made. There may be the following reasons for its failure.
- The steering column switch has failed. To check this, you need to close the two contacts located under the steering wheel. Front contact 53ah-w, rear contact 53ah-wh. After this, measure the resistance. In case of low resistance or breakdown, the switch must be replaced with a new one.
- The washer pump does not supply water. It needs to be changed.
- The wire connecting the switch to the pump has broken.
- The injectors are clogged with dirt. They can be cleaned with a sharp needle.
- Relay K3 does not work.
- The hose broke.
As you can see, even simple parts have enough problems and breakdowns. However, following the operating rules will help avoid repairs and increase their service life.
How to choose
Don't buy cheap copies. Products with a suspiciously low price are either made of low-quality materials or are sold as disassembled parts. An inexpensive consumable will require replacement after just six months of use.
It is advisable to find an original spare part. It will definitely fit the car, and the quality will be higher than that of its analogue.
Inspect the part carefully. The surface must be smooth, without scratches, even and transparent. The reflection must be clear and clear. If it is cloudy, do not rush to shell out money.
Check markings, manufacturer and type. Information must be clearly written. Blurred markings are one of the main signs of a fake.
The price of consumables ranges from 1000 to 3000 rubles.
Economy segment
Xyg (China) - the best Chinese parts on the market. Pass ultraviolet rays. The material is not of the best quality: poor visibility, the image is distorted. Weak structure. This consumable will have to be changed twice a year. Overall, the price is reasonable.
Borovskoye KMK (Bor, Nizhny Novgorod region). The spare part is made of soft material, chips and scratches quickly appear. Doesn't take punches well. Cheap, but short-lived.
Premium segment
Pilkington (UK). European quality. Resistant to scratches, chips do not appear the first time. Will last a long time.
Borovskoye AGC-glass (the plant was purchased by the Japanese Company AGC-Glass). Decent choice. Japanese quality, quite high price. The company provides energy-saving, multi-layer shock-resistant and colored lacquer-coated glass.
Types of glass for VAZ 2114
Knowing the size of the VAZ 2114 windshield, you also need to be able to choose it correctly. Parts with such parameters are produced by many domestic and foreign manufacturers. Let's look at the pros and cons of the most common brands of glass:
- KMK. Russian manufacturer from the city of Bor, Nizhny Novgorod region. Glass is made of a rather soft and unreliable material. It quickly develops scratches and chips. It can crack even from a small impact. The cost of the spare part is approximately 1500 rubles;
- BOR. Domestic brand. The part is of average quality, prone to chipping and other defects. Short-lived. Many owners change such glass at least once a year and note poor visibility. Product cost approx. 2000-2500 rubles depending on the place of purchase;
- Xyg . A brand from China that produces fairly good and inexpensive parts. Minor damage can quickly appear on the glass. It lets in the sun's rays and distorts the image, impairing visibility. Cost – approximately 2500 rubles ;
- AGC-glass. Premium glass of excellent quality. Produced in Russia in the city of Bor, but under the supervision of Japanese specialists. The part is multi-layered and impact-resistant. Not prone to the rapid appearance of minor defects. It holds up well even to significant impacts and is durable. It has an energy-saving coating that prevents the interior from quickly overheating in hot weather. Can be coated with colored varnish. There are several models with different designs and coatings. Does not distort the image. With careful driving, it usually lasts for several years of active use of the car. Cost – from 3800 rubles ;
- Pilkington. Premium glass from a famous brand from the UK. Famous for its impact resistance and reliability. Capable of maintaining its appearance for a long time and providing excellent visibility without distortion. Not prone to chips and scratches. With careful use, the car can last for many years. It has the only drawback - high cost. Now it costs no less 7000 rubles.
When choosing glass for a VAZ 2114, you should not consider the cheapest options. They tend to seriously distort the image, making driving uncomfortable, especially at night in headlights or on a sunny day. Such details are short-lived. And minor defects may appear on them already in the first months of operation. But you don’t have to buy too expensive products either. It is quite enough to purchase glass of an average price category.
Causes and consequences of damage
Driving on poor quality roads in Russia forces car owners to look for a new windshield at least once every year and a half. Even a very small pebble flying from under the wheels of a car can lead to damage to the part.
There are two types of damage:
- Chips. If only a chip appears on the surface, the driver is lucky. This means that the first layer is damaged; it is not necessary to install a new spare part.
- Cracks. You can't hesitate. At any moment, glass can crumble into pieces due to a hole in the road, and this will lead to an accident.
What can you do
If the driver fails to change it in time, there are several popular tips:
- Using a glass cutter, make perpendicular cuts 0.5 cm long along the edges of the “web”.
- Drill small holes with a thin diamond drill bit. The work requires accuracy, patience and attention.
- “Weld” the crack. It's better to contact specialists. Without experience it will be difficult.
Replacement
There are two options for replacing the windshield on a VAZ 2114:
Contact a car service. Fast, simple, but expensive. On one's own. If you have experience in repair work of this kind, time, patience, and an assistant, then dismantling is possible in your own garage.
How to remove
The work begins with the fact that we remove all unnecessary things. Side trims, wipers - this interferes with dismantling. Now we remove the old glass: starting from the top corner, squeeze it out along with the rubber. It is advisable to have someone help. If you pry the seal with a flat screwdriver from the inside, it will be easier to remove the headband.
You need to work with gloves, taking safety precautions.
Clean the grooves. The replacement now needs to be replaced with a seal. If the rubber is cracked, it is also advisable to replace it.
How to replace frames and seals
Replacing the windshield frame requires more effort, but this operation can be done at home.
We measure the frame. Its width is 680 mm in the center and 1378 mm diagonally. Further actions:
- We weld the fasteners on the sides.
- We make an amplifier, weld it to the frame from the outside.
- We clean the frame and the cavity for the wipers.
- We prime it twice.
- Apply adhesive sealant.
- We evenly coat the frame and cavity with paint and weld it.
The seal needs to be replaced as it wears out. If it has shrunk in places and lost elasticity, then it is advisable to install a new one in the near future. To replace the front window seal of a VAZ 2114 you will need:
- a set of flat screwdrivers;
- stationery knife;
- putty knife;
- solvent for nitro paint;
- adhesive sealant.
To make installation easier, apply lubricant to the rubber seal and soap solution to the lower groove. You need to put a thin, strong rope inside the seal. Place the new seal on the glass. We pull the ends of the cord in the center of the bottom of the material. It is advisable to soak the cord with detergent.
Required tools and materials
- Tinting film, for VAZ 2109 - at least 3 m.
- Baby shampoo or any high-quality detergent, at least 100 ml.
- Rubber scraper.
- A sharpened knife or blade.
- Sprayer in the amount of 2 pieces (needed to dilute the shampoo).
- Warm water.
- Dry wipes or lint-free cloth.
- Special hairdryer.
- Metal meter ruler.
- Assistant.
LLumar film
To quickly complete the task, the assistant will provide significant savings in time and resources, and will also significantly increase productivity. Prepare all this before starting work and your successfully tinted car is almost ready.
How to put
During installation you will have to resort to outside help. The glass is inserted into the lower groove, and only then carefully around the entire perimeter. As you insert the windshield, pull out the cord to fit the seal tightly and efficiently.
Be careful when pulling the rope at bends! In the side parts it slides with difficulty and can tear; press harder from the outside of the car.
It is advisable to fix the rubber with glue-sealant, and attach the glass to the roof and sides with tape overnight.
Replacing the rear window of a VAZ is carried out in the same way. If you installed a windshield, you can install this, although removing the rear window is a more difficult task. To insert the rear window, ask a friend for help, as you will have to pull the rope and press on the consumable at the same time.
Conclusion
Replacing damaged glass is not difficult, although it will require some skill. This is easy to do with your own hands using tools. It is advisable to have someone help you; it will be inconvenient to carry out the installation alone.
A selection of body dimensions, data on the body geometry of the VAZ 2115 and control points of the VAZ 2115, VAZ - 2114 from the factory documentation. A significant part of the repair work on cars, especially those received after road accidents, falls on body repairs. In most cases, repairs require checking the geometry of the attachment points of components and assemblies of the vehicle chassis.
VAZ 2115 body dimensions: 0 – base lines; 1 – axes of the front bolts for fastening the front suspension braces; 2 – center of support of the front suspension of the power unit; 3 – center of the support of the left suspension of the power unit; 4 – centers of the upper hinges of the front telescopic struts of the front suspension; 5 – centers of the hinges of the front suspension arms; 6 – points of intersection of the axes of the welded bolts for fastening the steering mechanism with the surfaces of the brackets; 7 – attachment points for the rear suspension support of the power unit; 8 – points of intersection of the axes of the rear welded bolts for fastening the rear suspension arms with the surfaces of the rear side members; 9 – centers of the upper supports of the rear suspension shock absorbers
Damage to car body can be very different. Therefore, the repair rules in each individual case must be different, most suitable for these damages, and it is necessary to make maximum use of the possibilities of straightening damaged panels. If possible, it is necessary to avoid thermal effects on the metal so as not to disrupt the factory welding and anti-corrosion protection of the body. Remove the front body panels only in extreme cases, to determine the location of damage, straighten or align the body. In cases of significant body damage, it is recommended to remove all interior trim to facilitate measurement, inspection and installation of hydraulic and screw jacks to correct distortion and damage to the body.
By editing it is necessary to restore the original linear dimensions and locations of the power units, the dimensions of the openings of the wind window, hood, and doors. Protrusion of the front surfaces and removable parts relative to adjacent panels is eliminated by fitting and adjusting them.
Control body dimensions, data on Lada 2115 geometry and VAZ 2115 control points from various repair bases.
Cost of downloading the file: 10.00 usd The link will be available within 16 hours after payment. After payment, a link to download the file will be sent to the specified email, or you can click the 'Buy' button again and the file download will start automatically.
How to replace a VAZ 2114 windshield
Repair and Tuning VAZ
- VAZ repair
- VAZ 2114
- Other
- Main characteristics of the VAZ windshield
- Types of damage
- Glass replacement
- Useful video
Sometimes, as a result of an accident or a simple hit by a stone, the windshield of a car is severely damaged and completely fails. You can solve the situation that has arisen, despite the complexity that may seem at first glance, with your own hands. Today we will talk about how to correctly replace the windshield of a VAZ 2114, as well as which glass is better to choose.
Replacing the windshield of a VAZ 2114
pay special attention
Important points that should not be overlooked when applying tinting to car windows, especially if you do the work yourself:
- Washing glass should be done meticulously, rinse it several times so that the tinting work goes as smoothly as possible. Particular attention should be paid to the edges of the glass.
- If there is dirt on the glass that is very difficult to wash off, do not hesitate, boldly but carefully scrape the glass with a sharp knife, or better yet, with an ordinary stationery knife.
- Under no circumstances should the glass be dried after washing; it should dry on its own so that there are no streaks.
- Do not forget to protect the internal parts of the car in case there is no way to remove the glass.
- It is better to level the film from the middle to the edges of the glass to remove excess air and solution.
- The film will adhere more easily to the glass if two people apply it, so ask for help.
- The main thing is not to allow any residual solution under the film, even in small quantities.
- As long as the film is wet, it can still be adjusted.
- Some write that you can apply a soap solution to the film itself, but in fact it is better not to get carried away with this, otherwise over time the tint film will slide off the glass.
- If bubbles appear on the surface of the rear windows, a special industrial hair dryer will be very helpful. It is very important not to overcook or exceed the permissible temperature limits, i.e. 200 degrees Celsius.
- Drying takes up to 9 hours, so the best option is to start cutting off the excess film from the glass after lunch and leave it in the garage overnight.
- Until the windows are dry, do not lower them or raise the windows under any circumstances!
- It is recommended not to install seals on glass for 2 weeks!
Design and dimensions
Consumables that do not match in size are one of the reasons for rapid breakdown. To prevent troubles, take the choice of a new part more seriously.
Head-on
The dimensions of the windshield of the VAZ 2115 are 1400×662 mm. The dimensions of the windshield on the VAZ 2114 and 2113 have the same dimensions, which makes it easier to find a new spare part.
It is multi-component: two glass layers and a film between them, the so-called triplex. This structure prevents fragments from scattering when damaged.
Rear
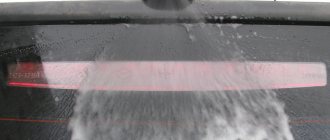
Cracks or chips on parts are rare. The size of the rear window of the VAZ 2114 is 1210x656 mm.
The parameters need to be known if the driver wants to tint the car.
Lateral
The front left side glass is 858 mm wide and 528 mm long. Consult with a salesperson at your auto store before purchasing.
A crack has appeared: what to do?
A damaged windshield on a VAZ is a source of increased danger for the driver and passengers; it can finally crack and fall out due to vibration and the car’s wheels getting into holes. It is better not to delay the purchase of new glass, but at first the growth of the crack can be delayed.
The fact is that the VAZ windshield is a three-layer glued structure (hence the name - triplex) made of glass and a transparent film that keeps the structure from crumbling upon impact. If only the first layer is damaged due to mechanical stress and a small crack appears, then its growth can be stopped in the following ways.
- A small crack can be carefully trimmed on both sides with a glass cutter. Using a glass cutter, cut 5 mm long marks perpendicular to the direction of the crack. This will help prevent further cracking for a while.
- At the ends of the crack, a hole can be made in the first layer of glass using a thin diamond drill bit. It’s a very delicate job that requires attention and patience, but if successful, it will definitely give results: for some time the crack will not spread beyond the hole.
When choosing a new windshield, you should not lean towards the cheapest options; you must remember that your safety depends on it. When purchasing, you need to check the product for scratches, cracks and chips along the edges, the surface must be absolutely smooth, and your reflection in the glass must be clear and not blurry.
Preparing for work
First, you need to check the integrity of the glass, because the film will adhere well and will only look good on undamaged windows. Secondly, it’s worth deciding on the color of the tint film; it’s best to take a shade that matches the color of the car - then you definitely won’t go wrong.
VAZ 2109
Next, you need to select the light transmittance of the tint. It is important to take a film with a color transmission rate of no higher than 70 percent in order to take into account the requirements of existing legislation. The main thing is not to save money, because cheap film will adhere much worse , come off in the corners, and will last much less than its more expensive counterparts. A good example of high-quality film are American samples; for example, for VAZ cars, a 20 percent film would be very convenient.
In the end, it is important to remember that, as with any car, tuning a VAZ 2109 car is quite a feasible job.
How to choose
Don't buy cheap copies. Products with a suspiciously low price are either made of low-quality materials or are sold as disassembled parts. An inexpensive consumable will require replacement after just six months of use.
It is advisable to find an original spare part. It will definitely fit the car, and the quality will be higher than that of its analogue.
Inspect the part carefully. The surface must be smooth, without scratches, even and transparent. The reflection must be clear and clear. If it is cloudy, do not rush to shell out money.
Check markings, manufacturer and type. Information must be clearly written. Blurred markings are one of the main signs of a fake.
The price of consumables ranges from 1000 to 3000 rubles.
Economy segment
Xyg (China) - the best Chinese parts on the market. Pass ultraviolet rays. The material is not of the best quality: poor visibility, the image is distorted. Weak structure. This consumable will have to be changed twice a year. Overall, the price is reasonable.
Frameless wipers: features
This design does not have its own skeleton. Basically, frameless wipers are a kind of tape that has a steel plate inside. Their appearance harmonizes perfectly with any car, which cannot be said about the skeletons of frame wipers.
These models do not belong to the economy segment. For different brands of cars, such wipers are selected individually. The curvature of the windshield of any car is formed according to aerodynamic parameters. Therefore, the curvature of the wiper must also be appropriate.
This is why low-cost windshield wipers do not press well and the glass does not clean. It is impossible to fix such brushes. You just need to install new, better ones. Premium brushes will work perfectly, regardless of the car model. However, they cost more than 1000 rubles.
A positive quality of frameless models is the ease of cleaning the windshield wiper from ice in winter. You just need to bend them a few times for the ice to instantly fall off. These wipers have excellent aerodynamics. At high vehicle speeds, their downforce increases.
If the glass is damaged
Apart from the case when the glass is completely broken, there are two main types of damage:
Each one needs to be repaired differently, giving the driver a wider variety of problems. But first it should be noted that triplex is used for the VAZ. This is glass consisting of three layers: two glasses, between which there is a protective film. The latter prevents the glass from simply shattering from an impact. Therefore, when the pebble described above hits the glass, a chip (or crack) forms on it. This is evidence that the first ball of glass is damaged.
Of course, this type of damage cannot immediately completely destroy the glass. But still, repairs cannot be delayed.
Replacing one layer can be inexpensive and quite quick. But if you start this process, the crack can ruin the tightness of the window, and you will have to replace the entire windshield.
Stages of work
To begin with, let’s note the ideal conditions necessary for high-quality work, namely:
- Closed, dry and warm room with minimal dust in the air;
- Full set of tools;
- Clean windows;
- Experience in tinting.
First stage
Do-it-yourself car window tinting is, first of all, giving the car a pleasant appearance. And you need to start this process by removing the glass and washing them on both sides in a special shower; if this is not possible, then you can stop by driving your car out of town or into a place that is located far enough from the road in wet weather. (removal of glass is written in the machine's operating manual).
Thus, the car will be protected from city dust. As a last resort, washing windows can be done at home in the shower, under running hot water. All stains, dirt, etc. will need to be washed off with a soapy solution of shampoo or other product, and after washing, all glass will need to be wiped dry with rags prepared in advance. It is important to completely clean the surfaces, because any foreign particles will cause swelling of the tint film.
First stage
It’s easiest to apply film from the side windows, so it’s best to start there to get used to it. The presence of a partner will be very helpful. At this stage, you should measure the dimensions of the side window and make a template with an allowance of 5 centimeters on all sides. Next, you need to cut out suitable shapes from the tint film using a knife and a meter-long metal ruler. The main thing: you need to place the transparent side of the film on a hard, clean surface and cut it. First you need to make templates for the windows. As an alternative, you can apply the film to the glass and, after carefully smoothing it, trace the glass around the perimeter.
Causes and consequences of damage
Driving on poor quality roads in Russia forces car owners to look for a new windshield at least once every year and a half. Even a very small pebble flying from under the wheels of a car can lead to damage to the part.
There are two types of damage:
- Chips. If only a chip appears on the surface, the driver is lucky. This means that the first layer is damaged; it is not necessary to install a new spare part.
- Cracks. You can't hesitate. At any moment, glass can crumble into pieces due to a hole in the road, and this will lead to an accident.
What can you do
If the driver fails to change it in time, there are several popular tips:
- Using a glass cutter, make perpendicular cuts 0.5 cm long along the edges of the “web”.
- Drill small holes with a thin diamond drill bit. The work requires accuracy, patience and attention.
- “Weld” the crack. It's better to contact specialists. Without experience it will be difficult.
Temporary protection
Temporary protection of glass can be carried out in several ways that will preserve the integrity of the windshield until it becomes possible to purchase a new spare part.
- First, you need to “break” the structure of the crack and the directions along which it goes. Using a glass cutter, make cuts about 0.5 centimeters from each edge across the crack.
- Drill several thin holes along the edges of the crack. To do this, use a diamond drill. These measures will prevent the crack from going further.
- Enlist the help of auto repair shops that are qualified in this matter. In good workshops, cracks that have arisen can be welded so that they are not even visible from the outside.
Having taken temporary measures, you should start searching for and purchasing a new part as soon as possible, otherwise the scale of the problem will increase. Temporary measures are called temporary because they cannot completely eliminate the problem.
Replacement
There are two options for replacing the windshield on a VAZ 2114:
Contact a car service. Fast, simple, but expensive. On one's own. If you have experience in repair work of this kind, time, patience, and an assistant, then dismantling is possible in your own garage.
How to remove
The work begins with the fact that we remove all unnecessary things. Side trims, wipers - this interferes with dismantling. Now we remove the old glass: starting from the top corner, squeeze it out along with the rubber. It is advisable to have someone help. If you pry the seal with a flat screwdriver from the inside, it will be easier to remove the headband.
You need to work with gloves, taking safety precautions.
Clean the grooves. The replacement now needs to be replaced with a seal. If the rubber is cracked, it is also advisable to replace it.
Windshield wiper trapezoids
The main reason you need to replace your windshield wiper arm is when your windshield wipers are running slowly. The trapezoid is also replaced in case of serious mechanical damage. To replace it, you must adhere to a certain technological sequence.
- Under the hood, the wires connected to the fuse block are disconnected.
- The protective casing covering the heater fan is removed.
- The stove filter is removed.
- The heater motor is disconnected. You just need to move it to the side, there is no need to remove it.
- The decorative trim is removed from the wipers.
- Under the protective rubber cover there is a nut that secures the windshield wiper. The cover lifts slightly and it unscrews. The janitor is removed.
- The wiper shaft is freed from rings and gaskets.
- The second windshield wiper is removed in the same way.
- Under the hood, the bolts securing the trapezoid to the body are removed.
It will not be possible to immediately pull out the released trapezoid. The fuse box will interfere, as well as the heater motor. To remove the trapezoid, you can use two exits.
- Remove the fuse box by unscrewing the nuts securing it, and remove the heater motor.
- Disconnect the gear motor from the trapezoid. Remove the gear motor one by one, and then the trapezoid.
When disconnecting the gear motor from the trapezoid, it is necessary to remember and mark the location of the crank. A marker will be useful for this purpose. Only after this can you unscrew the mounting bolts and disconnect the motor from the trapezoid.
Selection and replacement of glass
When purchasing a windshield for a VAZ 2114 car, you need to take into account several important circumstances that influence the choice of a high-quality and durable product.
There are two ways to directly replace any damaged car part:
- With the help of specialists at the service center;
- Independently, with the help of others.
It is recommended to change the windshield yourself only with the help of others and only when you have at least some experience in this matter.
If you are not confident in your abilities, do not skimp on installing a windshield and trust the professionals.
If you nevertheless decide to use a more complex but budget option, that is, you are going to install the windshield yourself, you should remember that replacing the windshield of a VAZ 2114 is carried out approximately in the following order.
- Free the removable windshield from the antenna, mirror, alarm, video recorder and other foreign objects that may be on it or glued to it. Remove the side trims on both sides.
- Remove the old windshield using gentle pressure from the inside. Start squeezing the “lobovka” outward from any angle convenient for you.
- Make sure that the seal is also removed from the car along with it. Take a closer look; if the parts are difficult to remove manually, use a flat-head screwdriver made of reliable metal. Pry up the part using the tool as a lever, this will make the glass come out faster. Squeeze the rubber seal over the metal edge of the body.
- At the same time, it will most likely not be possible to remove the triplex intact, since it is already damaged. There is no particular need for this, since using a windshield with numerous cracks poses a danger to the life and health of people in the car. But for your own safety, when removing old glass, use protective gloves to prevent cuts and be extremely careful.
- After removing the old windshield from the groove, the opening must be thoroughly cleaned and get rid of any remaining sealant. Even if the old seal remains intact after dismantling the windshield, it is still recommended to purchase a new seal and use it to install a new spare part.
- Pay attention to the corners of the seal. At the bend points there must be special holes for water to escape - “drains” or drainage holes. The drainage holes of the seal and the car body must match, otherwise water, if it gets on the glass, will end up in the car interior.
- The new seal should be well lubricated, for example with sealant or silicone, which will simplify the installation of the new glass. Some experts believe that the use of sealant or silicone, although it makes the glass fit stronger, nevertheless complicates its removal in case of damage. So in this matter, rely on your own opinion.
- Place the lubricated seal on the new windshield
- On the inside of the seal, it is necessary to place a thin thread of nylon around the entire perimeter so that the edges of the thread are in the middle at the bottom of the glass.
- Enlist the help of a friend: grab the “lobovuha” from different sides and insert it into the opening of your car, and then carefully press it to the seat. Lead the ends of the nylon cord inside the car, that is, into the interior.
- Next, one person should press the “lobovka”, while the other should carefully pull out the nylon thread from under the seal. When approaching corners, be especially careful, since it is at the bends that the nylon thread is most difficult to remove.
In car services, the process of replacing a windshield generally takes no more than half an hour, while replacing it yourself will take much more time. To make installation easier, special handles with suction cups are used, with which it can be easily lifted and inserted into the opening.
Only you can decide how to replace your windshield - yourself or with the help of specialists. One way or another, the presence of cracks on the windshield indicates the need to replace it as soon as possible. Don't risk your health and the health of your passengers!
Didn't find the information you are looking for? on our forum.
How to put
During installation you will have to resort to outside help. The glass is inserted into the lower groove, and only then carefully around the entire perimeter. As you insert the windshield, pull out the cord to fit the seal tightly and efficiently.
Be careful when pulling the rope at bends! In the side parts it slides with difficulty and can tear; press harder from the outside of the car.
It is advisable to fix the rubber with glue-sealant, and attach the glass to the roof and sides with tape overnight.
Replacing the rear window of a VAZ is carried out in the same way. If you installed a windshield, you can install this, although removing the rear window is a more difficult task. To insert the rear window, ask a friend for help, as you will have to pull the rope and press on the consumable at the same time.
Windshield H > Posted by ICE, Jul 27, 2010 09:44
#1 ICE
- Users
- 163 messages
- Moscow city
- Car: new
The native lobacher began to crack from the left edge to the right... after being “shot” with stones from under a Kamaz truck))).
I thought about the idea of installing a heated lobacha, the price is 5500 rubles (usually around 800-1500 rubles)
In my opinion. + better visibility in winter (because sometimes the anti-freeze + heater can’t cope), small savings on the anti-freeze, in winter at -30 it gets boring to defrost the windshield for half an hour (even though the engine is warmed up).
I'd love to hear feedback.
#2 connecting rod
#3 ICE
Taking into account my mileage in the region of 80k-100k per year in Moscow, the region and long-distance travel, and every 3 months there is a consistently new crack in the front. It will be a bit expensive.
On the other hand there is safety. When at night in winter you drive along a curved road where there are no lights or markings (it feels like you’re walking across a field) + the left anti-freeze system is frozen at -10, the stove manages to heat a radius of 50 cm from the center and the wipers are uselessly scraping frozen ice on the glass, then it’s worth it.