Hello, dear motorists! Although the number of cars with fuel injection now takes up the lion's share of the market, we cannot forget about carburetor cars. There are many cars with a carburetor fuel system, and therefore, the question of how and with what to flush the carburetor yourself remains relevant.
Unless, of course, you are planning to change the carburetor to an injector on your car. And washing the carburetor with your own hands will help you restore some of the technical parameters of the carburetor and, to a certain extent, reduce fuel consumption.
Provided that the carburetor is cleaned: systematically, in compliance with the cleaning technology and using a carburetor cleaner. Although, folk craftsmen say that you don’t necessarily need a carburetor cleaner. At home, solvent 645-652 works just as well. But, this is a matter of your taste when cleaning and flushing the carburetor with your own hands.
Basic carburetor maintenance work: cleaning and flushing
Like any mechanism, unit or device of a car, a carburetor requires routine maintenance. Thanks to timely and systematic maintenance, the factory parameters and settings of the carburetor will perform their functions longer.
What needs to be done during scheduled carburetor maintenance:
- mandatory washing of the carburetor outside;
- check the technical condition of visible components and elements of the carburetor;
- wash the strainer at the entrance to the carburetor float chamber;
- wash the float chamber itself;
- clean the jets from all kinds of deposits;
- carry out adjustments: idle speed, starter and carburetor float mechanism.
Let's make a reservation: cleaning the carburetor as part of systematic maintenance can take place without dismantling the carburetor.
How to clean a carburetor with your own hands - people's driving experience
Naturally, in the collection of tips from folk craftsmen on how to clean a carburetor, the carburetor manufacturer’s instructions for performing maintenance are always present at the core. In any case, when using a proprietary carburetor cleaner, or gasoline, kerosene, etc., do not forget about fire safety precautions. So, cleaning the carburetor, in order.
Carburetor cleaning - external washing and strainer cleaning
External cleaning is carried out using a brush and any carburetor cleaning product: diesel fuel or kerosene. It is not advisable to use gasoline. After external washing, it is advisable to blow out the carburetor with compressed air. How to bleed a carburetor? The ideal option is an air compressor; if you don’t have it, you can use a car compressor.
Before you start washing the carburetor, do not forget to remove the air cleaner, and make sure that no dirt gets into the internal cavities of the carburetor.
Cleaning the carburetor strainer. Its clogging is a fairly rare occurrence, however, once every 1-2 years or after 50 thousand km. The filter needs to be cleaned. Everything is simple here, the main thing is not to disturb the grid itself.
Clean the mesh filter with a solvent, rinse the filter cavity, and install the filter back, tightening the plug tightly.
Cleaning the carburetor - washing the insides of the carburetor
With just one caveat so as not to repeat myself. When using carburetor flushing fluids, always remember that a strong solvent can damage non-metallic parts of the carburetor (diaphragm or gaskets). Therefore, wash them separately and only with gasoline.
To clean the float chamber: remove the air filter, loosen the fuel hose clamp, remove it. After removing the float chamber, do not touch the float so as not to bend or damage the float. Do not lower the carburetor cap with the float down.
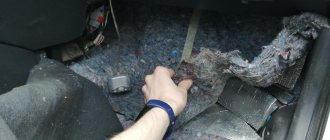
To avoid contamination of the float chamber with fibers from rags, clean the float chamber using a rubber bulb, sucking out fuel from the bottom of the chamber. If necessary, clean the bottom of the chamber with a thin, stiff brush, and repeat the operation with a rubber bulb.
We clean the main fuel air jets using compressed air. If the nozzle is very clogged, then thin copper wire is used to clean it.
What fluid to use to flush the carburetor
Given the huge range of auto chemicals, no one will give you clear recommendations on this matter. We can only say with confidence that the branded carburetor cleaning fluid helps remove all deposits that arise in the carburetor during its operation.
When using any of the existing carburetor cleaners, reviews of which you will find on the Internet, remember that first, no matter how much they praise it, thoroughly study the instructions for using the cleaner.
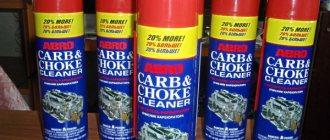
For example, Abro, a carburetor cleaner, according to the manufacturer: removes carbon deposits and poorly soluble resins. Affects the reduction of exhaust gas toxicity. And the Hi gear carburetor cleaner reduces fuel consumption. Although, an increase in fuel consumption is not always hidden in a dirty carburetor.
The manufacturer, as a rule, recommends using a carburetor cleaner every 5-7 thousand km when using low-quality gasoline. mileage
As a result, we summarize: cleaning and flushing the carburetor, with normal fuel, is necessary 1-2 times a year, or with a mileage of 20-50 thousand km.
The Importance of Carburetor Cleaning
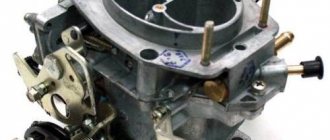
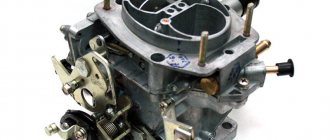
Experienced owners know where to look for a carburetor. It is located under the hood, and right on the engine intake manifold there is a carburetor injection that constantly interacts with gasoline and air. This important power system component includes several exposed parts that are susceptible to contamination. Read about how to clean the intake manifold here.
When the car is actively used, the internal and external surfaces of the carburetor are covered with a layer consisting of particles of engine oil. Engine temperature changes also negatively affect its operation. All this ultimately leads to the appearance of contamination on both the internal and external surfaces of the carburetor. This manifests itself in the formation of deposits of soot, dust, oil and gasoline film. And the longer this situation persists, the more dust will form on the surfaces of this unit.
When is mechanism repair indicated?
Car mechanics recommend cleaning the carburetor every 10-15 thousand kilometers for preventive purposes.
Signs of a mechanism malfunction are indicated by:
- gasoline consumption increases;
- When you release the accelerator pedal, the engine stalls;
- at idle there is strong vibration, engine tripping, and misfires;
- the color of the smoke from the exhaust pipe turned black;
- the acceleration of the car slows down, the response to the gas pedal weakens.
Before you start repairing the carburetor, you should make sure that there are no other problems with the car. The causes of unstable engine operation may be a malfunction of the spark plugs or ignition coil, or a breakdown of the fuel pump. All these factors can be easily checked and eliminated with your own hands.
Symptoms of pollution
Every owner should know when to start worrying and flush the carburetor. The critical state of this element can be determined by a number of characteristic features:
- significant dips during sudden acceleration and delayed response when pressing the accelerator pedal;
- unstable idling, speed becoming floating;
- difficulty starting a cold or hot engine;
- presence of high toxicity and smoke;
- significant reduction in power and increased fuel consumption.
Unfortunately, it is not always possible to say that the source of the problem is the carburetor when the above symptoms appear. Therefore, in such cases, it is imperative to first carry out a full diagnostics of the engine. Only after this can you start thinking about how to clean the carburetor.
If you constantly monitor the condition of this unit and regularly clean it, this will subsequently allow you to avoid many unpleasant moments, including unnecessary financial expenses and loss of time due to vehicle downtime.
Owners who neglect to wash this unit in a timely manner often experience the symptoms described above. In especially severe cases, when it is heavily clogged, dust and dirt as a result of vacuum may even end up inside the cylinder, and this can lead to the appearance of scuff marks on its mirror and carbon deposits on the surface of the piston.
Preparation
First of all, you need to prepare thoroughly. Buy an aerosol spray can. In fact, the caring owner of a carburetor car must keep it with him at all times. It is also called “carbcleaner”.
To clean the carb, it is enough to remove the VF cover, spray the product on the unit, after which the rotation of the motor unit should return to normal. However, such a solution only produces results. But you can try to clean the carburetor channel this way first.
In addition to the can, you also need to prepare a set of keys for removing the VF cover and the solenoid valve inside the device (on some cars this is mandatory).
Care products
A couple of decades ago, domestic car owners did not have the opportunity to use liquids to clean the fuel system.
They had to make do with more affordable means, such as diesel fuel, kerosene, solvent and acetone. These materials were highly accessible, allowing every motorist to put a carburetor into working condition at minimal cost. Any modern carburetor cleaning spray is an order of magnitude more effective than the compounds that were available before. And first of all, this is manifested in their higher quality.
Types of cleaning compositions
Car owners do not have any particular problems with how to flush the carburetor at home. There are two types of cleaning products available to them today:
- aerosol cleaner;
- a special liquid poured into a tank in which it is mixed with fuel.
Before using an aerosol cleaner, it is necessary to completely disassemble the working unit. In this case, a higher efficiency of the procedure is guaranteed. In the second case, when a special liquid is used, such complex manipulations are not required. The cleaning composition is simply poured into the gas tank, where, after mixing with fuel, it ends up in the carburetor, simultaneously removing all contaminants from the internal walls. Subsequently, the dirt enters the combustion chamber, and from there it exits through the exhaust pipe.
Tips for choosing
In order not to make a mistake when choosing a cleaner, you must follow a number of rules:
- It is recommended to choose formulations for washing that contain more active ingredients. The effectiveness of their work directly depends on this.
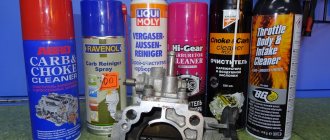
- Preference should be given to liquids from well-known manufacturers. Popular brands include Liqui Moly, Mannol, Hi-Gear.
- Before you go to the store for cleaning fluid, it doesn’t hurt to first read the reviews of other car owners who have extensive experience in cleaning the carburetor.
Safety rules should not be neglected. The aerosol cleaner contains many flammable components, so if handled carelessly, a fire hazard may arise. It is also necessary to take into account that such liquids have a specific odor. For this reason, it is recommended to clean this unit not only away from sources of fire, but also when creating conditions for good ventilation.
Flushing the carburetor without removing it from the engine and disassembling it
Let's look at the procedure for flushing the carburetor without dismantling it using Hi-Gear HG 3205. We need one can of this liquid (295 ml). In stores it costs about 300 rubles, and is designed for 40 liters of gasoline. One jar is enough for a one-time wash. The application procedure is as follows:
According to the manufacturer, the Hi-Gear HG 3205 additive not only promotes self-cleaning of the fuel system, but also helps:
Maybe, of course, everything is not so colorful, but after driving 300–400 km on this additive, you will definitely notice positive changes in engine performance. To maintain the fuel system and the carburetor in particular, it is recommended to repeat the described procedure every 3000 km.
Important Tips
After the carburetor has been cleaned, it must be reassembled in the same order.
During disassembly, you must immediately remember where the fuel and air jets were located. In addition, the float chamber level and idle speed should be adjusted. Considering this opportunity, after cleaning the power system unit, you should check the condition of the fuel pump and fuel tank. Some vehicles may have a mechanical fuel pump. It also needs to be checked and, if necessary, cleaned with an aerosol cleaner. If this is not done immediately, then very soon the dust present on the membrane and valves of the pump may again enter the carburetor and lead to new blockages.
To restore the fuel tank to proper condition, it will first have to be dismantled. Experts also recommend regularly cleaning this unit, since a lot of dirt often accumulates in it due to the use of low-quality gasoline. Subsequently, the sediment formed in the fuel tank can penetrate into the carburetor, and this happens with enviable regularity, even though fuel enters it through the fuel filter and the float chamber mesh.
To bring the fuel system into working condition, it is necessary to clean all key elements, starting with the gas tank and ending with the carburetor. Using an integrated approach will ensure stable engine operation and normalize fuel consumption.
WHAT DO WE HAVE AFTER COMPETENT ADJUSTMENT OF THE “SIX” CARBURETTOR UNIT?
Checking the adjustments of the fuel mixture preparation unit is the same important maintenance step as monitoring the condition of the car battery. An integrated approach to setting up the carburetor guarantees not only a comfortable mode of movement, but also a lot of useful points:
- An increase in power and a confident increase in speed.
- No failures in the operation of the internal combustion engine in the low and medium speed sector.
- Improved dynamic characteristics - the car picks up speed faster and accelerates in a short time.
- Optimal engine response, which is expressed in the responsiveness of the gas pedal.
The listed qualities make it possible to effectively use the combustible mixture, which is necessary both in urban traffic jams and on country roads. Therefore, proper adjustment of the carburetor unit will help the car gain speed in a timely manner and complete the planned maneuver.
Didn't find the information you are looking for? on our forum.
Other washing methods
Sometimes it happens that there is no special means for cleaning the working unit nearby. In such cases, solvent No. 646 can help. Although you shouldn’t rely too much on it. The effectiveness of this cleaning method is quite low, and it only allows for a short period of time to remove contaminants from the surface of the carburetor.
The proper operation of this part depends not only on the frequency of its cleaning, but also on the product used. In order not to make a mistake in choosing this product, you need to carefully familiarize yourself with its composition and properties in the store. It is imperative to take into account the activity of using the cleaning agent. We should also not forget that all elements of the fuel system require regular cleaning. To ensure proper operation of the carburetor, it is recommended to clean it of dirt every 10-15 thousand km.
Trouble-free operation of a vehicle depends on many components, not least of which is the carburetor. Every car owner should regularly check its condition. This is especially true for those who use low-quality fuel. This factor increases the likelihood of clogging by an order of magnitude. But you can avoid the negative consequences caused by a dirty carburetor if you clean it regularly.
Every car owner can handle this task with his own hands, so you don’t even have to turn to specialists for help. When disassembling this power unit, it is only necessary to remember the location of the main parts. But first you need to understand what is the best way to flush the carburetor.
This must be a special composition designed to remove contaminants from the internal and external surfaces of the working unit. It is not recommended to save on the purchase of cleaning fluid, otherwise this may soon result in new, even more serious problems for the car owner, the elimination of which will require not only more time, but also financial costs.
Most new gasoline cars are equipped with fuel injection systems. However, on our roads there are a sufficient number of cars with carburetor engines. They often have weaker performance characteristics, but remain popular due to their high self-repairability.
Most systems in carburetor cars can be put in order in a garage with a minimum set of auxiliary tools. The list of available operations also includes carburetor cleaning.
Cleaners have become the most popular
| Name of carburetor cleaner | Pros + | Minuses - | Price at the time of writing |
| MANNOL 9970 Carburetor Cleaner | Cleans very well and is convenient to use. Read the reviews: 1 → 2 → 3 → 4 → 5 → 6 → 7 → 8 | When stored, the tube taped to the cylinder constantly tends to get lost. | 150 rub. for a volume of 400 ml. |
| XADO JET100 ULTRA | Probably one of the best penetrating lubricants and its lubricating properties are excellent, and it also has a pleasant smell. Read the reviews: 1 → 2 → 3 → 4 → 5 → 6 → 7 | It ends quickly. Small volume. | 342 rub. for a volume of 250 ml. |
| Hi-Gear Carburetor Cleaner | Cleans perfectly. Effectively restores carburetor characteristics without disassembly. Read the reviews: 1 → 2 → 3 → 4 → 5 | The bottle is enough for 2 times. Bad smell. Toxic. | 522 rub. for a volume of 510 ml. |
| Liqui Moly Vergaser-Aussen-Reiniger | Gently cleans the fuel system. Using this composition, you can remove not only carbon deposits and tar deposits from the surface, but also clean channels and throttle valves. Read reviews: 1 | A little expensive. | 527 rub. for a volume of 400 ml. |
| Carburetor cleaner 3ton | Quality, price, carburetor cleaning 5+ Read reviews: 1 | Not found. | 114 rub. for volume 354 ml |
It's quite a difficult choice
You should pay attention to the reputation of each manufacturer. At the same time, it is possible to study reviews of each product
It is necessary to find additional information based on the experience of friends or other people. In the age of computer technology, this process will be the simplest and fastest. In addition, on the Internet you can search for tests of the most popular brands.
To help you choose, let’s look at cleaners from popular companies in more detail:
Based on the tests, the Liqui Moly product takes the leading place. It effectively cleans various heavy contaminants, cleans channels, jets and valves. Removes even stubborn paints. Sold in aerosol cans. This allows you to clean even the most difficult places. One of the popular brands is Mannol. The cleaner effectively removes carbon deposits and washes away dirt well from the carburetor, dampers and jets. Experienced people advise using this cleaner at regular intervals.
In this case, the performance of the fuel system will improve. If car enthusiasts are looking for a manufacturer who has developed a modern formula, then they should pay attention to the Hi-Gear brand. The composition helps remove any carbon deposits
The company offers various types of cleaners. Each differs in the method of use and exposure to pollution. The product of the ZM brand has collected numerous reviews. It was loved because it can be used not only as a cleaner, but also to lubricate mechanical components. The cleaner consists of organic compounds that are harmless to the environment. The product is universal, as it is used not only for the carburetor, but also for cleaning other elements. Among the large selection, the Jet 100 Ultra cleaner is not inferior to the championship. The product is used to clean all surfaces of the carburetor. Jet is an active product, so it quickly and efficiently removes all possible contaminants. At the same time, it has a lubricating effect, which can be useful in any emergency situations.
It should be remembered that often flushing the carburetor with cleaner does not help. In this case, you need to contact a car service.
To avoid this, you should use some simple rules:
• clean the carburetor every 5-10 thousand kilometers; • disassemble and clean the carburetor every 20-30 thousand kilometers; • periodically check the fuel system; • refuel with high-quality fuel; change filters.
From the above, we can conclude that you should not get hung up on one price of the cleaner.
It is necessary to pay attention to the properties of the product, features of use, degree of efficiency and contamination of elements, degree of purification and many other factors
Author of the article: Yuri Veselov
Preparatory activities
Before starting work, you should take care of the materials and tools used:
- diagram (it is advisable to have it on hand in order to correctly assemble all the parts into place).
- Specialized cleaner (specialized stores offer a wide selection of chemicals).
- A set of screwdrivers and wrenches (tools will be needed for dismantling and complete disassembly).
- A compressor or canister with compressed air and a special nozzle (in some areas the compressor will not be able to blow well, and the canister has a limited service life).
- A rubber bulb with a thin spout (you can use it to regulate the blowing force).
- Clean rags (lint-free cotton fabric is used, woolen rags are not used in any case).
- Personal protective equipment (when working with chemicals and when blowing with compressed air, you will need safety glasses and gloves).
Carburetor cleaning spray
Various chemical reagents are offered for use on the shelves of car dealerships. Each carburetor cleaner has its own advantages and disadvantages. The most common among users are LIQUI MOLY, Gunk Carb Medic, Run Way, ABRO CC-200.
You need to know that you cannot use WD-40 as a carburetor cleaning liquid, since it contains oil that is undesirable for this process.
The cost of special products for cleaning up the carburetor can range from, for example, $6 for a 350 ml can of Liqui Moly MTX Vergaser Reiniger to $18 for a spray with a capacity of 0.75 liters of IPONE Spray Carbu Cleaner.
If the level of contamination is not severe, it may be sufficient to use gasoline for cleaning. But it will be problematic to wipe off heavily ingrained soot.
Rinse or blow - which is better?
The carburetor has a large number of parts, so it is better to carry out a thorough cleaning using different methods. The body and lid can be washed, but small parts will require additional manipulation. An example would be jets. The channels are blown out with a stream of compressed air. You will first need to soak the elements in a special liquid, which will help dissolve some of the contamination.
Before disassembling, it is recommended to remove the device and identify any defects in the carburetor. There is often a need to repair a number of elements that have been damaged due to rubbing. They occur when operating rules are violated, as well as due to prolonged lack of maintenance.
It is also better to soak large carburetor parts in liquid and only then clean them. This will improve the effect of cleaning and further rinsing.
An important point is the choice of cleaning products, as well as the selection of the necessary liquid that will remove dirt and dust and will not damage the elements.
Carrying out cleaning
Washing and cleaning the carburetor can take from one to several hours. This depends on the level of knowledge of the specialist performing the operation, the degree of contamination and the means and materials used.
- First of all, fasteners are unscrewed , and then the fuel hoses are folded back. This must be done carefully, as they may contain fuel residues. Then disconnect the electrical connector of the magnetic valve. You will need to remove the cover from the carburetor and then place it on the table so that the floats are on top. This position reduces the risk of damage to the brackets.
- Before flushing the carburetor, you need to clean the strainer . For cars with high mileage, this operation is recommended to be done once every one and a half to two years. New cars need such washing less often. To wash it, you need to pour fuel into the float chamber through the fuel pump and remove the filter holder. The latter is washed out with a spray or special liquid. We blow out the mesh filter using an air cylinder or a compressor. Using a rag with a special product, we rub the surface above the filter plug and mount the filter elements in their places.
- from the float chamber using a rubber bulb. The remaining carbon deposits can be poured with a small amount of gasoline and blown out again with a blower, repeat until the container is clean. The float itself must be intact and during its operation it is undesirable to allow it to touch other structural elements.
- The jets must be removed carefully using a slotted screwdriver. Thin wooden sticks will help you get them out. Each emulsion well and nozzle must be thoroughly purged with compressed air. This must be done on both sides. First, the opposite direction from the worker is selected. Either thin copper wire or rigid fishing line will help get rid of contamination inside the jet. Under no circumstances should steel needles or objects made of materials of increased hardness be used for this operation to prevent damage to the channels.
- Now we clean the accelerator pump , first removing this part of the structure. We check the ball in it for free movement, and clean any possible blockages in the channels in the same way as the jets.
- The overall seal of the carburetor must not be compromised. To ensure this, we install a new gasket and assemble all the elements into place. After this, tighten the fasteners with sufficient force.
Removing jets for cleaning
Legend
There is a legend that a long time ago an aspiring auto mechanic decided to open his own workshop.
But he had one problem: he constantly confused the high-voltage wires. He could have confused the first with the third, or he could have confused them all at once.
And so, one fine day he diagnosed another car that was severely “troubled” (worked intermittently). I checked the spark plugs, removed the carburetor cover, and, as always, mixed up the wires (second with third).
Starts the engine and...
Pops, explosions, shaking. The carburetor begins to literally shoot, spewing out flames.
The young auto mechanic, frightened and hysterical, pressed on the gas and ran around the car for a couple of minutes, and only then somehow turned it off.
He immediately changed the second and third wires, putting them in their place, started it up and.
OH, MIRACLE! The engine ran smoothly, no failures, interruptions, or similar problems.
Cleaning procedure without dismantling the carb
Here's how it's done.
- The VF housing is removed, the EM valve and the plug responsible for the XX mode are unscrewed.
- After the internal elements of the carb become visible, it is necessary to apply a stream of aerosol agent to flush all lines of the XX system and the first chamber.
- At the same time, spray the aerosol spray into the second chamber and also treat the air jet channels of the main dosing system.
It is important to understand that correct application of the spray also involves treating camera mirrors and diffusers. Cleaning the valves is mandatory
A thin tube is specially provided for this purpose, allowing you to clean the most difficult places.
It is equally important to process the damper drive lever, as well as other components and simple places of the control mechanisms. This will ensure better controllability and normalize the functioning of the carb.
Cleaning does not end with the spray application stage.
- You need to wait five minutes. During this time, the product will soften the deposits and wash away the dirt.
- Next, you need to start the engine, and then pull out the choke, which will allow the engine to operate at idle speed without an EV valve. It is recommended to gas it a little more for a better effect.
By the way, some drivers do this. The speed of the power plant is forcibly increased in the idle mode, then an additional aerosol is sprayed inside the mixing device. In their opinion, this significantly improves the cleanliness of the carburetor.
The procedure can be repeated two or three times. At the final stage, everything must be put back together, the EM and other elements that had to be dismantled must be put back in place. Also, don’t forget to push the choke back into place.
Interesting point. It is recommended to tighten the valve while the engine is running. This must be done extremely carefully, first carrying out the process with your hands, and at the final stage, apply the force of an open-end wrench. You should turn the EM key no more than a quarter turn, as otherwise you can overdo it. In a word, you need to make sure that after removing the wiring from the EV, the engine begins to stall.
There is another cleaning method. It is much shorter than the above method. Often used by experienced motorists.
- Swap the two armored wires from the spark plugs. Replace the current cable of the first cylinder of the power plant in place of the cable of the fourth cylinder, and vice versa.
- Start the engine. It will begin to “sneeze” and “shoot”, but this will allow all impurities to be knocked out of the clogged carburetor channels.
During the process of starting an internal combustion engine with armored wires thrown in places, the consistency of ignition is disrupted. The pressure is created from the untimely ignition of fuel assemblies in the combustion chambers. In this manner, you can clean the SWR (carburetor) easily and simply, but you should not leave the engine running in this mode for a long time. In addition, this method is recommended as an emergency, and it is best to carry it out only if you need to drive a car to a service center.
On a note. One way or another, after such a shake-up of the system, the carburetor will still need to be cleaned, because debris from the jets will fall back into the chamber. If this is not done, the channels will become clogged with debris again after some time.
However, it is not always possible to clean the carburetor without removing it. Some models become so dirty during operation that debris accumulates and gets compacted in the float chamber, channels and other areas of the carburetor. It is especially unpleasant when the air supply nozzles become clogged, and the car’s fuel consumption increases significantly.
A carburetor is considered a complex device. Its details are selected with jeweler's precision, there are many of them. To remove all contaminants, washing alone will clearly not be enough. Therefore, carburetor manufacturers use more effective methods. For example, the jets are blown with compressed air, and before that they are soaked in a special liquid.
- Absolutely legal (Article 12.2.4).
- Hides from photo and video recording.
- Installs independently in 2 minutes.
- Invisible to the human eye, does not deteriorate due to weather.
- 2 year warranty
Action
Has a complex effect:
- dissolution and removal of deposits from the float system, jets, idle passages and other parts;
- restoring idle speed;
- reducing the harmfulness of exhaust gases;
- facilitating cold engine starts;
- increasing engine response;
- reduction of fuel consumption.
Thanks to this action, it becomes possible to adjust the carburetor until the required efficiency is achieved.
Application
The cleaner is poured into the fuel tank before refueling. Then you need to fill the tank to the top and drive on this fuel until the reserve. One bottle of product is enough for 40-60 liters of fuel. The liquid should be used every three thousand kilometers. More often when using low-quality gasoline.
CARBURETOR CLEANER:
- HG3205 / 295 ml (PROFFY COMPACT);
- HG3206 / 325 ml.
Expert advice
The main harm of deposits that appear in the system is that these products interfere with the process of normal mixture formation. Consequently, fuel burns worse and more is required. In this case, the dynamics of the vehicle suffers. An effective way to correct the situation without disassembling the system is to use cleaners.
Signs of severe blockage
The carburetor becomes dirty both outside and inside. Obvious signs of severe blockage:
- difficulty starting the power unit in a car;
- malfunction of the engine when idling;
- when you press the gas sharply, dips are observed;
- the car requires more fuel.
We cannot exclude other malfunctions that can also lead to the appearance of these signs of failure, but if the carburetor has not been flushed for more than a year, then in any situation it would not be a bad idea to do so. Before starting work, it is necessary to replace the fuel filter in the system so that after washing the equipment, only purified gasoline enters the device.
Why do this
The serviceability of this element of the fuel system significantly affects the quality of engine operation. Significant pollution causes excessive fuel consumption, negatively affects the dynamic properties of the car and has a negative impact on the environment. A regular cleaning procedure can almost completely restore its functionality. After all, even small specks that get into the jets can create significant problems.
Indirect signs will help identify the need for cleaning without disassembly. These include a clear decrease in dynamics and interruptions in fuel supply. You also need to pay attention to the spark plugs. If they are covered with a large layer of black soot or soot, as well as if they are clearly white, then you should think about how to clean the carburetor. The normal color for candles is a slight brownish tint.
Using a compressed air cylinder