The heating, ventilation and air conditioning systems of the Vesta interior are completely different models compared to similar systems operating in other Lada models. Moreover, both the design itself and the control method in these three systems are strikingly different. To begin with, we will conduct an overview analysis of the design of the Vesta stove, which will allow us to verify its effectiveness. VENTILATION AND HEATING SYSTEM
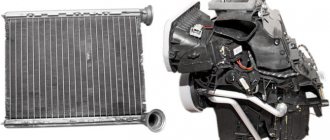
The heater radiator, designed to heat the interior of the car, is located inside the housing on the left side. If it needs to be replaced, it will be necessary to remove the upper frame (lining) of the panel (dashboard).
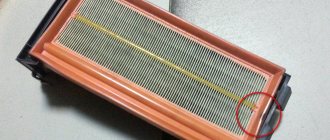
The cabin filter, which is located in the heater unit on the passenger side, functionally cleans the air entering the cabin. Unlike models such as Granta, Kalina or Priora, where the cabin filter is replaced from the engine compartment, on Vesta similar work is carried out from inside the car. In addition, the resource of the filter element is not the usual 15 thousand km, but 30,000 km, which is much more preferable.
Air temperature indicators in the cabin and outside send their measurements to the engine control unit (ECU). The control unit for the stove (heater) and air conditioner (SAUKU) is capable of monitoring parameters associated with temperature fluctuations in the air in the cabin, changes in the speed and direction of air flows, as well as heating controls. Depending on the configuration, the SAUKU can have three varieties:
- SAUKU with air conditioning;
- SAUKU without air conditioning;
- SAUKU with climate control (will be installed on cars a little later).
INTERIOR VENTILATION DIAGRAM Air ducts coming from the side of the stove body direct air jets to the windows, into the passenger compartment and legs. In turn, if the central deflectors are capable of controlling air flows in different vectors, then the power of these devices can be adjusted with a wheel located horizontally under them.
As for the implementation of the Vesta driver’s foot airflow system, in practice AvtoVAZ introduced an innovation by placing the air duct nozzle above the right foot, and not on the side. Some owners of the new sedan believe that such a mechanism is not entirely adequately selected, since the fingers are heated worse than the feet themselves. It is noted that the front passenger will not experience similar difficulties due to the fact that the air duct itself is closer to the wall of the engine shield. Also worthy of special attention is the option called “Cooled Glovebox”, which allows, on versions of the car with air conditioning, to cool any food or items in the glove compartment, which is achieved by connecting a small air duct to this small storage area. CONTROL ALGORITHM FOR OVEN AND AIR CONDITIONER “Classic” block without air conditioner The left regulator (No. 9) is designed to control the temperature of the supplied air. In turn, the right one (No. 17) controls the air flow. Accordingly, the buttons (No. 11-16) allow you to direct the air stream in a given mode. “Comfort” unit with air conditioning An additional advantage of this system is that if the left regulator (No. 18) makes it possible to operate the air conditioner, then the right one (No. 19) activates the air recirculation function. As for such parameters of the “Comfort” system as control of the supply air temperature, fan speed and air flow distribution, they are no different from the “Classic” version.
If you need LPG, then contact the exclusive representatives of TM Torelli in Ukraine, the Milano Ukraine company, read more on their website. “Luxe” unit with climate control Two buttons on the control unit have undergone changes: • In the “Defrost MAX” mode (No. 24), both the air conditioning (under favorable conditions) and the electric heating system are turned on forcibly, the power of which blows on the glass surfaces from the front and rear, as well as side mirrors. At the same time, the air temperature and the maximum maximum speed are set, after which the entire air stream is directed into the blower ducts of the windshield and front side windows. • In the “AUTO” mode, the activation of which depends on the external air temperature, automatic installation of parameters related to the temperature of both the cabin air and the coolant of the engine cooling system occurs, as well as the power of the air stream (fan speed) and changeable modes of air flow distribution . The information display (No. 10) can please motorists with its changes, as well as the temperature scale, in which convenient numbers have appeared instead of the usual measuring scale.
DIAGRAM OF CLIMATE INSTALLATION LADA VESTA/XRAY
Air conditioning system Lada Vesta/XRAY: 1, 2, 5 — air conditioning system pipelines; 3 — air conditioning compressor drive belt; 4, 15 — hoses of the engine cooling system; 6 - engine; 7 — air conditioning filter; 8 — air conditioner electric fan; 9 — air conditioner evaporator; 10 — air conditioner housing; 11 — radiator of the heating system; 12 — heater radiator supply hose; 13 — heater radiator outlet hose; 14 — air conditioning compressor; 16 — fan of the engine cooling system; 17 — radiator of the cooling system; 18 - air conditioner condenser.
CHECKING THE OVEN FAN
fan speed control knob to alternately switch four speeds. We check how it blows from the air ducts as the fan speed increases.
- If the stove does not work (the fan does not rotate at all), check the fuse in the mounting block (F45).
- If only one or more fan speeds do not work, then the cause may be a faulty auxiliary resistor or vehicle wiring.
- If the stove blows poorly (the air flow intensity is low), it means that the air intake grille or the cabin air filter .
We advise you to read our articles
How to solve the problem when the heater blows cold air from the passenger side
The stove blows warm air into the car interior no matter how sub-zero the temperature outside the window is. Its task is to provide comfort to all passengers in the vehicle. However, the stove, like any other automotive component, can fail. What to do in a situation when the heater on the passenger side does not heat? Do not be disappointed in advance; a similar problem occurs on cars of various brands. Note that this malfunction can occur either two years after purchasing a new car or two weeks after its purchase. Don’t get excited and immediately change the valves (in most cases, they have nothing to do with it). So, let's figure out what is the cause of the problem.
Why is this happening?
Undoubtedly, the most common reason for this is problems with the dampers. However, there are also problems with the radiator. As a rule, it is secured with several brackets, bolts and other fasteners in a free compartment. With frequent movement on poor road surfaces, the quality of the fastenings deteriorates, and accordingly, the components of the heating system begin to move in the pits in different directions.
As practice shows, these small movements are enough for a cold air flow to start flowing instead of the warm air supplied from the passenger seat (from the right air duct). This happens due to the formation of a gap between the casing wall and the end of the radiator. As a result, air enters the cabin, bypassing this component.
How to solve a problem
In many cases, this problem is solved by replacing the radiator (it was clogged with sediment due to dilution of antifreeze with plain water - sometimes dealerships do this). If the problem lies in the radiator, you need to pull it out, then cover the area where it is located with foam rubber so that in the future it does not move in different directions.
Other Possible Causes
It is possible that the system is sucking in air, which causes an air lock to form in the heating radiator after a certain time. This can also cause cold air to come in from the passenger side. Sedimentation (after mixing different types of coolants). Note that sediment remains even after purging the system. In this case, there are two ways out of this situation: remove and rinse the radiator thoroughly or replace it completely.
Well, now you know why the passenger side heater can blow cold. And only you can decide whether to fix this problem yourself (after spending time searching for its occurrence), or whether to put your car in the hands of professionals. In any case, we wish you good luck!
CHECKING HEATING EFFICIENCY
We start the engine and warm it up to operating temperature . We check that the inlet and outlet pipes of the heater radiator are heated and have approximately the same temperature. If the pipes have different temperatures, then it is possible:
- low coolant level in the expansion tank (which antifreeze is better)
- An air lock has appeared in the engine cooling system (air can be released through a special valve)
- Heater radiator clogged (replace)
We install the temperature regulator on the stove control unit all the way to the red zone. We make sure that the temperature of the air leaving the panel deflectors begins to rise. If it blows cold, it means:
- The damper drive is faulty (the damper does not open,
- preventing the passage of air through the heater radiator)
- The heater control unit is faulty (how to remove)
Articles about tuning Lada Xray
Dashboard Lada Vesta
On a Lada Vesta, the instrument cluster is very different from older Lada models. Therefore, this description will help you understand the meanings of indicators and instrument readings.
- Tachometer. Shows the engine crankshaft speed (x1000 min-1). The presence of the tachometer needle in the red scale area warns of increased engine speed. To prevent damage to the engine, its maximum speed is limited by the electronic engine management system software. Above approximately 6200 min-1 the fuel supply will be limited. Possible interruptions in engine operation and jolts in the movement of the vehicle are not a malfunction. When the rotation speed decreases, the fuel supply will resume. Also, do not allow the engine to operate when starting and while driving at an engine speed below 800 min-1. (ATTENTION! It is prohibited to operate the engine in a dangerous mode (at engine crankshaft speeds above 6200 min-1 and below 800 min-1).
- "Seat belt" warning light
- Warning light "Airbag system"
- Brake failure indicator
- "Electric power steering" warning light
- "Engine fault" indicator
- Battery indicator
- ABS warning light
- Speedometer
- Warning light "Unclosed hood"
- Signal indicator "Hazard alarm"
- Signaling device "Unclosed doors"
- Right and left turn signal indicators
- LCD indicator with functions
- Index "Coolant temperature". Operating a vehicle with a faulty warning light is prohibited. When the operating temperature of the coolant is exceeded (more than 115 °C), the indicator lights up red constantly, and a short-term intermittent buzzer sounds. Do not allow the engine to operate in overheating mode. (WARNING: Do not operate the vehicle with an overheated engine. The vehicle must be taken to a dealer to determine and correct the cause of the engine overheating.)
- Fuel level indicator and indicator
- Signal indicator "Parking lights"
- Signal indicator "Low beam headlights"
- Signal indicator "High beam headlights"
- Signal indicator "Front fog lights"
- Signal indicator "Rear fog lights"
- "ESC" indicator
- "ESC OFF" indicator
WHY DO GLASSES FOG?
The car windows should not fog up while the heater is operating If this happens, then the cause may be:
- heater core leaking
- cabin filter is clogged
- The electric recirculation air damper actuator is faulty
No matter what AVTOVAZ PR people say, the LADA Vesta, in accordance with the traditions of the Soviet automobile industry of the last century, turned out to be a “crude” car - with a lot of design flaws and quality defects. One of the global “jambs” that causes a lot of complaints - the clutch and manual gearbox - AVTOVAZ has already begun to change it to “more different ones”. It is not yet known whether this step will remove the claims of car owners about their reliability and smooth operation. It’s good that the company, although a year late, is trying to make its car better.
The heating, ventilation and air conditioning system of the Vesta's interior differs from similar systems of other Lada models. The difference is not only in its design, but also in the control method. Let's look at the design features of the Vesta stove, and also evaluate its effectiveness.
Disassembly - cleaning the fan
As I already wrote above, in each car the removal of this device is done differently, but the essence always remains the same, we either have the fan completely removed or there is direct access to it so that the elements can be lubricated.
The fan is almost always designed the same way - it is an electric motor and at the top there is a cylindrical comb (blades) that pumps air. Here's a small example.
The whistle comes from the engine itself; it has one or two bearings that hold the rotation shaft. If the bearings fail or become clogged with (annual) dirt, strange sounds occur - whistling, crackling, buzzing, etc. There are two possible scenarios:
Just cleaning. Diagnostics is simple, try turning the removed motor - if it turns difficult, sometimes even with familiar sounds, then vacuum the engine, lubricate the bearings and other rotating elements (can be done with any silicone grease, sometimes you can use WD-40), clean all the dirt from the shaft.
Usually this is enough in 70% of cases, the electric motor starts working quietly, easily, without unnecessary sounds. Enough for a very long time of silent operation.
Repair and replacement of shaft bearings. Diagnostics - the shaft does not rotate at all. Here the matter is more complicated, you will need to disassemble the engine itself - “look inside it.” Due to prolonged incorrect operation, bearings can jam, they simply break, the balls “wedge” in them. Many people can now say - why bother, you just need to buy a new engine! Perhaps this is a fairer remark, but the cost of the heater fan (and as a rule it comes assembled) is not very small. For example, for an ordinary foreign car of class “C” it will vary from approximately 5,000 to 10,000 rubles, which is a lot! And if you have a car of a higher class, then prices rise geometrically. So replacing bearings is very justified; they cost pennies.
SO: We unscrew the blades, they are either plastic or metal (often aluminum). There will be a nut in the middle that needs to be twisted, if you managed to unscrew it but the blades cannot be removed, put them, BUT NOT THE WHOLE engine, in hot water, not boiling water but not lukewarm (60 - 65 degrees), they can be additionally secured with boiling water glue it will soften a little, the plastic will expand and you will slowly remove the blades.
Next, we disassemble the electric motor itself, usually these are two or three bolts (nuts) that can be easily unscrewed
You need to "halve" the motor with care so as not to lose all the small parts. After you remove the cover you will see something like this:
Next, we remove the bearings, I repeat once again - often there are two of them, and then we change them. One aspect, as a rule, is that you will not be able to find exactly the same ones as those installed in yours. However, having removed the parameters of the shaft, or taking the old option, we go to a special store, of which we have a lot in the city, and buy a suitable option.
We just select the size, take a regular ball bearing, or even our domestic one - they will last longer. We put them on the shaft, assemble the motor and rejoice.
In 90% of cases, if you did everything correctly, there will be no noise, whistling, or crackling. Even if your engine was jammed, after replacement, performance will most likely be restored. This is exactly what we did with a friend in his Skoda Fabia, a new stove cost about 5,000 rubles, the price of our repair was the purchase of two bearings + a can of silicone grease, about 400 - 500 rubles. Now for the second year it has been working great, no whistling, no crunching - silence! As a friend said, it works even quieter than the new one, but it seems to me that “every sandpiper praises its own swamp”!
Elements of the ventilation and heating system
The stove body (in Fig. No. 5) is located in the car interior under the instrument panel frame. Inside the case there are:
- heater radiator;
- electric fan;
- fan speed controller (RFV) or additional resistor;
- air flow distribution damper;
- gear motor that regulates the dampers;
- air filter.
The heater radiator releases heat to heat the interior. Located inside the case on the left side. To replace it, you will have to remove the upper frame (lining) of the panel (dashboard).
Interior ventilation diagram
Air ducts run from the stove body, which direct air flows to the windows, into the interior and legs. The central deflectors can adjust air flow in different directions, and its strength is controlled using a horizontal wheel underneath them.
AvtoVAZ has implemented airflow for the Vesta driver’s feet in a new way. The air duct nozzle is located not on the side, but above the foot of the right foot. Some owners of the new sedan believe that this design is not very successful, because It warms the toes worse than the foot itself. For the front passenger, the air duct exits closer to the wall of the engine shield and a similar situation will not arise.
Worth o. On versions of the car with air conditioning, a small air duct fits into the glove compartment, which can cool, for example, a water bottle.
Lada X Ray
Modification of the rear air ducts in the Lada X Rey is necessary in the case when the owner purchases floor mats for the second row, not original ones from an official dealer (which is quite expensive), but from a third-party manufacturer.
Original rug Lada X Rey
The fact is that the sides of such carpets are quite high, and they simply cover the air duct. In such a situation, it is recommended to make Z-shaped pipes and put them on the air ducts. This is exactly what Eldar Gaparov, known on Drive as gim11, did in his Lada XRAY (top prestige) car.
Heater and air conditioner control
“Classic” block without air conditioning
Left regulator (No. 9) – supply air temperature control; Right (No. 17) - air flow regulation; Buttons (No. 11-16) - setting the direction of air flow.
Comfort unit with air conditioning
The left regulator additionally has the function of turning on the air conditioner (No. 18), and the right one has the function of turning on air recirculation (No. 19). Otherwise, the control of supply air temperature, fan speed and air flow distribution of the Comfort version of the system is similar to the Classic version.
Luxe unit with climate control
Two buttons are replaced on the control unit:
- “Defrost MAX” mode (No. 24) - the air conditioning is forcibly turned on (if conditions permit), electric heating of the windshield and rear windows and side rear-view mirrors. The entire air flow is directed to the blower nozzles of the windshield and front side windows, and the maximum speed and air temperature are set.
- “AUTO” mode - in this mode, the air flow intensity (fan speed) and one or another air flow distribution mode are automatically set depending on the outside air temperature, the cabin air temperature and the coolant temperature of the engine cooling system.
The information display (No. 10) has also undergone changes; the air temperature scale has been replaced with numbers.
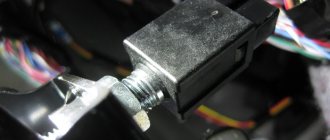
The heater does not turn on
Lack of response to turning on the heater means: failure of the switch, the fan itself, or a blown fuse. First you need to make sure the integrity of the latter. To do this, open the block cover in the lower left part of the panel and find fuse F25 (30A), indicated in the photo:
If it is burned out, replace it with a similar one - 30A. But before this, it is strongly recommended to find out the reason; perhaps the “dying” fan motor was the culprit for the blown fuse.
Also, if the fan operates only in the last, fastest mode, the resistor unit is to blame.
(2 ratings, average 4.5 out of 5)
Reviews about the Vesta stove
The first reviews from Vesta owners about the stove are generally positive. No significant deficiencies were identified. The car warms up quickly. It blows quite strongly from all the air duct nozzles. In cold weather at -25 degrees, the car interior is warm and comfortable. When using the control unit and adjusting the deflectors, the cost of the parts is not visible; in terms of quality, it resembles a foreign car.
To improve the efficiency of the heater, close the glove compartment cooling in winter:
Let us remind you that with the first cold snap we were also able to test the operation of the heating. You can find other information about Vesta that interests you in this content. By the way, problems with the operation of the stove can be caused by an air lock in the cooling system.
How does your Vesta’s stove heat? In the comments to the article we leave impressions and notes about the efficiency of the heater.
Advantages and disadvantages
The washers work fine if you fill them with normal fluid. But the injectors on the hood freeze. The central locking works without problems. If you maintain and lubricate the rubber seals, the doors will not freeze. Once I lost the lock plug on the handle. I pulled it hard, the plug flew off because it was frozen to the handle, I didn’t even notice. But then I saw that it was not there, later I found it and installed it.
AvtoVAZ still has not fixed the problem with the limit switches; they freeze in cold weather. But this can be easily solved, there are many ways. You can buy other softer rubber bands; some people install springs or lubricate them with silicone.
The dealer put rubber floor mats in my interior. There were always puddles on them and there was ice underfoot. In the summer I bought other Eva rugs and have not regretted them.
Water collects in honeycombs, making it dry and comfortable underfoot. As I already said, I have a Lada Vesta “comfort image” configuration. There is a heated windshield, three-stage heated seats for the driver and right passenger. The rear seats are not heated.
Heating can operate automatically or manually. In automatic mode, each stage operates for 8 minutes.
At first, the maximum power is turned on, and at the end it remains to work at minimum heating. You can switch manually without waiting 8 minutes, then the automation turns off. I don’t know how the rear heaters work, since they don’t exist.
The Lada Vesta car has a stove heater…
...designed to heat the car interior. The stove is also actively used during rain or cold weather.
The heater is also activated if necessary to quickly remove fogging from the windows or warm up passengers. In the “Lux” configuration, the car is additionally equipped with air conditioning, which creates a favorable temperature for a person.
The most common malfunctions of the Lada Vesta heater radiator: leakage, fan noise, engine vibration. The replacement process is not complicated, but requires care on the part of the repairman.
Heated windshield
It also works for 8 minutes, then turns off automatically. I didn’t regret it when I chose the package; I didn’t want to buy the basic one. Up to 20 degrees below zero there are no complaints about the heated windshield. After 3-5 minutes the glass warms up and the snow thaws. If the frost is stronger, then these 8 minutes are not enough, the glass does not have time to warm up.
You have to turn it on again, transfer the heat flow to the glass, otherwise there will be no use. Perhaps this is only on my Lada Vesta. Not the entire glass area is heated; in place of the wipers it does not heat up, they freeze. You need to buy some kind of winter brushes or lubricate them.
Features of driving a car in winter
On the sides of the glass, the heating threads do not reach the edge; stripes remain. Therefore, they block the view on the left, plus the A-pillars are also wide. When turning left it will be difficult to see the road. I would like the entire area to be heated.
If you are still thinking about which configuration to choose, then take it with winter options. Write what you think about this, good luck on the roads!
How the stove works on Lada Vesta. Device
- The heater radiator is connected to the system main via rubber pipes. The heat emitted by the internal combustion engine is transferred to the heating system.
- The heating system radiator distributes heat throughout the car interior using an electric fan.
- A preset resistor online regulates the fan rotation speed.
- The air flow is circulated and cleaned by a mesh and cabin filter (see diagram).
- With the help of installed dampers, the driver and passengers regulate the air flow flowing to them.
- The gearmotor rotates the damper based on the readings of the regulator and heater sensors.
Typical stove malfunctions
The most common problems with the stove on Lada Vesta are the following:
- the actual temperature does not correspond to the set one - low level of antifreeze (antifreeze), clogged radiator pipes or the formation of an air lock, which causes cold air to blow;
- vibration appears during operation - the electric motor is loose;
- insufficient air flow from the deflectors - clogging of channels and air ducts;
- the heater is inactive when it is activated on the dashboard - failure of the fuse (No. 14) of the mounting block.
Checking the stove fan
During the circulation of the air flow, dust particles settle on the surface of the impeller, as a result of which it begins to make noise and extraneous sounds appear.
To clear the fan blades of debris, it is necessary to provide access to the unit.
- Unsnap the glove box.
- Remove the filter element.
- On the right is the furnace mechanism. We press the plastic clips and turn the impeller counterclockwise.
- We remove the motor.
- We wipe the drive with a rag.
- Install the parts in reverse order.
Checking the stove dampers
Dampers are installed in the area between the deflectors and the fan. During operation, they fail, become deformed, and become damaged. Checking the serviceability of the damper on your own is quite simple: you need to activate the stove at maximum speed. If it doesn't blow well, it means the air duct is clogged. Change the damper positions. If you hear squeaking or noise, lubricate the moving parts with silicone grease.
Foggy windows when the heater is activated is the first sign of a ventilation problem. This problem provokes a sharp decrease in visibility on the road and an increase in the risk of an emergency. As soon as fogging is detected, check the condition of the ventilation; most likely, the air ducts are clogged.
Checking heating efficiency
Carry out prevention before the onset of winter. Be sure to check:
- heating the air;
- changing speed modes when switching the control lever, if necessary, replace the brushes of the stove motor;
- absence of extraneous noise, whistling in fan operation;
- the need for a time interval to warm up the air ducts.
Problems
Stove motor During operation, the device may become unusable or reduce its efficiency.
We check the fan at all four speeds:
- if the fan stops rotating, look at the safety element in the control unit;
- if one of the speeds does not work, the reason is a breakdown of the additional resistor or car wiring.
- When the fan operates at low intensity, you need to clean the air intake grille or filter.
We check the dampers - at maximum speed, use the keys to change the distribution modes:
- if they do not move, the problem is in their electric drive;
- If the Lada Vesta heater dampers squeak, you should lubricate them with silicone grease.
We warm up the engine to operating temperature, then watch how the pipes are heated. The problem lies in the different temperatures of these elements:
- minimum antifreeze level is likely;
- you need to force out the air plug through a specialized valve;
- If the radiator is clogged, replacement is necessary.
Replacing a stove radiator with your own hands on a Lada Vesta
Preparation of the workplace, necessary tools:
- rags;
- Phillips head screwdriver;
- flashlight to increase visibility;
- new radiator.
How to remove a radiator. Replacement sequence:
- We turn off the engine, turn off the ignition, and squeeze the parking brake.
- Open the hood and remove the terminal from the battery.
- We grind off the antifreeze from the system. The plug is located at the bottom point of the radiator (key 17).
- We remove the decorative trim on the instrument panel.
- Remove the top decorative trim above the glove box. Let's take it out.
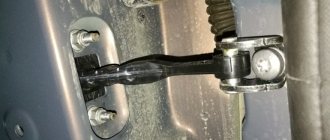
- We dismantle the metal dashboard support on the driver's side.
- Remove the air pipe.
- Open the stove lid.
- We remove the heater.
- We install a new heater radiator.
- We assemble the structure in reverse order.
Review of Manufacturer Prices
Dimensions: 184x133.5x26 mm.
| Serial number/item | Price in rubles |
| LUZAR 271153553R (original) | From 5000 |
| STELLOX 10-35126-SX | From 4500 – 4700 |
| FENOX RO0004C3 | From 4500 – 4700 |
| RO0003O7 | From 4500 – 4700 |
| AVA QUALITY COOLING RTA6398 | From 4500 – 4700 |
| VALEO 812374 | From 4500 – 4700 |
| NISSENS 76512 | From 4500 – 4700 |
| MAGNETI MARELLI 350218221003 | From 4500 – 4700 |
| *prices are as of May 2022 | |