The gas distribution mechanism is one of the most important systems of an internal combustion engine. The timing belt controls the engine valves, ensuring the normal functioning of intake and exhaust. During intake, the fuel-air mixture enters the combustion chambers as a result of the opening of the intake valve. The next phase opens the exhaust valve, and the gas distribution mechanism removes exhaust gases from the combustion chamber. The VAZ 2190 uses a standard gas distribution unit, differing only in the number of engine valves.
Device
Let's first analyze its device.
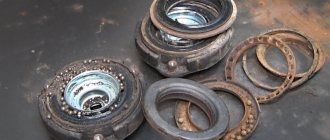
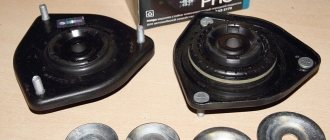
Here is a picture of a thrust bearing. In its upper part there are three studs for its fastening and one central fastening through the inside of the support.
This video was created to explain the essence of installing a support bearing, the purpose of which for some reason most car enthusiasts forget. They only know the purpose of shock absorbers and springs, although the support is an equally important element in the car’s suspension.
Video
Struct assembly diagram for Kalina car
Scheme for assembling struts for Granta vehicles
The video above (see pictures) shows:
• Attaching the upper part of the rack to the body mudguard;
• The stand itself is disassembled with a spring and upper support;
• Support bearing (there are several types).
The upper support serves to smooth out the loads coming from the wheels through the shock absorber onto the car body and distribute them evenly.
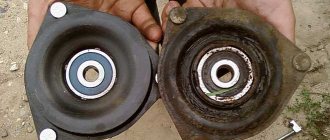
Support bearing wear
As it is used, the support bearing wears out and there is grinding, creaking, knocking, and the most dangerous thing is when play appears. All this is reflected in the condition of the rack itself and the entire wheel assembly.
So, if you lift the car on a lift and move the wheel sideways, right/left, you will notice a large free play of the entire assembly, which will tell us that the support bearing requires replacement.
If you look from above, where the shock absorber rod is attached, you will notice its movement from side to side. You can also place your hand on the top of the shock absorber where the rod nut is located. In this place the play is clearly felt.
When the bearing balls wear out, the load on the front suspension elements increases and the vehicle's handling deteriorates. Consequently, all this negatively affects overall traffic safety.
Replacing the rack support
To replace the support bearing, the strut must be removed from the car, disassembled, after compressing the spring with special ties. The faulty support is removed, a new one is installed, the rod fastening nut is tightened, the ties are removed and the stand is installed on the car.
After replacing the supports, it is recommended to check the wheel alignment on a stand to check the wheel alignment angles.
That's all, write comments. Goodbye!
In this article we will get acquainted with a small but very important component of a car's suspension - this is the front strut support bearing (in common parlance, a support bearing).
Let's try to find out why it is needed, what threatens it, and how to determine that a part requires replacement.
There is not a single unnecessary part in the machine, so if at least one of them fails, this can pose a threat to its overall performance. As a rule, a harbinger of malfunctions can be:
- changes in vehicle behavior;
- the appearance of extraneous sounds and knocks;
- unusual vibrations.
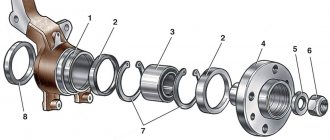
Removing the camshaft
We remove the camshaft to replace the shaft itself, valve lifters, valve stem seals, and also when repairing the cylinder head. Remove the cylinder head cover (see “Adjusting thermal clearances in the timing valve drive”). Remove the camshaft gear pulley and the rear timing cover (see “Replacing the camshaft oil seal”).
Using a 10mm socket, unscrew two nuts 1 and bolt 2 securing the cylinder head plug.
The connection between the bolt and the plug is sealed with a rubber ring.
Remove the plug from the cylinder head studs.
A rubber O-ring is installed in the groove of the plug flange.
Using the “13” socket, evenly in several steps (until the pressure of the valve springs is relieved), unscrew the ten nuts securing the camshaft bearing housings.
Remove both camshaft bearing housings from the cylinder head studs.
Remove the oil seal from the camshaft nose...
...and remove the camshaft from the cylinder head beds. Before installing the camshaft, we clean the mating surfaces of the cylinder head from any remaining old sealant...
...and bearing housings. We install the camshaft in the following sequence. Apply a thin layer of engine oil to the bearing journals and camshaft cams. We place the camshaft in the bed of the cylinder head like this...
...so that the cams of the valve shaft of the 1st cylinder are positioned as follows. In this case, the pistons of the 1st and 4th cylinders must be in the TDC position.
Apply a thin layer of sealant to the surfaces of the cylinder head mating with the camshaft bearing housings in the area of the outer supports. We install the camshaft bearing housings and tighten the nuts securing them in two steps. We pre-tighten the nuts securing the bearing housings until their mating surfaces touch the cylinder head...
...in the specified sequence. In this case, it is necessary to ensure that the installation bushings of the bearing housings fit freely into their seats. Finally tighten the nuts to the prescribed torque in the same sequence. After tightening the nuts, carefully remove any remaining sealant squeezed out of the gaps. We press in a new camshaft oil seal (see “Replacing the camshaft oil seal”). We install the timing belt. We check and, if necessary, adjust the clearances in the valve mechanism. We carry out further assembly in reverse order.
Front strut support bearing. Purpose
A car's suspension is one of its most important systems, responsible for comfort and, most importantly, traffic safety. In all the variety of parts that make up the suspension, the front strut support bearing occupies far from the last place.
It is this unit that is responsible for reliable fastening of the strut shock absorber to the car body, while ensuring its axial rotation to turn the front wheels when maneuvering. Of course, the support bearing has to cope primarily with axial loads, although radial loads are also possible.
The design of the support unit depends on the manufacturer. In most cases, it consists of a housing with fasteners, inside which there is a support bearing (with balls or rollers held by a cage) and rubber seals.
The body consists of two halves, sometimes it is made non-separable. The support bearings of the front pillar are located in the engine compartment, with the housing fixedly attached to the glasses of the car body. The shock absorber rod is attached to the moving part of the support assembly.
Causes of malfunction
Since we are dealing with a suspension element that has to work under significant loads, its design life is quite long.
So, for example, for the VAZ-2110, according to the manufacturer’s recommendations, the support bearing should be replaced after every hundred thousand kilometers. However, in the realities of our off-road conditions, the factory set of support units is unlikely to withstand such a mileage.
The reasons for premature wear of supporting elements can be:
- poor quality of roads;
- aggressive driving style;
- the desire to save on repairs when cheap analogues are installed instead of original components;
- neglect of maintenance requirements.
Another reason lies in insufficient insulation of the support bearing. It is practically open and exposed to:
- pollution (dust, sand);
- humidity (corrosion);
- chemical influence of aggressive reagents.
The influence of these factors accelerates natural wear and reduces the service life significantly.
Symptoms of a problem
It is quite difficult to determine the malfunction of the strut support bearing, primarily due to the fact that the main signs may indicate either a malfunction of the latter or a breakdown of other suspension components or the steering system. These signs may be:
- characteristic tapping while moving;
- crunches when turning with a roll;
- moving to the side when moving in a straight line;
- the emergence of problems with controllability.
In any case, a more accurate diagnosis is needed. If the fault can be localized to the unit of interest to us, replacement of the support bearing is mandatory.
Engine Features
Due to the design of the car's cooling system, the engine does not warm up above 80 degrees. The management of AvtoVAZ does not see anything wrong with this; they have an official information letter on this matter. You can read it in the material: What is the operating temperature of an 8 valve engine.
The engine design is as simple as an axe. There are no hydraulic compensators, no sores were noticed. Mostly problems can arise due to malfunctions in the engine management system.
Video of acceleration to 100 km per hour
I haven’t shot my video yet, it’s winter, so we’ll wait for the weather to warm up. That's when I'll post it on our YouTube channel. In the meantime, here's a video from Grantovodov.
Here's another interesting video. It is interesting because the measurement is made using an application with a navigator, which means that the speedometer readings are more accurate if the navigator is well calibrated. Everyone knows that the higher the speed, the more the car’s speedometer lies.
Self-diagnosis method
For self-diagnosis, you will need the help of another person.
Having chosen a flat surface, put the car on the handbrake and remove the protective covers from the glasses.
Have an assistant rock the car to set the shock absorbers in motion, and observe the behavior of the bearing yourself. The malfunction of the unit can be judged by:
- by the presence of backlash;
- when knocking or other sounds appear in the bearing area.
Make similar observations when your partner rotates the steering wheel, and then repeat the manipulations with the second pillar.
Replacing a strut bearing requires special tools and some plumbing skills. The best option would be to entrust the work to specialists, but if you are used to doing everything yourself, then you can do it yourself, but this is a topic for another article.
In any passenger car, regardless of design, the suspension must provide a smooth ride, good handling, each element of the chassis plays its role, and there are no unnecessary spare parts. The support bearing is a part of the front suspension, without which it is impossible to imagine a front-wheel drive car; if it were not there, the steering wheel would turn very tightly, with a terrible squeak, and it would be impossible to drive the car.
Eliminate camshaft knock (axial runout) with your own hands
Many already know that the VAZ 2111 injection engines have the following disease: “Axial camshaft runout”. This disease does not progress and does not cause damage to other timing components, but it manifests itself in the form of an unpleasant camshaft knock. It just so happened that the developers of the 2111 engine missed this point.
Where carburetor engines used to have a fuel pump and distributor, injection engines have a regular plug into which the camshaft rests. The camshaft axial play set by the manufacturer should not exceed 0.15-0.20mm. Over time, as the camshaft pastel wears out, the axial play increases, and a distinct knock begins to be heard from under the valve cover. Of course, you can continue to drive with this knock and not worry, but not every car enthusiast will be pleased.
I am sure that almost any auto repair shop will tell you: “Either ignore this knock, or change the entire head!” But there is one simple and absolutely free way to eliminate this annoying knocking noise by placing a washer between the camshaft and its side cover! Below is a detailed description and photo report of the work done.
Checking the camshaft axial play.
Remove the timing belt cover and start the engine. Then, with the engine running, press the handle of a screwdriver into the camshaft gear bolt. If the knock disappears when pressed, the reason is: Axial runout of the camshaft.
Why do you need a support bearing?
The question of why a support bearing is needed is asked by many novice car enthusiasts, but before you figure it out, you need to understand how shock absorber struts work and are installed. Shock absorbers in a car are designed to ensure a smooth ride, smooth out shocks and vibrations when driving on uneven roads, bumps and potholes. On front-wheel drive cars, the struts are attached to the body at the top, to the so-called “glasses”, and at the bottom they are connected to the steering knuckles. The support bearing (PU) is often called the upper shock absorber support; this generally simple device plays a very important role in the suspension of the car, and if it is faulty, it will become difficult to drive the car. It is necessary to monitor the condition of the supports and replace them in a timely manner - we must not forget that traffic safety depends on them.
What types of support bearings are there?
The upper shock absorber mounts on different car models can differ significantly in design and mounting;
- with two or three studs;
- with threads in the body of the cup for screwing in bolts.
To dampen oscillations and vibration, shock absorber cups often have a rubberized surface or separate elastic elements, and the bearing itself can be pressed out and replaced.
What other support bearings are there? There are car models on which the upper support is not attached to the body “glass” with studs or nuts; the shock absorber is held in place by the upper steel plate. A wide metal washer is secured here with a nut screwed onto the shock absorber rod; to ensure a soft connection, a rubber spacer is placed under the plate (a similar design is found on the Chery Amulet car).
In some designs, the upper support consists of several parts; they may contain separate upper and lower cups, rubber buffers, and the bearing itself. When assembling the shock absorber strut, all parts are installed in a certain order; they must not be mixed up.
Front shock absorber support bearing faults
Like any parts in a car, OPs wear out and break over time; these suspension elements have their own service life. For each car model, the shock absorber supports have their own service life; on average, parts can last from 50 to 100 thousand kilometers without replacement. But for various reasons, support bearings can fail prematurely; the main causes of failure are:
- driving a car on bad roads;
- poorly performed repairs (for example, during installation the nuts were not fully tightened);
- low quality of spare parts or defects, most often non-original parts are of poor quality;
- destruction of the OP as a result of an impact (when hitting an obstacle or due to an accident);
- ingress of dirt and moisture onto the parts of the “support”; on many car models these parts are not protected in any way.
To make sure that the upper support is faulty, it is necessary to carry out diagnostics; in general, checking the support bearing is not difficult, but it is better to diagnose the suspension together.
Generator drive pulley Unscrew the main bolt of the generator pulley
You can unscrew the bolt of the generator pulley using ordinary keys, which were mentioned above in the list of necessary tools. If the bolt does not come out of the generator pulley, then you must perform the following steps:
dismantling the plug in the clutch housing
The flywheel teeth are fixed with a mounting blade, the presence of which was justified by the list of necessary tools.
After performing these steps, the generator pulley bolt will stop turning, since the crankshaft will be fixed with a mounting blade.
Removing the generator pulley
The generator pulley must be dismantled immediately after removing the mounting blade. After dismantling is completed, the pulley must be placed on a clean surface. The presence of debris in the unit assembly can cause it to jam.
dismantling the lower timing cover
The process of dismantling the lower timing cover is carried out by removing three mounting bolts. Put the belt on the pulley. I bought a belt on Grant 825, which could be a Lada Granta. This design occurs in Grants 21116 and 11186 engine models.
timing belt removal
The last stage is dismantling the timing belt and then determining the condition of the tension roller. The belt removal process occurs in the following order:
Removing the timing belt from the timing pulley
removing the belt from the crankshaft.
It is at the second stage that the Grant timing belt is dismantled along with the tension roller. We carry out a visual inspection of the roller, in particular, we determine the external condition and the level of play of the mechanism.
At the time of reinstalling the lower timing cover, it is necessary to adjust the tension of the belt itself.
The reasons for premature belt breakage on the Lada Grant remain a mystery, which is based not only on the poor quality of the material used in the belt, but also on the low quality of assembly of the aggregate units through which the timing belt passes.
Among other reasons for premature timing belt breakage, one can note the desire of the car manufacturer to keep up with Euro 3/4. It was the desire to adjust the car to these standards that led to the above-mentioned negative aspects in the daily operation of the car.
Despite the manufacturer’s claims about the quality of Grant’s timing belt and the threshold of his personal mileage of 200,000 thousand km, it breaks already at 70–80 thousand km. Priora/Kalina timing belt, which is better? A Gates roller belt can be a good and worthy replacement solution.
It is the Lada Granta from Priora that the timing belt will fit the Lada Granta and will not cause premature failure. The price of a timing belt for a Grant allows it to be changed every 50,000 thousand km, which, in turn, will reduce the likelihood of other cost items arising regarding the repair of engine valves.
How to check the serviceability of the front strut support
The OP check is performed when the car is parked on a level surface; there is no need to hang the wheels. Diagnosis is carried out as follows:
- one of the inspection participants in the front rocks the car up and down;
- another person performs a visual inspection to see if there are any gaps.
Additionally, you can turn the steering wheel and observe the behavior of the shock absorbers, put your hand on the upper support while rotating the steering wheel or rocking the car - if there is play, you will feel it with your hand; clicks and squeaks may also be heard. Another diagnostic option is to grab the top cup protruding above the glass and try to rock it from side to side, in this case the play will also be noticeable.
Signs of a faulty support bearing may include:
- knocking in the front suspension while the car is moving;
- periodically occurring creaking while turning the steering wheel;
- crunching, knocking from the front when driving on an uneven road, for example, when driving at a railway crossing;
- tight turning steering wheel;
- instability of the car on the highway.
It is possible to accurately identify the fault only by disassembling the shock absorber struts and performing a visual inspection of the parts.
Sporty on the outside and no less sporty on the inside
The gearshift lever and steering wheel are now covered with very high-quality leatherette, a seven-inch touch (!) display has appeared on the console, and the front windows are electric “already in the base.” By the way, the 2022 Lada Granta Sport is comparable in cost to a “non-sport” car, but in the “Lux” specification. However, even in the previous generation, the Granta Sport version was never cheap.
Lada Granta Sport 2020 – interior/front
Today's sports "civilian" Grant has a 1.6-liter engine, boosted to 120 horses and 160 Nm, against the "former" 145. This power unit was designed on the basis of a serial engine with the VAZ 21126 index - a very productive engine. Among other things, this version was equipped with brake components from AP-Racing with 200 mm 4-piston ventilated front disc brakes and 135 mm 2-piston rear disc brakes.
So-called semi-sports seats with pronounced lateral support are installed here. They have a long cushion, but are also designed in a “sporty” way.
Support bearing cost
The upper support of the front strut is a relatively inexpensive part; the cost of a spare part depends on the car model, brand, design features; it is no secret that car shops can sell the same spare parts at different prices. The approximate price of a shock absorber bearing is from 150 to 2200 rubles; for prestigious foreign cars, parts usually cost significantly more; you can buy cheaper ones from non-original production. As you can see, the range in prices for these spare parts is quite large; the most expensive bearings are sold for cars:
- Mazda 3;
- Toyota 4Runner/ Avensis;
- Nissan Juke;
- Honda CR-V;
- Mercedes W204;
- Lexus RX300;
- BMW X6.
At a very affordable price you can purchase support bearings for such car models as:
- Chevrolet Lacetti;
- Daewoo Matiz;
- Honda Fit;
- Nissan Almera;
- Chery Amulet;
- Hyundai Accent.
Support bearings for Chinese and Korean cars are generally inexpensive; spare parts for brands such as BMW, Audi, Lexus, and many purely American cars are almost always more expensive.
Replacing the support bearing
Changing a support bearing is not very difficult, and almost every driver can do the job if he has the necessary tools and at least a little plumbing experience. It is more convenient to replace the OP in a pit or a car lift, but it is also possible to carry out repairs on a flat area, for example, in a garage or on the street near the house.
What kind of keys are required for repairs depends on the specific car model; in addition to combination and ring keys, sockets with collars, hexagons and sprockets are often used. To change the support bearing, it will be necessary to remove and disassemble the shock absorber strut, so in any case you will need:
- hammer;
- screwdrivers;
- pliers;
- mount;
- set of spring ties;
- remover of ball joints (steering rods).
Cars such as Mitsubishi, Renault or Chevrolet often require keys of non-standard sizes - 16, 18, 21 and 23.
Characteristics of Lada Granta timing belt
The Lada Granta gas distribution mechanism is driven by a belt. This type of device has been familiar to car enthusiasts for a long time. After all, the timing belt design migrated from the VAZ 2108 engine, which became the basis for all subsequent modifications of VAZ power plants. The Grant is equipped with two types of engines: an 8-valve engine and a 16-valve engine. The gas distribution system of the 16-valve power unit has a complex structure and increased dimensions compared to the 8-valve one. Accordingly, replacing the Granta timing belt becomes more complicated.
The main feature of the 16-valve device is the presence of two camshafts operating synchronously, in parallel with the crankshaft. The structure is located in the cylinder head. All three shafts are synchronized via a toothed belt. The main disadvantage of a timing belt drive is the unreliability of the belt itself. When it breaks or jumps, the valves meet the pistons and bend. The structure of the 16-valve timing belt is clearly shown in the photo.
16 valve unit
- Installation mark on the drive cover.
- Lid.
- Intake camshaft pulley.
- Phase disk (sensor).
- TDC mark on the camshaft.
- Exhaust camshaft pulley.
- Support roller.
- Tensioner roller.
- Drive belt.
- Pump pulley (coolant pump).
- Installation mark on the oil pump.
- Crankshaft alignment mark.
- Crankshaft pulley.
You can change the timing belt kit yourself. The main thing is to know about the presence and correct placement of installation marks. By the way, most foreign cars do not have such marks, so in this case VAZ cars have the advantage.
The eight-valve timing drive of the Lada Granta, compared to previous modifications of the car, looks simpler. The scheme is simple, because there is no idler roller and there is only one camshaft. The 8-valve timing device can be seen clearly in the photo.
8 valve system
How to change the support bearing on a VAZ-2115 car
To replace the OP without a lift, the car will have to be jacked up; before starting work, stops should be placed under the rear wheels. Next we perform the following steps:
- unscrew the hub nut, for this purpose you will need a 30mm head with a wrench or pry bar (depending on the design of the head);
- remove the front wheel on the side where the bearing will be replaced, hang the car on a jack, and install a stand under the threshold to secure it (you can use a wooden block);
- Having pulled out the cotter pin with pliers, unscrew the nut holding the steering tip, using a puller, disconnect the tip from the shock absorber strut;
- unscrew the two caliper bracket bolts (13 wrench), if necessary, hold the caliper guide with the “17” wrench;
- move the caliper to the side on the brake hose;
- disconnect the ball joint (two bolts) from the steering knuckle, move the assembly with the axle toward you, freeing the hub from the CV joint splines;
- from above, under the hood, tighten the three nuts of the upper support (13 wrench);
- Having removed the rack assembly, use zip ties to compress the spring evenly on both sides;
- Having fixed the shock absorber rod in a stationary position with a special wrench, use a 22 mm head to unscrew the nut that holds the entire structure, including the support bearing;
- Next, remove the old bearing from the rod, install a new bearing without removing the couplers, tighten the nut to 22 until it stops;
- loosen and remove the ties and assemble.
Some car owners recommend using a gas wrench instead of a special wrench to hold the shock absorber rod, but this is not recommended; you can scratch the mirror surface, and then the shock absorber will leak.
Since many VAZ models have an identical suspension design, exactly the same as on the VAZ-2115, replacement is carried out on cars 2108-09-099, 2110-11-12, 2113-14. Due to the fact that with this sequence of operations the steering knuckle is not disconnected from the shock absorber strut, wheel alignment is not necessary after repair.
Instructions for carrying out work
Replacement
How does the belt on 2190 differ from replacing it on a 16-valve unit? Below are instructions for the first type of motor; for our client, the differences from the second will be considered separately. First, you need to remove the positive cable from the battery and disconnect the connector from the crankshaft position sensor.
KEY-DOP
Then remove the timing belt guard and set it aside. In order to avoid mistakes when installing a new belt, you need to align the marks on the engine housing with the mark on the camshaft gear
. This can be done by turning the bolt holding the pulley on the engine crankshaft with an open-end or socket wrench, and do not forget to turn the gearbox into neutral.
The second method, using a suspended wheel, was described above. When the marks coincide, you need to remove the rubber plug located on the gearbox and open the inspection window. The flywheel is visible in it; the mark on it should also coincide with the slot on the body. The next step is to remove the belt from the generator drive pulley. To do this, you need to loosen the lower mounting bolt of this unit, and unscrew and pull out the upper one.
Then the generator housing can be moved forward and the belt can be removed from the pulleys. Immediately, using this moment, you can inspect the removed belt for defects and damage, and, if necessary, replace it. Next comes the operation to loosen the bolt holding the crankshaft pulley
. It often happens that you can’t just do this with a spanner wrench, especially after factory tightening. There are several ways.
- Insert a flat, powerful screwdriver or pry bar into the flywheel inspection window, blocking it. Hold the screwdriver with your right hand and loosen the pulley bolt with your left hand using a 17 mm wrench.
- If you have an assistant, the procedure is greatly simplified. One will engage 4th gear, press and hold the brake pedal, while the second one will unscrew the pulley. It’s much more convenient to do this, both hands are free to work.
- Some car enthusiasts put a spanner on the pulley bolt and rest it against some element of the body or suspension, after which they turn the crankshaft with the starter in neutral gear. The method is quite dangerous, it is permissible to use it in the most extreme case, when it is not possible to loosen the bolt by other methods.
Replacing the timing belt for Lada Largus 8 valves.
After the bolt is unscrewed, the pulley is removed and the working part is wiped with a rag. Then you need to loosen the tension roller bolt, the belt tension will weaken and you can remove it. Since the roller also needs to be changed, it needs to be unscrewed. The last element that will need to be removed is the bottom cover of the mechanism; it is attached to the engine with three bolts.
This completes the disassembly of the unit. Before installing a new roller and timing belt, you need to make sure that the pump drive shaft rotates freely and does not jam. Otherwise, you will have to make a decision to replace the coolant pump.
Some Tips for Replacing the Front Shock Absorber Upper Mount
- When disassembling, the hub nut should be loosened before you remove the wheel; if the car is already suspended on a jack, it will not be easy to move it.
- If you do not have a ball joint and tie rod remover, the steering tip can be knocked out by hitting the joint joint with a heavy hammer, the blows must be sharp and precise. Even if the tip seriously “boils” in the connection, after several attempts it will still come off.
- To make it more convenient to disassemble the shock absorber strut after removal, you can immediately (while the shock absorber is still on the car) loosen the shock absorber rod nut.
- To make the nuts and bolts easier to turn off during the next repair, it is recommended to treat the fasteners and threads with graphite lubricant during assembly.
- When removing the shock absorber assembly with the hub and steering knuckle, it is a good idea to check the condition of all suspension parts on this side of the wheel. Such diagnostics will save your money and time, because it is often discovered that along with a defective support bearing, for example, a shock absorber is also faulty, or the outer CV joint has a large amount of play.
- You need to compress the spring with ties gradually, squeezing the coils little by little on one side and the other. The spring is compressed until the upper support begins to rotate freely; too much compression of the coils is not required, and in general it is unsafe.
In general, replacing the support bearings on the front struts is quite simple; to make a replacement, you don’t have to go to a car service center; you can do the work yourself.
>