There are two energy sources in a car. Battery and generator. Moreover, the generator is the main one, since it is able to charge the battery while driving. In the most extreme, desperate cases, battery energy can be used. According to various estimates, in the most optimistic case, you can drive about 100 km on a flat road on a battery. In this case, the headlights should not be turned on, the heater should not be turned off, and, preferably, the ambient temperature should be low and the speed should be constant so that the radiator fan does not turn on. And the battery will be fully charged. Only in this case all the energy will go into the “spark”.
If the VAZ 2107 engine (injector) is running and there is no battery charge, there may be many reasons.
Let's start with the generator. The VAZ 2107 (carburetor) has an alternating current generator (model 372.3701), and an alternating current rectifier is built into the design. This is a synchronous three-phase motor.
The reasons why the battery is not charging can be common, regardless of whether you have a carburetor or an injector. Let's consider the reasons when the generator is to blame, that is, there is no voltage at its terminals. This can happen because the rectifier bridges (diode), the winding and many other reasons have burned out.
The VAZ 2107 (injector) is equipped with a figure-eight generator 5142.3771. Its difference from a conventional generator on a VAZ 2107 is that it produces a higher current, not 55 A, but about 80-90 A per hour, since the injector requires more electricity, it is more modern and has a higher power density. The figure shows a generator producing a rectified current of 80 A at a voltage of 14 V.
Attention! Before claiming that charging has disappeared specifically in the VAZ 2107 generator, check:
- If there is incoming voltage at the generator, this does not yet prove that it is the generator that is damaged and there is no outgoing current. After all, diodes supply current to the excitation winding of the generator. In this case, the battery charge lamp will light up on the dashboard.
- It is also worth measuring the voltage in the network with a tester. If it is below 12 V, then most likely there is a short circuit somewhere, and in this case the wiring may heat up intensely.
- You should check the generator belt, or rather, its tension. If it is loosely tensioned, then instead of driving the generator rotor, the belt slides along it itself, since there is no contact.
- The generator charging relay has failed. We need to talk about this separately.
The charging relay on the VAZ 2107 (injector) is located in the same housing with the brush mechanism, and its task is to stabilize the output voltage. Several years ago there were relays that were stamped into a printed circuit board and were located under the instrument panel and were non-separable. In the figure, the relay is indicated by an arrow. In everyday life, due to its characteristic shape, it is called a “tablet”.
Now, with the development of microelectronics, the printed circuit board is successfully replaced by a semiconductor relay. The sizes have become smaller, and there are no problems with installation.
Where to start checking
If the VAZ 2107 battery icon does not light up, the voltmeter gives normal readings, but the battery does not charge, which means there is no (or insufficient) contact at the terminals. Their severe oxidation can cause the voltage from the generator to the battery simply not to flow. Therefore, it is necessary to remove the terminals, thoroughly clean them, as well as the battery terminals, then reconnect the battery to the on-board network and check the functionality of the charging system.
In the case when the voltage on the VAZ 2107 battery is still below normal, you need to measure it at the output from the generator with the engine running. Is there a big difference between the readings on the terminal and on the battery? Try cleaning the contacts and checking the wire connecting the battery to the generator. Broken - requires replacement.
The next element that is checked is the generator drive belt. If it becomes loose, it will slip along the pulley, which is why the generator will not be able to generate the required amount of electricity. And although charging will be carried out (provided the circuit is in good condition), it will not be enough. At the same time, the engine is running, the voltmeter shows the norm. However, if the system is loaded a little more - for example, by turning on the headlights - then the voltage drops sharply. Then, if the battery charge on a VAZ 2107 disappears, this indicates that the tension belt is loose and slipping. The belt should be tightened; if it wears out during operation, replace it. But you can’t overtighten either: excess belt tension puts an overload on the pumps and generator bearings.
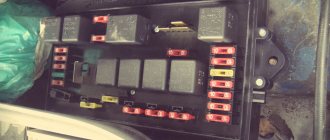
The third component of the circuit that is checked during the initial diagnosis is fuse No. 10 (in the fuse box). It is he who is responsible for supplying voltage to the battery: the VAZ 2107 battery charging fuse has blown - the system will not work.
Price issue
The cost of repairing each box is determined by the number of worn parts.
When performing work in the service, the average cost will be:
- gearbox overhaul - from 2500 rubles;
- removal and installation of the unit - about 4,000 rubles;
- changing the oil in the box - up to 1000 rubles;
- installation of new bearings on the input shaft - approximately 5,000 rubles.
Service costs are approximate and may differ depending on the city, workshop location and general condition of the box. In most cases, it is more profitable to purchase and install a less worn unit than to rebuild an old one.
Clock malfunctions on VAZ 2107
The standard clock on the VAZ 2107 is not the most important element in the car, but when something on the dashboard does not work, it causes a lot of inconvenience. If the clock, which is located on the center console of the 7's interior, does not work, then the driver and passengers cannot navigate the time. When a watch does not work, nothing more than identifying the cause of the breakdown and eliminating it will help solve such a problem. The main reasons why the clock in the VAZ 2107 may not work are:
- The fuse has blown - this is the part where you should start troubleshooting. The fuse is located on the fuse block called F6. A multimeter set to continuity mode will help you check its malfunction.
- The ground power terminal has become disconnected (or oxidized), which is connected directly to the device itself. To check this malfunction, you will need to remove the panel on which the clock and cigarette lighter are installed and check the quality of the connectors.
- The insulation is broken or the core of the power wire is damaged - this happens rarely, but if it is not a fuse or a contact, then you need to check the integrity of the power wire and ground. A device such as a multimeter set to DC voltage measurement mode can help with this.
- The mechanism is damaged. If all the component parts are intact, then there is a high probability that the problem is in the devices themselves. They can be repaired, or you can install electronic devices instead of standard ones.
It is recommended to check the serviceability of devices in the order presented in the material. If it turns out that the fuse is damaged, it can be replaced, and if the contact is poor, the terminal should be tightened. If the wire is damaged, then it needs to be insulated or replaced, but if the breakdown occurs with the watch mechanism itself, then it will have to be replaced or repaired. Practice shows that it is easier to replace them, especially since electronic devices not only look stylish, but also have wider functionality.
Connection
The question of how to connect a clock to a VAZ 2107 is asked by all owners who removed the torpedo and then put it in its place. On the VAZ 2107, a round electromechanical clock is installed on the center console. They are installed on all models of sevens, both carburetor and injection.
The devices in question are located next to the cigarette lighter. They are connected to the standard network, from which they are activated. To ensure the clock operates, three wires are used, the connection diagram of which is shown in the photo below.
These three wires have the following purposes:
- clock power wire;
- power supply for VAZ clock backlight;
- minus.
The negative wire is attached to the device body, and the clock power and backlight are connected to the positive terminals. When connecting, you need to take into account that the clock power is directly connected to the positive wire, and the backlight is connected to the wire terminal from the dimensions. This means that the backlight is activated when the headlights are turned on.
About their device
Before finding out the importance of the elements of the ignition system in question, it is necessary to understand their structure. Structurally, the high-voltage wire consists of the following parts:
- A conductor through which current flows.
- Insulation - rubber or silicone is used as an insulating material.
- Protective caps on both ends.
- Metal contacts.
Each element performs corresponding tasks, and at the slightest violation of integrity, it will be necessary to replace it. Armored wires cannot be repaired, since they play one of the main roles in the car’s ignition system, and also belong to the category of consumables.
It is a mistaken belief that armored wires on a car are ordinary wires that are designed to transmit current from a source to a receiver. As you know, VAZ 2107 cars were produced in two variations of the fuel supply system - carburetor and injector. Although many parts and mechanisms on the carburetor and injector are the same, this does not apply to the GDP. The carburetor VVP differs from the injection one on the VAZ 2107 in the following parameters:
- The length, on which the amount of resistance also depends. The wires on the injection unit are shorter than on the carburetor.
- Fasteners that connect to the distributor on the carburetor and the ignition module on the injector.
- The amount of GDP. There are four of them on the injector, and five on the carburetor.
- Type of caps.
Knowing the design differences, you must also understand that high voltage flows through the wire. The current comes from the distributor or MG through the wires to the spark plugs. The slightest malfunctions lead to the fact that current is not supplied to the spark plug, and a spark does not occur. If a spark does not occur, the cylinder does not work, which negatively affects the operation of the engine.
Hours of freedom
The instrument panel of the “six” is quite informative; it contains instruments for measuring speed, engine speed, an oil pressure sensor, a coolant temperature sensor and a sensor showing the remaining amount of fuel in the fuel tank.
As for the operation of the generator device, if there is no energy regeneration, the “control” lights up. But this already becomes known after the generator fails. To prevent the creation of such a situation, it is advisable to install a device such as a VAZ 2106 voltmeter clock, which is already equipped with VAZ-2105 cars of the last 07 years of production.
For this installation you will need:
- UAZ voltmeter,
- Electrical wire 20-25 cm,
- Special input connector (“female”)
Important note: when repairing electrical devices and connecting circuits, it is necessary to de-energize the equipment by removing the negative battery cable from the connector. This is necessary to prevent short circuits and failure of the vehicle’s electronic equipment.
Algorithms for setting the clock of the VAZ 2106 voltmeter
- We remove the factory clock on the VAZ 2106 from the mounting location, disconnect the supply wiring;
- We connect the clock of the VAZ 2106 voltmeter to the positive contact of the backlight of the interior box. The contact is activated when the ignition is turned on.
- It is not possible to use the factory electrical circuit on the chronometer due to the constant activation of the contact, which can lead to battery discharge if the vehicle is stored for a long time;
- We lay the leash from the place where the chronometer is fastened to the side of the interior box to the place where the device is illuminated and connect the wires in the required way, and fasten the output end of the wire with a “female” connector;
- Remove the voltmeter fasteners;
- To securely fasten the voltmeter, we wrap it in several layers of fabric insulating tape. We install the ring - the seal from the chronometer, the backlit cartridge and connect the wiring;
- We insulate the old wire from the red “six”, because it is under constant voltage.
After this, we install the new device in the mounting location.
What to do if there is no charge, weak charge (battery is discharged)?
If the battery of your VAZ 2107 is discharged, then one of three elements may be “to blame”: the generator, the voltage regulator, the connections between them. Determining “who is to blame” can be very simple, even without additional equipment. How this article will help.
We carry out testing using standard equipment
To monitor the operation of the generator on the “seven” there are two instruments: a voltmeter and a control light on the instrument panel. With their help, you can track the cause of your troubles.
1) Turn on the ignition without turning on the starter
and look at the warning light. It should shine at full intensity, as in the photo. The voltmeter needle, normally, stands on the white part of the scale (photo). Let's say everything is OK - go to point 2 - start the engine.
The battery charge control lamp is on
Position of the voltmeter needle before starting the engine (ignition on)
The lamp does not light, the voltmeter needle remains at zero when the ignition is turned on.
Check fuse No. 10 in the mounting block. 99% of the time it will be burnt out. In this case, all other lamps on the instrument panel will also be de-energized. Replace it with the same one and test again. If the fuse burns out again, you need to look for the cause, that is, a short circuit. We check whether the wires from the generator are disconnected, whether the insulation is frayed somewhere, etc. Diagram 3 at this link will help you find the reason
The lamp does not light up, the voltmeter needle shows normal
We check the wires on the generator to see if the wire has come loose from terminal “61”. If everything is normal there, you need to check whether there is a “plus” on this wire using a test lamp, an indicator screwdriver or a multimeter.
Terminal “61” of the VAZ-2107 generator
If there is a “plus”, we check the “tablet” (aka “chocolate”) and the generator.
There is no “plus” - you will have to remove the instrument panel and check the lamp. Replace the burnt out one. How to remove the panel, watch the video
2) Start the engine
The control lamp should go out, the voltmeter needle goes into the green sector and is located from the middle to the right edge (photo). If everything is so, then most likely the generator is working normally.
The voltmeter shows normal voltage (charging is present)
The lamp remains on or dims slightly
If you give it gas, it goes out at high speeds and lights up again when they decrease. The voltmeter needle is in the white sector and goes to the edge of the green when the speed increases. The generator output is faulty. The same conclusion if the lamp continues to light at any speed, and the voltmeter needle is in the white sector and even goes to red.
Voltage too low (motor running). Weak charge
3) If the generator seems to be working, but the battery is gradually discharged
Let's do one more check. We start the engine, turn on the heater fan and low beam, take the key to “10” and, loosening the negative terminal of the battery, remove it. An idling engine (about 900 rpm) should not stall. If the engine stops, put the terminal back in place and start it again. While holding the speed at 1200-1500, remove the terminal again. Has the engine stalled again? Then turn off the headlights, leave the heater fan on and repeat the test. Now the engine with the negative terminal disconnected from the battery continues to run. The generator output works, but does not produce the required current, it needs to be repaired, the diode bridge will need to be replaced.
Note! During such a check, it is better and safer to work together. Do not disconnect the battery terminal without at least turning on the heater fan or other load.
A voltage surge at the time of shutdown can “burn” the electronic elements of ignition systems
You need to be especially careful on a car with an injection engine.
How to determine the lack of battery charge
Checking the battery charge
The easiest way to determine the lack of charging is using the car’s instruments, that is, the charging indicator lamp and the sensor (voltmeter) on the instrument panel. The sensor arrow should be in the green sector, and the battery lamp should not light up when the engine is running. Otherwise there is no charging.
But the best way is to check the voltage on the battery with a multimeter. When there is a charge, the voltage on it lies in the range of 13.6-14.2 V, and when there is no charge, it will only have its own voltage of 12 V (± 0.6 V). Under no circumstances remove the terminals from the battery to check to avoid damage to the RR, ECU and other electronic devices on your car.
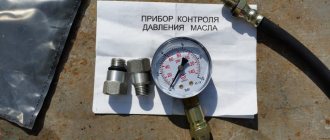
To troubleshoot battery charging problems, you must use the following tools:
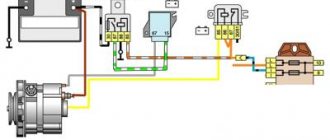
Connection diagram for the VAZ 2107 heater fan.
The diagram below shows how the stove fan (4) is powered. Power from the battery, through the mounting block (1), goes to the ignition switch (5) and again goes to the mounting block (1). In the mounting block (1) it passes through fuse F1 (10 amperes) and goes to the stove speed switch button (2). Next, power from the button goes either through the resistance (3) to the motor (4), or directly to the stove motor (4).
The VAZ stove fan will not work if any of its circuit components is faulty. You can determine the reason why the VAZ 2107 heater fan does not work:
- There is a fault in the mounting block.
- The contacts of the heater fan speed switch are burnt out.
- The speed control resistance has burned out.
- There is a malfunction in the heater motor itself.
Let's take a closer look at each of the faults.
There is a malfunction in the VAZ 2107 mounting block.
If the stove stops blowing air, then first of all look to see if fuse F1 in the mounting block is intact. Usually, if this fuse blows, then the heated rear window and reverse lights stop working along with the heater. This fuse must be rated 10 amps. No more and no less. If you install a fuse of less than the nominal value, it will constantly burn out, and if you install a fuse of a higher nominal value, it is possible to burn the mounting block. If you have a fuse of a higher rating (as in the photo below), then the likelihood increases that the mounting block has failed and the plus is not supplied to the speed shift button. How to find out, read the next paragraph.
The contacts of the heater fan speed switch are burnt out.
You checked the fuse and saw that it was intact. Let's dig further. Now we take and remove the gear shift button from the panel and disconnect the wires from it. Afterwards, we reliably connect one end of the indicator light to ground, and alternately insert the other end into the removed terminals of the wires disconnected from the button. The ignition must be on!
If the light does not light up, then power is not supplied to the speed switch and the mounting block is most likely faulty.
If the light comes on when testing one of the contacts, it means either the button or something else is faulty. How to find out? Very simple! To do this, we make a jumper from a regular wire, from the contact, during the test of which the indicator light came on, to one of the other two contacts. The stove motor will work if the button is faulty. If the motor does not work, then it is the motor that is faulty.
The stove only works at one speed VAZ 2107.
When the stove operates only at the highest speed, this means that the ballast resistance has burned out.
In this case, just change it. It is located under the dashboard approximately in the middle, closer to the driver's side.
There is a malfunction in the heater motor itself.
Before disassembling the panel and stirring up the interior, check whether the mass going from the heater motor to the body sits well. It often happens that this wire simply rots.
If you have a multimeter, you can ring it. To do this, take out the speed switch button and disconnect the contacts from it. Now, in the continuity mode, connect one probe of the multimeter to ground, and check the wires with the others one by one. If the motor and ballast resistance are working properly, the multimeter will beep when checking two of the three wires. If the ballast resistance is faulty, then the multimeter will beep when checking one of the three wires, and if the heater motor does not work or does not have contact with ground, then the multimeter will be silent.
If you want to learn how to replace the stove motor, read this article!
Video “Consequences of bearing failure”
The consequences of the destruction of the secondary shaft bearing while driving are demonstrated in a video from user Sergey Tsapyuk.
Do you have any questions? Specialists and readers of the AUTODVIG website will help you ask a question
Was this article helpful?
Thank you for your opinion!
The article was useful. Please share the information with your friends.
Yes (80.00%)
No (20.00%)
X
Please write what is wrong and leave recommendations on the article
Cancel reply
Rate this article: ( 5 votes, average: 4.80 out of 5)
Discuss the article:
Troubleshooting VAZ 2107 battery charging problem
First, you should check the serviceability of the alternator belt - it is this that causes the alternator to rotate and generate current. This belt drives the coolant pump, so this malfunction also manifests itself in engine overheating.
If the charge indicator lamp does not light up, and the voltmeter shows normal voltage of the on-board network, and the battery does not charge, the reason is in the contacts at the terminals.
You should remove the wires from the battery and clean the battery terminals and wires with emery cloth. If the charge does not appear, it is necessary to measure the voltage at terminal “30” (generator output) with the engine running. If the voltage at this terminal and the battery is very different, you need to clean the contacts and ring the wire going from the generator to the battery. The faulty wire must be replaced.
If, when the engine is running, the voltage in the on-board network is within normal limits, but when a load (headlights) is connected, it drops, the reason lies in the weak tension of the alternator belt. As the load increases, the weakened belt slips. A correctly tensioned belt should bend by 12-17 mm with a force of 10 kgf. A loose belt must be tightened or replaced.
Important: if the belt is over-tensioned, excessive load occurs on the bearings of the generator and pump, which can lead to their failure. Other reasons for the lack of charge may be a broken rectifier diode on the generator, an open or shorted rotor or stator winding
Other reasons for the lack of charge may be a broken rectifier diode on the generator, an open or shorted rotor or stator winding.
Diodes can be checked using a multimeter or a test lamp. Using a multimeter, you can check the resistance of the diodes in the direction in which they should be locked. To check with a test lamp, you must remove the “+” terminals from the battery and connect the test lamp. The wire of the test lamp must be touched in succession to the three bolts of the rectifier devices. Then perform the same operation, only disconnecting the “-” terminal. If the lamp lights up, the diode being tested is broken.
If one of the diodes malfunctions, the diode rectifier assembly must be replaced.
A break in the stator winding is determined with a multimeter by measuring the resistance between the rectifier unit mounting bolts. Lack of contact between the winding and the other indicates its breakage. In this case, it is necessary to replace the winding or generator assembly.
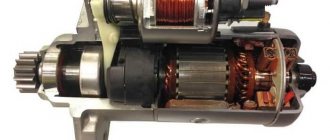
A common cause of generator failure is brush wear. To check them, you need to dismantle the brush assembly. The length of the brushes must be more than 5 mm, otherwise they need to be replaced. Also, the brushes may become warped or “stick” in the wells. Therefore, it is necessary to check the condition of their side surface.
Note: the VAZ 2107 generator (carburetor) is no different from the unit for the injection version of the “Seven”. Therefore, all tips for checking and repairing the generator are relevant for both modifications of the car.
If the warning lamp does not light up and other devices do not work when the engine is running, and the battery is not charging, the reason is a blown fuse or a breakdown of the ignition switch (relay).
The reason for the lack of battery charging may be a breakdown of the relay regulator. To check it, you need to connect “+” from the battery to the top contact, and “-” to the left one and check the voltage on the brushes, which should be 12 V. If the voltage is lower, the relay regulator must be replaced.
Let's start the renovation
There may be several reasons for the battery not charging. The instructions below are quite universal and are suitable for any case.
Troubleshooting algorithm:
- First of all, we check the serviceability of the belt and its tension. If it is damaged or loose, charging will be less than normal and will ultimately lead to battery failure. The belt is also partly responsible for the operation of the cooling pump, so a damaged belt can cause other problems as well.
The problem can be determined by the sign when, when the engine is running, the voltage in the power circuit is within the normal range, but immediately after connecting the load it disappears. Another sign of a weak belt may be a whistling sound. It may appear immediately after starting the engine or when large current consumers, such as lights, are turned on.
This needs to be corrected, since a poorly tensioned belt slips during operation of the mechanism, which accelerates its wear. It must be tightened to a deflection level of 12 - 17 millimeters with a pressure of 10 kgf, or replaced with a new one;
- In order not to waste time and not draw false conclusions, you need to check the voltage on the battery with the engine stopped and running. The normal supply voltage of the machine when the engine is running should be 13.6 - 14.1 volts. A voltage below this will indicate a weak belt (point 1), a faulty regulator relay, or a failed diode bridge.
- If everything is fine with the belt, remove the charging relay and check the wear of the brushes. They should be longer than 5 millimeters, this can be seen visually, but to be sure, check with a ruler. If they malfunction, replace the VAZ 2022 charging relay.
Dashboard lighting for VAZ 2107: what lamps are needed and how to replace them
In order to replace the lamps in the lighting fixtures of your car, it is not at all necessary to go to a service station and pay a highly qualified specialist. All operations can be done independently with minimal effort and money. Today we will talk about replacing light bulbs in the dashboard (DP) of a VAZ 2107 car.
Location of lamps on the instrument panel of the VAZ 2107
Before we start replacing the light bulbs, let’s see where they are located on the PCB board and what the VAZ 2107 is responsible for illuminating or indicating.
Layout of dashboard lamps on a VAZ 2107, where:
- Fuel level.
- Instrument lighting.
- The direction indicators are on.
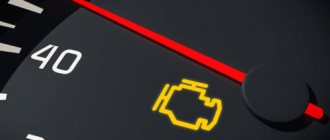
- Engine control controller malfunction.
- Exterior lighting is on.
- Emergency oil pressure.
- The parking (hand) brake is on.
- High beam headlights are on.
- Battery charge indicator lamp.
Removing the instrument panel and preparing for replacement
To change the lamps in the instrument panel, the latter will have to be removed. It cannot be said that the PP can be removed with one movement of the hand: the designers of the VAZ 2107 made dismantling a little more difficult than on other cars of the VAZ family. Nevertheless, dismantling the PP is quite feasible in a garage or even a parking lot. In this case, the operation does not require any special knowledge. The tools we will need are:
- small flat screwdriver or knife;
- crosshead screwdriver.
I think all this will be found in the trunk of any VAZ 2107, and we can get started. First of all, we remove the plastic handles from the heating control knobs by prying them off with a flat screwdriver.
- Removing handles from the seven's interior heating system
- We unscrew the nut securing the daily counter reset button (marked with a red arrow), and push the button itself inside the shield.
Removing the daily counter reset button Now you need to unscrew the screw that is located under the plug and secures the decorative trim. Remove the plug using a flat-head screwdriver and unscrew the Phillips screw.
After this operation, the right side of the panel will move away so that you can get to the flexible speedometer control shaft.
Releasing the right side of the control panel on a VAZ 2107
The shaft is removed with bare hands: simply unscrew the nut securing it.
Removing the speedometer drive
Now remove the instrument panel from the clamp that secures its left side and pull it out slightly to get to the vacuum hose connected to the econometer. It can also be removed with bare hands, but be careful not to tear it.
Removing the vacuum hose from the econometer to the PP
It remains to disconnect the three power connectors of the instrument panel and the three wires on the VAZ 2107 heater switch. Before disconnecting, it is advisable to mark them so as not to confuse them when assembling the panel.
Disconnecting the power wires from the heater switch
We remove the decorative trim along with the PP and unscrew the four self-tapping screws securing the shelves (two on each, I marked them with red arrows) to the decorative trim, and the instrument panel can be removed.
Removing PP from a decorative trim
What kind of lamps are needed?
Before disassembling your VAZ, it makes sense to drive it to the nearest auto store and stock up on new light bulbs. But which ones to buy? Judging by the first photo, the backlight and indication lamps have different sizes. The choice is simple: if the backlight bulbs have burned out (position 2 in the same photo), then you will need AMN 12-3-1 (T3W) bulbs. If they are indicator ones, then A 12-1.2 (Wl.2).
You can purchase backlight lamps for VAZ either together with sockets or separately. In the second case, the burnt out light bulb must be removed from the socket and a new one installed in its place.
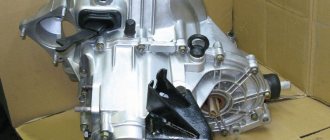
Replacing oil seals
Structurally, the oil seal is a sealing device that closes the passage to oil. When a part wears out, the housing stops holding liquid and an oil leak occurs.
To dismantle the part, you will need to perform a certain sequence of actions.
Input shaft oil seal
The procedure is performed like this:
- completely disassemble the gearbox to open access to the oil seal;
- pry off the seal ring with an awl;
- remove the oil seal itself from the shaft;
- Installation of the new part is carried out in the reverse order.
Secondary shaft oil seal
Disassembling the secondary shaft oil seal is more difficult.
- Remove the centering device from the shaft flange.
- Use a special puller to pull the flange off the secondary shaft along with the washer;
- Use a screwdriver to pry the oil seal out of its socket.
- Carefully install the new seal.
The main causes of malfunctions of the VAZ 2107 cigarette lighter
The cigarette lighter of the VAZ 2107 quite often fails. This happens for various reasons.
Fuse blown
If the cigarette lighter is used as a power outlet to operate multiple high-power devices through a power strip, the cigarette lighter fuse, rated for a maximum current of 10 A, may blow. Due to the peculiarities of the VAZ 2107 electrical connection diagram, the clock and radio will stop working along with the cigarette lighter.
Poor contact or oxidation
Sometimes the cigarette lighter contacts or connectors become oxidized and the device stops working. In such a situation, they must be cleaned by first disconnecting the negative terminal from the battery. The latter will eliminate the possibility of a short circuit. In addition, often the connector of the device connected to the cigarette lighter does not fit into the socket tightly enough. Such unreliable contact can lead to short circuits, melting of contacts and failure of the cigarette lighter. The contacts may also melt when installing a fuse of a higher rating (for example, 15 A). In such cases, you can try to clean and resolder the contacts. If this does not lead to a positive result, the cigarette lighter will need to be replaced with a new one. The cost of a new device for the VAZ 2107 is about 150 rubles.
Sometimes the cigarette lighter coil burns out. In this case, the device is replaced with a new one.
Broken electrical wiring
The cigarette lighter may stop working due to pinching or chafing of the wires, followed by broken contacts. You can diagnose this situation using a multimeter by testing the wiring of the cigarette lighter connection circuit.
After finding the damaged section of the wiring, it is replaced with a new one.
Particular attention should be paid to the integrity of the wire insulation - this will reduce the likelihood of a short circuit and fire to a minimum.
Generator diagnostics
In order to check the diodes, you need to use a multimeter or a test lamp. Using a multimeter, you can measure the on-state resistance of semiconductors. In order to diagnose devices using a lamp, you need to disconnect the positive terminal from the battery. One wire must be connected to the positive terminal of the battery, and the second to the three bolts of the rectifier diodes.
Afterwards you need to perform a similar operation with the negative terminal turned off (and the positive terminal turned on). If the lamp starts to light up, this may indicate that the corresponding diodes are broken. The best option is to install a new diode block. But in order to save money, you can replace only those that are faulty.
The main condition for repairs is to do everything carefully. The current flows in this node is large, so weak insulation will lead to the formation of a spark gap, which will cause failure of not only the semiconductors, but also the generator windings. If the charging light is on on a VAZ-2107, this may indicate that one of several components has failed.
What to do if the battery is boiling
The lamp goes out, the voltmeter needle goes to the right into the red sector, and there is a sharp “chemical” smell in the cabin. At idle, the needle is in the green sector, but as soon as you accelerate, it goes all the way to the right. This indicates that the voltage regulator (chocolate) has failed. If this happens, moving on is more expensive! All the electrical equipment of the car may burn out, and the battery will get damaged, the electrolyte will “boil”, the plates may become warped. To get to the repair site, you can temporarily turn off the generator by removing the wire from terminal “61” of the generator. You can drive for quite a long time on a good battery, just don’t forget to turn off unnecessary electrical appliances - heater fan, heated rear window, radio, etc. Headlights or running lights will have to be left.
Voltage too high (overcharge)
This article describes a simple way to determine if the alternator, voltage regulator, or connections between them are faulty. How to repair all this in the next article.
I have a VAZ 2107 injector, the voltmeter needle goes to the left to red, while charging is normal both at idle and under load
Sergey! I've seen this happen; all the dial gauges were lying. Replaced the dashboard assembly. The reason was found out of curiosity - broken diodes.
VAZ 2107 injector, the generator produced 12.5 V, the lamp is on when the ignition is turned on, the voltmeter is in the white zone, when the lamp is turned on, the lamp goes out, the voltmeter remains in the white zone, I changed the tablet and the diode bridge, it gave 13.2 V, a day later it was 12.5 again
Unfortunately, the quality of spare parts today is simply terrible. Most likely the diode bridge has failed again. Sometimes, according to acquaintances from the car service center, they go through several pieces until it “takes root.” Or you can try to buy a used generator at a salvage yard.
VAZ 2107. The arrow on the charging sensor is jumping. Sometimes it hangs in the red zone. Then sharply turn to green, and then to the beginning. The brushes seem normal, I looked. Relay?. The VAZ 2107 battery charge arrow twitches.
Indicator light
As can be seen from the diagram, the charging system involves a large number of components and each of them can cause poor charging or its absence. To monitor the battery charging process, the car's dashboard is equipped with a control light.
If the system is in good working order, the control signal turns on after the factory. But when the engine enters operating mode, the VAZ 2107 battery charging light does not light up. This means that the battery's energy supply is replenished from the generator. At the same time, the needle on the voltmeter moves to the green sector.
Signs of a battery not charging:
- The VAZ 2107 battery charge arrow twitches.
- The control signal does not go out. In some cases, the VAZ 2107 battery light blinks.
- The voltmeter needle does not go to the green zone after starting the engine.
- When the engine is running, the voltage on the battery should remain around 13.9.
- The permissible deviation in any direction does not exceed 0.3 V. Undercharging of the VAZ 2107 battery within these limits is not yet dangerous.
A voltage drop to 12 V says: the generator is not charging! lamp is dimly lit - the battery is undercharged.
Possible damage to the tachometer and methods of elimination
If we talk about malfunctions, if the tachometer fails to work, the process of finding them may vary depending on the type of motor.
- Carburetor. On such a motor, 3 wires are connected to the device, 2 are power, the 3rd is connected to the coil. To determine the cause of damage to the measuring device, it is necessary to approach the control panel (rear part) and disconnect the terminals included in the device. Next, using 3 other working wires, the device must be directly connected to the battery and coil. When starting the unit, the device should begin to function if the cause is the circuit. If this does not happen, you need to look for a problem in the ignition or the device itself.
- Injection engine. In this situation, the tachometer connection diagram is different. There are 4 wires used here, 2 for power, 1 is directed to the electrical control unit, another 1 is directed to the crankshaft sensor. A fairly acceptable option would be to perform computer diagnostics. In addition, it’s time to try checking the position on the contact connectors or install a new DPKV.
More complex breakdowns
If, when the engine is running, the voltage in the on-board network is in the normal range, but when the load increases, it immediately drops, then we can say that the alternator belt is very loosely tensioned. Quite often, at low speeds, the belt even begins to whistle. It should be noted that with normal belt tension, the sag should be no more than 17 mm. Moreover, the force should be no more than 10 kgf. If the belt is very loose, it needs to be tightened. If tension cannot be achieved, a new one should be installed.
But you cannot tighten the belt too much - this will cause excessive load to be applied to the bearings. This will lead to damage to the bearings of the pump and generator. Quite often, the cause of loss of charging is a breakdown of one or more diodes of the rectifier bridge. It also happens that the rotor or stator winding breaks through. To check these elements, you need to completely disassemble the generator set.