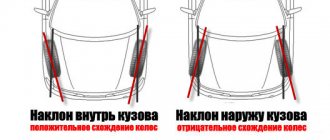
Situation VAZ 2107 2000 year 80,000 in the suspension I only changed the brake discs. I wasn’t in any accidents, I did get into potholes, but not more than 30 km. For some time now it has turned out that the wheel alignment cannot be set accurately (you have to put a lot of washers on the right wheel) and the car pulls somewhat to the right. I checked it again at another car service center, and they also confirmed the original diagnosis. Actually, the last wheel alignment displayed is shown in the picture. The essence of the problem is that the right wheel seems to be shifted back. At the car service center, I personally looked at the suspension with the mechanic, but no crime was found. The silent blocks are normal (we checked the displacement sizes using a caliper according to the manual). There are indeed cracks, but they are small and are flattened by the washer. The cross member is visually normal. The tie rods and swingarm are fine. We checked the ball joints, for some reason the boot on the top left was torn and the master claims that there is play. Regarding the left upper left, I generally agree, since on bumps you can hear a booming sound on the left (probably the ball is knocking). They recommended that I replace all the ball joints. I don't feel sorry, but how justified is this?
The question is, can ball joints really bring a car to the point where the wheel alignment cannot be pulled out? Or we need to look for the reason somewhere deeper. I would also measure the geometry of the body, but where? https://selis76.narod.ru/tmpimg/shodrazval.JPG
Re: > Situation of the VAZ 2107, 2000, 80,000, I only changed the brake discs in the suspension. I wasn’t in any accidents, I did get into potholes, but not more than 30 km. For some time now it has turned out that the wheel alignment cannot be set accurately (you have to put a lot of washers on the right wheel) and the car pulls somewhat to the right. I checked it again at another car service center, and they also confirmed the original diagnosis. ====Have you adjusted the wheel alignment over the past 80t.km? Entering a pit at a speed of 30 can also have all sorts of consequences, depending on the case.
Actually, the last wheel alignment displayed is shown in the picture. The essence of the problem is that the right wheel seems to be shifted back. At the car service center, I personally looked at the suspension with the mechanic, but no crime was found. ====What does this mean - a backward shift?
> The silent blocks are normal (we checked the displacement sizes using a caliper according to the manual). There are indeed cracks, but they are small and are flattened by the washer. > The cross member is visually normal. > Steering rods and swingarm are fine. ====
> We checked the ball joints, for some reason the boot on the top left was torn and the master claims that there is play. Regarding the left upper left, I generally agree, since on bumps you can hear a booming sound on the left (probably the ball is knocking). ====A torn boot kills a ball joint in a couple of weeks. It’s easier for the top one, but if you didn’t replace the rubber band in time, prepare a new ball joint.
> I was recommended to replace all the ball joints. I don't feel sorry, but how justified is this? ===Actually, 80t.km is quite a justified period for replacing all the balls, possibly the steering ones (depending on the backlash), and the amo mounting rubber bands, especially the rear upper ones, and maybe including the AMO themselves. You should not be afraid of replacing balls, and it is very useful to master the procedure. In addition, when you don’t poke your nose into the suspension for a long time, everything doesn’t turn out well :). And when from time to time, everything is OK. You can also replace one. SEE what happens. Unfortunately, the fact is that the newly delivered 80k will not work. F.z. why, but... One winter - one ball per throw, at least.
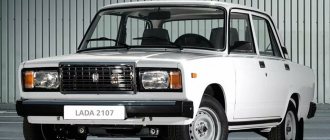
This type of maintenance of the VAZ 2107 car, such as adjusting the angles of the wheels, is called wheel alignment and is performed at intervals recommended by the manufacturer. In addition, any defect in the suspension guide elements may cause a change in the wheel alignment geometry. This means that after replacing, for example, silent blocks or ball joints, you need to check whether the angles of inclination of the front or rear wheels of your “seven” are off.
Pras777 › Blog › Making negative camber on a Zhiguli (plus castor).
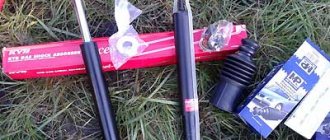
You will need a pit, a mount, a tool, as well as special camber washers (they look like a horseshoe in shape) and regular washers (washers from classic cylinder head bolts work well).
It's easier to do it with two people, but it can be done with one person. There is no universal recipe, because everyone’s car is different, has different body geometry, etc. Therefore, I can’t clearly describe the steps for you like in a magazine and tell you how much of what, where and with what.
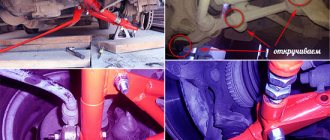
On Zhiguli cars there are such things as “camber bolts” (number 1 in the photo). There are two of these bolts on the right lower arm and two on the left lower arm. These bolts are used to adjust camber and caster.
The bolt closest to the front bumper will be called the front bolt, and the bolt that is closer to the rear bumper will be called the rear bolt. Number 2 in the photo indicates washers. In this case, only washers from the cylinder head bolts are installed, and special alignment washers (horseshoe-shaped) are not installed.
The arrows from number 2 are directed to the places where the washers need to be put on. You can build on how it was done on this machine. That is: we put three washers on the front bolts, and five washers on the rear bolts. Tighten the bolts and see if you are satisfied with the result. If the wheels are a little loose (in your opinion), then add washers. And if there are too many broken, then we begin to remove the washers.
You, of course, noticed that there are not the same number of washers on the front and rear bolts. This difference in the number of washers regulates the castor. Castor, simply put, is the return of the steering wheel. This phenomenon can be described as follows: you are rushing sideways, your steering wheel is turned in one direction, then when shifting, you release the steering wheel and it quickly turns (returns) in the other direction. This is castor.
Typically, a comfortable caster is achieved when the difference in the number of washers is approximately twofold. That is, for example, if you put three washers on the front bolts, then you need to put six washers on the rear bolts, that is, twice as many. Do this and then see how you feel when driving a car whether the caster needs to be increased or decreased.
Many people thoughtlessly strive to make a huge castor, but this is complete stupidity. The castor should not be large or small, it should be optimal and this is important. Castor is aimed at improving handling. When changing the caster (adjustment with washers), two parameters change: the speed of return of the steering wheel changes and, following this, the lightness of the steering wheel AUTOMATICALLY changes. The larger the castor (i.e., the greater the difference in the washers/the faster the steering wheel returns), the heavier the steering wheel.
Your task: to find a middle ground in which the steering wheel returns as quickly as possible, but at the same time, so that the steering wheel turns easily, so that you can handle it without problems, without getting sick from its tightness.
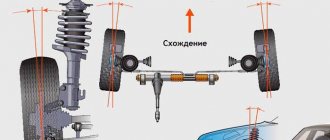
Also, do not forget that immediately after your intervention in adjusting the camber and castor, you will have to adjust the discrepancy. It is regulated much more simply - by steering rods (torsion of the rods). The wheels should be level or slightly to the sides.
There is no need to despair if something doesn’t work out right away. Setting up a car is always difficult. But the sooner you start trying, the sooner you’ll figure it out and understand what’s what.
An important point: if it turns out that your camber bolts are too short to put washers on them and thereby increase the camber, then simply buy longer bolts and replace them. The auto store sells bolts of different lengths, take your pick! A real camber bolt has a special rectangular head. If you want to replace your bolts with longer ones, you can install the bolts with a regular hat, it doesn't matter.
Be sure to use engraving washers and tighten these bolts regularly.
Source
Installation of plates
Installation of negative camber plates is carried out as follows:
- It is necessary to ensure rigid stability of the car and raise the rear axle. All these manipulations are best performed on a screw electric lift; this will not only provide freedom of action, but also convenience.
- Next, you need to remove the rear wheels along with the entire brake system. This is necessary to lighten the structure and also make the bottom bolts accessible to you.
- Unscrew the 4 hub mounting bolts and remove them. In order to unscrew them safely, you may need to treat them with WD-40 and wait a while. The standard bolts have a hex head, this design allows them to be clamped more securely. The kit also includes bolts for fastening; they are long, since the standard bolts are not enough to tighten the connection. But, unfortunately, the caps on them are made with standard open-end wrenches. This does not allow them to be properly tightened. Therefore, you can purchase hex bolts separately.
- Before installation, the negative camber plates and the surface of the beam should be treated with anti-corrosion compounds, having previously been cleaned of rust. This will then allow you to easily disassemble the structure if necessary.
- Then reassemble everything in reverse order. As a rule, no adjustments are required after installing the plates. But, however, they don’t exist anyway.
Communities › VAZ: Repair and Modification › Forum › Negative collapse on the classics!
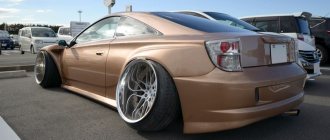
What is the purpose of such tuning? In general, you go to the wheel alignment and tell the dude to create a negative alignment.
They say that some kind of spacers need to be installed there, but I can’t figure out which ones exactly!
the goal is to increase the contact patch with the road, i.e. reduction of slippage and confidence