The heating, ventilation and air conditioning system of the Vesta's interior differs from similar systems of other Lada models. The difference is not only in its design, but also in the control method. Let's look at the design features of the Vesta stove, and also evaluate its effectiveness.
Design of the LADA Vesta stove
You should start with the fact that the stove body is located under the dashboard frame. What parts does the system consist of?
- Air filter.
- Stove radiator.
- Fan.
- Damper regulating gearbox.
- Additional resistor.
- Air flow distributor.
The radiator of the LADA Vesta heater produces and releases heat into the cabin. The fan is designed to supply air to the vehicle interior. Using a part such as a resistor, the speed is adjusted.
You can work with the stove using the SAUKU or “heater and air conditioning control unit”. The AvtoVAZ company installs three control units on its cars on various trim levels.
The simplest option would be SAUKU without an air conditioning system (“Classic”). Average in cost - with air conditioning (“Comfort”). And the most expensive is SAUKU with a developed climate control system (“Lux”).
Checklist for installing a lampshade
- Take the necessary measurements;
- Using the obtained parameters, cut out a stencil from available materials (paper, cardboard);
- Disassemble the lampshade, mark the recesses for the bolts on the model;
- On the ceiling of the cabin, select the place where you would like to install the lamp;
- Fix the stencil on the ceiling where the lamp will be installed with adhesive tape;
- Trace the outlines;
- Attach the lamp, make sure the parameters match;
- You need to cut the sheathing with a tool with a very sharp blade to eliminate uneven, torn edges;
- After cutting, reattach the lampshade and correct the contours;
- Where the screws will be screwed in, attach metal clamps;
- Secure the lampshade.
What is the pattern for ventilation and heating of the interior?
The LADA Vesta heater fan directs air to the feet of the passenger and driver, to the windows and directly into the passenger compartment. With the help of deflectors, the driver can regulate the direction of air flows and their strength.
A function has been added to LADA Vesta with which the driver or passengers can easily cool a bottle of mineral water or Coke. The refrigerated glove compartment will comfortably hold your favorite soft drinks and keep them cool even on the hottest day.
Replacement instructions
For the procedure, you should use an overpass or inspection hole. To raise the car, you can use a jack, lifting the front end and placing it on supports. Replacement is carried out only on a cold machine.
Required Tools
Replacing a timing belt and chain is a complex and lengthy procedure. To complete it as quickly as possible, you need to properly prepare for it and prepare in advance:
- a set of keys;
- set of heads;
- knob;
- screwdriver
To make consumables last longer, you should buy originals.
Stages
- First, turn off the power to the car by removing the negative terminal from the battery.
- If protection is installed, it must be removed.
- Then you need to drain the coolant from the system.
- At the next stage, you need to dismantle the radiator, cooling system fan, and pump pulley.
- Then you need to remove the drive belts for the power steering, air conditioning compressor, and generator.
- Next, unscrew the spark plugs.
- Then we remove the distributor protection screen and disconnect the tube connecting it to the timing belt from the air collector sleeve.
- By turning the crankshaft by the bolt securing its pulley, you should set the marks. The mark on the timing belt pulley must coincide with the casting on the camshaft; accordingly, the installation mark on the crankshaft gear must align with the mark on the oil pump housing. In the video you can see how to set the tags correctly.
- Using a special tool, you need to unscrew the mounting bolt and remove the crankshaft pulley.
- Then you need to remove the lower and middle timing protection covers.
- By unscrewing the tensioner mounting bolt and turning it counterclockwise, we loosen the tension on the timing belt and remove the latter.
- Now you should change the roller and start tightening the VAZ 2105 timing belt.
Changing the tension roller
Before doing this, all parts should be cleaned of dirt.
- The belt should first be pulled onto the crankshaft pulley, then onto the oil pump drive pulley, and lastly onto the camshaft pulley.
Pulling the belt onto the camshaft pulley
- Having put the belt on the tensioner, you need to tighten the bracket and install the spring.
When installing the timing belt, do not rotate the camshaft and crankshaft so as not to knock off the marks.
- After turning the crankshaft two turns, you need to check that all installation marks match, tension the belt and tighten the tensioner bracket mounting bolts.
- Next, assembly is carried out in reverse order.
After the procedure for changing the timing belt or chain of the VAZ 2105, you should start the car and check the performance of the engine.
Stove control
There have been no fundamental changes in the control of the air conditioning and ventilation system. Still, you may notice a few new keys.
Block "Classic"
Using buttons 11 to 16 you can adjust the direction of the air flow. Using the regulator number 9, the air temperature is controlled. 17 – air flow power.
"Comfort" block
Using key 18 you can turn on the air conditioning, 19 – air recirculation in the car interior. Control of parameters such as fan speed, temperature, air flow distribution is similar to the “Classic” version.
Block "Lux"
As for the “Lux” version, only two keys have been changed. 24 is now responsible for forcing the air conditioning on, as well as for heating the mirrors.
When you press key 20, you activate the automatic mode for selecting the air temperature in the cabin depending on the current temperature outside the cabin.
Connection
In this case, it is necessary to ensure that the floor lighting on the Lada Vesta and X-Ray works in the same way as the rest of the car, that is, it fades out when the doors are closed. Otherwise, the constantly burning backlight will begin to irritate and tire you, especially on a long night journey.
In this case, there are 2 connection options:
- To CBKE;
- To the ERA-GLONASS lamp.
To CBKE
The connection goes to plug P1, contact C4 (the red wire goes into it) - 12V, provided the car is disarmed. Plug P1, contact C6 (a white wire goes into it) – when the door is opened, a “ground” gradually appears.
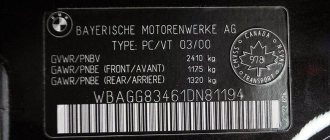
The location of the electronics box varies depending on the model.
Lada Vesta
In a sedan it is located behind the glove box, and therefore, in order to get to it, the glove compartment must be removed. To do this, you need to open the glove box lid, then release the latches that hold its upper edge. When this is done, the lid pulls towards itself, overcoming the resistance of the 3 fasteners, and snaps off.
Vesta glove box mount
Next you need to remove the glove box light. It is located in the upper left corner and is held in place by a spring-type lock. You need to pry up the lampshade with a knife or screwdriver and snap it off, then disconnect the wiring.
When the ceiling light is removed, you only need to unscrew the 5 mounting screws that secure the glove compartment to the dashboard. This is done using a T20 Torx bit.
Lada X Ray
In this case, everything is simpler, since the electronics unit is located on the left side of the dashboard, at the driver’s feet.
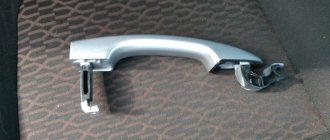
To the ERA-GLONASS lamp
First you need to remove the lampshade itself. Before work, you must reset the negative terminal from the battery.
Next, you need to insert a screwdriver or knife between the roof upholstery and the lampshade, with the help of which you can disengage the latches.
Then unscrew the 2 screws that secure the lampshade to the body, and pry off the spring retainer (also with a knife or screwdriver). In the end, all that remains is to disconnect the plug.
For greater convenience of connecting the floor lighting (and other devices) to the Lada Vesta and X-Ray through the lampshade, the plug is numbered. It is recommended to navigate by the number, since the color of cars of different years of assembly and configuration may differ.
Diagram of the ERA-GLONASS lighting unit
Connection:
- Contacts 11 and 14 (usually white-pink color) - after turning on the main relay (opening the doors, turning the key in the ignition switch), +12 V appears. A few minutes after the key is removed from the ignition switch, the power stops.
- Contact 15 (usually blue-black or black) – ground;
- Contact 17 (usually white) – mass of door limit switches. It occurs only when the doors are open.
The implementation of floor lighting on the Lada Vesta is demonstrated in the video.
Final opinion about the stove on LADA Vesta
In general, only a small percentage of owners of this car complained about the new stove. Drivers praised the updated design of the control panel - it became easier to work with.
Many owners who purchased a car in the summer may not be aware of the damper in the glove compartment, which must be closed in winter to increase air flow to all components.
The new stove and ventilation system provide a high level of comfort and warmth even in frosty temperatures of -30 degrees Celsius, which is not uncommon in Russia. In hot weather, you can also prepare a pleasant cool microclimate, which will allow you to enjoy any trip.
Results
In severe frost (at -20 degrees), the thawing order will be approximately as follows:
- 1 minute – the ice on the mirrors begins to melt;
- 2.5 minutes – the ice on the mirrors has almost melted, the bottom of the windshield (stove) begins to thaw;
- 4 minutes – the mirror elements are completely dry, the snow on the threads of the rear window will melt;
- 5-6 minutes – the windshield and areas on the side windows near the mirrors noticeably move away from the ice;
- 7-8 minutes - the heating has melted the ice from the main part of all the windows, you can drive.
In warmer weather, you can start driving earlier, as soon as the engine speed drops to operating speed. There are no comments on the operation of Vesta’s heating; one can only find fault with the fact that the seat heating is not adjustable.
Theme Options
Search by topic
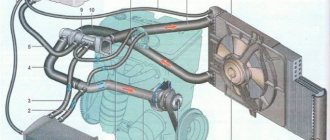
Elements of the ventilation and heating system
The stove body (in Fig. No. 5) is located in the car interior under the instrument panel frame. Inside the case there are:
- heater radiator;
- electric fan;
- fan speed controller (RFV) or additional resistor;
- air flow distribution damper;
- gear motor that regulates the dampers;
- air filter.
The heater radiator releases heat to heat the interior. Located inside the case on the left side. To replace it, you will have to remove the upper frame (lining) of the panel (dashboard).
An electric fan forces air into the car interior through air ducts. It is located on the other (right) side of the body. Access to it opens after removing the glove compartment.
The additional resistor is designed to regulate the rotation speed of the fan motor. It is installed on the heater housing on the driver's side.
The cabin filter cleans the air entering the cabin. Located in the heater block on the passenger side. It is replaced from inside the car (and not from the engine compartment, as on Grant, Kalina or Priora). In addition, the filter element resource is 30,000 km, and not the usual 15 thousand km.
The job of the gear motor is to regulate the position of the damper, which distributes air throughout the cabin. How this happens is shown in the video:
Air temperature sensors in the cabin and outside transmit readings to the engine control unit (ECU).
The control unit for the stove (heater) and air conditioner (SAUKU) is designed to regulate the air temperature in the cabin, change the speed and direction of air flows, and control the heaters. Depending on the configuration, the SAUKU may differ slightly. There are three types in total:
- SAUKU without air conditioning;
- SAUKU with air conditioning;
- SAUKU with climate control.
Checking the operation of the heated windshield
The efficiency of the windshield heating, like other heating systems in the car, depends on the ambient temperature. Vesta owners have noticed that at -3 degrees, only 3.5 minutes are enough for the ice and snow from the windshield to melt. Then we make one sweep of the wipers and all the ice goes away:
At lower temperatures, for example, when it is -20 degrees outside, the windshield heats up more slowly. Thanks to the heater, after 3-4 minutes the first signs of thawing appeared at the bottom of the glass. The main part of the ice disappears only after 7-10 minutes, you can go.
By the way, if the filaments are clearly visible inside the glass and the heating does not work, contact your dealer with this question; it is possible that this option is simply not activated on your car.
On Lada Vesta SW and Lada Vesta SW Cross, the heated windshield is activated with a separate button. Heating efficiency on video:
Interior ventilation diagram
Air ducts run from the stove body, which direct air flows to the windows, into the interior and legs. The central deflectors can adjust air flow in different directions, and its strength is controlled using a horizontal wheel underneath them.
AvtoVAZ has implemented airflow for the Vesta driver’s feet in a new way. The air duct nozzle is located not on the side, but above the foot of the right foot. Some owners of the new sedan believe that this design is not very successful, because It warms the toes worse than the foot itself. For the front passenger, the air duct exits closer to the wall of the engine shield and a similar situation will not arise.
Worth o. On versions of the car with air conditioning, a small air duct fits into the glove compartment, which can cool, for example, a water bottle.
How to understand that there is a malfunction in the system
Frequent addition of antifreeze indicates that the connecting hose system is not tight. And this contributes to the penetration of liquid beyond the CO. You should carefully inspect the connecting hoses and their integrity. Be sure to inspect the pump and drain holes. If there are traces of leaks, you need to solve the problem yourself or contact a service station.
To identify problems with the cooling system, you need to warm up the car to a maximum of 85-92 degrees. Then you need to check the lower pipe, when it is cool, this means that only a small circulation circle is working - the thermostat does not open. In this case, the machine cannot be used. To verify that the part is faulty, you need to open the expander cover. Make observations when antifreeze does not flow, you need to clean the pump or replace the thermostat.
Heater and air conditioner control
“Classic” block without air conditioning
Left regulator (No. 9) – supply air temperature control; Right (No. 17) - air flow regulation; Buttons (No. 11-16) - setting the direction of air flow.
Comfort unit with air conditioning
The left regulator additionally has the function of turning on the air conditioner (No. 18), and the right one has the function of turning on air recirculation (No. 19). Otherwise, the control of supply air temperature, fan speed and air flow distribution of the Comfort version of the system is similar to the Classic version.
Luxe unit with climate control
Two buttons are replaced on the control unit:
- “Defrost MAX” mode (No. 24) - the air conditioning is forcibly turned on (if conditions permit), electric heating of the windshield and rear windows and side rear-view mirrors. The entire air flow is directed to the blower nozzles of the windshield and front side windows, and the maximum speed and air temperature are set.
- “AUTO” mode - in this mode, the air flow intensity (fan speed) and one or another air flow distribution mode are automatically set depending on the outside air temperature, the cabin air temperature and the coolant temperature of the engine cooling system.
The information display (No. 10) has also undergone changes; the air temperature scale has been replaced with numbers.
Heated seats.
These are simple buttons
these are 3 position
In general, an electrician is needed.
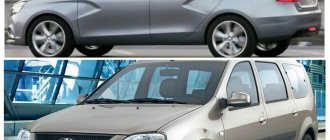
Lada Vesta SW Cross 1.8 5MT Luxe Multimedia Mars
How does the morning begin in winter? When others clean the windshield with plastic cards, the windshield heating on Vesta turns on. Snow covering roads and vehicles, coupled with low temperatures, causes inconvenience for motorists - they tried to solve this problem with the Lada Vesta. Russia is famous for its harsh winters. AvtoVAZ tried to adapt the new models to the winter season. The Lada Vesta engine starts even in 30 degree frost, and the design of the locks prevents freezing. Additional options on the luxury model, such as a heated windshield, rearview mirrors and seats, are a bonus for drivers. In cold weather, you don’t need to manually remove snow and ice deposits with a scraper; just turn on the heated windshield. On the Lada Vesta, heating will quickly and easily remove snow and ice. It is also recommended to use this function in a blizzard with snow, to remove excess load from the mechanism driving the wipers. Read the article to the end and find out how to enable it, how it works and what problems are encountered with this function!
AvtoVAZ methodology
To eliminate vibration of the interior heater fan, it is necessary to carry out work in accordance with the procedure.
1. Place the car in the workplace, brake with the parking brake, open the hood, disconnect the earth wire terminal from the battery (spanner 10).
2. Remove the heater fan, Figure 1, in accordance with the requirements of the technological instructions for the corresponding car model:
- TI 3100.25100.20546 “Body of LADA Largus cars - removal / installation of main components and parts”;
- TI 3100.25100.20589 “LADA Vesta car body – removal / installation of main components and parts”;
- TI 3100.25100.20599 “LADA X-Ray car body – removal/installation of main components and parts.”
Figure 1 – Heater fan
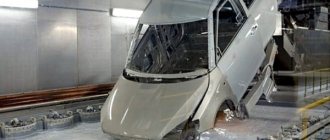
3. Blow out the heater fan impeller, Figure 2, with compressed air to remove dust, dirt and foreign objects (compressed air blow gun).
4. Wash the heater fan impeller with a cleaning solution to remove any remaining dust and dirt, avoiding contact of the cleaning solution with the heater fan motor (technological container, brush, wiping cloth, cleaning solution - water, liquid soap).
Figure 2 – Places where dust accumulates on the heater fan impeller
5. Use a rag to wipe off the remaining cleaning solution from the heater fan impeller (wiping rag).
6. Install the heater fan on the car in accordance with the requirements of the technological instructions for the corresponding car model.
7. Connect the earth wire terminal to the battery (spanner 10).
8. Turn on the ignition, turn on the heater fan at 2nd and higher speeds, make sure that there is no increased vibration of the fan in all operating modes. Turn off the fan and ignition.
Photo: Phantom70 logbook and alexpalshin
Keywords: Lada Vesta stove | Lada Xray stove | air conditioner Lada Vesta | air conditioner lada xray | stove Lada Largus | air conditioner Lada Largus | AvtoVAZ order
2
9
Found an error? Select it and press Ctrl+Enter..
(AEB) Car sales statistics in the Russian Federation for April 2022 (-72.4%) - the largest drop
What is needed to convert a regular Lada Granta into Drive Active (articles, prices)
Installation of side trims on Lada Priora seats
If the standard instrument panel navigation does not work on Lada Granta and Kalina