During the operation of the vehicle, its components and assemblies are subject to contamination. Accumulated dust and dirt prevents the proper functioning of critical parts of the vehicle's systems, which in turn affects the vehicle's productivity.
The electronic throttle valve on the VAZ-2114 is, according to experts, one of the most polluted mechanisms in a car. Therefore, the remote control must be given close attention and periodically maintained. Otherwise, the driver will experience excess gasoline consumption by the vehicle, instability of the engine, and many other troubles.
Cleaning the throttle
Later versions of the VAZ 2114 model could have electronic throttle valves installed, so next we will consider instructions for cleaning both types of throttle: mechanical and electronic. Note that the types of throttles discussed below were installed on the 8-valve VAZ 2114 engine.
Cleaning the mechanical throttle is carried out in several steps:
- Unscrew the cap of the expansion tank to relieve pressure in the cooling system;
- Disconnect all sensor plugs from the throttle;
- Using a Phillips screwdriver, unscrew the coolant pipe clamps on the throttle body;
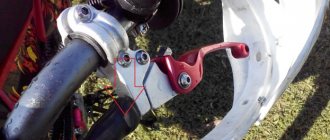
- Remove the throttle cable (if you do not have an electronic gas pedal);
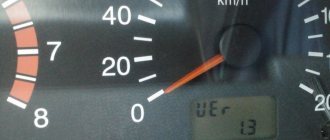
- Using a 13-mm socket (or a spanner), unscrew the two nuts securing the assembly, not forgetting to remove the old gasket;
- Next, proceed to thoroughly clean the assembly, not forgetting to clean all surfaces adjacent to the damper. To remove dirt from hard-to-reach places, you will need compressed air from a compressor or a regular car pump.
Assembly should be done in reverse order. Cleaning the electronic throttle has several features:
- Because The mechanism of the electronic version contains microsensors; when cleaning them, you should not get carried away with chemicals, because there is a risk of damage;
- To thoroughly clean the mechanisms of the electronic version of the unit, remove the cover secured with 4 bolts;
- Next, after cleaning all the elements, lubricate the gears with lithol;
- Also, when reinstalling the electronic version of the unit, it may need to be adapted.
Replacing the sensor
Like any other vehicle electronics component, the throttle sensor is changed when the negative terminal of the battery is reset. A Phillips head screwdriver is sufficient for removal. Disconnect the connector and unscrew the fastening screws.
We remove the sensor and clean the docking area with a dry cloth. If necessary, apply a little grease to the throttle axis. Then we install a new sensor, put on the connector and connect the battery.
Important! After replacing the sensor, you need to start the engine and let it idle for a while.
After this, gradually add speed several times without moving the car. The electronic control unit (ECU) must adapt to the new sensor. Then we operate the machine as normal.
Step-by-step instruction
All repairs are divided into two stages - disassembly and cleaning. The cleaning time depends on the degree of contamination of the damper and the general wear of the engine. There is no need to use great physical force here; each stage can be done alone without outside help.
What you need for washing
Repairs must be carried out after the engine has cooled down. To remove the throttle assembly, you will need two screwdrivers, as well as a 13mm socket wrench. Almost every car enthusiast has these tools. Any cleaning agent is suitable for working with the damper itself, the main thing is that it removes oil and soot well. For better cleaning, we recommend using cotton swabs; they will help you reach the most difficult to reach places.
Cotton swabs will help to better clean the damper from dirt
When disassembling the mechanism, it may turn out that some consumables are no longer suitable for further use. Therefore, it is better to purchase a throttle valve gasket or a receiver O-ring in advance, depending on the engine size.
Removing the throttle assembly and cleaning it
The throttle assembly must be removed in the following sequence:
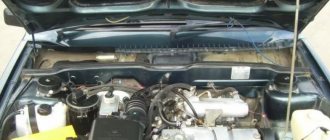
- Having opened the hood, remove the plastic cover that covers the top of the engine.
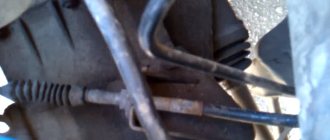
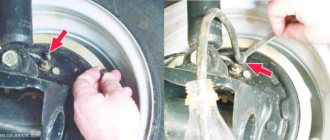
- Remove the rubber vent hose. If there is a large amount of dirt, remove it with a regular rag. Remove the ventilation hose using a screwdriver
- Before removing the mechanism itself, we will need to relieve the pressure from the cooling system. To do this, remove the hoses with the antifreeze liquid, having previously wrung out several clamps. We remove the hoses with antifreeze liquid, having previously wrung out the clamps
- To protect the holes from dust during repairs, it is better to immediately cover them with small plugs.
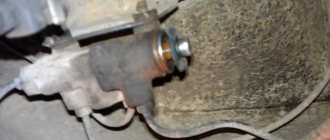
- To gain access to the valve itself, you will need to remove another hose that ventilates the fuel tank.
- Now you can remove the damper by first unscrewing the two mounting bolts and disconnecting the cable that connects the part to the accelerator pedal. We remove the damper by first unscrewing the two bolts
For further work, you need to decide which cleaning method you will use. For minor contamination, choose the simpler and faster surface cleaner. If the mechanism is covered with a large layer of dirt, and some elements are coked, then a complete cleaning is suitable. Surface cleaning does not require further disassembly of the mechanism. It is enough to remove oil deposits from internal and external surfaces with a rag and cotton swabs. We recommend using gasoline or thinner as cleaning agents.
Tip: Adjust the damper during cleaning to completely remove dirt from the inner surface of the mechanism.
When completely flushed, we will need to replace the gasket or o-ring. To disassemble the tool, take a small screwdriver and a 13mm wrench to unscrew two more bolts. After cleaning, mechanics recommend blowing out all the holes with a stream of compressed air - this will remove excess moisture and small dust particles.
What does the throttle valve look like before and after cleaning?
When disassembling the throttle assembly, we recommend paying special attention to the idle speed sensor. The efficiency of fuel use and the smooth movement of the vehicle depend on its correct operation.
To clean it, it is better to use WD 40 and thin cotton swabs. We remove dirt from the case and thoroughly clean the contacts of the device.
Signs of a dirty remote control
The most common symptoms associated with a dirty damper:
- Poor engine starting.
- Unstable idling, speed fluctuates.
- The car jerks when driving at low speeds.
- Difficulty idling, engine stalls.
All these signs indicate a dirty remote control. But do not rush to draw conclusions and start cleaning the unit, because they may also indicate a breakdown of some sensors: IAC, TPS - they are located on the throttle assembly and may be faulty. In particular, high-quality washing of the remote control can cure them, but not a fact (by following the link, you can check, clean, replace the IAC, check the TPS, repair and replace it). A faulty mass air flow sensor also has similar symptoms. It is advisable to clean the remote control at intervals of 30 thousand km.
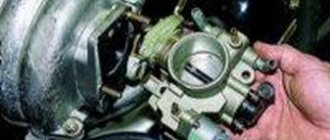
What is a throttle valve and where is it located in the VAZ 2114
This part is part of the intake system and is responsible for supplying air to the cylinder, where the fuel combustion process takes place. If the throttle valve operates correctly, the optimal amount of air enters the cylinder. This ensures normal engine operation and sufficient power of the power unit.
Throttle Position
In the VAZ 2114 model, the throttle assembly is located between the air filter and the intake manifold. The damper itself is located inside the unit and to clean it we will need to first remove the mechanism itself and then disassemble it. This work can be done without the involvement of car service mechanics; you just need to prepare the necessary tools, materials and choose free time.
Throttle assembly diagram with description
- coolant supply pipe;
- ventilation system tube;
- coolant outlet pipe;
- damper position sensor;
- RXX;
- vapor recovery system pipe;
- throttle valve.
Important: Auto mechanics advise cleaning and adjusting the throttle valve once every 55-60 thousand kilometers.
Problems and solutions
There are a lot of reasons for unstable idle, and they apply to both carburetor and injection engines and even diesel engines, both to the old type design and to the new E-gas pedal, which AvtoVAZ is so proud of. Let's start with the problems that occur in carburetor-type engines:
- The fuel-air mixture has become lean. To fix the problem, you just need to make an adjustment to the level of eight hundred revolutions.
- Unstable running can also occur due to wear on the carburetor valve. In this case, the engine operates exclusively with the choke mode extended. To fix the problem, you need to replace the defective part with a new one.
- It also happens that the system channels become dirty. Then the fuel does not receive the required portion of air and leads to failure. Here you just need to clean the channels.
In the injection type of engine, there are no fewer reasons for failure.
- The first thing you can check is air leaks. Be sure to check the connection between the intake manifold and the cylinders to see if the gaskets are worn out. There are rubber plugs on the same manifold; if they are cracked, it is better to replace them. You can check all this by buying carburetor cleaner or any other flammable item in the store, start the car and spray all the joints, if there is a leak, the car will start to twitch, look in that place.
- They can cause gaps in speed and malfunctions in the IAC sensor (idle air control), it is often enough to remove it and clean it or inspect it for damage and replace it if necessary.
- It would not be amiss to check the throttle assembly, since it is not the strong point of the fourteenth model. It is possible that the throttle valve is simply clogged, which causes failures in the entire system. Cleaning it is not at all difficult; this work can be done independently.
- Wear or contamination of spark plugs also affects idle speed, as well as the entire operation of the engine. This is perhaps the most quickly solvable problem that can be eliminated by replacing old spark plugs with new ones in five minutes.
But problems with electronic equipment, in particular the famous E-gas, are much more complicated. Here it is observed:
- regulator failure (IAC);
- DMRV sensor failure;
- failure of the EGR valve (adsorber);
- damage to wires.
The regulator is checked using a multimeter. If the device produces unacceptable values, above 80 Ohms, then you need to replace the regulator with a new one, since repairing it will be problematic.
If the regulator is normal, then you need to check the mass air flow sensor. The check is as follows: the connector is disconnected and the motor is turned on.
If the speed dynamics, at the initial one and a half thousand revolutions, increases, there is no doubt that the breakdown lies in the sensor. As practice shows, 80% of VAZ-2114 malfunctions lie in this part.
Unstable to long-term operation and EGR, which regulates exhaust gas emissions. When it fails, operation can be normalized by cleaning the valve.
And the last thing that should be checked is the condition of the air filters, which on the fourteenth get clogged quite often, and the ignition system itself.
So, we found out the reasons for the occurrence of unstable idle speed of the fourteenth VAZ model and learned methods for eliminating them. All that remains is to wish that your swallow works without failures and pleases you with excellent work!
No duplicates found
The viburnums had an electric pedal.
on the VAZ-2114 there is an electronic pedal.
Perhaps the author should correct it, not “from Granta” but “from 2010-2012”. VAZ 2113, also e-gas
Thanks for the addition, but it’s no longer possible to edit a long post (or I don’t know how).
Thank you for the excellent post, I would like to know how to adapt the pedal through a wire, I just adapted it mechanically, I didn’t feel the difference, VAZ 211340 2012 e-gas car. I have a laptop and a wiring harness (OBD2), I would appreciate any help.
The guy has a 2008 2114 with an electronic pedal.
Ecology is ecology, but the transition to an electronic accelerator pedal was largely due to the fact that the leader in the production of automotive electronics, Bosch, began in the 2000s to switch to a torque model of engine control in its ECUs. Instead of the usual and understandable OZ for fuel and correction, they began to introduce algorithms for optimal control of the ECU.
Regarding the reaction to the accelerator pedal, this problem was present in one way or another on all cars in the first generation of this system. Moreover, most of all they complained about the French. The Germans had this moment better worked out from the very beginning. And since 2005, it’s not possible to feel much of a difference.
As for our cars, the problems with the throttle were caused not by the environment, but by insufficient refinement and tuning. Because after VAZ and UAZ switched to Bosch 17.9.7 and analogues (to avoid a monopoly) in the form of M74, problems began to appear in commercial vehicles, with increased fuel consumption, sometimes with an immobilizer, with deterioration in performance. And in the first 3-4 months, people calmly opened the algorithms, completed them, configured them, and already offered normal solutions for chip tuning. Where no crutches in the form of boosters are needed.
Thank you for the clarification!
Good afternoon. The car is VAZ 211340 2012 e-gas. I will be glad for any help in solving problems to bring it back to normal. What firmware do you recommend, and how to flash it correctly.
I would recommend stock firmware first. Then figure out what doesn’t suit you. By the way, what’s not to like? if it’s a pedal, then you can install a regular throttle and change to firmware without e-gas
Everything is completely stock, nothing was changed, and if they were changed, it was with similar spare parts, there was no talk of tuning. The problem is with the speed, they float not bad. Also, the car may stall when I reverse. This is roughly what it looks like from the outside. I put it in reverse, squeeze the clutch, put it in neutral, slow down, the speed drops and as a result the car stalls. This happens not only in reverse gear. Usually before a traffic light. I slow down, depress the clutch, put it in neutral, slow down (the speed is around 2-7 km per hour, and the revolutions drop to 500, then sharply to 1200, and seem to return to normal. https://www.drive2.ru/b/921974/ there is a very funny letter from Auto Vase.
I quote: “On cars of the Lada Kalina family, equipped with an 8-valve engine, an electronic accelerator pedal and air conditioning, a possible place for the discrepancy to occur is “Speed up by 1500 - 2500 rpm at the time of gear shift to neutral” and “ Increase in engine speed when driving in neutral gear from 500 rpm to 1200 rpm.” To eliminate these inconsistencies, it is necessary to reprogram the ECM controller using the PB-6 programmer produced by NPP New Technological Systems, Samara (additionally, you need to purchase a cable for the M74 controller from NPP NTS, Samara), file I444CE08.hex .
In AGO, use defect code 1411020 000 008 “Reprogramming the controller with software I444CE06”, culprit 00001, labor intensity item 87088 – 0.3 n/hour. In the descriptive part of the AGO (field “Description of the defect”) and RA (in the column “Special notes on the complaint”), it is necessary to indicate the manifestation of non-compliance on the vehicle.”
That is, they openly say that everything is fine, don’t worry, just buy it and reflash it yourself. There are no problems with buying, but with reflashing, as if for the first time, I’m afraid to mess up. Maybe you can help me solve my problem.
Cleaning the throttle valve of a VAZ 2114
There are two cleaning methods: - Without removing the unit; — And accordingly with its dismantling.
Which method should I choose? It all depends on the degree of pollution. If the mileage has been up to 25 thousand since cleaning or replacing the throttle. Then, most likely, it is possible to limit ourselves to superficial cleaning and prevention without removing the part. In other cases, it is recommended to completely dismantle the unit for deep, thorough processing, cleaning and gaining access to hard-to-reach places.
We will describe in detail the process of complete removal after which the first option will not be difficult to complete. So, let's begin:
To begin, unscrew the cap of the expansion tank with antifreeze. This is necessary in order to “relieve” the pressure and avoid antifreeze leaking out of the hoses.
Next, we need to unscrew and loosen all the clamps that tighten the hoses attached to the throttle block. The same applies to the air pipe. To carry out the work, we will need a 13mm wrench or socket. After removing the clamps, we disconnect the hoses themselves. We disconnect the pipe from only one side and, for convenience, move it to the side.
Now remove the throttle cable from the throttle drive selector.
Turn off the power to the sensors.
Take the 13mm head, unscrew the two bolts and remove the throttle assembly. Remove the old gasket.
To treat contamination, you can use carburetor cleaner and a clean rag or rag. If the degree of contamination is very high, then you can use a toothbrush with hard bristles. Just before cleaning, disconnect the idle air control. Apply the product to the contaminated surface. Using progressive movements, remove carbon deposits from the metal surface. If you are not satisfied with the result, repeat the operation again until complete cleansing
It is very important to clean or blow out the channels that are in the product. A lot of dirt accumulates there
It is most convenient to carry out purging using compressed air. To do this, you can use a regular car pump. If the sensor socket and the sensor are clogged, be sure to clean them too. Do not forget to carefully clean the junction of the throttle assembly and its internal cavity. To do this, apply some cleaning product to a rag. Distribute evenly on the inner walls of the parts. Take a brush and clean the problem areas. After finishing the treatment, wipe the cleaned areas with a damp cloth and remove any remaining dirt. After washing the unit, it is recommended to clean and blow out the disconnected pipes. We expect a short amount of time. We install a new gasket at the junction of the throttle assembly. We attach and secure the knot in place. We connect the IAC sensor. We pull the hoses onto the fittings of the cooling system and connections to the adsorber. We put on the throttle body pipe. We fix the cable on the drive. Tighten the clamps of all attached elements. We connect the sensor chips. Close the cap of the expansion tank with coolant. We start the car and test its operation.
The non-removal method is somewhat similar to the one we described earlier. The only difference is that we will only remove the air duct pipe and nothing else. The work steps are as follows: — Remove the pipe; — We repeat point number 10 of the previous method. — We connect and secure everything in the reverse order, not forgetting to replace the old gasket with a new one.
Keep in mind that this method is most suitable for preventative, light, superficial cleaning. If malfunctions or incorrect operation of the engine occur, use only the removal method. Now we know how to clean the throttle valve on a VAZ 2114 using two different methods, quickly and without much difficulty.
Helpful advice
Please note that if you do not have a carburetor cleaner available, you can use other cleaning products, for example the well-known WD-40
Instructions for dismantling the mechanism
Replacing the throttle valve on a VAZ-2114 does not require any special professional skills, so even a novice driver can carry out all the work. To carry out the work, you need to arm yourself with all the necessary equipment: a 13mm socket wrench, screwdrivers, cleaning agent.
The procedure for removing the remote control is as follows:
see also
- The plastic cover is removed from the top of the motor, and the hoses that provide ventilation are detached.
- It is also advisable to make sure that lubricant residues are in the air pipe; this will indicate that the mechanism really needs urgent cleaning.
- Then you need to remove the cap that covers the expansion tank to reduce pressure in the system, remove the clamps with fasteners and disconnect all supply hoses.
The final step in the throttle body removal process is to remove the hose that vents the fuel tank, disconnect the cable, and release the two bolts. When the mechanism is dismantled, based on a visual inspection, a conclusion can be made about its level of contamination. Then proceed to complete or partial cleaning of the throttle valve.
Car service nuances
It's no secret that many car owners prefer repairs at service stations. There are many reasons for this.
If you need to clean your throttle body, you won't have to pay a lot of money for it. Today such a service costs about 500 rubles.
But there are several nuances that should be taken into account when visiting a service station.
In addition to cleaning the damper, the technicians will begin to assure you that additional cleaning of a number of components is required, as if without this the repair will not be complete and the effect will not be achieved. All this is a banal attempt to charge you more money for unnecessary work. They may start telling you that the damper is cleaned every 15, or even 10 thousand kilometers, they will offer their services, maybe even provide a discount as a regular customer. Again, the simplest trick. This figure is completely untrue. The frequency of cleaning the throttle valve on a VAZ 2114 car recommended by the manufacturer is 60-70 thousand kilometers. But in practice it turns out to be about 50-60 thousand kilometers.
You just need to monitor the condition of the unit and pay attention to the symptoms of contamination that we have already introduced you to today.
https://youtube.com/watch?v=Xh9LUV37tiE
Whether to do the work yourself or have it done at a car service center is entirely up to you. The most important thing is not to let the problem get worse, as it can result in really expensive repairs.
Loading …
Signs of damper contamination
The car itself may tell you that it’s time to start cleaning the damper. To do this, you need to listen to the engine. A few main signs:
- when the e-gas pedal is released, the engine speed decreases jerkily;
- difficulty starting in winter;
- When starting, a strong smell of gasoline may be felt in the garage;
- at the beginning of operation, the engine stalls, since not all cylinders start at the same time;
- the car jerks during acceleration;
- it is impossible to brake with the engine and coast;
- when switching to low speeds, the car may stall;
- When driving at low speeds, shocks are felt.
The appearance of these symptoms is due to the fact that insufficient air enters the engine and the fuel mixture becomes poorly enriched. Due to the design features, combustion product residues accumulate on the damper - unprocessed fuel, soot, drops of oil. Dust and small particles of sand are added to them from the air supply system, which makes the mass very thick. The intervals between preventive cleanings are shortened by poor quality fuel and engine oil.
When the layer of dirt becomes thicker, the damper cannot move smoothly, and its opening angle becomes smaller. Because of this, the amount of air entering the cylinders is reduced and engine power is reduced.
Symptoms of DZ malfunction
The throttle mechanism quickly becomes dirty due to the fact that it is located in direct contact with combustion products. Plus, during the operation of the car, natural contamination of the internal protection occurs with various inclusions that enter through the filter membrane. Dust and dirt reduce the movement of the damper, the thermal gap decreases, and in turn the channel capacity decreases.
You can understand that the throttle valve needs cleaning by the following signs:
- During frosts, starting the VAZ-2114 engine is very problematic, and when starting the engine you can’t hear the smell of exhaust gases. In a closed room you can often hear the strong smell of gasoline.
- Due to the lack of air-fuel mixture in the engine cylinders, vibration occurs when the power unit is started, and at low speeds the vehicle jerks.
- There is no smoothness when releasing the gas pedal and when switching from high to low speeds.
If similar symptoms of a malfunction begin to appear, then it is likely that the throttle mechanism has reached its critical level of contamination and requires prompt cleaning.
Cleaning the throttle valve on a VAZ 2114 in two ways
Flushing the throttle valve is not a troublesome procedure. Especially if you have already had to remove the throttle and put it back. For those who are hearing about such a unit as a throttle for the first time, I’ll explain: on the fourteenth, as well as on the fifteen and ten, this damper is located in front of the intake manifold.
The main function is to regulate the amount of air that enters the manifold. It is clear that the fuel entering the cylinder burns only when mixed with air, therefore, the more of it, the more active the combustion is, the engine produces more power, and the car drives faster. Everything would be fine, but only if there is more air, then in proportion to it more gasoline will flow in and be burned. But this is not always required. And this same throttle controls the inlet for air flow, thereby controlling the power produced by the engine and the speed of the car.
The valve opens and closes at the moment when we press the shoe to the floor - the gas pedal - or release it (the throttle valve is connected to the gas through a cable).
As has already been said, you don’t need much experience in the process of how to clean the throttle valve; it is much more important to realize in time that it needs it. Experienced drivers and service specialists unanimously insist that every 60-70 thousand kilometers it is necessary to carry out preventive maintenance along with diagnosing the condition of the damper.
Operating principle of TPS
Throttle position sensors are divided into two types: contact and non-contact. They are different in design, but the methods for testing them are the same. Their drive can be mechanical or electrical.
The first mechanical ones (film resistive or potentiometers) are a slider with contacts placed on it.
The throttle valve, through the drive and gear with the shaft, changing its position (angle of inclination) moves the slider along the resistor tracks. Based on the voltage from 0.7 to 4V (varies due to changes in the resistance of the resistor tracks), the ECU understands where the damper is located and adjusts the fuel supply.
Those. increasing the angular position of the damper increases the DC voltage value and vice versa.
When the driver just turns on the ignition, the ECU receives data from temperature sensors about the degree of engine warming up. Based on this, the throttle valve is set to the pre-start position at a certain angle.
For example, on the Lada Priora and Kalina, where there are two TPS (in cars with an electronic throttle pipe module), at this moment the output signal voltage should be:
- The first output is in the range of 0.39-0.52V.
- The second is 2.78-2.91V.
For each car brand, these indicators may differ, but if we consider the above models, then the following happens:
- If after turning on the ignition within 15 s. nothing happens (the gas pedal is not depressed, the engine does not start), the ECU turns off the electric throttle drive, and the throttle drops to 7%.
- 30 seconds after the ignition is turned on and the driver is inactive, the ECU closes the damper completely and then returns it to the pre-start position.
In this case, the signal output voltage is equal to:
- In the first case, 0.5-0.6V.
- In the second - 2.7-2.8V.
If there is a break in the throttle sensor circuit, the ECU turns off the throttle drive and stores an error code in the memory.
Also, on cars with two TPS, as is the case with Lada Priora and Kalina, their total signal output voltage should not exceed 3.2-3.4V.
The operating principle of non-contact (magnetoresistive TPS) is based on the magnetic-resistive effect - they rarely fail, due to the absence of contacts rubbing against each other. For this reason, they are more reliable and last longer, although they are more expensive than contact ones.
Common causes of malfunction are short circuits in electrical circuits, broken wiring.
Causes of throttle valve contamination
1. It is difficult for the engine to switch from high speeds to idle when the accelerator pedal is suddenly released. For example, when you brake or coast in neutral. Instead of a smooth return to speed, they rapidly drop to 400-600 per minute, after which, as a rule, the engine stalls with characteristic shaking or with great difficulty is restored to the required speed.
2. Also, an engine with a dirty throttle assembly has difficulty with “cold” starting, and in some severe cases, “hot” starting. Before starting such an engine, you have to turn the starter for a long time, and the characteristic smell of gasoline can be heard from the exhaust. However, as soon as you slightly open the throttle several times by briefly pressing the gas pedal, the engine “comes to life” and starts.
A mixture of air and oil, as well as microscopic dust particles that pass through the air filter from the crankcase ventilation system. When used on a car, this substance slowly covers all internal surfaces, especially in places where there is strong air turbulence, that is, behind the throttle valve, as well as on the idle air control rod.
Today I will talk about how to clean the throttle valve of a VAZ 2110 with your own hands with a detailed description of the entire process.
The throttle valve contains a sensor that transmits information about its opening to the electronic engine control unit. After this, the ECU regulates the supply of fuel to the combustion chambers. Many VAZ 2112 owners are thinking about increasing the power of their car by improving or replacing this engine unit.
This is usually followed by a smooth stop of the engine instead of the standard return to idle. There are also problems with cold starting or, conversely, an engine that is too “heated” will require turning the starter for a long time, which is fraught with consequences in its own way.
Often it is the condition of the throttle valve that affects this. How? The fact is that after 50–60 thousand kilometers, the patch on the damper becomes dirty, and this leads to improper operation of the engine. So before you think about completely replacing or upgrading your throttle body, maybe you should try just cleaning it?
MUST WATCH VIDEO:
If the driver is attentive to the behavior of his car and constantly monitors the performance of the car’s electronics and engine, then he can be confident that no surprises await him on the road. You must constantly remember that your car will serve you for a long time and faithfully only if you take care of it and its insides. Any car loves care, even after leaving the car wash you can feel how softly the engine starts running and how smoother the car drives on the road.
If you find an error, please select a piece of text and press Ctrl+Enter.
How to check IAC?
Checking the DXX should begin with a visual inspection. Sometimes you can notice oxidation of the contacts or damage to the wiring or the part itself. And to fix the problem, you will need to clean the contact connections, restore the integrity of the wires, or replace the sensor.
If no external defects are found, diagnostics should be performed with a multimeter. You can make sure that voltage is supplied to the regulator as follows:
- Turn on the car ignition;
- Switch the measuring device to voltmeter mode;
- Install the negative terminal of the voltmeter on the motor housing;
- Connect the positive terminal of the device to contact A of the regulator, and then to D.
The device screen should display a value of approximately 12 Volts. If it is different, then there is a break in the wiring. To check the IAC itself, you need:
- Remove the sensor from the car;
- Set the multimeter to ohmmeter mode;
- Connect the tester terminals to contacts A and B of the part, and then to C and D. If the sensor is working, the device will show 50-53 Ohms;
- Connect an ohmmeter to terminals A and C, B and D. The resistance should approach infinity.
If the tester readings are different, the regulator has failed. If it breaks, it needs to be replaced. You can diagnose and replace the element yourself. There is usually no need to contact a car service center with such a problem.
General characteristics
If we consider the throttle assembly as a whole, it will consist of several parts:
- coolant outlet and supply pipes;
- ventilation system tube;
- a sensor that controls the position of the damper;
- RXX;
- the damper itself;
- condensation system pipe.
Knowing the throttle structure and what it looks like is necessary for cleaning. This unit is one of the most important components of the intake system. When the throttle operates correctly, a sufficient amount of air is sent to the engine, which is used to enrich the fuel mixture. The damper is controlled by an electronic gas pedal, which, when pressed, changes the opening angle.
This mechanism is located between the intake manifold and the air filter. Getting to it for preventive cleaning will not be difficult even for someone who has just become a car enthusiast.
Why did AvtoVAZ need E-gas?
As I already said, environmental standards are becoming stricter every year, in order for the exhaust to comply with the standards, the cable had to be removed. This made it possible to get rid of the driver’s empty gasping, as well as other unnecessary actions that increase the toxicity of exhaust gases. The electronic pedal, as it were, regulates “at its own discretion” how to open the throttle. Even a sharp press on the pedal will be processed in such a way that as little harmful CO2 as possible is released into the atmosphere.
How it works?
An electronic pedal consists of three main elements: pedal, electric pedal. damper, as well as a sensor located on the pedal itself. The sensor reads the degree of pressure on the pedal, and then sends the data to the electronic unit. It receives the data, analyzes it and sends a signal to the electronic damper, which opens to the required degree.
Cleaning the throttle valve VAZ 2114
The injection power system of modern VAZ cars is not particularly complex, and the difference in the design of the system on the models is insignificant. However, the injector requires more precise adjustments and any little thing can lead to interruptions in engine operation. Today we will look at the throttle valve of the VAZ 2114, and using its example we will establish the causes of malfunctions in idle speed and other systems associated with its clogging.
Signs and causes of clogged throttle valve VAZ 2114
The throttle valve of VAZ injection engines is the very first after the air filter to encounter all the blockages that atmospheric air can cause. The filter copes with cleaning satisfactorily, but some dust particles still penetrate into the system through leaks in the pipes. In addition, blow-by gases can, through the crankcase ventilation, deposit an oil film on the throttle valve and idle air control valve.
In general, a clogged throttle valve results in incomplete closure of the intake diffuser, which usually results in:
unreasonably high idle speed; increased fuel consumption; difficult engine starting; floating idle speed. But due to contamination, the damper may not open completely, and this is fraught with jerks, failures in engine operation, as well as insufficient throttle response and loss of effective power.
When to clean the throttle valve of a VAZ 2114
Experts recommend cleaning the throttle valve and IAC at least once every 60,000 km. The procedure is not at all complicated and takes a few minutes, but it eliminates a lot of problems, which are especially pronounced when operating a car in city conditions and heavy traffic. The process of cleaning the damper must be carried out on a cooled engine, and the only tools we need are a screwdriver to disconnect the clamps and a 13mm socket wrench. And a new gasket.
Also, before starting work, you should think about what you will wash with. In principle, you can wash it with anything, but fuel specialists recommend using liquid to clean carburetors. It best copes with oil deposits that settle on the surface of the damper and diffuser. If buying a liquid for 120 rubles can cause irreparable damage to your budget, then you can use acetone or any solvent.
Removing the throttle valve
Remove the throttle valve from the engine completely. This way we can provide a more thorough cleaning. To get to the entire fuel economy of the engine, we will need to remove the decorative casing, which hides the 2114 engine with its unique aesthetics. After this, we need to remove the hose of the forced crankcase ventilation system, which is often the cause of clogging of the damper.
Along the way, it’s worth taking a look at the air pipe. If there is oil in it, then this indicates that the forced crankcase ventilation system has lost its former freshness and the thin ventilation channel could be clogged.
After this, it is necessary to relieve the pressure from the cooling system. This is necessary so that antifreeze does not pour out of the heating hoses, which we have to remove. When the pressure has stabilized, you can remove the hoses from the throttle body pipes. To prevent antifreeze from spilling, we recommend using two old spark plugs instead of hose plugs. They are always at hand, easy to insert and simply remove from the hose. Remove the damper drive cable, disconnect the gas tank ventilation hose, and remove the throttle assembly.
Cleaning the throttle valve VAZ 2114
Of course, it’s easier to clean with an aerosol liquid, then you don’t have to poke around in hard-to-reach canals with ear sticks. When cleaning, be careful and avoid using sharp metal objects to avoid damaging the diffuser and damper.
Let's start with the IAC sensor. First, we take it out and assess the degree of contamination. Most likely, it will be covered in an oily film and dirt. After this, take the carburetor cleaner and generously spray the aerosol onto the working surface of the sensor. We wash the conical needle and its spring especially thoroughly. We carry out the procedure until the sensor is completely clean. Before installing the sensor, it is necessary to check the distance from the sensor body to the cone itself. It should be within 22-23 mm.
After cleaning the assembly, let it dry thoroughly, install a new gasket and assemble the entire structure in the reverse order. The idle should return to normal and engine performance should stabilize. I wish you stable idle speeds, and good luck on the roads!
Motorhelp.ru engine diagnostics and repair
VAZ electronic throttle: design, diagnostics, flushing and repair.
In this material I want to talk about the design, diagnostics and repair of the Delphi electronic throttle valve (pipe), installed on VAZ cars together with the M74 engine management system.
The reason for writing this article was one very typical malfunction on a VAZ 2115 car with an atypical cause, which I will talk about a little later. I would like to warn you right away that the author of this article does not bear any responsibility for unqualified intervention and repair of the electronic throttle valve in the event of its failure and emergency situations on the road, since repair of this unit is not provided, but only replacement. Design. An electrically driven throttle valve (pipe) is designed to dose the amount of air entering the intake manifold. Changing the amount of incoming air is achieved by turning the damper with an electric motor, which is controlled by a controller. Main parts of the throttle body: All photos are clickable!
1. Housing 2. Damper 3. Gearbox 4. Electric motor 5. Throttle position sensors.
The connection diagram is shown below:
Removing the throttle assembly: 1. Turn off the ignition, remove the minus terminal from the battery. 2. Unscrew the clamps and remove the intake pipe hose from the throttle body. 3. Disconnect the harness block. 4. Unscrew the 4 bolts securing the throttle assembly from the intake manifold and remove it.
Typical faults and their diagnosis. A childhood problem of the first car releases, error P2135 (Mismatch of signals from sensors A and B of the throttle position) manifests itself in the form of unstable idling, speed limit to 2000 and loss of traction. It can be successfully treated by crimping, bending and soldering the contacts of the throttle body block or by replacing the entire electrical wiring harness. On most cars it has been cured for a long time, on new ones it almost never occurs. Floating speed and unstable idle. Here we will dwell in more detail, since this phenomenon is common and appears sooner or later on almost all cars. The main reason here is the mismatch between the throttle opening angle and the amount of incoming air. On most cars it can be treated by washing. It is advisable to wash the throttle valve at least once every 20-30 thousand km. otherwise, deposits of soot and oil particles create obstacles to air movement during idle with all the ensuing consequences. Therefore, the throttle assembly must be kept clean and tidy - this is an axiom. The second reason for floating idle speed is throttle play. How does it manifest itself and how to diagnose it. Below is a screenshot of the SMS diagnostic program. The parameters were taken from a VAZ 2115 car with an M74 engine management system.
Here it is worth paying attention to the high air flow, relative filling and injection time. At the same time, the opening angle of the throttle valve is very small and the controller, trying to stabilize the idle speed, drives the ignition timing into the minus. This happens because the actual angle of the throttle valve does not correspond to the angle calculated by the control unit due to backlash. Moreover, if you initialize the throttle, then the engine may work normally for some time, but after some time or after a restart, the situation with the speed floating repeats. It is worth mentioning here that if the throttle is dirty, the parameters will also differ from the norm, with the only difference being that the valve opening angle becomes larger than usual. As an example, here is a screenshot with normal parameters:
How to eliminate throttle play. To do this, the throttle assembly must be disassembled. From the gearbox side, unscrew 4 screws (Torx 15) securing the cover.
Here we see the gears of the transmission mechanism.
The middle gear is simply removed.
On the other side there are throttle position sensors and an electrical connector. They are fastened with very rare pentagonal Torx screws. Photo below:
We're filming. The electric motor in the housing and the damper axis are visible.
Next, you need to use a press or vice to squeeze out the throttle axis from the TPS side towards the gears.
Remove the axle.
There is no need to remove the electric motor if it is in good condition. You can check it simply by measuring the resistance at the contacts. The resistance should be approximately 10 to 30 ohms.
Below is a photo of all the components of the electric throttle in disassembled form.
The position of the throttle valve, when the electric drive is not engaged, is determined by the position of the spring whiskers between the stops - lugs in the throttle body and is approximately 10% of the opening relative to the closed position.
Play along the axis of rotation of the throttle valve appears due to wear on the aluminum spring stops. Marked with a red arrow:
There are 2 options here: either replacing the throttle assembly, which is not cheap; at the time of writing (September 2013) it costs about 2,500 rubles. Or you can remove the backlash by eliminating the gap between the spring mustache and the body bosses. The essence of the method I propose for eliminating the backlash is to slightly move the spring mustaches by the amount of the gap, by cutting, for example with a needle file, grooves for the mustaches in the plastic stops on the gear itself.
After modification, we check the play by hand. However, it should be taken into account that a slight play of the order of 0.1-0.2 mm along the axis of rotation will still be present due to the loose fit of the spring on the axle bushings.
If everything is in order, we assemble in reverse order. The throttle valve axis is secured against displacement with a tight-fitting washer, photo below:
You can press this washer back onto the axle using a suitable tube or, for example, a 10mm deep socket.
Important note! After repair, replacement of the electronic throttle body, or replacement of the ECM, it is necessary to perform zero adaptation of the throttle position. This is done very simply. The first switching on of the ignition after repair must be accompanied by a delay of at least 30 seconds. During this time, you will hear the electric damper drive turn on, turn the damper until it is completely closed and return it to its original position. After this procedure, the throttle adaptation can be considered completed and the engine can be started. If you did everything correctly, the idle speed will become stable and even.download dle 10.6 movies for free
What error codes appear when the IAC is faulty?
If the idle air control is faulty, the on-board computer may display the following errors:
- P1509 - IAC control circuit overloaded;
- P1513 - IAC control circuit, short to ground;
- P1514 - IAC control circuit, open or shorted to +12 V.
When deciphering fault codes via the Internet or in the vehicle's operating manual, you may sometimes encounter definitions indicating problems with the operation of the IAC. They often indicate a regulator failure. Errors can be seen not only on the on-board vehicle, but also when diagnosing a car using a scanner. Sometimes they indicate not sensor defects, but contact failure.
Disadvantages of the electronic pedal
- A slight “thought” at first when pressing the accelerator;
- The “E-pedal” does not make it possible to carry out deep tuning, since for this it is necessary to convert to a “cable” system, and this is an additional expenditure of about 20-25 thousand rubles plus a bunch of sensors and cables. Not everyone will agree to such a hassle;
- Exclusively on the first (raw) versions with “e-gas” the pedals stuck, the engine speed fluctuated and random periodic self-pressing occurred;
- Most likely the second point is to blame, which does not allow you to upgrade the car.
But what to do if an avid driver wants to drive recklessly?! Our craftsmen found the optimal solution without removing the “e-gas” - this is re-flashing the sensors and adjusting the turbochargers.