At the moment, there are several types of internal combustion engines - gasoline and diesel.
And if for the latter to work, ignition of the mixture is not required (it burns from the force of compression), then in the case of gasoline engines a spark is required.
It is produced by a special element - a candle. These are available on injection and carburetor machines. During operation, motorists often wonder what gap should be on the spark plugs. Today we will talk about this topic in more detail.
About the ignition operation
The spark plug is the last element that comes into contact with the fuel-air mixture. Its main function is to ignite the fuel at the moment when the piston is at top dead center. The voltage is supplied from high-voltage wires. In turn, the interval between spark supply is set by the ignition coil. When the piston is at TDC, a spark runs between the spark plug electrodes. It is the catalyst for this process.
The mixture ignites and the compression energy is transferred to the piston. After the gases are removed, the process is repeated again. However, in order for a spark to be able to properly pierce the electrodes and ignite the mixture, the gap must be optimal.
It changes during use. Thus, a distinction is made between small and large gaps. We will discuss further how they affect engine operation.
Design
If we take into account the design of the candles, then they consist of the following elements:
- Contact output. Serves to connect high-voltage wires from the ignition system;
- Insulator. Due to it, the candles do not overheat;
- Insulator ribs. Do not allow electrical breakdowns;
- Central and side electrode. Serves to form a spark between them, which ignites the fuel mixture;
- Seal. This element prevents hot gas from escaping from the combustion chamber.
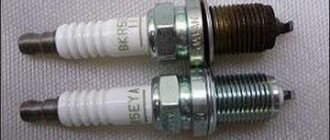
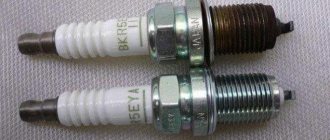
An important point in the correct operation of spark plugs is the gap between the electrodes.
What does a small gap affect?
If the gap between the electrodes is small (less than 0.4 millimeters), this will first of all manifest itself in the way the engine operates. In this case, the owner will observe misfires. Why is this happening? The fact is that a powerful spark is required to ignite the combustible mixture. And since the distance between the electrodes is small, its strength will be insignificant.
As a result, the combustible mixture will ignite every other time. The engine starts to stall. On carburetor units the spark plugs often flood. This is not very good, since the motor is operating in overload mode.
Cause of the phenomenon
The main reason why the VAZ 2114 burns spark plugs in cold weather lies in the following. During cold (and, especially, frosty) weather, the oxygen content in the atmospheric air increases sharply.
When the car starts, the sensors transmit a corresponding signal to the ECU, thereby causing an increased supply of gasoline (this is due to the fact that more oxygen requires more fuel, otherwise the mixture will be lean and the engine will not work correctly).
Candle VAZ 2114
If the car is new, and all components and assemblies of its fuel system and engine are fully operational, then the increased volume of gasoline will not cause any difficulties at the time of start, and the car will start immediately. But, if the car is more than 3 years old (subject to frequent use), then the problem with flooded spark plugs becomes more than real for it.
The most common reasons for flooding the spark plugs on the VAZ 2114 injector are:
- low compression due to piston wear;
- low quality of fuel used;
- bad (poor quality) candles;
- low battery level.
A large gap is not always good
Therefore, if the spark is weak and the gap is small, it needs to be increased as much as possible. But it is not so. If the gap is 1.3 millimeters or more, the spark simply will not pass between the electrodes. The engine will start to stall again. In addition to this, carbon deposits will appear on the candles.
A breakdown of the lower contact insulator is also observed. This occurs because the spark tries to travel through the shortest path between the electrodes. In winter, such an engine may not start at all.
Symptoms of a problem
If the spark plugs fail, there will be no spark. Consequently, the fuel mixture will not be able to ignite, the engine will freeze and show no signs of life.
There are several telltale signs that may indicate poor spark plug performance.
- The engine starting procedure gets worse. The starter turns, but the motor itself does not respond;
- Fuel consumption increases;
- CO emissions increase;
- At idle and while driving, the engine begins to jerk the car;
- The dynamic performance of the car drops, it is not possible to raise the speed to the required maximum, the engine power noticeably decreases, etc.
But all these are indirect reasons, since they do not directly indicate the failure of the spark plugs. You can verify their malfunction only by checking.
What is the norm?
So we have some data. A small gap is anything below 0.4 millimeters. Large – 1.3 and above. What gap should the spark plugs be? It all depends on the type of food. On carburetor cars with a distributor ignition system, this parameter is 0.5-0.6 millimeters.
But not all units should have such a gap on the spark plugs. A carburetor with electronic ignition works normally with a gap of 0.7-0.8 millimeters.
What about modern cars with fuel injection? What gap should their spark plugs have? Experts recommend choosing a parameter of 1-1.25 millimeters. It is with this value that the engine operation will be as stable as possible, without skipping or tripping.
Replacement procedure
- We turn off the engine and be sure to wait until it cools down;
- Raise the hood lid and fix it in the open position;
- If your engine capacity is 1.6 liters, then you will have to unscrew the fasteners and remove the plastic cover (owners whose engine capacity is below 1.6 liters do not face this procedure, because they do not have this plastic cover on their car);
- We pull out the high-voltage wires using the rubber caps;
- We remove the resulting dirt and carbon deposits with a brush;
- We unscrew the spark plug by placing a spark plug wrench on it;
- We repeat the same steps with the remaining old candles;
- The new spark plug should be inspected again, the gap between its electrodes should be checked;
- First, we tighten the new part by hand, not with a tool, this will protect the thread from breaking if the installation suddenly turns out to be incorrect;
- We continue the twisting procedure, but with a tool;
- We reconnect the high-voltage wires we removed earlier (the explosive contacts should fit snugly in the spark plug).
You should not tighten the parts with special frenzy; their threads can be seriously damaged by rough forceful movements.
Spark plug gap for gas
This is a separate topic for consideration. The gas mixture is slightly different from gasoline. The spark plug requires less force to create a spark. Accordingly, the gap should be about 0.7 millimeters. However, motorists say that even at 1.1 mm, a car with gas-cylinder equipment operates stably.
Therefore, on gas units, adjusting the spark plug gap is no different from gasoline units. There are also so-called gas candles. The thickness of their electrode is slightly smaller than usual. However, reviews from car owners say that this did not give much effect. The car drives equally well on gas with both conventional and gas spark plugs. This is nothing more than a marketing ploy.
Cleaning
If the spark plugs are dirty, then it is not at all necessary to immediately replace them with new elements of the ignition system, igniting the fuel mixture in the combustion chamber of the VAZ 2110. Regular cleaning will quickly remove the dirt and return the spark plugs to their previous functionality.
There are several common cleaning methods that can be used at service stations and in garages with your own hands.
Regardless of the chosen method, we recommend that you follow the general principles of operation when cleaning the elements of the ignition system.
- Protect the coating of the spark plugs from abrasion; do not use rough sandpaper or other similar abrasives.
- Do not expose the candle to high temperatures. It is not worth heating them over a fire for the purpose of cleaning. Some people do this for some reason.
- Check the spark plug for resistance using a megometer. If the second scale does not show + infinity, then the spark plug will have to be changed. Cleaning is useless. With a value of 1000 it is also better not to try to resuscitate the element.
Now let's talk directly about cleaning methods.
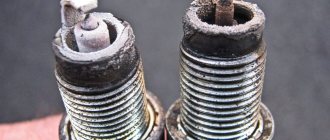
The formation of carbon deposits and flooding will require not only removing and drying the spark plugs, but also thoroughly cleaning them.
- One popular method is to remove carbon deposits with a fine-bristled wire brush;
- Another option is treatment with kerosene, which removes carbon deposits quite effectively;
- Another method involves the use of sandblasting. The effectiveness of this approach is short-term, so you will soon have to remove the candles again and clean them;
- Many people have also gotten used to using chemical converters. To do this, candles are placed in a solution, allowed to sit for about an hour, after which they are cleaned with matches, toothpicks to remove carbon deposits, washed with water and dried;
- In order not to buy specialized products, you can use acetone using the same cleaning principle;
- Our grandfathers cleaned candles with vinegar. To do this, you will need to dip them in vinegar for an hour, then add literally 5 drops of electrolyte;
- There is an ultrasonic cleaning method, but this requires specialized equipment.
If you do not get the desired result, you will have to change the candles. But first they need to be selected.
How to display?
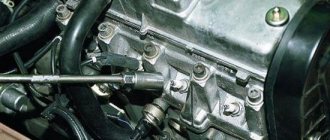
If you notice that the car begins to behave differently, misfires appear, it is worth checking the condition of the spark plugs. They may have the wrong clearance. To adjust the parameter, disconnect the high-voltage wires and unscrew the spark plug with a special wrench (as in the photo below).
Next, pick up a special tool - a probe. The same is used to adjust the gaps between the valves. A photo of the device can be seen below. It can be purchased at any automobile market. The cost of such a tool is about two hundred rubles.
So, let's move on to the setup. Using feeler gauges, we determine the exact gap on the spark plugs. Please note that on cars with a contact system (old Zhiguli and Moskvich cars) this parameter is 0.1 mm lower than on contactless ones.
If the gap is less than normal, bend the electrode with a flat screwdriver. If the value is higher, the element is pressed with the same tool, only from the other side. Some spark plugs may have a lateral electrode (and there are several of them).
In this case, the gap is set for each element. The run-up should be minimal. Having set the gap of one spark plug, screw it into place, install the armor wires and begin setting up the next one. It is important not to confuse the location of high-voltage wires.
Therefore, unscrew the candles one by one, and not all at once. Or make special marks. Otherwise, the engine may simply not start. At this stage, setting up the spark plugs can be considered complete.
Connection diagram
The ignition module is part of the space under the hood, it’s easier to find it by the position of the high voltages, they go from the spark plugs straight to it.
Ignition coil diagram:
This diagram is good to follow when you have to replace the ignition coil of a VAZ 2114. In principle, everything is transparent: from contacts with the controller (ECU) to high-voltage wires. The name of the circuit is often common under the name ignition coil pinout: the pinout is a visual representation of the functionality of the device's contacts, which are numbered according to their purpose.
Basically, the most necessary knowledge about what the pinout of the ignition coil is is carried by high-voltage wires (abbreviated as HF (contacts). Because it is through the HF contacts that, in fact, the ignition module is connected to the engine system.
It can be connected in two different ways: when the ignition system coil is removed and when it is directly in its place in the car engine.
If you are holding the module in front of you:
- Let us recall the diagram: the first and fourth contacts are on one winding, the second and third – on the other (they are numbered in the diagram!)
- Then, the lower explosive contact (left) goes to the first cylinder
- On the second - upper explosive contact (left)
- The third cylinder goes to the upper explosive contact (right)
- On the fourth – lower explosive contact (right)
If the module is plugged into the engine, then pinouting the explosive contacts will be more difficult, because the device stands at an angle (as if in a diamond):
- We throw the central lower contact onto the first cylinder
- On the second - left contact
- We put the upper contact on the third cylinder
- On the fourth - right contact
Of course, the first installation option is more convenient, especially since the explosive wires require increased care in the nature of the connection (mixed up and won’t start, in the worst case, the entire engine system is ruined). Speaking to the point, it is clear that the connection diagram for the VAZ 2114 ignition module is not complicated.
By the way, buying an ignition coil is not a cheap pleasure; the price of an ignition module for a VAZ 2114 ranges from seven hundred to a thousand rubles, depending on the location of your city on the map of our country (for more information about how much an ignition module for a VAZ 2114 costs, you can find out by calling a disassembly service or a spare parts store, the running part is almost always in stock).
Why is it so important to stick to the norm?
A correctly adjusted spark plug is not only the key to smooth engine operation. The gap parameter also affects fuel consumption. By setting the required distance between the electrodes, you will reduce it by 5-6 percent. Also, a normal gap has a positive effect on the life of the spark plug itself, since it will no longer pierce the insulator.
If you regularly monitor this parameter, the life of the spark plug can reach 60 thousand kilometers. This applies to both injection and carburetor engines.
Dangers when repairing valves
Before starting work, it is necessary to refresh your theoretical knowledge regarding the design of the gas distribution mechanism, remember what a VAZ valve is, etc. If the design of a car is a “dark forest” for you, then it is better not to take risks and entrust the work to specialists, because Repair and replacement of valves are very serious and responsible operations.
You can, of course, find a lot of additional information on the Internet. But to systematize it, you still need minimal theoretical knowledge. Otherwise, it will be very difficult to understand the difference between the recirculation valve and the two-way valve from the VAZ intake valve. Of course, reliable operation of the air recirculation system of the VAZ 2110 is also very important.
But it cannot be compared with the operation of the valve mechanism or the idle system of the VAZ 2110. Violations in the adjustment of the valves of the VAZ 2110 can lead to very dire consequences. Increased noise when the engine is running is the least significant of them. Large gaps in the valve mechanism lead to loss of engine power. The longer you don’t pay attention to this problem, the worse the motor will “pull”.
In an incorrectly adjusted gas distribution mechanism, the camshaft and the VAZ valves themselves will also wear out intensively. Very often, especially when operating a car on gas, the valve disc burns out.
Step by step order
First of all, remove the plastic engine casing located on top. If the bolts are not covered with corrosion, they will easily unscrew.
Then disconnect the terminals from the individual ignition coils one by one. Using a “10” key, unscrew the bolt that secures it to the cylinder head cover. When the bolts are unscrewed, move it to the side.
Using a screwdriver, remove it from its seat and move it to the side. Inspect the spark plug wells for damage, and be sure to check for oil in them.