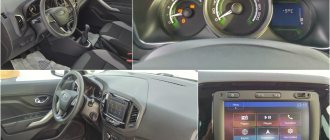
Dashboard of Lada Granta FL: is it worth changing “analogue” to “digital”?
The updated Lada Granta FL model was presented in Moscow as part of the international motor show in 2022. Sales started in the fall. The changes affected not only the appearance, but also the interior. The windshield washer nozzles moved from the hood to the fascia, the headlights became more powerful and brighter, and the central instrument console became similar to the design of the Lada Kalina.
The instrument panel has acquired X-style elements. LED illumination of symbols emphasizes the sporty character of the car. The instrument cluster with white backlighting will appeal to every fan of the brand: bright, but unobtrusive, clear and contrasting.
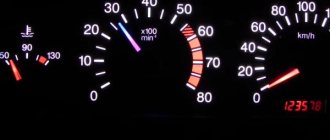
List of sensors and signal indicators on the panel
The diagram shows a detailed layout of the devices present.
The instrument cluster on this car, as the instructions show, has the following sensors:
- Tachometer (for instant recording of the crankshaft speed).
- Motor control module malfunction indicator.
- Signal lamp indicating left turn is on.
- Indication of low oil pressure in the engine.
- ABS indicator lamp.
- Signal indicator of a malfunction in the immobilizer assembly.
- Symbol for indicating increased coolant temperature in the engine cooling circuit.
- A lamp indicating an emergency condition of the brake system components.
- Right turn indicator indication.
- Battery charge level indicator symbol.
- Speedometer (speed controller).
- Indication of directional stability.
- Indicator that the transmission is not allowed to move to the next stage.
- High beam symbol.
- Stern fog light indicator.
- Activated low beam lamp.
- Indicator that the front fog lights are on.
- Button for resetting the daily distance traveled.
- Route controller display.
- A lamp signaling the need to close the doors.
- Low fuel level indicator.
- Symbol of lack of required tire pressure.
- Fault lamp in the electric power steering system.
- Seat belt indicator.
- Indicator of breakdowns in the motor unit (infrequently used).
- Airbag integrity and serviceability indicator.
The dashboard will definitely tell you the following:
If, after starting the engine, the engine status indicator does not “disappear,” then this implies a malfunction in one of the components of the unit or its attachments.
If the low oil pressure lamp in the Lada Granta engine continues to blink after starting it, then it becomes necessary to check the operation of the lubrication system components (pump, pressure reducing valve, etc.), as well as the condition of the cylinder-piston group.
The ABS indication, if this system is in good condition, should be deactivated after a couple of seconds from the moment the engine starts.
The lamp, indicating an excessively high coolant temperature in the engine cooling circuit, stops lighting 5 seconds after the engine starts. When this phenomenon is not observed, there is a likely risk of engine overheating. Here it is recommended to check all components that influence the maintenance of a “normal” (working) temperature indicator.
If the brake symbol is active when the engine is running, you should check the level of the corresponding fluid (reservoir under the hood) and top up if necessary.
The activated indication of the unit that provides directional stability “tells” that it is disabled.
A signal appeared from the fuel reserve lamp - it became necessary to replenish the tank with fuel.
If the status indicator of the electric power steering mechanism lights up, this fact confirms the presence of a malfunction in this unit.
When the pressure inside the LADA Granta tires reaches a minimum, the corresponding symbol informs about this moment.
When the engine is running, the lamp responsible for indicating the airbag cannot be illuminated.
From this it can be seen that the entire list of sensors and indicator symbols that the instrument cluster contains around the perimeter is endowed with a traditional character. They are informative and understandable even for customers who have touched the steering wheel of a Lada Grant for the first time.
Types of analog panels
For the Granta FL model, 5 variations of instrument panels have been developed.
| Equipment, year of manufacture | Software type | Panel code | Data transfer method |
| FL, 2018 | 3034 | 8450101019 | Can |
| FL, 2018 | 134 | 8450101020 | Can |
| FL, since May 2018 | Regular | 8450104295 | Can |
| FL Drive Active, 2019 | Regular | 8450104296 | Can |
| FL Cross, since May 2018 | regular | 8450104300 | Can |
CAN is a high-speed data transmission network laid inside the machine. The time it takes for a signal to appear on the panel from the moment it occurs is 0.001 seconds. This speed allows the driver to receive information instantly. Moreover, this applies to all parameters: speed, oil and fuel systems, mileage tracking, operation of the air conditioning system, etc.
Creaks on the parting panel of the Lada Granta
The description of the Lada Granta instrument panel comes down not only to the positive aspects of the design. According to reviews from car owners themselves, after some time of using the car, the instrument panel still begins to creak and knock in some places. Fortunately, as a rule, these places are typical, and with some effort, you can get rid of these problems on your own.
Creaks usually appear in the following places:
1. The center console is the place where the radio is located or is intended to be located.
2. Areas with built-in airbags or with plugs instead.
3. An air duct or cable that serves as a lever for drawing air into the air conditioning system.
4. Dashboard visor.
These problems are not great and, if necessary, you can get rid of them yourself using sound insulation materials.
The dashboard is always the object of increased attention from the driver. In the process of starting the engine, when moving, stopping, the owner systematically pays attention to indicator readings, color signals, and speed meters. Fortunately, technology has stepped far forward and now electrical devices are used instead of mechanical ones, which significantly increases accuracy and service life, reduces cost, and simplifies repairs.
Types of electronic panels
The digital panel was produced by Ferrum . The built-in on-board computer in combination with an LED instrument cluster is designated Gamma GF651. The icons on the instrument panel are standard. Variations of matte and glossy panels, bright appearance, and sports car-style design appealed to many fans of the Lada Granta FL. The panel is controlled using a standard steering column switch.
Thanks to the firmware, full compatibility with cars manufactured before the end of 2015 has been achieved. There is one technical nuance - the activated immobilizer prevents the normal operation of the panel. Therefore, it is necessary to perform a “learning” operation.
Standard trim levels do not have a steering wheel switch. If you want to set the “digital”, the steering column switch should be installed as a kit. The panel allows you to connect the parking sensors of the GF801 series. The data will be displayed on the LED display.
On-board computer for lada granta (review, compatible models, recommendations, functions and description)
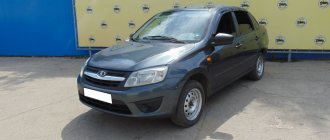
This is the best thing that has ever been created in Togliatti. Harmony, originality, budget price - this is the Lada Granta 2190. The car replaced three “classic” models - VAZ 2107, Kalina and Samara. Not a high price is the main priority of this model. To do this, the company used technology that allows you to reduce the number of parts that make up the car. For example, the front part consists of only three parts, and the instrument panel consists of 40 parts. The Lada Granta is 22 centimeters longer than the Kalina and has 5 mm less ground clearance. The car is already arousing great interest, and the queues for it are huge.
It would take a lot of time to list all the advantages of the car, but still, how can we not mention the spacious interior and beautiful modern panel from Renault Logan. There is enough space for a tall driver, there is enough space both above the head and on the sides. The seats are better in shape and design, and have an upright seating position. The same front panel now has a stylish dark color, round ventilation holes, and laconic shapes. The steering wheel contains three spokes, just like foreign cars.
The doors also acquired a more complete composition and meaningful design. Beautiful door handles finally start to resemble themselves
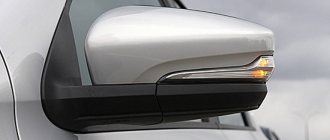
Large side mirrors provide good visibility, and this is very important for drivers. It will probably be interesting to many, but it was in the Lada Granta that another interior detail appeared, which had never been seen on VAZ cars before, these are two cup holders
The package can be found in three versions: Standard, Norma, Luxury. The “Standard” kit contains manual windows and unpainted bumpers. And the “Norma” kit also contains an airbag for the driver, an electric tailgate, an on-board computer, and an alarm system. The “Lux” package contains full power accessories, heated mirrors, air conditioning, heated front seats, airbags, ABS BAS. Each configuration has its own engine, all of them with a volume of 1.6 liters, but with a power of 80, 90, and 98 horsepower.
Whatever one may say, the Lada Granta is a modern car, which is distinguished by a spacious interior, a new panel, seats, and a large trunk. And although technically the car is far from perfect, it is a new and most importantly affordable product.
Advantages of the digital panel
The manufacturer Ferrum offers an original solution: the panel combines the standard functions of an analog instrument panel and an on-board computer. A car owner who decides to change the instrument panel to a digital one benefits in price and design. For a reasonable price, he gets a stylish shield containing more than 100 functions. Not every on-board computer has similar parameters.
- the panel does not require re-wiring;
- you can install it yourself;
- the cost is comparable to the price of a high-quality on-board computer.
The main advantage is detailed text information about the error that occurred. The on-board computer is only capable of issuing codes that the owner of the car deciphers independently.
There is a tachometer in the middle of the display. This once again emphasizes the sporty nature of the design. The graphic display with a resolution of 128×64 has an image inversion function.
Refinement of the Granta liftback dashboard
The basic equipment of the dashboard of the Lada Grant “Norma”, “Standard” is quite simple and uninformative. The defect was promptly corrected by manufacturing a new panel sample. It is installed exclusively on the “Lux” modification. An alternative option outside the factory version is provided. In order to increase the information content, a new instrument layout and external design are used:
- the borders of the instruments are separated by a chrome insert;
- more space is allocated for a computer monitor;
- the owner can independently choose the color design of the backlight in order to reduce eye strain;
- basic (important) information is now displayed at the top of the display.
Information about the Lada Granta instrument panel software
- turn off the ignition;
- press and hold the mileage reset button in pause mode;
- activate the ignition;
- release the pressed button.
Information about the software version and hardware model will appear on the monitor. The data must be used when purchasing a new shield.
Flaws
In addition to a wide range of advantages, the digital panel for Lada Granta FL has a number of disadvantages:
- when the distant color is turned on briefly, the panel changes the mode to “night”;
- when the ignition is turned on, there may be malfunctions in the indication of the performance of the ESD, ABS and airbags;
- When you turn off the ignition, the digital display may go out for a few seconds.
When temperature changes occur, incorrect values may appear in the readings of the oil pressure sensors, battery voltage at idle and transmission oil temperature in the automatic transmission.
Switches and levers under the steering wheel
The right switch under the steering wheel is responsible for the window cleaner and washer. The switch turns on electrical circuits when the ignition is on. The switch lever can be moved to the following positions
0 - windshield wiper and washer off
1 — intermittent wiper operation mode is on (non-fixed position)
2 — intermittent wiper operation mode is turned on (fixed position). In intermittent operating mode, the windshield wiper blades make one stroke at regular intervals of several seconds, regardless of the presence of drops on the windshield (in a variant, an automatic wiper control system is installed
3 - low speed windshield wiper enabled
4 - high speed windshield wiper enabled
5 — by moving the lever toward you, the windshield washer is turned on (not a fixed position)
Lada Granta will get a digital instrument panel
The CMGAISD company may release a digital dashboard for cars of the Lada Granta family.
According to Lada.online, the company CMGAISD, which produces small-scale digital devices for the Lada Vesta and XRAY , is considering the possibility of producing a similar accessory for cars of the Lada Granta .
Experts note that on Granta everything is the same as on Vesta , but the connector will be different. The developers say that if they manage to collect 10 pre-orders, it will take them two months to create a digital instrument panel. The pre-order cost of the panel will be 30,000 rubles, and after the start of sales the price tag will be 35,000 rubles.
Lada Granta FL
The developers also stated that this panel can only be installed on the Granta FL . For installation, a restyled model is required, sales of which started in September 2022.
Photo: Lada.online
The panel will have a matte anti-glare display with a resolution of 1920x720, 8 Gb Flash drive, will use the Android system and 2Gb RAM, WiFi special for RealDashCanBus 3 and will have one USB 2.0 connector. A leather-covered visor will be supplied with the panel.
Dashboard Lada Granta FL
The accessory can be connected via a standard connector. A mobile application is provided to configure the shield. The Internet is connected via WiFi or USB modem. Owners will be able to customize the interface design according to their preferences. The digital panel turns on instantly; the developer has delayed the turn on for 12 hours.
Source
Reviews from Lada Granta owners about the functionality of the dashboard
| № | Positive |
| 1. | Nikolay, 39 years old: in general, I am satisfied with the information content of the console, the display is bright. True, it shines a little in the sun, but this is not so significant. |
| 2. | Konstantin, 41 years old: I bought Grant a year ago in the “Lux” configuration with a new dashboard. I'm 100% satisfied. |
| 3. | Vitaly, 44 years old: I bought a Granta in 2013, the old instrument panel was good, but it was deformed after an accident, I replaced it with a new version from the “Lux” version. Identical in fastenings. |
| 4. | Dmitry, 37 years old: during a side collision with Renault, the dashboard and dashboard were damaged. I didn’t upgrade to a luxury one, I bought my original one. |
| 5. | Vladimir, 39 years old: he will buy Grant second-hand, he is happy with everything, the panel is good and informative. True, at night it is too bright, sometimes it strains the eyesight. |
| 6. | Kirill, 45 years old: I work as a taxi driver, I drive all the time, I’m happy with the panel, it’s informative. The on-board computer quickly displays all the necessary data. |
| 7. | Vladislav, 34 years old: after a major overhaul, friends recommended installing a new panel from the Luxury configuration, but he left the old one and is happy with everything. |
| Negative | |
| 1. | Vladlen, 44 years old: the old instrument panel is not very informative, often displays information and speedometer readings incorrectly. Installed from Lux configuration. Now there are no complaints. |
| 2. | Sergey, 33 years old: after the accident, I replaced the front console, including the panel, since the old version was unfinished and damp. |
| 3. | Vyacheslav, 39 years old: I drove the original device for a month and replaced it with a luxury version, it is much better and more informative. |
Owners' opinions on the functionality of the dashboard were divided, as expected. If we objectively compare the two panel models, then the winner is the “Lux” package. Regarding the duration of operation, efficiency of data output, and accuracy of readings, they are identical. The internal filling is the same, with the exception of the external design.
A digital instrument cluster may be made for Lada Granta
Electronic instrument panels are not cheap, so not all manufacturers install them on their cars. However, it is becoming increasingly possible to buy a digital panel as an accessory. The CMGAISD company, which was the first to begin small-scale assembly of digital panels for Lada Vesta and XRAY, is considering the possibility of producing a similar shield for the Lada Granta family.
CMGAISD told the Lada.Online website.
The developer also noted that the instrument panel will only be suitable for the Granta FL, that is, for the restyled model, sales of which began in September 2022.
The characteristics of the instrument panel will be as follows:
- 1920x720px matte anti-glare screen (on Vesta 1280x480px);
- LED backlight;
- Android 2Gb RAM;
- 8 Gb Flash;
- 1 x USB 2.0;
- WiFi special for RealDashCanBus 3.
The shield also comes with a leather-covered visor.
The digital panel will be connected via a standard connector. For convenient setup of the shield, a special mobile application is provided. The Internet is connected via WiFi or USB modem. It will be possible to change skins (interface design). The digital panel turns on instantly; the developer has delayed the turn on for 12 hours.
You can pre-order (without payment) a digital panel for Lada Granta FL in our online store (pre-order).
Source
Lada Granta will get a digital instrument panel
The CMGAISD company may release a digital dashboard for cars of the Lada Granta family.
According to Lada.online, the company CMGAISD, which produces small-scale digital devices for the Lada Vesta and XRAY models, is considering the possibility of producing a similar accessory for cars of the Lada Granta family.
Experts note that on Granta everything is the same as on Vesta, but the connector will be different. The developers say that if they manage to collect 10 pre-orders, it will take them two months to create a digital instrument panel. The pre-order cost of the panel will be 30,000 rubles, and after the start of sales the price tag will be 35,000 rubles.
Side doors Lada Granta
To open the door from the inside, pull handle 1 towards you. To open or close the window, use handle number 3 Door handle number 2
To lock the door from the inside, press the lock button. To unlock the lock, pull out the button.
The rear door can be locked by pressing the lock button while the door is open and slamming it shut.
The front doors cannot be locked in this way, since the lock button does not go down when the door is open. To prevent children from inadvertently opening the rear doors on the move, press down the child lock lever and slam the door. Now the door can only be opened from the outside
Firmware for the instrument cluster of Lada Granta and Kalina 2
Have you encountered a problem where the outside air temperature is not shown in the instrument panel? Even after installing the sensor, the values are not displayed on the screen. To correct this drawback, it is proposed to update the dashboard firmware of Lada Granta and Kalina 2 cars.
First, we find out what version of the firmware is embedded in the instrument panel. The first numbers (2190 or 2192) indicate the car model (Granta or Kalina 2). This is followed by the numbers 00, 20 or 40, which stand for “standard”, “norm” or “lux”, respectively.
Installing navigation software in Kalina 2/Granta radio
The most popular navigation program is Navitel (version 7.5.0.202 has been tested and works). You can download it from the torrent forum. Configure the program to work on the COM5 port at a speed of 4800. We write Navitel to the SD card, and we also write the NavitelContent folder in the root of the card, which should contain maps and speedcams. We insert the card into the radio and launch Navitel. If everything is configured correctly, then after a while you should hear “Connection with satellites established.”
That's it, the navigation is configured and ready for use:
AVTOVAZ masters never cease to amaze car enthusiasts with news about improvements to the functions of their cars. The Volzhsky Automobile Plant has once again expanded the equipment of one of the best sedans of the domestic manufacturer - navigation has become one of the central options for the Lada Grant.
The bestseller was presented in several versions at once. Three variants of the "" class LADA Granta now have improved sound insulation.
It is known that new versions of LADA Granta, in addition to the noise insulation package, are also equipped with airbags, an ABS+BAS system, side mirrors with an anti-dazzle function (electric drive and heating are present), heated front seats, parking sensors, a climate control system, and a rain sensor. , multimedia system and other options.
The second updated Lada Granta will be version 5, with a volume of 1.6 liters, manual transmission and 87 hp. under the hood. This version of the sedan is equipped with a multimedia system and 14-inch wheel rims.
Other options, such as ABS+BAS, air conditioning system, front door windows, are similar to version 4. The third version of the Granta configuration will go on sale under serial number 5 as a luxury model. in the third version it will be equipped with side airbags. But a special option in the car will be navigation on the Lada Granta.
Firmware versions of Lada Granta and Kalina 2 instrument panels
The table was compiled (is in the process of being adjusted) based on reviews from car enthusiasts (please add comments). There is no guarantee that all data is correct!
* — DTNV — outside air temperature sensor, DTOZH — coolant temperature sensor.
Download firmware (dumps of instrument panel firmware, links are available for site users):
- 2190-50 — To download files you need to log in to the site
- 2192-50 (software 1.9) - To download files you need to log in to the site
- 2190-00-029 — To download files you need to log in to the site
- 219020-060 — To download files you need to log in to the site
- 219020-076 — To download files you need to log in to the site
- 219020-087 — To download files you need to log in to the site
- 219020-090(AT) - To download files you need to log in to the site sent by ARS190475
- 219020-091 — To download files you need to log in to the site
- 219020-096 - To download files you need to log in to the site sent by ARS190475
- 219040-046 — To download files you need to log in to the site
- 219040-047 — To download files you need to log in to the site
- 2190-3801010-50 Software: 6.6 (KP with two displays) - To download files you need to log in to the site sent by ARS190475
- 2190-3801010-50 Software: 7.2 (KP with two displays) - To download files you need to log in to the site sent by ARS190475
- 219220-014 — To download files you need to log in to the site
- 219240-006 - To download files you need to log in to the site sent by ARS190475
- 219240-007 — To download files you need to log in to the site
- 219240-009 — To download files you need to log in to the site
- 219240-012 — To download files you need to log in to the site
- 219240-014 — To download files you need to log in to the site
- 219250-2.5 (KP with two displays) - To download files you need to log in to the site sent by ARS190475
- 219020-092_for_076 — To download files you need to log in to the site
- 219020-092 — To download files you need to log in to the site (author)
- 2190-3801010-50 Software: 7.1 - To download files you need to log in to the site
- 219050-72 (KP with two displays) To download files you need to log in to the website
- 219090-23 (KP with two displays for AMT) To download files you need to log in to the website
- 219090-24 (KP with two displays for AMT) To download files you need to log in to the website
- 2190-70 PO-01 AMT To download files you need to log in to the site sent by ARS190475
- 2192_80 software version 001 - Kalina cross with AMT To download files you need to log in to the website
- 2192_90 software version 1.6 - Kalina cross with AMT. Dump of two-window tidy. To download files you need to log in to the site.
- 2190_90 v1.7 To download files you need to log in to the site
- 8450101019 Granta FL To download files you need to log in to the site
During the firmware process, the instrument cluster may fail; the author of the article does not bear responsibility. In addition, by disassembling the instrument panel you lose the warranty.
Appearance of the instrument panel on Lada Kalina
Dashboard for Lada Kalina
- Tachometer. Using it, the driver can find out what the crankshaft rotation speed is. The dial is divided into sectors. If the arrow is on red, this means that the engine is operating in a dangerous mode.
- Indicator of a malfunction of the system that controls the motor. This light turns orange when the ignition is turned on and goes out when the engine starts running. If it lights up while the engine is running, this means that the engine must be stopped and the cause of the malfunction eliminated. Operating the engine with the indicator on is prohibited.
- A diode that signals the activation of the left turn signal.
- Indicates low oil pressure in the system. After the motor starts running, the indicator goes out. If the light stays on for more than 5 seconds after starting the engine, this will indicate that the oil pressure in the unit is insufficient.
- ABS. Lights up when the ignition is turned on and goes out two seconds after starting the engine. If it continues to burn, this will indicate that the brake system is faulty. It is not recommended to use the car in this case. We need to find the problem and fix it.
- Immobilizer. Lights up orange. The driver can use it to determine the operation of the car’s security system.
- Coolant. The indicator displays the temperature of the coolant in the system. After starting the engine it goes out. Also, during operation of the car, the indicator may light up when the fluid temperature is above 115 degrees. When the temperature drops to 110 degrees, the light bulb will go out. It is not recommended to operate the vehicle if this indicator is constantly on. This may lead to motor failure.
- Parking brake. After starting the engine it goes out. If the indicator lights up while driving and a beep is heard, this will indicate that there is not enough fluid in the brake system. If the indicator lights up, it is prohibited to operate the vehicle.
- The light indicates that the right turn signal is on.
- Battery. Lights up red. Goes off after starting the engine. If the light comes on at full intensity while driving, this means that the battery charge is low. In this case, the alternator (or alternator belt) or voltage regulator may be faulty. It is prohibited to operate the machine with the indicator on.
- Speedometer. Shows the speed at which the car is moving.
- ESC. Lights up yellow. Goes off after starting the engine. If “ESC OFF” lights up while driving, this indicates that the system is not working. If the lamp flashes while driving, this will allow the driver to understand that the system is working. In all other cases, the lamp will indicate that the exchange rate stability system is not working.
- Shift to higher gear. Not applicable on this car.
- High beam. It indicates that the high beams are on in the car.
- Fog lights. It says the rear fog lights are on.
- Low beam. The car has low beams on. If the headlight does not light, check the fuse, then replace the low beam lamp.
- Front fog lights. Indicates that the front fog lights are on.
- Reset daily mileage. When you press the button, the counter is reset to zero.
- On-board computer display.
- Unclosed doors. Indicates that one of the doors in the car is not closed.
- Fuel. Indicates the amount of fuel in the tank. It is not recommended to allow the gasoline in the tank to run out completely. This may cause the fuel pump to fail.
- Tire pressure. Indicates insufficient tire pressure.
- Power steering indicator. Lights up orange. After starting the engine it goes out. If the lamp lights up while the engine is running, this indicates a malfunction of the amplifier. The problem needs to be fixed.
- Unfastened seat belts.
- Motor malfunction. Not used on cars.
- Airbag condition. Goes off after starting the engine. If the lamp continues to light, this indicates a malfunction. The problem needs to be fixed, because if necessary, the pillow will not open.
Ignition is on, check indicators come on
On-board computer display
On-board computer display (explained below)
All data is processed by a trip computer. It is installed on the car depending on the configuration. There are three types of such computers. The difference between them is the amount of information they provide to the driver.
- Current time or gear shift prompt indicator.
- Car mileage.
- Outside air temperature.
- Gasoline level in the tank.
Instructions for flashing the dashboard firmware
Required
: Usbdm OSBDM V4.95 programmer (available in the Aliexpress catalog).
Install the HCS12 Programmer software and USBDM driver X86 or X64. For Windows 8 or 8.1, driver authentication must be disabled before installing the software. After installing the software, connect the programmer to the PC (the COM and USB lamps should be on).
Attention! In single-window and double-window devices, the programming connectors are located differently, and the programming voltage is not 3.3 but 5 volts. A device powered by 12 volts does not need to be powered from a programmer, especially one set to 3.3v - the programmer will bypass the power supply to the processor.
- remove the instrument panel and rear cover;
- power supply (9-14 V) on pins 19 and 21 (you can do it without power, to do this, move the jumper under the programmer cover to 3.3v);
- minus on pin 17;
- programmer cable (the PWR lamp will light up).
Launch the HCS12 Programmer software and make the settings:
- On the Interface click detect , USBDM-js16-001 . The bottom checkboxes must be activated;
- On the Target , click on the Load Hex Files and select the firmware (must be in the root of the disk), check the Auto Reload , select the HY-MC9S12HY64 , select Unsecure , select EraseSelective and check the Enable Sounds . (to reset the mileage and erase the immo, select EraseMass, but this is not recommended);
- On the Advanced , check the Enabled and check the field below (there should be a letter F at the end, if there is another letter, then change it to F).
When all the parameters are set, we start the process of flashing the instrument panel (on the Target , click Program Flash ). After 10 seconds, the update will be completed; when asked about connecting the next device, answer “No”. We check the version of the instrument panel again. All!
Lada Kalina Hatchback › Logbook › DIY navigation on Lada Kalina 2
One fine day I wanted to get navigation on the standard multimedia. Well, it really asked for it - a large screen, convenient display location, does not use batteries (it is powered from the car’s on-board power supply). But the plant was not able to offer it. Therefore, I had to read several forums, order a GPS receiver, connect and configure it. Well, since I’m not the only one who wants it, I decided to write instructions. In short, installation of navigation is quite simple and is carried out in three steps: 1. Buy a GPS receiver (for example BU-353S4) 2. Download and install the driver. Copy the installed driver (usbser.dll) to StaticStore. At the next driver request, specify \StaticStore\usbser.dll 3. Download and write to a Navitel SD flash drive, patched for com5 speed 4800.
As a result, we get working navigation. An example of how it works:
PS. A little later, I changed the skin to another one (with larger buttons) and removed the taskbar. And everything turned out great. I don’t plan to reflash and use different altmenus, because... I don’t need anything from there, just navigation. And it works great without reflashing.
Introduction
The Lada Kalina 2 radio uses Windows CE 6. To exit the radio shell to the desktop, press the Settings button on the touch screen and hold for a few seconds. The screen will blink and show the Windows desktop. Return back by double clicking on the Home icon
GPS receiver
Lada Kalina 2 does not have a GPS receiver. Therefore, even when the factory releases firmware with navigation, after installing the firmware we will only get a map, without navigation. Therefore, we go to aliexpress (or any other convenient place) and buy a USB-GPS receiver BU-353S4. I bought it for 38 dollars, here is the link: www.aliexpress.com/item/G...s-Portable/990897657.html
Driver
Let's go to the car. Go to the Windows desktop. To make sure that the GPS receiver of the radio tape recorder sees, we connect the GPS receiver and see the driver request: We plug the GPS receiver from the USB, close this window and install the driver - we find the *.cab file recorded on the flash drive and poke it twice. When asked whether to install it in the Windows folder, confirm by clicking OK.
Since the next time you turn on everything unnecessary from the Windows folder (including our installed driver) will be deleted, we go to the Windows folder, find our installed driver there (it’s called USBSER.DLL) and copy it to the StaticStore folder (copy items - insert are in the menu above).
We plug in the GPS again. No errors or driver prompts are displayed. We check the operation after a reboot - launch the standard shell by double-clicking on the Home icon. After it has successfully downloaded, we return to the Windows desktop. At this point my system again asked for a driver. But since we have everything prepared, we don’t need to install it again. Simply indicate in the driver request window that appears the path and name of our DLL, which we copied 5 minutes ago: \StaticStore\USBSER.dll. This should help and the driver issue will no longer bother you.
Navitel
On the official Navitel website it is written that the version for Windows CE is not for sale. This means you can’t buy it, so you’ll have to download it from torrents. Version 5.0 is old and I didn't like it. You can take version 7.5 or 8.5. For example, version 7.5.0.202, downloaded from rutracker: rutracker.org/forum/viewtopic.php?t=4417951
In order for Navitel to see our GPS receiver, it needs to be patched to work with Com5 at a speed of 4800. For this, patches are included. We launch them one by one. First patch on Com5, then at 4800 speed.
We write Navitel to an SD card. On the same card, write the NavitelContent folder to the root (the map and speedcams are there). We insert the card into the radio, launch Navitel... And after a few seconds you will hear “Connection with satellites established.”
source