- ➡️ Check while driving
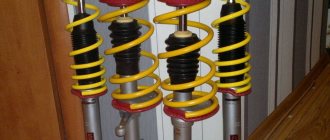
- ➡️ Springs
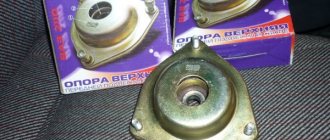
- ➡️ Manufacturers of OP
An important element of a car suspension is the struts and support bearing (OP). It is installed in the front or rear pillar, or rather in the upper support. The bearing ensures mobility and at the same time rigidity of the connection between the shock absorber and the car body.
Front support
The strut effectively dampens vibrations that occur when the car moves on uneven roads. This allows you to reduce the load on the steering, chassis, suspension, and transmission.
The connection between the shock absorber and the car body must remain movable when the wheel is turned. To do this, it is necessary to install an intermediate rolling element between the shock absorber and the body shell, which is subjected to high loads and fails after a certain period of time.
Rear support
The name “support” indicates the main functional purpose of the part. It is this one, located inside the support, that rests on the car body.
The unit ensures smooth running and appropriate controllability of the machine. In addition, the rear wheels receive greater stability on the road. The design and arrangement of the support bearing allows it to withstand fairly high axial and radial loads.
It is important to know:
There is no OP as a rolling element on the rear shock absorber support, since there is no need to rotate the strut.
The main signs of a faulty support bearing
Rear support
- Creaks, knocks, breakdowns in the suspension, the pillar area.
- Increased play between the body body, part, and seat.
- When overcoming rounded irregularities (for example, a speed bump), there is no squeaking, it only appears in the pits.
- Wear of rubber bands between the lower cup and spring.
Knocks in the rear suspension - replacing the support
Front support
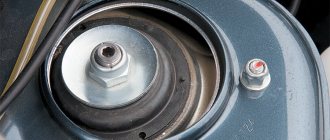
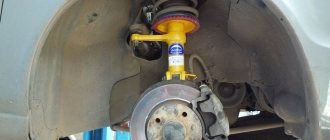
- Broken support. This is when the rod pierces the rubber (see photo).
- Wear of the rubber base of the support.
- The appearance of knocking noises when turning the steering wheel;
- A sharp, peculiar crunch that occurs when a wheel overcomes an obstacle.
- Metallic knock.
- Deterioration in vehicle controllability.
- Loss of maneuverability.
- Violation of driving performance, knocking, crunching of the front part of the vehicle body.
- Changing the direction of movement of the front wheels while maintaining a constant steering wheel position.
- Rocking of the body in the direction of travel.
- The distance from the support to the cup is higher than permissible (see photo).
How do support bearings knock?
Clicking noises when turning the steering wheel
How to replace supports yourself
No pit or overpass is required to dismantle and install the support. All work can be done with the help of a jack and a partner. Their sequence is described below:
- Unscrew the top rod using two keys.
- We jack up the car. The lower part of the support is removed from the bowl and then removed.
- After removal, thoroughly clean the support seat from dirt and corrosion, treat it with a rust converter and tint it.
- We assemble the stand and install it in place.
- We attach the strut to the lower arm.
- Raise the body on a jack so that the wheel remains on the ground.
- We install the support.
- The assistant slowly lowers the jack.
- Gradually align the position of the rod in the support.
- After installing the rod, tighten the support nuts, taking into account the tightening torque specified in the instructions (use a torque wrench).
- The completion of the repair is a test drive on an empty road (you should not go onto city streets until you are sure that the steering is working properly).
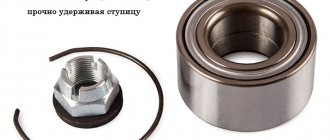
If the support itself has no complaints, but the bearing has served its purpose, you can only do its replacement. To do this, we dismantle the rack and support. We remove the bearing. Clear signs for replacement:
- uneven wear of balls;
- scuff marks on the clip;
- destroyed seals.
The bearing itself can be easily disassembled into its components, but it must be replaced as a whole. This spare part is inexpensive, and the responsibility on it is too great to repair it manually.
Causes of support bearing failure
Taking into account the specifics of Russian roads, as well as difficult climatic conditions, it can be determined that the load on the suspension elements is high. For any “opornik” the service life is on average 100,000 km. But when driving on bad roads, this figure decreases by 1.5-2 times.
Rear support
Malfunction of the rear support bearing and its failure is possible in the following cases:
- Wear by mileage;
- Moisture getting inside;
- Late suspension maintenance;
- Driving on bad roads, exposure to dust, dirt;
- Strong shocks (breakdowns) of the suspension when hitting a deep hole;
- Exceeding the maximum permissible weight of cargo placed in the trunk and rear seat.
Front support
Aggressive driving style, poor road conditions or a defective part most often causes a breakdown. Failure occurs earlier for the following reasons:
- Driving on dusty roads.
- Low quality spare parts.
- Natural wear and tear.
- Sharp turns of the steering wheel, drift;
- Sudden braking immediately before an obstacle.
- Wear of the rubber elastic seal.
- Loosening the mounting bolts.
- Malfunction of strut elements (spring, shock absorber, buffer, etc.).
A little about the design of the car suspension
Let's talk about the suspension design
— almost all mass-produced cars now use the so-called MacPherson suspension, named after its inventor. An important element of the suspension are shock absorber struts.
MacPherson strut is also called the “swinging candle”
due to its design features. The device contains a spring, a damper and a shock absorber on one axis, which absorbs the energy of vertical vibrations of the car, ensuring a smooth ride.
The upper part of the rack is attached to the body
car using a special rubber bushing - the upper support. These undercarriage components transfer variable vertical load from the wheels to the body during operation.
In the front supports
In addition, a rolling element is required, a strut bearing, which allows the strut to rotate. By design, the support in the front of the car differs from the rear in that a strut bearing is installed there.
How to check the knock of the prop on VAZ cars
Before replacing a part, make sure that it has actually failed. On VAZ cars, the condition of the racks and supports should be checked 1-2 times a year. This is what auto mechanics advise in service centers. You can use a fairly simple method, but it will require 2 people. The degree of wear of the support bearing can be determined quite accurately by following these steps.
To clearly demonstrate the verification process, watch the video:
Checking the “supporters” on VAZs
Creaking noise when turning the steering wheel
Checking and operation for a specific car model
You can find specific inspection and operating instructions for a specific car model on our website. Further in the navigation table, you can find and go to instructions for diagnosing and replacing support bearings for your car.
Navigation by instructions:
- Chevrolet:
- Lanos
- Lacetti
- Cruze
- Aveo
- Focus 2
- Accent
- Lancer 9
- Logan
- A80 B4/B3
- Astra H
- Almera
- Nexia
- Octavia
- Corolla
- Ceed
At what interval should a support bearing be diagnosed?
Various manufacturers set their own limits on the service life of this part, which experiences fairly high loads during vehicle operation. The average limit is limited to a mileage of 100,000 km. Taking into account the condition of the roadway, this could be 50,000 km or less. Typically, replacement of a part is required once every 2-3 years.
But in practice, it is necessary to change as a squeak appears, when the maximum degree of wear is reached. Well, the check should be carried out annually, after 20,000 km - mandatory. Moreover, it is not difficult to do this.
Replacement
Replacing the front support bearings is quite simple. The main thing is to find a really high-quality part, because not all manufacturers can provide supports with a high degree of wear resistance. So, we arm ourselves with the following tools:
- spanner;
- head for disassembling racks;
- spark plug head for ratchet;
- rod nut wrench;
- spring compressors.
And, of course, the prop himself. We will carry out the replacement procedure as follows:
- Jack up and remove the wheel.
- Remove the two nuts securing the front strut to the hub.
- Unscrew the nut from the shock absorber rod, while holding it with a hexagon.
- We remove the stand.
- Compress the spring and remove the support bearing.
- We again clamp the hexagon on the rod and unscrew the nut.
- We remove the bearing, install a new one and repeat all the steps, only in reverse order.
The cause of knocking while turning may be a malfunction of the steering rack, steering shaft or steering cardan. Therefore, after replacing the support, the problem may not disappear. In this case, all of the above systems should be checked.
Video on replacing the support:
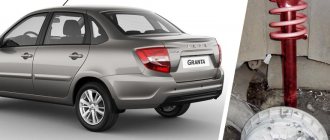
Roads are called one of the two main “troubles” of Russia. Constant holes and potholes cause not only inconvenience in terms of comfortable movement, but also cause significant damage to the car’s suspension, its individual elements, especially bearings. Replacing them is not difficult, even a beginner can handle it, but diagnosing the need for this replacement in a timely manner is much more difficult, especially without knowing the signs of a faulty support bearing. We will talk about them further, but first a little theory.
Malfunction of other rack elements
All of the above methods for checking the rolling element are quite accurate and effective. But none of them gives a 100% guarantee until the unit is disassembled. The cause of the creaking that appears in the area may be steering rods or other adjacent parts or suspension elements.
Spring fault
If the strut spring sags or breaks, this will immediately result in a deterioration in comfort and a decrease in the vehicle’s handling quality. And hence the decline in road safety in general. A sagging spring on one of the wheels is clearly visible visually. Creaking and grinding noises are only possible if it breaks.
How to identify a malfunction of the support itself (not the bearing)
If the support is worn out, a dull sound or knocking sound will be heard when overcoming uneven sections of the road. It is easy to verify that the support is faulty; you just need to assess the condition of the rubber bands. If they are damaged or do not take their place, the entire support will have to be replaced.
Compression progress buffer failure
A rubber or polyurethane compression stroke buffer may lose its integrity or elasticity over time. In this case, extraneous creaks and noises may appear that occur at the moment of maximum compression of the spring. A standard visual inspection of the element will help verify the malfunction (or absence thereof).
Shock absorber wear
There are several ways to determine the wear of a part. This includes noise on bumps and excessive body roll, especially during sharp turns. The malfunction of the shock absorber is most clearly felt when overcoming an uneven section at speed, when the car continues to sway for some time.
Chevrolet Lacetti EVERYTHING IS DONE Logbook Replacement of bearings and supports of front shock absorber struts
I DID IT! Yes, I did it, I got rid of the rattle in the front suspension. Personally, in my case, the support and bearing of the front shock absorbers were to blame. I’ll say right away that this is not a difficult task at all, it took me 1.5-2 hours of leisurely work, taking into account the fact that I was doing everything for the first time. Tightening the spring took the most time. Let me make a reservation right away that the gap between the support cup and the body has not completely disappeared. It shrank but remained. The replacement process I described is also completely similar to the process of replacing the entire rack.
I had such a gap
Using a crooked spanner, unscrew the top nut at 19 (others in the description have it at 17 for some reason). I’ll say right away that the right rack gave up on its own, but on the left I had to hold the rod with a key at 9
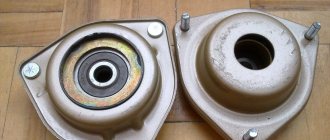
Then we see this picture and a comparison of the depth of the old support and the new one. It’s already clear that the old one has sagged
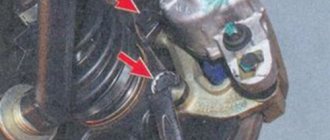
Then we climb down and, having removed the wheel, we see that we need to unscrew: 1) with a 14 wrench we unscrew the nut securing the stabilizer strut to the shock absorber strut 2) with two 17 wrenches we unscrew the nut and bolt securing the strut 3) we pull out the ABS hose from the groove 4) we pull out the bracket and remove it brake hose
We just pull out the stand and there it is, a beauty already with ties in front of me
Next you need to tighten it to such a state that it looks like this
If you do less and listen to the smart guys who will shout at you “But then you’ll tighten it with a nut,” it may turn out that the bearing will fit a little askew, will not press tightly and there will be play that will quickly lead to unnecessary sounds in the chassis. We put the bearing on, we still have a little groove left on rod to fit the support tightly
We tighten the whole thing with a nut. By the way, you won’t be able to tighten it too much; it will tighten just as long as the thickness of the bearing and support is enough.
We put the rack in the reverse order))) but this is the gap I got after replacing the supports
This is an example of old and new support
Impressions from the work done: +1000 to self-esteem+ 200 to control+ 200 to the silence of the front suspension+150 to extraneous sounds (now I began to hear many other sounds)
Thank you for your attention, ask questions and don’t forget to “Like”
Recommendations for checking and extending the service life of supports
If replacement is required
To easily and quickly dismantle a worn out faulty unit, you need to prepare a special rack wrench. It is assembled from 2 tubes of different diameters, obtaining a lever of the appropriate length.
Periodic inspection
Regular inspection and timely maintenance are a guarantee of increasing the service life of spare parts. Check the unit after 10-12 thousand kilometers, especially since this is not difficult to do.
Timely lubrication
Regardless of the car’s mileage, at least once a year (preferably twice, in spring and autumn), it is necessary to lubricate the support with silicone grease. Carry out the work with the protective cover removed.
Accurate vehicle control
Driving your car carefully, without sudden acceleration or jerking, as well as driving on good roads, is the best way to protect parts from premature wear.
Modernization and strengthening
To strengthen the supports, spacers are used to increase ground clearance and auto-buffers, which absorb the load. They also make a spacer between the posts.
The best manufacturers
OPs are produced by different companies. The optimal solution is to install original parts. Purchasing spare parts made in China is risky and there is a high risk of defects. Users of numerous forums note the best bearing manufacturers:
| Item No. | Brand name | Official company logo | A country |
| 1 | SNR | France | |
| 2 | SKF | Sweden | |
| 3 | F.A.G. | Germany | |
| 4 | INA | Germany | |
| 5 | Koyo | Japan |
Popular questions
Installing the inner CV joint boot
Posted: 06/18/2014 Last week we changed the inner boot of my brother on his fawn. Not the easiest procedure, but nothing particularly complicated. They removed the axle shaft, removed the outer CV joint and its boot, and then pulled the outer...
More details
Oil pressure sensor repair
Posted: 06/08/2014 Replacing the oil pressure sensor is probably one of the easiest things to do. And not only in terms of the low complexity of the process itself, but also in the low time investment. The main thing is to find out why...
More details
Installing rear struts
Posted: 11/30/2014 I have a VAZ 2109, I change the struts myself when I have time, it’s not difficult, although the first time I also sweated a lot. In general, you need to start by loosening the nut, it secures the upper support of the rack, is located in the glass to...
More details
Removing the rear fender
Posted: 07/20/2015 Friends, I hasten to share with you my experience on how to remove the rear wing. After reading this message, you may be surprised and will not believe that this can be done with your own hands. I advise you to save...
More details
Engine protection repair
Posted: 12/02/2014I bought a seven-year-old Toyota Corolla. Upon closer examination, I noticed the absence of crankcase protection; there was a plastic boot; of course, this did not interfere with the purchase. I drive carefully, I don’t drive recklessly, however...
More details
Replace oxygen sensor
Posted: 11/25/2014I encountered a similar problem about six months ago, also at a very inopportune moment. We were going to my mother-in-law’s dacha; it wasn’t her birthday. The car was acting a little strange. I arrived at the wrong time for...
More details
Repair of front struts
Posted: 06/16/2014If you have a head on your shoulders and your arms are growing from where they need to be, then you can try to change the front struts yourself. Personally, I had such a need when the car dealership announced the cost...
More details
Remove the rear seat
Posted: 07/19/2015 I removed the rear seat on a Toyota Crown car. The lower part of the seat, as you know, can be removed quite simply, thanks to the snap fastenings. But with the upper part, still...
More details
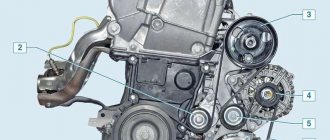
Alternator belt repair
Posted: 05/01/2016 Please show me how to put on the alternator belt on a Gili Emgrand car
More details
How to change a water pump
Posted: November 25, 2014 I replaced the water pump for the first time this year. And myself. First, I disconnected the battery terminals, drained the coolant from the cooling system, then installed the piston of the first cylinder in the right position...
More details